カレンダーが空いていたので、投稿します。
今回はライブラリを作ったお話と、ライブラリを作るにあたって工夫した点、参考にしたものや、ライブラリを作った後どういうアクションを取ったのかお話します。
UIScrollView、UINavigationBarを引っ張ってそのまま画面を閉じてみたい
UIScrollViewを「引っ張って更新」というのはよくあるのですが、「引っ張ってそのままViewController(やUINavigationControlelr)を閉じる」ってあんまりないよね。ということで作ってみました。
Carthage,CocoaPodsに対応していて、Swift3で動作します。
どんなライブラリなのか
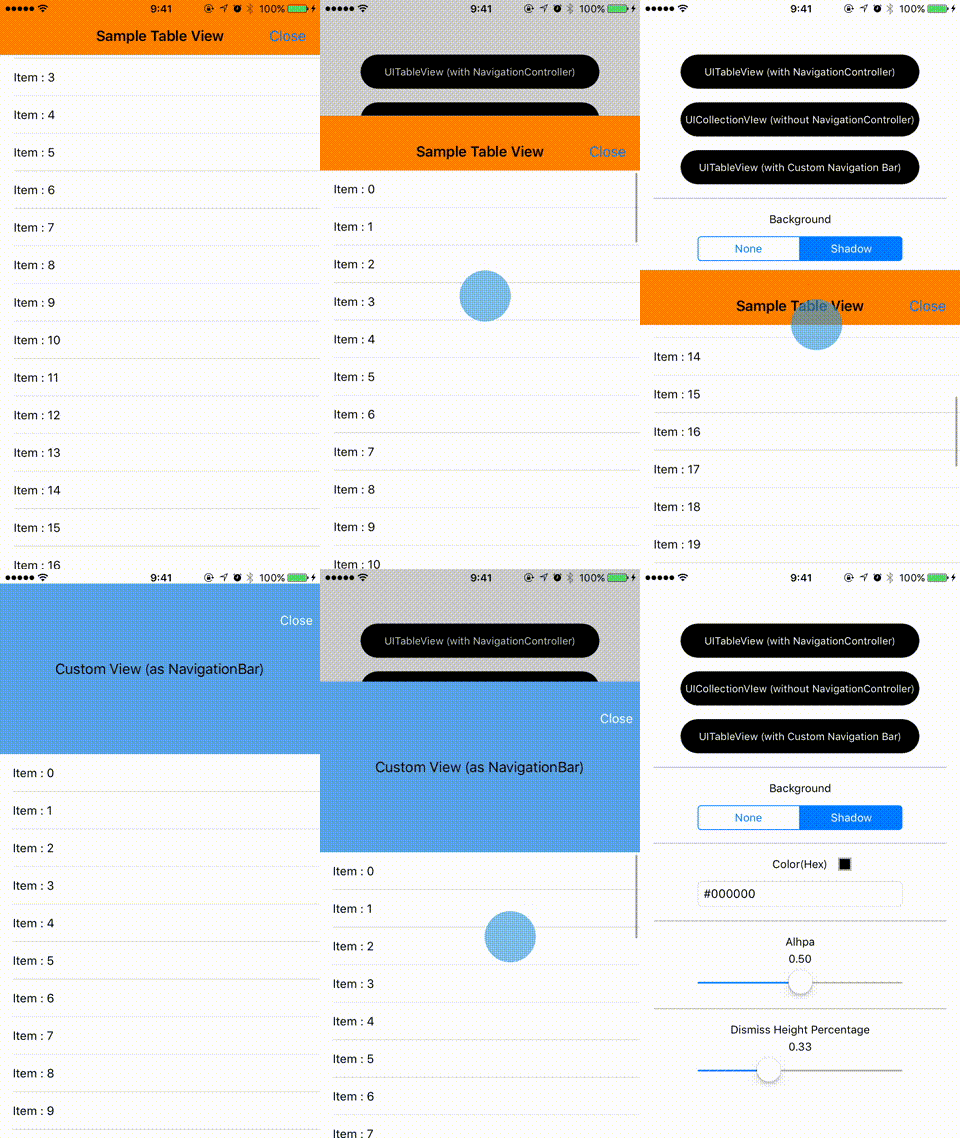
名前の通り、UIScrollViewを下に引っ張ることでそのままmodalさせたUIViewController(UINavigationController)を閉じれるというライブラリです。
もちろん、UIScrollViewのサブクラスであるUITableView、UIScrollViewでも使用することができます。
(gifの撮影時の指のポインターに関してはTouchVisualizerを活用させて頂きました...!)
使い方
使い方は簡単で、UIScrollViewを持つUIViewControllerのプロパティとして宣言して、UIScrollViewを渡してあげるだけです。(PullToDismiss側では弱参照で保持します)
加えてUIScrollView(UITableView、UIScrollVIew)のdelegateメソッドを使う場合は、PullToDismissのdelegateProxyに本来のdelegateの受取先を登録します。
あとはそのviewControllerがUINavigationController上にあれば、UINavigationBarに「引っ張って閉じる機能」が自動的に付与されます。
import PullToDismiss

class SampleViewController: UIViewController {
    @IBOutlet private weak var tableView: UITableView!
    private var pullToDismiss: PullToDismiss?

    override func viewDidLoad() {
        super.viewDidLoad()
        // ScrollViewを渡してPullToDismissのインスタンスを生成
        pullToDismiss = PullToDismiss(scrollView: tableView)
        // delegateを登録することで、一度PullToDismiss側で受け取ったdelegateをこちらでも受け取れるようになる
        pullToDismiss.delegateProxy = self
    }
}

extension SampleViewController: UITableViewDelegate {
    // PullToDismissが一度受けた後に、PullToDismiss側から呼び出される
    func scrollViewDidScroll(_ scrollView: UIScrollView) {
        // ...
    }

    // PullToDismissが一度受けた後に、PullToDismiss側から呼び出される
    func tableView(_ tableView: UITableView, didSelectRowAt indexPath: IndexPath) {
        // ...
    }
}
ので、本来のDelegateメソッドの操作を邪魔することなく、「引っ張って閉じる」挙動を追加できます。
あとは、このSampleViewControllerをmodalする時に、modalPresentationStyleを.overCurrentContextに変えてあげれば、閉じる時に元のViewControllerが見えるようになります。
let vc = SampleViewController()
let nav = UINavigationController(rootViewController: vc)
// 注!これを忘れると元のVCが見えず黒くなる
nav.modalPresentationStyle = .overCurrentContext

self.present(nav, animated: true, completion: nil)
カスタマイズ
PullToDismissでは、こんな感じで閉じる時の背景の影の色を変えたり、Blurをかけたりが可能になります。
pullToDismiss?.background = ShadowEffect(color: .red, alpha: 0.5) // color: red, alpha: 0.5

// preset blur (.extraLight, .light, .dark)
pullToDismiss?.background = BlurEffect.extraLight

// set custom Blur
pullToDismiss?.background = BlurEffect(color: .red, alpha: 0.5, blurRadius: 40.0, saturationDeltaFactor: 1.8)
Blurに関しては、VisualEffectを使わずに、カスタマイズ可能なCustomBlurViewを作成して導入しています。
細かくBlurのパラメータを調整できるようにしているので、気になる人はこちらのソースコードを覗いてみてください。
【当初enumでカスタマイズできるようにしていたがイケてなくてやめた】
当初はenumのassociated valueを駆使して作っていたのですが、だんだんと↓みたいな感じになって苦しくなってきました...
    // enumでassociated value使えばいいっしょ!...と思っていた

    public enum Background {
        case none
        case shadow(UIColor, CGFloat)
        case blur(CGFloat, UIColor, CGFloat)
    }

    private func makeBackgroundViewIfNeeded() {
        deleteBackgroundView()
        switch background {
        case .shadow(let color, let alpha):
            let shadowView = UIView(frame: .zero)
            // shadowViewの生成ロジック (略)
        case .blur(let blurRadius, let colorTint, let colorTintAlpha):
            let blurView = CustomBlurView(radius: blurRadius)
            // blurViewの生成ロジック (略)
        default:
            ()
        }
    }

    private func updateBackgroundView() {
        switch background {
        case .shadow(_, let alpha):
            // shadowViewの更新ロジック (略)
        case .blur(let blurRadius, _, let colorTintAlpha):
            // blurViewの更新ロジック (略)
        default:
            ()
        }
    }
あれ、だんだんとswitchでやらないといけないことが増えてる...
そんなときにこちらの発表スライドが公開されて、protocol+structで書くようにしたら実装がすっきりしました!
自分だけが使うなら最悪筋肉 ![]() を持ってして突き進むのもありですが、ライブラリを作る時は使う人が「なんだこれ」ってならないようにするのも大事ですね。
を持ってして突き進むのもありですが、ライブラリを作る時は使う人が「なんだこれ」ってならないようにするのも大事ですね。
ちなみに、使った後は、同じメソッド内部でも、こんな感じでスッキリしました。
protocol+structにしたことで、switch文での分岐を減らせ、 .none みたいなcaseを考えないようにできた(なければnilとする)ので、かなり見通しが良くなりました。
public protocol BackgroundEffect {
    var color: UIColor? { get set }
    var alpha: CGFloat { get set }
    var target: BackgroundTarget { get }

    func makeBackgroundView() -> UIView
    func applyEffect(view: UIView?, rate: CGFloat)
}

// BackgroundEffectを適合させ、単色の背景を表示するeffectを定義
    public struct ShadowEffect: BackgroundEffect {
        // propertyとか (略)

        public func makeBackgroundView() -> UIView {
            // ...
            return view
        }

        public func applyEffect(view: UIView?, rate: CGFloat) {
            // ...
        }
    }

    // BackgroundEffectを適合させ、ブラーを表示するeffectを定義
    public struct BlurEffect: BackgroundEffect {

        // propertyとか (略)

        public func makeBackgroundView() -> UIView {
            // ...
            return view
        }

        public func applyEffect(view: UIView?, rate: CGFloat) {
            // ...
        }
    }

// ================================-

    private func makeBackgroundView() {
        deleteBackgroundView()
        guard let backgroundEffect = backgroundEffect else {
            return
        }

        // 生成処理がこれだけ
        let backgroundView = backgroundEffect.makeBackgroundView()
        // 細かいロジック(略)
        self.backgroundView = backgroundView
    }

    private func updateBackgroundView() {
        guard let backgroundEffect = backgroundEffect else {
            return
        }

        let targetViewOriginY: CGFloat = targetViewController?.view.frame.origin.y ?? 0.0
        let targetViewHeight: CGFloat = targetViewController?.view.frame.height ?? 0.0
        let rate: CGFloat = (1.0 - (targetViewOriginY / (targetViewHeight * dismissableHeightPercentage)))

        // viewの状態更新もこれだけで済むようになった
        backgroundEffect.applyEffect(view: backgroundView, rate: rate)
    }
delegateProxyのカラクリ
こんな感じで、PullToDismiss側で一度UIScrollView、UITableViewのDelegateを受けてから、必要に応じてpullToDismissのdelegateとして登録したオブジェクトに対して流してあげています。
class PullToDismiss {
    // ...
    public weak var tableViewDelegate: UITableViewDelegate? {
        return delegateProxy as? UITableViewDelegate
    }
    // 他にもUICollectionViewDelegateなども実装しているが割愛
}

extension PullToDismiss: UITableViewDelegate {
    public func tableView(_ tableView: UITableView, willDisplay cell: UITableViewCell, forRowAt indexPath: IndexPath) {
        tableViewDelegate?.tableView?(tableView, willDisplay: cell, forRowAt: indexPath)
    }

    public func tableView(_ tableView: UITableView, didEndDisplaying cell: UITableViewCell, forRowAt indexPath: IndexPath) {
        tableViewDelegate?.tableView?(tableView, didEndDisplaying: cell, forRowAt: indexPath)
    }

    public func tableView(_ tableView: UITableView, didSelectRowAt indexPath: IndexPath) {
        tableViewDelegate?.tableView?(tableView, didSelectRowAt: indexPath)
    }

    public func tableView(_ tableView: UITableView, didDeselectRowAt indexPath: IndexPath) {
        tableViewDelegate?.tableView?(tableView, didDeselectRowAt: indexPath)
    }

    // 他にも必要最低限のdelegateメソッドを備えています(省略)
}
基本的なdelegateメソッドは網羅していますが、一部実装することでパフォーマンスに影響がでるものや、あまり使われないdeleateメソッドに関しては実装をしていないので、以下のように自信でカスタムなクラスを作って、必要なdelegateメソッドを補完してもらう形になります。
実はこのアプローチはこちらを参考にさせて頂きました。
ライブラリを作った後は
やっぱり作っても使われないと悲しいので、こちらの記事で書かれているように、
CocoaControlsにAppetize.ioで用意したDemoを添えて登録したり、
awesome-ios、awesome-swiftに掲載してもらえるようにPRを投げたりしました。
(そしてどれも無事に掲載されました...!)
そしてその効果もあって、![]() がじわりじわりと増えています。
がじわりじわりと増えています。
これからも
- README.mdはしっかり書く
- Installの手段を提供する(Carthage, CocoaPods)
- 適度に宣伝活動はする
- 環境のアップデートに追従する(Swift3対応とか)
を続けていこうと思います。
最後に
よかったら使ってみてください..! 問題報告やrequest、PRもお待ちしております。
(......そして気に入ったら ![]() 頂けるとうれしいです!)
頂けるとうれしいです!)
