業務委託で参画しているプロジェクトで、「API設計書を書く時間がないけど欲しい」のでswaggerを導入してみました!
フレームワークの種類が豊富なswaggo/swagを採用し現状かなり満足しています。
この記事では、swaggerの導入を検討している人向けに解説していきます。
前提
- Go v1.19
-
github.com/swaggo/swag@v1.8.7github.com/swaggo/swag/cmd/swag@v1.8.7
github.com/labstack/echo@v4.9.1
-
使い方
基本的にswagger用のアノテーションやタグを書いて、swag initを通すだけです。
導入
swaggoのバージョン(ex. v1.8.8)だと、gofmtとコンフリクトするので下記のバージョンを使っています。
$ go install github.com/swaggo/swag/cmd/swag@v1.8.7
1. mainパッケージの記述
echo専用のecho-swaggerを適用させています。
apiのbasepathやホスト名まで記述ができてカスタマイズ性がありますね〜。
package main

import (
	_ "./docs"

	"github.com/labstack/echo/v4"
	echoswagger "github.com/swaggo/echo-swagger"
)

// @title                      Recommend Swaggo API
// @version                    1.0
// @description                This is a recommend_swaggo server
// @license.name               Apache 2.0
// @license.url                http://www.apache.org/licenses/LICENSE-2.0.html
// @host                       localhost:1323
// @BasePath                   /v1
// @securityDefinitions.apikey ApiKeyAuth
// @in                         header
// @name                       Authorization
func main() {
    /* 省略 */

    // 開発環境のみで確認
	e := echo.New()
	if cfg.IsDevelopment() {
		e.GET("/swagger/*", echoswagger.WrapHandler)
	}

    /* 省略 */

	if err = e.Start(fmt.Sprintf(":%s", cfg.Port)); err != nil {
		panic(err)
	}
}
1.1 docsをimportしている理由
下記はGinの例ですが、titleなどをエクスポートしてくれる機能があるので、docsという階層を呼び出しています。
Additionally some general API info can be set dynamically. The generated code package docs exports SwaggerInfo variable which we can use to set the title, description, version, host and base path programmatically. Example using Gin:
1.2 セキュリティ
JWTを使っていてheaderにAuthorizationを含めているため下記の様な記述になっています。
実際にswaggerui上では認証を使ってAPIの呼び出しができるため、動作確認をサクッとできちゃいます。
// @securityDefinitions.apikey ApiKeyAuth
// @in                         header
// @name                       Authorization
また、Basic認証などもあり様々な対応が可能です。
2. handlerパッケージ
「handlerの関数」と「リクエストをバインド用の構造体」を記述します。
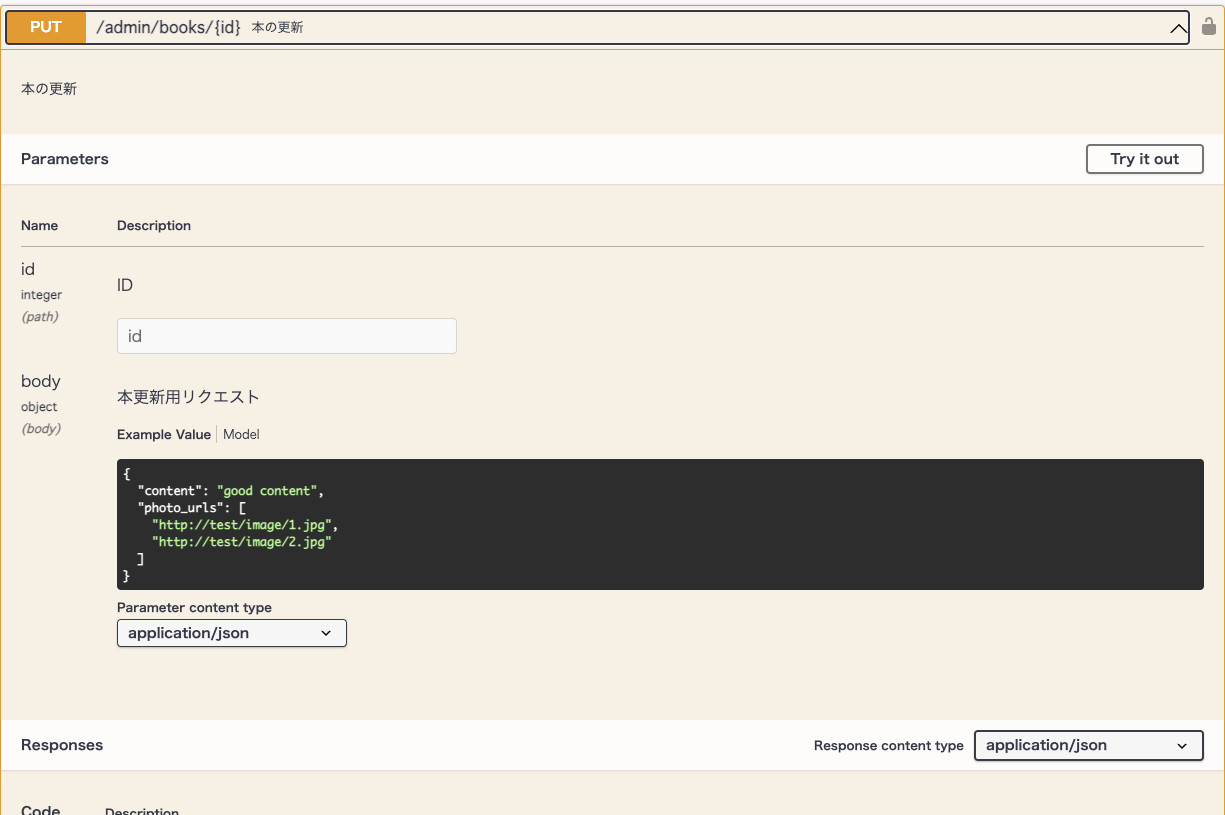
2.1 構造体にデフォルト値を設定する
swagger-uiでAPIにリクエストする際の値を前もって設定できるようです。
配列なども対応しています。
package request

type UpdateBookRequest struct {
    // refs: https://github.com/swaggo/swag#use-swaggerignore-tag-to-exclude-a-field
    // refs: https://github.com/swaggo/swag#example-value-of-struct
	ID         int      `param:"id" swaggerignore:"true"`
	Content    string   `json:"content" example:"good content"`
    PhotoUrls  []string `json:"photo_urls" example:"http://test/image/1.jpg,http://test/image/2.jpg"`
}
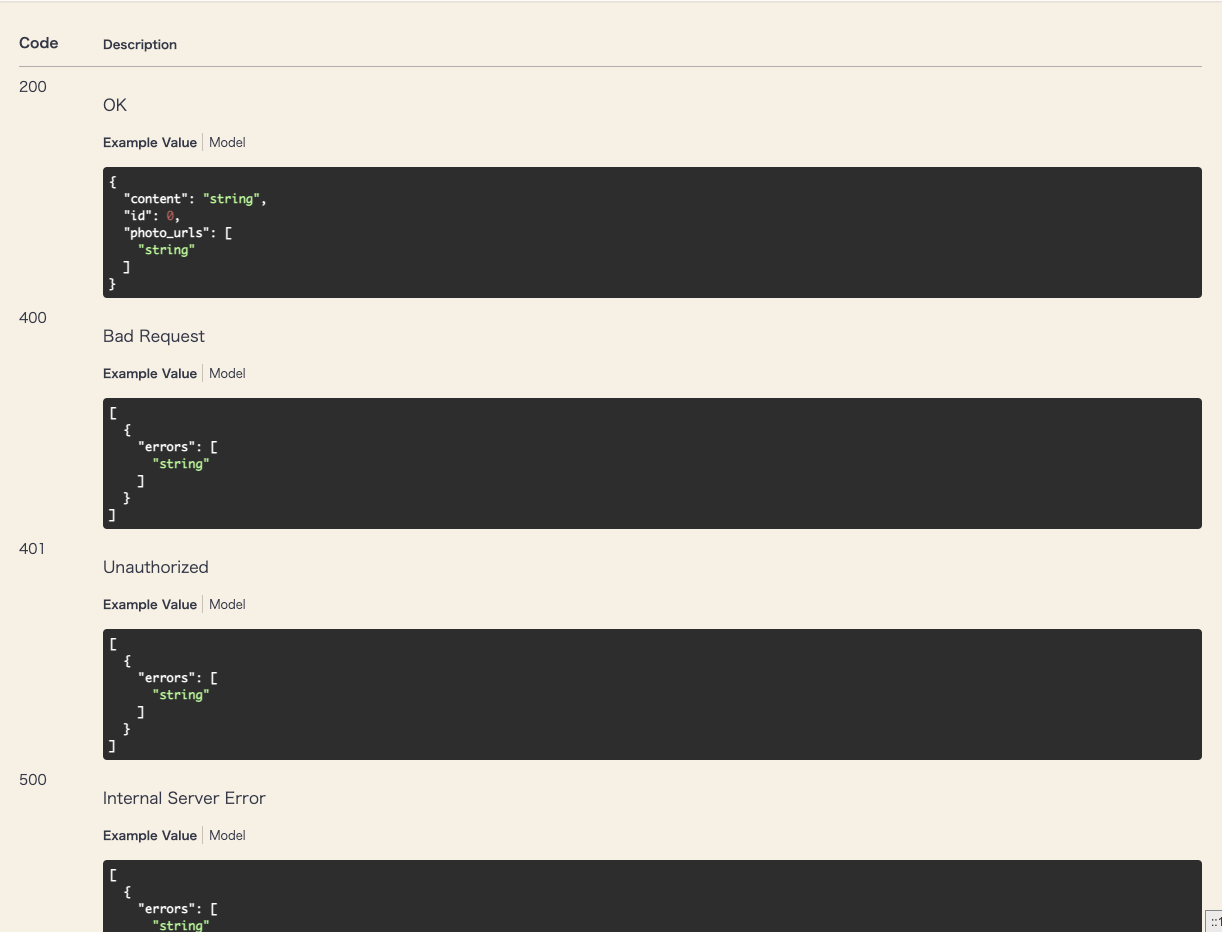
2.2 ハンドラの関数定義
リクエストパラメータ(@Param)を設定したり、レスポンス(@Success/@Failure)で何が返ってくるかを一行書くだけで幸せになれますね〜。
package admin

import (
	"net/http"

	"application"
	"handler/admin/request"

	"github.com/labstack/echo/v4"
)

// UpdateBook godoc
//
// @Summary     本の更新
// @Description 本の更新
// @Accept      json
// @Produce     json
// @Security    ApiKeyAuth
// @Param       id   path     int                       false "ID"
// @Param       body body     request.UpdateBookRequest false "本更新用リクエスト"
// @Success     200  {object} model.Book
// @Failure     400  {array}  ErrorResponse
// @Failure     401  {array}  ErrorResponse
// @Failure     500  {array}  ErrorResponse
// @Router      /admin/books/{id} [put]
func (ah *AdminHandler) UpdateBook(ec echo.Context) error {
	var req request.UpdateBookRequest
	if err := ec.Bind(&req); err != nil {
		return ah.NewErrorResponse(ec, err)
	}

	ctx := ah.GetCtx(ec)
	res, err := ah.Application.UpdateBook(ctx, &application.UpdateBookRequest{
		ID:        req.ID,
		Content:   req.Content,
		PhotoUrls: req.PhotoUrls,
	})
	if err != nil {
		return ah.NewErrorResponse(ec, err)
	}

	return ec.JSON(http.StatusOK, res)
}
3. コマンドを実行
コード整形してドキュメントを生成します。
swag initだけだと、外部の依存する構造体や自作モデルを読み出せないため下記を実行しました。
$ swag fmt
$ swag init --parseDependency --parseInternal
実際にできたもの
上記で設定したパスにアクセスすると、swagger-uiが立ち上がります。
感想
これでフロントエンドでのモデル作成も容易になりました!
コード読んでね〜と言わなくても、swaggerを見てねですみます。
それでは、よきAPI開発を〜![]()