□D言語 DMD/LDC のインストールメモ(Windows編)
はじめてD言語をインストールする人の参考になればと思います。なお、誤字、間違い、などなど色々とツッコミがありましたら指摘よろしくお願いします。
□今回の材料
- dmd.2.071.1
- ldc2-1.0.0
- Visual Studio Community 2015
- Windows 10 Home ver 1511 / build 10586.545
□とてもまじめな運用/基礎知識
DMD/LDC のバージョン管理
dmd はおおむね1~2ヶ月ほどで何かしらの新バージョンが公開されますが、まずインストールする前に changelog を見ましょう。
- dlang.org/changelog https://dlang.org/changelog/
新バージョンをインストールしても古いバージョンは残しておきましょう。
もし新バージョンで既存のコードにコンパイル時にエラーが出たらとりあえす、環境変数 PATH を以前バージョンに戻し作業優先させましょう。
が!しかし、最近は破壊的な変更は全くなくなりましたので...これに意味があるのかどうかよくわかりません。
- ディレクトリのイメージ
C:\D
 ├─dmd.1.076
 ├─dmd.2.063.2
 ├─dmd.2.066.2
 ├─dmd.2.069.2
 ├─dmd.2.071.1
 ├─dub-1.0.0
 ├─ldc2-1.0.0-win32-msvc
 ├─ldc2-1.0.0-win64-msvc
 ├─ldc2-1.1.0-beta2-win32-msvc
 └─ldc2-1.1.0-beta2-win32-msvc
Windows 64bitアプリケーションを作るには
DMD は単体で 32bitアプリケーションを作る事ができますが、64bitアプリケーションは作る事ができません。
もちろん dmd -m64 オプションにより 64bitのObjectファイルを出力することができますが、
付属の link.exe(optlink) は 16/32bit用なので Windows 64bitのリンクができません。
そこで、Microsoft Visual C++ の link.exe/Runtime を利用し Windows 64bitアプリケーションを作ります。
また、LDC も同様の方法で対応します。
□DMD のインストール
非常に簡単です、1.Visual C++をインストールし、2.DMD のWindowsインストーラ版(exe)で
インストールを行います。これで Windows 64bitアプリケーションが作成できるようになります(終了w)
- Visual C++ をインストール
- DMD を Windowsインストーラ版でインストール
- DMD インストールの確認
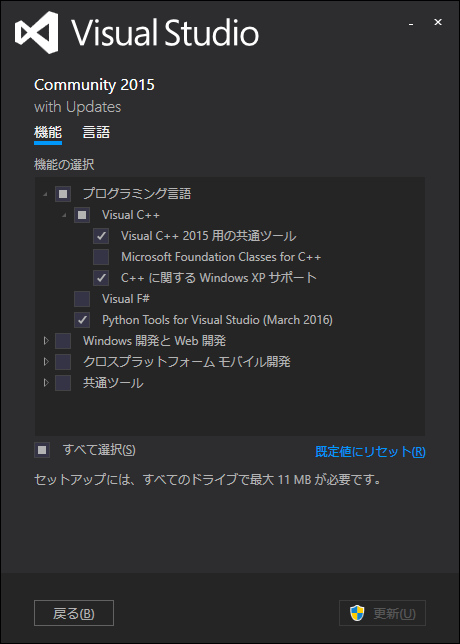
Visual C++ をインストール
Visual C++ は Visual Studio Community 2015 よりインストール、インストールするパスはデフォルト、なお Visual C++ はオプションを指定しないとインストールされないので注意が必要です。
以下にダウンロードのリンクや解説サイトのリンク
- Community 2015 日本語版ダイレクトリンク https://www.visualstudio.com/post-download-vs?sku=community&clcid=0x411
- Visual Studio Community 2015 HomePage https://www.visualstudio.com/ja-jp/downloads/download-visual-studio-vs.aspx
- atmarkit Visual Studio 2015の解説 http://www.atmarkit.co.jp/ait/articles/1508/07/news031.html
DMD を Windowsインストーラ版でインストール
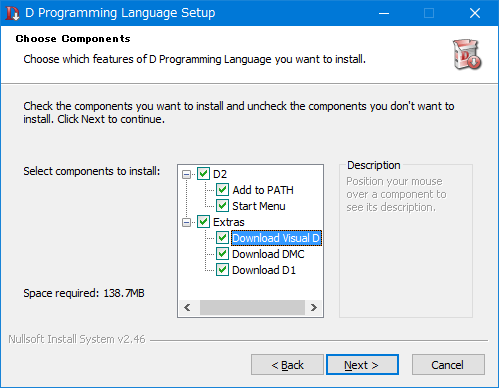
DMD は .7z アーカイブ版と Windowsインストーラ版がダウンロード可能です。
Windowsインストーラ版を使い dmd 本体および Visual D のインストールを行います。
以下にダウンロードのリンクや解説サイトのリンク
- DMD download Page (Windowsの'exe'をダウンロード) https://dlang.org/download.html#dmd
- DMD Release Archive http://downloads.dlang.org/releases/
注意点
- ダウンロードページ内の Windowsインストーラ版(Windows exe)をダウンロード
- インストール時に Visual D(Visual Studio D extension)をチェックしインストールしてください
- DMDをインストールするパスは 'C:\D' など間違いのないパスを指定しましょう
DMD インストールの確認
インストールが終わったら以下のソースコードをコンパイル
- テスト用ソースコード
// Written in the D programming language.
// dmd 2.071.1
/*
dmd option <dsource.d>
  -m32           generate 32 bit code
  -m32mscoff     generate 32 bit code and write MS-COFF object files
  -m64           generate 64 bit code
*/

import std.stdio;

int main()
{
	string s = "Hello! ";
	version(Win32)
	{
		s ~= "Win32";
	}
	else version(Win64)
	{
		s ~= "Win64";
	}
	else
	{
		s ~= "Win??";
	}
	s ~= "/";
	version(CRuntime_DigitalMars)
	{
		s ~= "CRuntime_DigitalMars";
	}
	version(CRuntime_Microsoft)
	{
		s ~= "CRuntime_Microsoft";
	}
	writeln(s);
	writeln("#");
	return 0;
}
- 実行用の Build.bat ファイル
注意点は Build.bat の環境変数 path は windows\bin\dmd.exeのディレクトリを設定してください。
rem ---- DMD path
path=C:\D\dmd.2.071.1\windows\bin;

dmd -wi -m32 -ofhello32.exe hello.d
@if ERRORLEVEL 1 goto :eof
hello32.exe

dmd -wi -m32mscoff -ofhello32mscoff.exe hello.d
@if ERRORLEVEL 1 goto :eof
hello32mscoff.exe

dmd -wi -m64 -ofhello64.exe hello.d
@if ERRORLEVEL 1 goto :eof
hello64.exe

echo done...
pause
- Build.bat の実行結果が以下のように表示されいればOK
Hello! Win32/CRuntime_DigitalMars
#
Hello! Win32/CRuntime_Microsoft
#
Hello! Win64/CRuntime_Microsoft
#
done...
- DMD のインストールの説明はこれで終了。
□LDCのインストール
LDC はコンパイル済みのアーカイブが提供されていますので、それを展開しインストールします。もちろん既に、Visual C++ をインストールされている場合は再びインストール必要はありません!!詳しく追及していませんが現時点(LDC v1.0.0)では LDC はクロスコンパイルはできないようですので 64bit .EXEを作るには LDC win64-msvc を 32bit .EXE を作るには LDC win32-msvc が必要です。
- 補足 ldc2-1.1.0-beta2-win64-msvc.zip は win32/64bit のクロスコンパイルが可能です。
おおかまな手順を以下に示します。
- Visual C++ をインストール
- LDC win32-msvc / win64-msvc をダウンロードし展開
- LDC インストールの確認
LDC win32-msvc/win64-msvc をダウンロードし展開
以下のリンク先から LDC をダウンロードし 'C:\D' などに展開します。
- LDC win32-msvc Direct download link https://github.com/ldc-developers/ldc/releases/download/v1.0.0/ldc2-1.0.0-win32-msvc.zip
- LDC win64-msvc Direct download link https://github.com/ldc-developers/ldc/releases/download/v1.0.0/ldc2-1.0.0-win64-msvc.zip
- LDC v1.0.0 release page https://github.com/ldc-developers/ldc/releases/tag/v1.0.0
LDC のインストールの確認
- 実行用の Build_lcd.bat ファイル(ソースファイルは hello.d を使います)
@echo off
path=C:\D\ldc2-1.0.0-win32-msvc\bin;c:\windows\system32;
ldc2 -m32 -ofhello32.exe hello.d
@if ERRORLEVEL 1 goto :eof
hello32.exe

path=C:\D\ldc2-1.0.0-win64-msvc\bin;c:\windows\system32;
ldc2 -m64 -ofhello64.exe hello.d
@if ERRORLEVEL 1 goto :eof
hello64.exe

echo done...
pause
- Build_ldc.bat の実行結果が以下のように表示されいればOK
Using Visual Studio: C:\Program Files (x86)\Microsoft Visual Studio 14.0\
Hello! Win32/CRuntime_Microsoft
#
Using Visual Studio: C:\Program Files (x86)\Microsoft Visual Studio 14.0\
Hello! Win64/CRuntime_Microsoft
#
done...
- LDC のインストールの説明はこれで終了。
□そして、おまけ
dmd.2.071.1.windows.7z などアーカイブを展開している場合やソースからビルドして使っている場合は、以下の sc.ini を置き換えると -m64 が有効になるかもしれません。
[Version]
version=7.51 Build 020

; environment for both 32/64 bit
[Environment]
DFLAGS="-I%@P%\..\..\src\phobos" "-I%@P%\..\..\src\druntime\import"

; optlink only reads from the Environment section so we need this redundancy
; from the Environment32 section (bugzilla 11302)
LIB="%@P%\..\lib"

[Environment32]
LIB="%@P%\..\lib"
LINKCMD=%@P%\link.exe

[Environment64]
LIB="%@P%\..\lib64"

; needed to avoid COMDAT folding (bugzilla 10664)
DFLAGS=%DFLAGS% -L/OPT:NOICF

; default to 32-bit linker (can generate 64-bit code) that has a common path
; for VS2008, VS2010, VS2012, and VS2013. This will be overridden below if the
; installer detects VS.
LINKCMD=%VCINSTALLDIR%\bin\link.exe

; -----------------------------------------------------------------------------
; This enclosed section is specially crafted to be activated by the Windows
; installer when it detects the actual paths to VC and SDK installations so
; modify this in the default sc.ini within the dmd git repo with care.
;
; End users: You can fill in the path to VC and Windows SDK and uncomment out
; the appropriate LINKCMD to manually enable support yourself.
;
; Users using Visual Studio 2010 Express with SDK 7.0A: The installer cannot
; determine the path to the 64-bit compiler included with SDK 7.0A. It's
; recommended to install the Windows SDK 7.1A. Alternatively you can set
; LINKCMD as the path to link.exe SDK 7.0A installs. It would typically be:
;   C:\Program Files (x86)\Microsoft Visual Studio 9.0\VC\bin\amd64\link.exe

; Windows installer replaces the following lines with the actual paths
VCINSTALLDIR=C:\Program Files (x86)\Microsoft Visual Studio 14.0\VC\
WindowsSdkDir=C:\Program Files (x86)\Windows Kits\8.1\
UniversalCRTSdkDir=C:\Program Files (x86)\Windows Kits\10\
UCRTVersion=10.0.10240.0

; Windows installer uncomments the version detected
LINKCMD=%VCINSTALLDIR%\bin\x86_amd64\link.exe
;VC2013 LINKCMD=%VCINSTALLDIR%\bin\x86_amd64\link.exe
;VC2012 LINKCMD=%VCINSTALLDIR%\bin\x86_amd64\link.exe
;VC2010 LINKCMD=%VCINSTALLDIR%\bin\amd64\link.exe
;VC2008 LINKCMD=%VCINSTALLDIR%\bin\amd64\link.exe

; needed with /DEBUG to find mspdb*.dll (only for VS2012 or VS2013)
PATH=%PATH%;%VCINSTALLDIR%\bin\x86_amd64;%VCINSTALLDIR%\bin
;VC2013 PATH=%PATH%;%VCINSTALLDIR%\bin\x86_amd64;%VCINSTALLDIR%\..\Common7\IDE;%VCINSTALLDIR%\bin
;VC2012 PATH=%PATH%;%VCINSTALLDIR%\bin\x86_amd64;%VCINSTALLDIR%\..\Common7\IDE

; ----------------------------------------------------------------------------
; Add the library subdirectories of all VC and Windows SDK versions so things
; just work for users using dmd from the VS 64-bit Command Prompt

; C Runtime libraries
LIB=%LIB%;"%VCINSTALLDIR%\lib\amd64"

; Platform/UCRT libraries (Windows SDK 10.0)
LIB=%LIB%;"%UniversalCRTSdkDir%\Lib\%UCRTVersion%\um\x64"
LIB=%LIB%;"%UniversalCRTSdkDir%\Lib\%UCRTVersion%\ucrt\x64"

; Platform libraries (Windows SDK 8.1)
LIB=%LIB%;"%WindowsSdkDir%\Lib\winv6.3\um\x64"

; Platform libraries (Windows SDK 8)
LIB=%LIB%;"%WindowsSdkDir%\Lib\win8\um\x64"

; Platform libraries (Windows SDK 7 and 6)
LIB=%LIB%;"%WindowsSdkDir%\Lib\x64"

; DirectX (newer versions are included in the Platform SDK but this
; will allow us to support older versions)
LIB=%LIB%;"%DXSDK_DIR%\Lib\x64"

; -----------------------------------------------------------------------------
[Environment32mscoff]
LIB="%@P%\..\lib32mscoff"

; settings very much copied from Environment64, see comments there
; needed to avoid COMDAT folding (bugzilla 10664)
DFLAGS=%DFLAGS% -L/OPT:NOICF

; Windows installer replaces the following lines with the actual paths
VCINSTALLDIR=C:\Program Files (x86)\Microsoft Visual Studio 14.0\VC\
WindowsSdkDir=C:\Program Files (x86)\Windows Kits\8.1\
UniversalCRTSdkDir=C:\Program Files (x86)\Windows Kits\10\
UCRTVersion=10.0.10240.0

LINKCMD=%VCINSTALLDIR%\bin\link.exe

; needed with /DEBUG to find mspdb*.dll (only for VS2012 or VS2013)
PATH=%PATH%;%VCINSTALLDIR%\bin
;VC2013 PATH=%PATH%;%VCINSTALLDIR%\..\Common7\IDE;%VCINSTALLDIR%\bin
;VC2012 PATH=%PATH%;%VCINSTALLDIR%\..\Common7\IDE

; ----------------------------------------------------------------------------
; Add the library subdirectories of all VC and Windows SDK versions so things
; just work for users using dmd from the VS Command Prompt

; C Runtime libraries
LIB=%LIB%;"%VCINSTALLDIR%\lib"

; Platform/UCRT libraries (Windows SDK 10.0)
LIB=%LIB%;"%UniversalCRTSdkDir%\Lib\%UCRTVersion%\um\x86"
LIB=%LIB%;"%UniversalCRTSdkDir%\Lib\%UCRTVersion%\ucrt\x86"

; Platform libraries (Windows SDK 8.1)
LIB=%LIB%;"%WindowsSdkDir%\Lib\winv6.3\um\x86"

; Platform libraries (Windows SDK 8)
LIB=%LIB%;"%WindowsSdkDir%\Lib\win8\um\x86"

; Platform libraries (Windows SDK 7 and 6)
LIB=%LIB%;"%WindowsSdkDir%\Lib"

; DirectX (newer versions are included in the Platform SDK but this
; will allow us to support older versions)
LIB=%LIB%;"%DXSDK_DIR%\Lib\x86"
-location https://github.com/SeijiFujita/quiita_works/tree/master/using_m64
tag: dlang
filename: using_m64.md
last update: 2016/09/06