はじめに
UnityとROS2を連携させることを可能にするUnity-Robotics-Hubが、最近ROS2対応しました。
そこで本記事では、ROS2とUnityを連携させるための「環境構築」について解説します。
実行環境
本記事で用いる実行環境は以下の通りです。
| 項目 | 値 |
|---|---|
| CPU | Core i7-9750H |
| OS | Windows10 |
| ROS2 | Foxy Fitzroy |
| Unity | 2020.3.16f1 |
※DockerやWSL2を使用する選択肢もありますが、外部PCとの通信が難しいことから、Windowsで実行します。
※今後Oculus Quest2を使用したサンプルを作成する予定のため、Oculus Linkが利用可能なOSであるWindowsを使用しています。
Unity-Robotics-Hubについて
Unity-Robotics-Hubの概要
Unity-Robotics-Hubは、Unity環境内でROSをベースとしたRoboticsのシミュレーションをするためのツールやチュートリアルなどを提供してくれているリポジトリです。
本記事ではその中の、ROSとUnityを連携させる「ROS–Unity Integration」というドキュメンテーションをメインに扱います。
ROS2とUnityの通信の仕組み
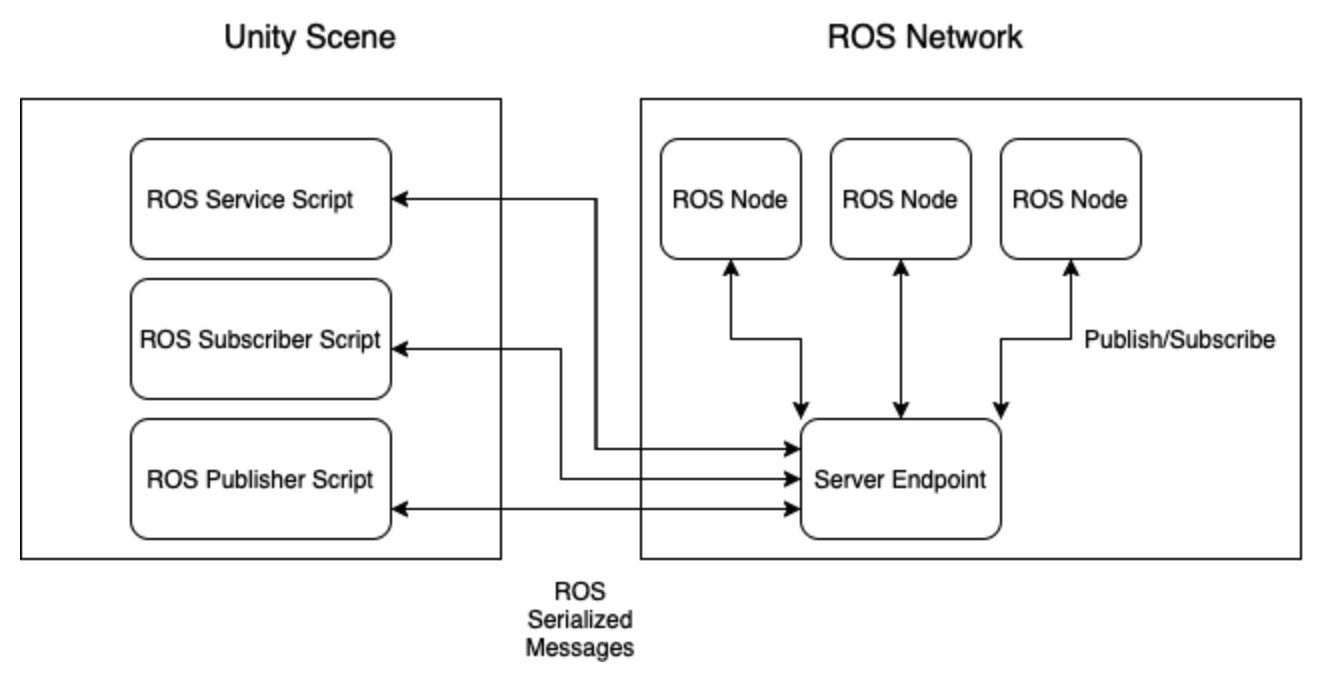
Unity側
Unity側では、ROS-TCP-Connectorというpackageを使用します。そのpackageは以下の3つの機能を提供します。
①ROSConnection
Unityスクリプト(C#)でROS2との通信(Publish/Subscribe)を可能にするプラグイン
②Message Generation
ROS message(Twistなど)をUnityが扱えるようにC#のclassに自動で変換してくれるプラグイン
③ROSGeometry
UnityとROSの座標フレームが違う場合に変換できる
※Unityでは、X軸が右、Y軸が上、Z軸が前を向いている
※ROSはさまざまな座標フレームに対応している
ROS2側
ROS2側では、ROS-TCP-Endpointを起動することで、ROS-TCP-Connectorを使用したUnityとROS messageを送受信できるようになります。
ROS2側の環境構築
WindowsへのROS2のインストール
①ROS2 FoxyをWindowsにインストール
公式ページに沿って、ROS2 FoxyをWindowsにインストールします。
※ページの下の方にある、**Alternativeの方法でインストールすることを強くお勧めします。**インストールが複雑でなく素早くインストールが可能です。この先はAlternativeの方法でインストールしたことを前提に進めていきます。
②動作チェック
Command Promptを開き、以下のコマンドを実行
shell1
$ call C:\opt\ros\foxy\x64\local_setup.bat
$ ros2 run demo_nodes_cpp talker
shell2
$ call C:\opt\ros\foxy\x64\local_setup.bat
$ ros2 run demo_nodes_cpp listener
2つのシェルが通信していることを確認する。
Visual Studio2019のインストール
WindowsでBuildする際にVisual Studioが必要になるためインストールする。
公式ページを参考に、Visual Studio 2019をインストールする。
※既にインストール済の場合
Visual Studio Installerから「Modify」を押して、「Desktop development with C++」にチェックを入れて再インストールしておくのが確実です。もしくはアンインストールし、再インストールしてください。
ROS2のworkspaceの作成
ROS2のworkspaceに関する公式ページを参考に実行する。
workspaceの作成
$ call C:\opt\ros\foxy\x64\local_setup.bat
$ md \dev_ws\src
$ cd \dev_ws\src
$ git clone https://github.com/ros/ros_tutorials.git -b foxy-devel
Build
$ call C:\opt\ros\foxy\x64\local_setup.bat
$ cd \dev_ws
$ call "C:\Program Files (x86)\Microsoft Visual Studio\2019\Community\VC\Auxiliary\Build\vcvarsall.bat" x86_amd64
$ colcon build --merge-install
※Buildするために、Visual Studio 2019を呼び出しています。
※CMAKE_C_COMPILERに関するエラーが出る場合は、Visual Studio 2019のインストールが上手くいっていない可能性が高いです。
turtlesimのsampleを起動
$ cd \dev_ws
$ call install/setup.bat
$ ros2 run turtlesim turtlesim_node
亀のシミュレータが起動すれば成功です。
Unity側の環境構築
Unityの公式ページから「Unity:2020.3.16f1」をインストールしてください。
Unity-Robotics-Hubの導入
Unity-Robotics-HubのDownload
-
Unity-Robotics-HubのzipファイルをDownloadし、解凍後、Documentsフォルダに入れる。
-
「Unity-Robotics-Hub/tutorials/ros_unity_integration/ros2_packages」の中にある、
-
unity_robotics_demo
-
unity_robotics_demo_msgs
を、workspace/srcに入れる
ROS-TCP-Endpointの実行
ROS-TCP-EndpointのDownload
ROS-TCP-EndpointをDownloadし、解凍後、workspace/srcの中に入れる。
※git cloneを使用するとROS1バージョンがDownloadされてしまうので注意
Build
$ call C:\opt\ros\foxy\x64\local_setup.bat
$ cd \dev_ws
$ call "C:\Program Files (x86)\Microsoft Visual Studio\2019\Community\VC\Auxiliary\Build\vcvarsall.bat" x86_amd64
$ call install/setup.bat
$ colcon build --merge-install
$ call install/setup.bat`
※call install/setup.bat
1回目:Buildに使用する環境を設定
2回目:新しくBuildされたパッケージを環境に追加
ros_tcp_endpointの実行
※<your IP address>に、ROSを使用しているPCのIPアドレスを入力してください
$ call C:\opt\ros\foxy\x64\local_setup.bat
$ cd \dev_ws
$ call install/setup.bat
$ ros2 run ros_tcp_endpoint default_server_endpoint --ros-args -p ROS_IP:=<your IP address>
ros_tcp_endpointの起動の成功例
C :\dev_ws>ros2 run ros_tcp_endpoint default_server_endpoint --ros-args -p ROS_IP:=192.000.00.000
 [INFO] [1630459690.215017900] [TCPServer]: Starting server on 192.000.00.000:10000
ROS-TCP-Connectorの実行
ROS-TCP-ConnectorのDownload
公式ページを参考にDownloadする
- Unity Versionが「2020.3.16f1」のプロジェクトを作成する
- 「Window」から「Package Manager」を開く
- 左上の「+」ボタンを押して、「Add package from git URL...」に
https://github.com/Unity-Technologies/ROS-TCP-Connector.git?path=/com.unity.robotics.ros-tcp-connectorを入力して追加 - メニューバーに「Robotics」が追加されているはずなので、「ROS Setting」を選択
- IPアドレスを変更
- ROS1からROS2に変更
Unity Robotics DemoのBuild
 $ call C:\opt\ros\foxy\x64\local_setup.bat
 $ cd \dev_ws
 $ call "C:\Program Files (x86)\Microsoft Visual Studio\2019\Community\VC\Auxiliary\Build\vcvarsall.bat" x86_amd64
 $ call install/setup.bat
 $ colcon build --merge-install
 $ call install/setup.bat
※call install/setup.bat
1回目:Buildに使用する環境を設定
2回目:新しくBuildされたパッケージを環境に追加
Message Generationの実行
- メニュー「Robotics -> Generate ROS Message」
- ROS message path「Browse」ボタンから、dev_ws/src/unity_robotics_demo_msgsを指定
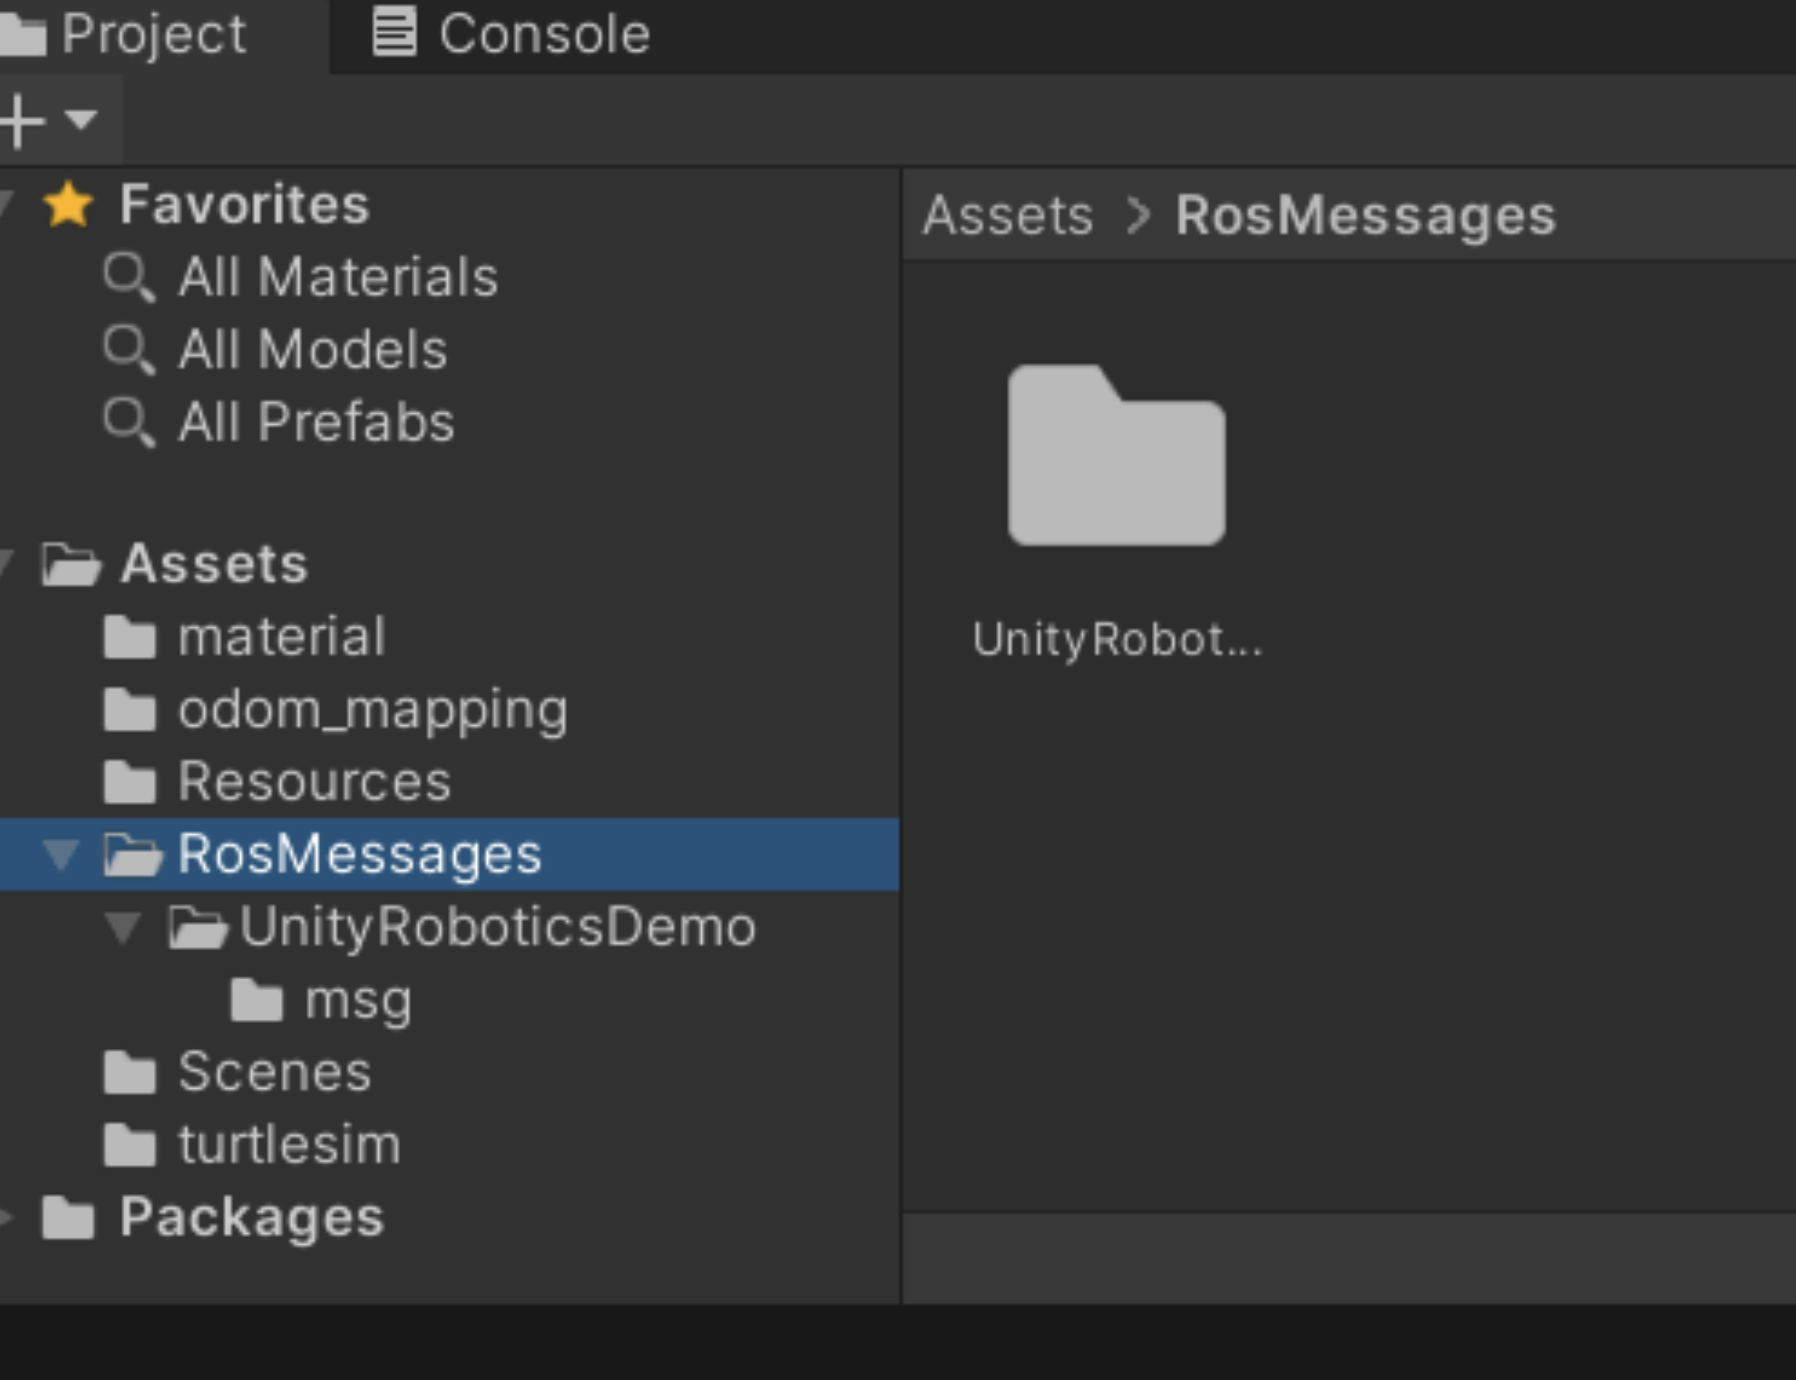
- メニュー「Robotics -> Generate ROS Message」から、「ROS Message Browser」の中でBuildボタンを押すと、UnityのAssets内に「RosMessages」というフォルダが作成されている
以下のように追加されていれば成功
Windows Firewallの設定について
Windowsを使用する場合、通信するためにポートを開ける必要があります(手順)。
※Windowsの環境によって、手順で示されている画面(UI)とは違う場合があります。
サンプルの実行①:Unity -> ROS2
UnityとROS2が通信する環境が整ったので、実際にサンプルを実行し、動作確認を行います。
1つ目のサンプルは以下のような内容です。
- Unity(Publisher):Cubeの位置・姿勢情報をTopicとしてPublishする
- ROS2(Subscriber):UnityからのTopicをSubscribeする
ros_tcp_endpointの起動
$ call C:\opt\ros\foxy\x64\local_setup.bat
$ cd \dev_ws
$ call install/setup.bat
$ ros2 run ros_tcp_endpoint default_server_endpoint --ros-args -p ROS_IP:=<your IP address>
Unity側の実行
このページの手順に沿って、スクリプトの作成、シーンの作成を行ってください。
※スクリプトをアタッチした空オブジェクトのInspectorに表示される、CubeパラメータにCubeオブジェクトをアタッチすることを忘れないでください。
ROS2側の実行
- topic listを実行し、Topic(/pos_rot)がUnityからROS2ネットワークにpublishされていることを確認します。
- 確認後、topic echoを実行し、topic内容を確認します。
$ call C:\opt\ros\foxy\x64\local_setup.bat
$ cd \dev_ws
$ call install/setup.bat
$ ros2 topic list
$ ros2 topic echo /pos_rot
成功例
pos_x: 0.0
pos_y: 1.0
pos_z: 0.0
rot_x: 1.5136975230593711
rot_y: -0.8131293901451347
rot_z: 0.3018129334884557
rot_w: 0.6689227173812269
サンプルの実行②:ROS2 -> Unity
2つ目のサンプルは以下のような内容です。
- ROS2(Publisher):color情報をTopicとしてPublishする
- Unity(Subscriber):ROS2からのTopicをSubscribeし、Cubeの色を変化させる
ros_tcp_endpointの起動
$ call C:\opt\ros\foxy\x64\local_setup.bat
$ cd \dev_ws
$ call install/setup.bat
$ ros2 run ros_tcp_endpoint default_server_endpoint --ros-args -p ROS_IP:=<your IP address>
Unity側の実行
このページの手順に沿って、スクリプトの作成を行ってください。
※スクリプトをアタッチした空オブジェクトのInspectorに表示される、CubeパラメータにCubeオブジェクトをアタッチすることを忘れないでください。
ROS2側の実行
$ call C:\opt\ros\foxy\x64\local_setup.bat
$ cd \dev_ws
$ call install/setup.bat
$ ros2 run unity_robotics_demo color_publisher
UnityのCubeの色が変化すれば成功です。
おわりに
今回はWindows環境でUnityとROS2を連携させるための環境構築について解説しました。
次回は、ROS2からのTopicを可視化することを目的として、簡易型シミュレータをUnity内に作成する方法について解説します。