概要
Goの構造体と関数の紐付けの仕組みを利用し、オブジェクト指向っぽくAPIにリクエストする。
この仕組みを利用することで、認証キーなどの共通の設定を、メソッドごとに引数で渡す必要がなくなり、よりシンプルにAPIリクエストをするコードが書けるようになった。
構造体と関数の紐付け
Goでは下記のように記述することで、構造体と関数を紐づけることができる。
package main

import (
	"fmt"
)

type Person struct {
	Name string
}

func (p *Person) Introduction() string {
	return fmt.Sprintf("私の名前は%sです", p.Name)
}

func main() {
	p := &Person{"たろう"}

	fmt.Println(p.Introduction())
}
func (p *Person) 関数名 ~と宣言すると、その関数を構造体に紐づいた関数として定義するこができ、その関数が構造体(Person)のメンバ変数を参照することができる。
なので上記のプログラムを実行すると、下記のように出力される。
$ go run main.go
私の名前はたろうです
この機能を利用して、APIにリクエストするコードを作成する。
前準備
環境は以下の通り。
- golang: 1.16.5
Qiitaのアクセストークンの発行
テスト用のAPIとして、QiitaのAPIを利用する。APIを利用するために、下記の記事を参考にQiitaのアクセストークンを取得する。
その後、取得したアクセストークンをTOKENの環境変数にセットする。
TOKEN=${発行したQiitaのアクセストークン}
最後に、curlコマンドで指定したユーザのアカウント情報を取得するAPIをリクエストし、APIの認証に問題がないことを確認する。
curl -H 'Authorization: Bearer ${TOKEN}' 'https://qiita.com/api/v2/users/sey323' | jq
{
  "description": "",
  "facebook_id": "",
  "followees_count": 32,
  "followers_count": 22,
  "github_login_name": "sey323",
  "id": "sey323",
  "items_count": 27,
  "linkedin_id": "",
  "location": "Tokyo.Japan",
  "name": "",
  "organization": "",
  "permanent_id": 163680,
  "profile_image_url": "https://qiita-image-store.s3.ap-northeast-1.amazonaws.com/0/163680/profile-images/1609825686",
  "team_only": false,
  "twitter_screen_name": null,
  "website_url": "https://sey323log.hatenablog.com/"
}
実装
Getリクエストを実行するソースコードの作成
構造体内関数を利用し、QiitaのAPIをコールし、結果をターミナルに表示するプログラムを作成する。
package main
import (
"encoding/json"
"flag"
"fmt"
"log"
"net/http"
)
const endpoint = "https://qiita.com/api/v2"
type QiitaClient struct {
Token string
}
func NewQiitaClient(token string) *QiitaClient {
return &QiitaClient{token}
}
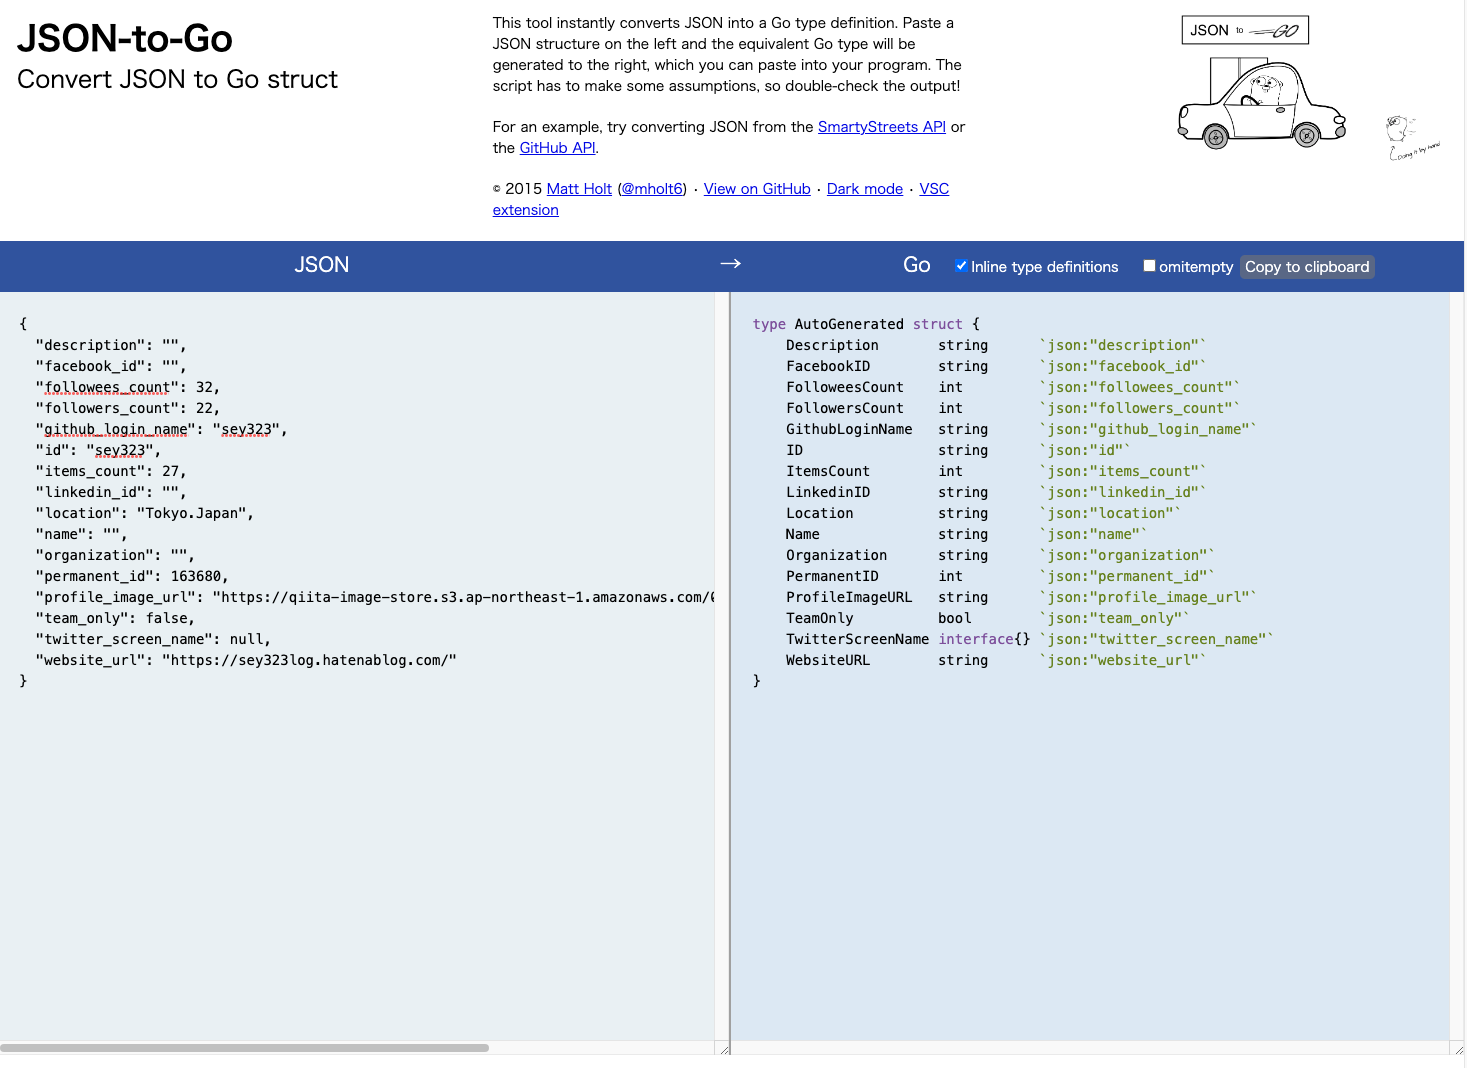
// 下記のURLから自動生成する。
// https://mholt.github.io/json-to-go/
type DescriptionResponse struct {
Description string `json:"description"`
FacebookID string `json:"facebook_id"`
FolloweesCount int `json:"followees_count"`
FollowersCount int `json:"followers_count"`
GithubLoginName string `json:"github_login_name"`
ID string `json:"id"`
ItemsCount int `json:"items_count"`
LinkedinID string `json:"linkedin_id"`
Location string `json:"location"`
Name string `json:"name"`
Organization string `json:"organization"`
PermanentID int `json:"permanent_id"`
ProfileImageURL string `json:"profile_image_url"`
TeamOnly bool `json:"team_only"`
TwitterScreenName interface{} `json:"twitter_screen_name"`
WebsiteURL string `json:"website_url"`
}
func (qc *QiitaClient) GetDescription(username string) {
endpoint := fmt.Sprintf("%s/users/%s", endpoint, username)
// HTTPリクエストを作成
req, err := http.NewRequest("GET", endpoint, nil)
if err != nil {
log.Fatal("error: %v", err)
}
req.Header.Add("Content-Type", "application/json")
req.Header.Add("Authorization", fmt.Sprintf("Bearer %s", qc.Token)) // 自身が保持するToken情報を利用する。
// クライアントの作成
client := &http.Client{}
resp, err := client.Do(req)
if err != nil {
log.Fatal("error: %v", err)
}
defer resp.Body.Close()
if resp.StatusCode == 200 {
// レスポンスを構造体にデコード
decoder := json.NewDecoder(resp.Body)
var descResp DescriptionResponse
err := decoder.Decode(&descResp)
if err != nil {
log.Fatal("error: %v", err)
}
// MarshalIndentで変換して出力
descJson, err := json.MarshalIndent(descResp, "", " ")
if err != nil {
log.Fatalf(err.Error())
}
fmt.Printf("%s\n", string(descJson))
return
}
}
func main() {
token := flag.String("token", "", "Qiitaのアクセストークン")
username := flag.String("username", "sey323", "ターゲットのQiitaのユーザ名")
flag.Parse()
log.Printf("username: %s", *username)
// APIのクライアントの初期化
qiitaClient := NewQiitaClient(*token)
// 指定したユーザの詳細情報を取得、トークンはqiitaClientが保持しているので渡す必要がない
qiitaClient.GetDescription(*username)
}
qiitaClientを初期化する際に認証トークンを渡し、認証トークンの情報を持ったqiitaClientが、GetDescription関数によりユーザの情報を取得している。
このように記述することで、メソッドを追加した際も、そのメソッドをQiitaClientに紐づく関数として記載することで、QiitaClient構造体が持つ認証トークンを再利用することができる。
実行
作成したプログラムを実行する。アクセストークンと詳細を取得したいユーザ名を引数に指定し、プログラムを実行する。
$ go run main.go -token $TOKEN -username sey323
{
  "description": "",
  "facebook_id": "",
  "followees_count": 32,
  "followers_count": 22,
  "github_login_name": "sey323",
  "id": "sey323",
  "items_count": 27,
  "linkedin_id": "",
  "location": "Tokyo.Japan",
  "name": "",
  "organization": "",
  "permanent_id": 163680,
  "profile_image_url": "https://qiita-image-store.s3.ap-northeast-1.amazonaws.com/0/163680/profile-images/1609825686",
  "team_only": false,
  "twitter_screen_name": null,
  "website_url": "https://sey323log.hatenablog.com/"
}
備考: レスポンスの構造体(struct)の自動生成
レスポンス結果を格納する構造体を作成する際に、今まではcurlやAPIドキュメントのレスポンスから手動で書き起こしていたが、下記のサイトを利用することで、構造体のGoのソースを自動で生成できた。
利用方法はシンプルで、画面左側のエリアにJson形式のレスポンスをコピペするだけで、そのJsonの構造体のソースコードを自動で生成してくれる。