Angularにおけるバリデーションの基礎を解説していきます。
今回は、
- バリデーションの使い方
- Angularのビルトインバリデーションの種類
をやっていきます。
前回の振り返り
前回は、Angularの Reactive forms を学びました。
今回も Reactive forms は出てきますので、もしわからなくなったら前回に戻って思い出してみてください。
この記事のソースコード
このAngular入門は、動くソースコードをすべて公開しています。
(記事ごとにブランチを分けています)
https://github.com/seteen/AngularGuides/tree/入門その08
バリデーションの使い方
Angularにおけるバリデーションはとても簡単です。
ほとんどHTMLの中で完結します。
まずは、 product-edit.component の name の項目に対して、入力が必須というバリデーションを追加してみます。
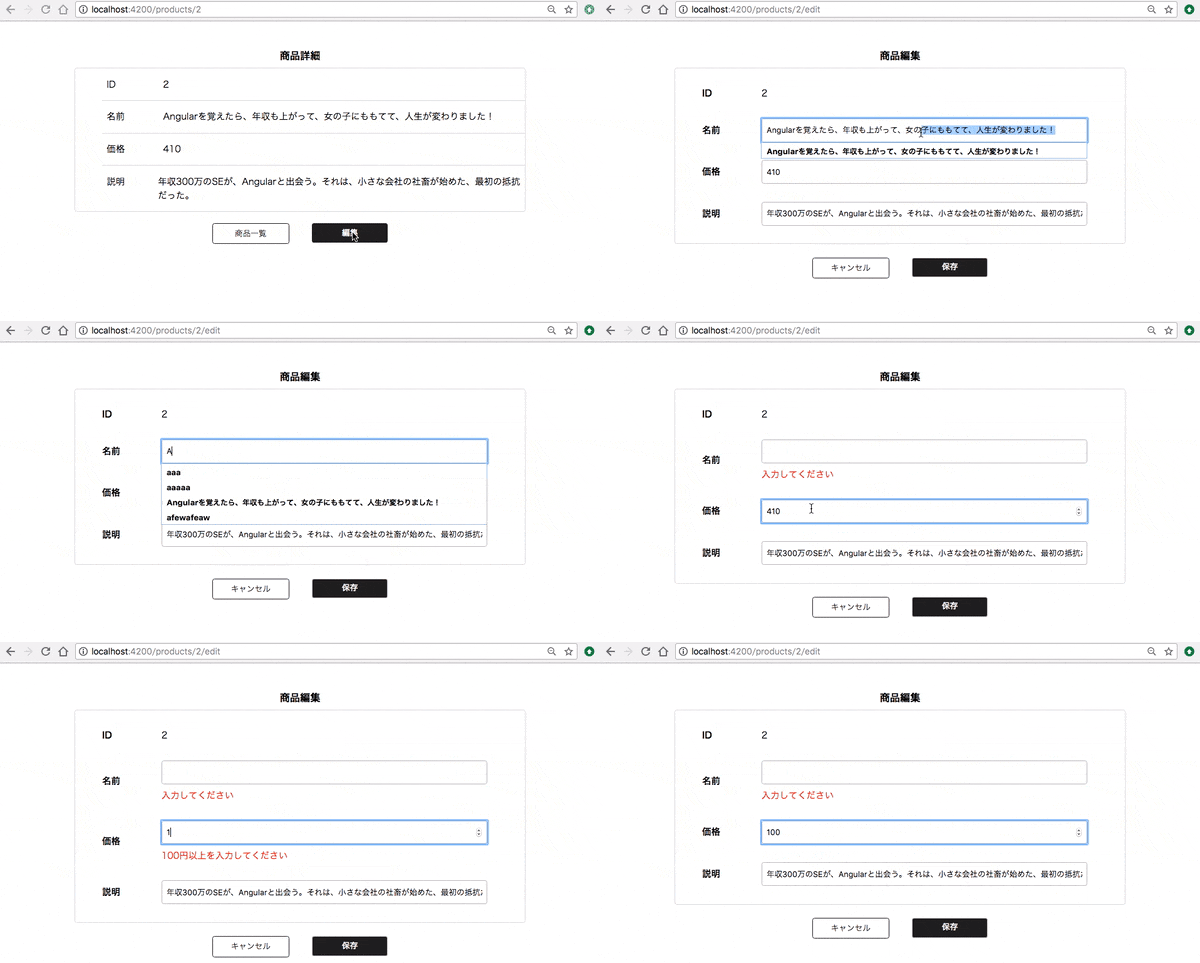
name 入力がない場合は、 「入力してください」と出ます。
<div class="container">
  <div class="title">商品編集</div>
  <form (ngSubmit)="saveProduct()" [formGroup]="productForm">
    <div class="edit-form">
      <div class="edit-line">
        <label>ID</label>
        <span>{{ productForm.controls.id.value }}</span>
      </div>
      <div class="edit-line">
        <label>名前</label>
        <div>
          <input id="name" type="text" formControlName="name" required> # <- 変更
          <div *ngIf="name.invalid && (name.dirty || name.touched)" class="alert"> # <- 追加
            <div *ngIf="name.errors.required">入力してください</div>
          </div>
        </div>
      </div>
      <div class="edit-line">
        <label>価格</label>
        <input type="number" formControlName="price">
      </div>
      <div class="edit-line">
        <label>説明</label>
        <input type="text" formControlName="description">
      </div>
    </div>
    <div class="footer">
      <span class="button white" [routerLink]="['/products', productForm.controls.id.value]">キャンセル</span>
      <button class="button black">保存</button>
    </div>
  </form>
</div>
import { Component, OnInit } from '@angular/core';
import { Product } from '../../shared/models/product';
import { ProductService } from '../../shared/services/product.service';
import { ActivatedRoute, Params, Router } from '@angular/router';
import { FormBuilder } from '@angular/forms';

@Component({
  selector: 'app-product-edit',
  templateUrl: './product-edit.component.html',
  styleUrls: ['./product-edit.component.scss']
})
export class ProductEditComponent implements OnInit {
  productForm = this.fb.group({
    id: [''],
    name: [''],
    price: [''],
    description: [''],
  });

  constructor(
    private route: ActivatedRoute,
    private router: Router,
    private fb: FormBuilder,
    private productService: ProductService,
  ) {}

  get name() { return this.productForm.get('name'); } // <- 追加

  ngOnInit() {
    this.route.params.subscribe((params: Params) => {
      this.productService.get(params['id']).subscribe((product: Product) => {
        this.productForm.setValue({
          id: product.id,
          name: product.name,
          price: product.price,
          description: product.description,
        });
      });
    });
  }

  saveProduct(): void {
    const { id, name, price, description } = this.productForm.getRawValue();
    this.productService.update(new Product(id, name, price, description));
    this.router.navigate(['/products', this.productForm.controls.id.value]);
  }
}
解説
まずは、変更点の少ないTypescript側から見ていきます。
get name() { return this.productForm.get('name'); }
Typescript側では、これだけ追加しています。
これは、 getter です。 getter はメソッドなのですが、メソッドでないように () なしで呼び出せます。
そのため、 HTMLから読んでいるときは、 name だけで呼べています。
この productForm.get('name') で取得できるのは、 FormControl クラスのインスタンスです。
次に、HTML の変更点を細かく見ていきます。。
<input id="name" type="text" formControlName="name" required>
name の <input> に対して required という属性を追加しました。
これにより、この項目が必須である( required )というバリデーションが効くようになります。
<div *ngIf="name.invalid && (name.dirty || name.touched)" class="alert">
次に、 <input> の下に追加した <div> 要素を見ていきます。
色々と見知らぬ要素が *ngIf の中に出てきています。一つずつ解説していきます。
name.invalid は、 name のバリデーションに一つでも違反したら true になります。
name.dirty は、 name 要素が変更されたら true になります。
name.touched は、 name 要素の入っている <input> の blur イベント発火時に true になります( 一度 <input> タグにフォーカスをあてて、離れたら)。
これらの3つを用いて、この <div> は、 name に何も入力されていない状態になり、かつ ユーザが入力内容に変更を加えたか、一度フォーカスを入れて離れたときに内容が表示されるようになります。
この name.dirty || name.touched をなぜ使うかというと、もしこれらがなければ、例えば登録フォームの1番最初のまだ何も入力していない時点からエラーが表示されることになり、
ユーザにとって不快な情報を表示してしまうからです。
<div *ngIf="name.errors.required">入力してください</div>
最後に、この行を説明していきます。
name ( FormControl クラスのインスタンス) が invalid になると、 name.errors に違反したバリデーションをキーとした情報が生成されます。
今回は、 required バリデーションを使っているので、 name.errors.required が true になっています。
TIPS: 色々な FormControlのプロパティ
FormControlには、今回紹介した以外にもプロパティがあります。
もっと使いこなしたいという方は公式ページを参照してみてください。
https://angular.io/api/forms/FormControl
ここまでのコミット
(少し見栄えを調整するために scss を変更しています。変更内容は下の章で記載します)
編集画面に他のバリデーションを追加してみる
まずは name 要素に required のバリデーションをつけましたが、他にもバリデーションをつけてみましょう。
今回追加するバリデーションは下記の3つです。
-
nameは、最大50文字まで -
priceは必須 -
priceは、100以上
<div class="container">
  <div class="title">商品編集</div>
  <form (ngSubmit)="saveProduct()" [formGroup]="productForm">
    <div class="edit-form">
      <div class="edit-line">
        <label>ID</label>
        <span>{{ productForm.controls.id.value }}</span>
      </div>
      <div class="edit-line">
        <label>名前</label>
        <div>
          <input id="name" type="text" formControlName="name" required maxlength="50"> # <- 変更
          <div *ngIf="name.invalid && (name.dirty || name.touched)" class="alert">
            <div *ngIf="name.errors.required">入力してください</div>
            <div *ngIf="name.errors.maxlength">50文字以内で入力してください</div> # <- 追加
          </div>
        </div>
      </div>
      <div class="edit-line">
        <label>価格</label>
        <div>
          <input type="number" formControlName="price" required> # <- 変更
          <div *ngIf="price.invalid && (price.dirty || price.touched)" class="alert"> # <- 追加
            <div *ngIf="price.errors.required">入力してください</div>
            <div *ngIf="price.errors.min">100円以上を入力してください</div>
          </div>
        </div>
      </div>
      <div class="edit-line">
        <label>説明</label>
        <input type="text" formControlName="description">
      </div>
    </div>
    <div class="footer">
      <span class="button white" [routerLink]="['/products', productForm.controls.id.value]">キャンセル</span>
      <button class="button black">保存</button>
    </div>
  </form>
</div>
import { Component, OnInit } from '@angular/core';
import { Product } from '../../shared/models/product';
import { ProductService } from '../../shared/services/product.service';
import { ActivatedRoute, Params, Router } from '@angular/router';
import { FormBuilder, Validators } from '@angular/forms';

@Component({
  selector: 'app-product-edit',
  templateUrl: './product-edit.component.html',
  styleUrls: ['./product-edit.component.scss']
})
export class ProductEditComponent implements OnInit {
  productForm = this.fb.group({
    id: [''],
    name: [''],
    price: ['', Validators.min(100)], // <- 変更
    description: [''],
  });

  constructor(
    private route: ActivatedRoute,
    private router: Router,
    private fb: FormBuilder,
    private productService: ProductService,
  ) {}

  get name() { return this.productForm.get('name'); }
  get price() { return this.productForm.get('price'); } // <- 追加

  ngOnInit() {
    this.route.params.subscribe((params: Params) => {
      this.productService.get(params['id']).subscribe((product: Product) => {
        this.productForm.setValue({
          id: product.id,
          name: product.name,
          price: product.price,
          description: product.description,
        });
      });
    });
  }

  saveProduct(): void {
    const { id, name, price, description } = this.productForm.getRawValue();
    this.productService.update(new Product(id, name, price, description));
    this.router.navigate(['/products', this.productForm.controls.id.value]);
  }
}
解説
「name` は、最大50文字までの解説」のバリデーション
<input id="name" type="text" formControlName="name" required maxlength="50">
maxlength=50 を追加しています。HTML5の maxlength 属性と同様の書き方ですが、これだけでバリデーションが追加されます。
<div *ngIf="name.errors.maxlength">50文字以内で入力してください</div>
バリデーションが追加されたので、 name が 50文字を越すと name.errors.maxlength に 値が入ります。
具体的には、 { requiredLength: 50, actualLength: 52 } のような値が入っていますので、このあたりの情報を使ってメッセージを作りたいときは、値を取得してメッセージを作れます。
「 price は必須」のバリデーション
これは、 name と同じやり方です。
<input type="number" formControlName="price" required>
<div *ngIf="price.invalid && (price.dirty || price.touched)" class="alert">
  <div *ngIf="price.errors.required">入力してください</div>
</div>
required を <input> 要素に追加し、
price 用のエラー表示用の <div> を用意しています。
「 price は、100以上」のバリデーション
このバリデーションだけは、今までのものとは異なります。
実は、 <input> タグに属性として追加して使えるバリデーションは基本的にHTML5で定義されているものだけで、
その他は自分でディレクティブを作るか、Typescript側でバリデーションの設定を行う必要があります。
productForm = this.fb.group({
  id: [''],
  name: [''],
  price: ['', Validators.min(100)], // <- 変更
  description: [''],
});
price の入力は、 元々 [''] だけを入れていましたが、新しい配列の要素を増やしました。
FormControl に入力している配列は、1つ目の要素は初期値ですが、2つ目以降の要素は Validator を入れられます(複数可)。
Angularがデフォルトで用意してくれているバリデーションは、 Validators に定義されています。
ここで入力している Validators.min(number) は、 FormControl の値の最小値を定義するバリデーションです。
これにより、 price の値に 100 よりも小さな値が入ると price.errors.min に値が入るようになります。
<div *ngIf="price.errors.min">100円以上を入力してください</div>
Typescript側の設定で、 price に 100 よりも小さい値が入ると price.errors.min に値が入るようになったので、HTMLでエラーを表示しています。
この例では利用していませんが、 price.errors.min には { min: 100, actual: 12 } のような値が入るので、これも値をエラーメッセージなどに利用したい場合はこのオブジェクトから取得できます。
スタイルを整える。
エラーメッセージを表示するためのスタイルを整えます。
.container {
  margin: auto;
  padding: 32px 0;
  width: 800px;
  .title {
    padding: 8px 0;
    text-align: center;
    width: 100%;
    font-weight: 600;
    font-size: 18px;
  }

  .edit-form {
    padding: 16px 48px;
    border: 1px solid #D9DBDE;
    border-radius: 4px;
    background-color: #FFFFFF;

    .edit-line {
      display: flex;
      align-items: center;
      padding: 16px 0;
      width: 100%;

      label {
        width: 15%;
        font-size: 16px;
        font-weight: 600;
      }

      input {
        border: 1px solid #BDBDBD;
        border-radius: 4px;
        padding: 0 8px;
        width: 560px;
        height: 40px;
        font-size: 14px;
      }

      .alert { // <- 追加
        margin-top: 8px;
        color: red;
      }
    }
  }

  .footer {
    display: flex;
    justify-content: center;
    padding: 24px 0;

    .button {
      margin: 0 20px;
    }
  }
}
では、実際に動作確認してみましょう。
必須、価格制限のエラーが表示されていますね。
(実はChromeだと maxlength を設定するとそもそもそれ以上入力できなくなってしまうので今回の動画では外しています)
ここまでのコミット
バリデーションが全てOKのとき初めて保存できるようにする
バリデーションエラーがあるときに表示されるようにしましたが、
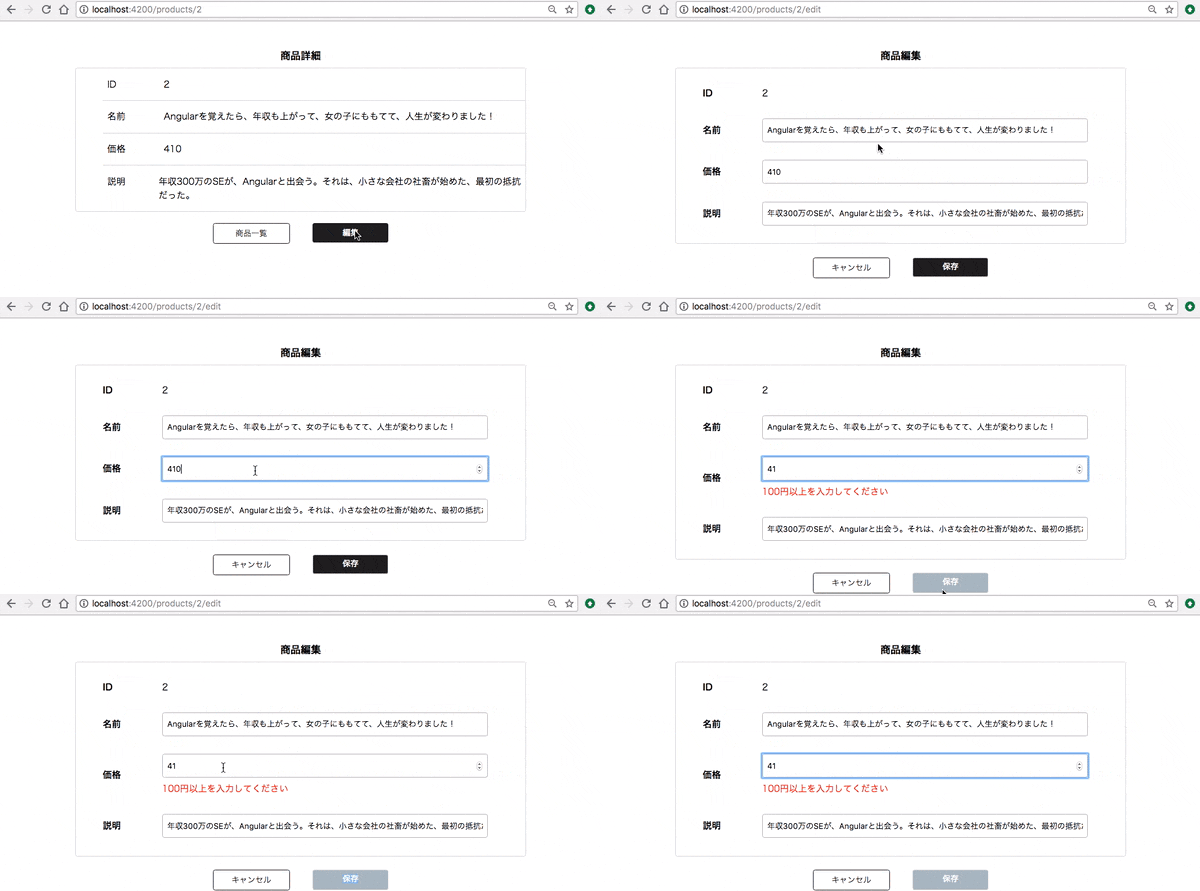
現状ではまだエラーがあっても保存ボタンを押すことができてしまいます。そのため、例えば価格が 99 でも保存できてしまいます。
バリデーションエラーが全て解消されて始めて保存ボタンが enable になるようにしてみましょう。
import { Component, OnInit } from '@angular/core';
import { Product } from '../../shared/models/product';
import { ProductService } from '../../shared/services/product.service';
import { ActivatedRoute, Params, Router } from '@angular/router';
import { FormBuilder, Validators } from '@angular/forms';

@Component({
  selector: 'app-product-edit',
  templateUrl: './product-edit.component.html',
  styleUrls: ['./product-edit.component.scss']
})
export class ProductEditComponent implements OnInit {
  productForm = this.fb.group({
    id: [''],
    name: [''],
    price: ['', Validators.min(100)],
    description: [''],
  });

  constructor(
    private route: ActivatedRoute,
    private router: Router,
    private fb: FormBuilder,
    private productService: ProductService,
  ) {}

  get name() { return this.productForm.get('name'); }
  get price() { return this.productForm.get('price'); }

  ngOnInit() {
    this.route.params.subscribe((params: Params) => {
      this.productService.get(params['id']).subscribe((product: Product) => {
        this.productForm.setValue({
          id: product.id,
          name: product.name,
          price: product.price,
          description: product.description,
        });
      });
    });
  }

  saveProduct(): void {
    if (this.productForm.valid) { // <- 変更
      const { id, name, price, description } = this.productForm.getRawValue();
      this.productService.update(new Product(id, name, price, description));
      this.router.navigate(['/products', this.productForm.controls.id.value]);
    }
  }
}
<div class="container">
  <div class="title">商品編集</div>
  <form (ngSubmit)="saveProduct()" [formGroup]="productForm">
    <div class="edit-form">
      <div class="edit-line">
        <label>ID</label>
        <span>{{ productForm.controls.id.value }}</span>
      </div>
      <div class="edit-line">
        <label>名前</label>
        <div>
          <input id="name" type="text" formControlName="name" required maxlength="50">
          <div *ngIf="name.invalid && (name.dirty || name.touched)" class="alert">
            <div *ngIf="name.errors.required">入力してください</div>
            <div *ngIf="name.errors.maxlength">50文字以内で入力してください</div>
          </div>
        </div>
      </div>
      <div class="edit-line">
        <label>価格</label>
        <div>
          <input type="number" formControlName="price" required>
          <div *ngIf="price.invalid && (price.dirty || price.touched)" class="alert">
            <div *ngIf="price.errors.required">入力してください</div>
            <div *ngIf="price.errors.min">100円以上を入力してください</div>
          </div>
        </div>
      </div>
      <div class="edit-line">
        <label>説明</label>
        <input type="text" formControlName="description">
      </div>
    </div>
    <div class="footer">
      <span class="button white" [routerLink]="['/products', productForm.controls.id.value]">キャンセル</span>
      <button class="button black" [class.disabled]="productForm.invalid">保存</button> # <- 変更
    </div>
  </form>
</div>
.container {
  margin: auto;
  padding: 32px 0;
  width: 800px;
  .title {
    padding: 8px 0;
    text-align: center;
    width: 100%;
    font-weight: 600;
    font-size: 18px;
  }

  .edit-form {
    padding: 16px 48px;
    border: 1px solid #D9DBDE;
    border-radius: 4px;
    background-color: #FFFFFF;

    .edit-line {
      display: flex;
      align-items: center;
      padding: 16px 0;
      width: 100%;

      label {
        width: 15%;
        font-size: 16px;
        font-weight: 600;
      }

      input {
        border: 1px solid #BDBDBD;
        border-radius: 4px;
        padding: 0 8px;
        width: 560px;
        height: 40px;
        font-size: 14px;
      }

      .alert {
        margin-top: 8px;
        color: red;
      }
    }
  }

  .footer {
    display: flex;
    justify-content: center;
    padding: 24px 0;

    .button {
      margin: 0 20px;

      &.disabled { // <- 追加
        background-color: #B0BEC5;
        pointer-events: none;
      }
    }
  }
}
解説
Typesciptに if 文を追加
saveProduct(): void {
  if (this.productForm.valid) { // <- 変更
    const { id, name, price, description } = this.productForm.getRawValue();
    this.productService.update(new Product(id, name, price, description));
    this.router.navigate(['/products', this.productForm.controls.id.value]);
  }
}
this.productForm.valid は、 FormGroup のもつ全ての FormControl のバリデーションエラーがないときに true になります。
逆に this.prodcutForm.invalid は、 false になります。
この追加で、バリデーションにエラーがあるときは、何もしないようになりました。
HTMLでclass指定
HTMLで変更しているのは一行だけです。
<button class="button black" [class.disabled]="productForm.invalid">保存</button>
[class.xxx]="something" は、 something の部分が true を返すと、この要素に xxx という class が追加されるという意味です。
今回は、 this.productForm.invalid が true だと disabled classが付与されるようにしました。
disabled classは、 scss で追加しています。
SCSSに disabled クラスを追加
&.disabled {
  background-color: #B0BEC5;
  pointer-events: none;
}
disabled クラスは、 背景を灰色にし、クリックイベントなどを受け付けないようにしています。
これにより、 バリデーションエラー時には、保存ができないようになりました。
TIPS: Typescriptのコードの必要性
HTML, SCSS を変更するだけで、バリデーションエラーがあるとボタンが押せなくなりました。
このため、 Typescript側の修正は必要ないように思えますが、実は必要です。
Form の中の<input>要素でEnterを押すと、Formが送信されてしまいます。
そのため、ボタンを無効化したとしてもsaveProduct()メソッドが呼ばれることがあるのでTypescipt側での制御も必要となります。
では、動作確認をしてみましょう。
エラー状態になるとボタンが灰色になり、クリックできなくなっていますね。
ここまでのコミット
Angularのビルトインバリデーション
Angularでビルトインされているバリデーションは、下記です。
| バリデータ | 役割 | 属性で指定可能 |
|---|---|---|
| min(number) | 最小値のバリデーション | x |
| max(number) | 最大値のバリデーション | x |
| required | 必須のバリデーション | ◯ |
| requiredTrue |
true が必須のバリデーション(チェックボックスなどで使う) |
x |
| メールアドレスフォーマットのバリデーション | x | |
| minLength(number) | 最小文字数のバリデーション | ◯ |
| maxLength(number) | 最大文字数のバリデーション | ◯ |
| pattern(regex) | 正規表現一致のバリデーション | ◯ |
複数のバリデータを使う場合
Angularの Validators クラスには、複数のバリデータを使いたいときに利用する compose メソッドが用意されています。
実際に使う場合を想定してみます。
先程の例の price で required , min の2つのバリデーションを利用しました。
このとき、 required はHTML, min はTypescriptで記述しました。
このように複数のバリデーションを行いたい場合で、かつどちらもTypescriptで設定しないといけない場合に compose を使います。
  productForm = this.fb.group({
    id: [''],
    name: [''],
    price: ['', Validators.compose([Validators.min(100), Validators.required])],
    description: [''],
  });
複数のバリデータを使う場合は、上記のように記載します。簡単ですね。
まとめ
今回は、 Angularのバリデーションについて学んでいきました。
Angularのバリデーションは、非常に便利で簡単にやりたいことができるので、みなさんも利用してみてください。
次回は、自作のカスタムバリデータを作る方法を解説していきます。
Angular入門 未経験から1ヶ月でサービス作れるようにする その9. カスタムバリデーション
入門記事一覧
「Angular入門 未経験から1ヶ月でサービス作れるようにする」は、記事数が多いため、まとめ記事 を作っています。
https://qiita.com/seteen/items/43908e33e08a39612a07

