ファッションサイトWEARでは、ファッションコーディネイトサイトで様々な人のスナップ写真がアップロードされています。見てみると、モデルの方々は正面に直立不動でただ立っているというよりは、少し横に向いたり、服が見えやすいように少し片足上げるなど、立ち方に工夫があります。今回はそのスナップ写真のモデルの姿勢推定を行い、その推定結果をクラスタリングしてみました。
姿勢推定モデル
こちらのモデルを利用させていただきました。以下の関数にて、画像のパスを与えると身体の各点(body_parts)のx座標とy座標を結合したリストを返します。すべての画像においてすぺての点の推定できるわけではないので、目や耳を除いた骨格の部分をすべて(max_n_body_parts)推定できたものについてのみ結果を返しています。
from tf_pose import common
import cv2
import numpy as np
from tf_pose.estimator import TfPoseEstimator
from tf_pose.networks import get_graph_path, model_wh

# 先にモデルをロードしておく
model = 'mobilenet_thin'
resize = '432x368'

w, h = model_wh(resize)
if w == 0 or h == 0:
    e = TfPoseEstimator(get_graph_path(model), target_size=(432, 368))
else:
    e = TfPoseEstimator(get_graph_path(model), target_size=(w, h))

def img2vec(estimator, w, h, img_path, resize=resize, local_file=True):
    max_n_body_parts = 14 # 目や耳を省く
    resize_out_ratio = 4.0

    if local_file:
        image = common.read_imgfile(img_path, None, None)
        if image is None:
            image = requests.get(img_path).text
    else:
        res = requests.get(img_path)
        image = np.array(Image.open(BytesIO(res.content)).convert('RGB'))

    humans = estimator.inference(image, resize_to_default=(w > 0 and h > 0), upsample_size=resize_out_ratio)

    image = TfPoseEstimator.draw_humans(image, humans, imgcopy=False)
    image_h, image_w = image.shape[:2]

    dfs = pd.DataFrame(index=[])
    columns = ['human', 'point', 'x', 'y']

    xx = 0
    if len(humans) != 1: return

    for human in humans: # 実際は一人しかいない
        xx = xx + 1

        for m in human.body_parts:
            body_part = human.body_parts[m]
            center = (int(body_part.x * image_w + 0.5), int(body_part.y * image_h + 0.5))
            list = [[xx, m, center[0],center[1]]]
            df = pd.DataFrame(data=list, columns=columns)

            dfs = pd.concat([dfs, df])

    dfs = dfs[dfs['point'] < max_n_body_parts]
    if len(dfs) != max_n_body_parts: return

    return np.array(dfs.x).tolist() + np.array(dfs.y).tolist()
また、画像中の身体の位置を補正するために、x座標とy座標それぞれでmin-maxの正規化をかけるので、実際はベクトル化の部分の処理は以下のようになりました。
def min_max_norm(l):
    max_ = max(l)
    return [l_ / max_ for l_ in l]

vec = img2vec(e, w, h, f"{file_path}", resize="432x368", local_file=False)
min_max_norm(vec[:14]) + min_max_norm(vec[14:]) # このベクトルが一つの画像に対するベクトル(リスト型)
スナップ写真をベクトル化
今回は、メンズのスナップ写真とレディースのスナップ写真に分けてデータを作りました。また、冬服はコートやロングスカートやマフラーなどで姿勢推定の難易度が少し上がる気がしたので、夏の期間に絞って画像を集めました。
- https://wear.jp/men-coordinate/?from_month=6&to_month=8&pageno=hoge
- https://wear.jp/women-coordinate/?from_month=6&to_month=8&pageno=hoge
それぞれ、men_vecsとwomen_vecsという変数名のリストに先程の関数で作られるベクトルをappendしていったところ、それぞれ708個と374個のベクトルが集まりました。
クラスタリング(K-means)
メンズとレディースそれぞれのベクトルの集合をクラスタリングしていきます。姿勢の座標特有のベクトル化やクラスタリングの手法がよく分からなかったこともあり、x座標とy座標を結合したベクトルをその空間上のk-meansによるクラスタリングを行いました。
クラスタ数の決定
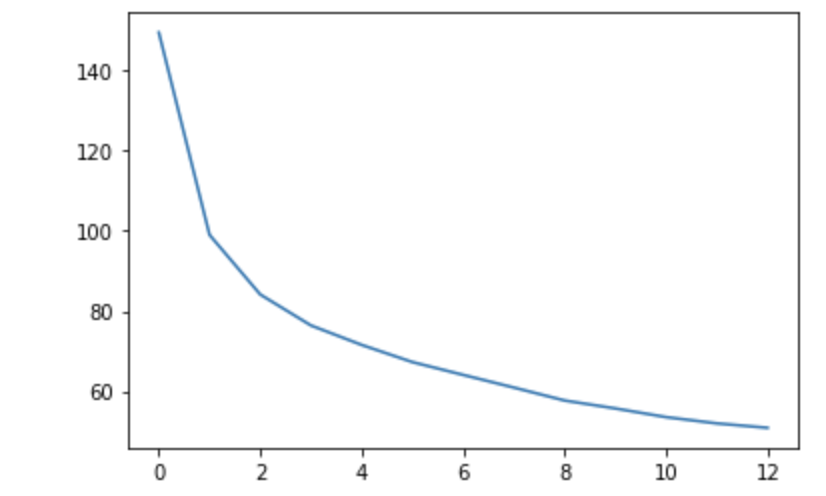
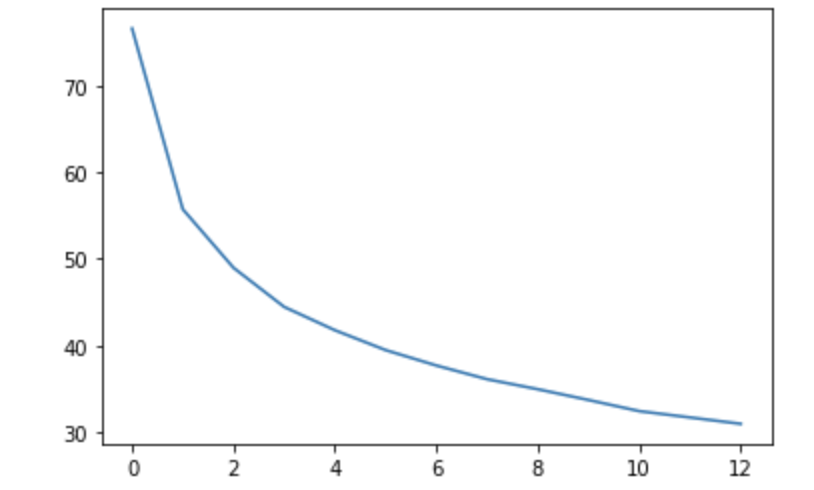
まずは、クラスタ数(k)を決めるために、クラスタ数ごとの損失のようなものを計算します。
sklearnのKMeansによると、
inertia_ : float
Sum of squared distances of samples to their closest cluster center.
とのことなので、この値(各点の最寄りの重心からの距離の総和)をその損失のようなものとして、各クラスタ数ごとにプロットします。
from sklearn.cluster import KMeans

# kを変えて距離の総和を計算
errors = []
for k in range(1, 14):
    kmeans_model = KMeans(n_clusters=k, random_state=0).fit(np.array(men_vecs)) # もしくはwomen_vecs
    errors.append(kmeans_model.inertia_)
plt.plot(errors)
| メンズ画像のクラスタリング | レディース画像のクラスタリング |
|---|---|
 |
 |
これ以降はmen_vecs もしくはwomen_vecsをvecsに置き換えたものとします。
vecs = men_vecs
# vecs = women_vecs
クラスタリングのプロット(PCA)
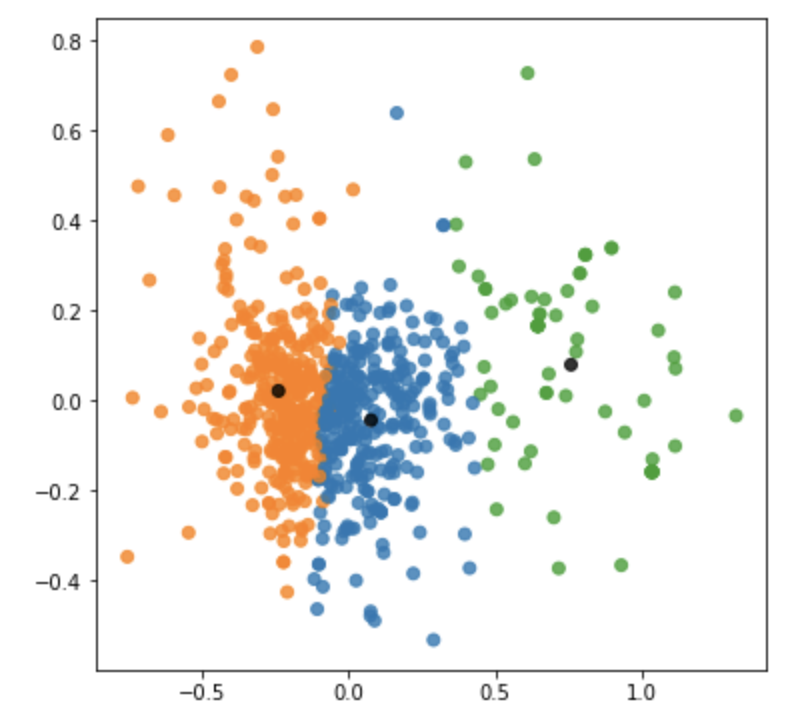
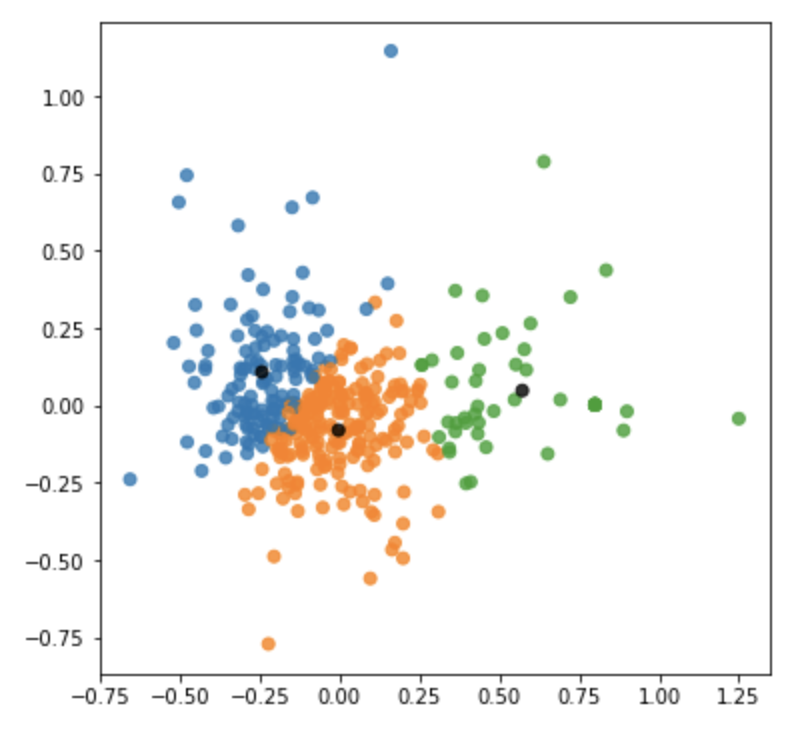
先程のプロットから、今回はk = 3とすることにしました。クラスタごとのデータの散らばりを主成分分析を用いた2次元のプロットで確認します。
k = 3
kmeans_model = KMeans(n_clusters=k, random_state=0).fit(np.array(vecs))
labels = kmeans_model.labels_
クラスタごとに色を塗り分ける設定をしています。重心はすべて黒にしました。
from sklearn.decomposition import PCA

pca = PCA()
pca.fit(np.array(vecs))
feature = pca.transform(np.array(vecs))
centroids_pca = pca.transform(kmeans_model.cluster_centers_)

# NOTE: クラスタの重心を別の色に割り当てる
color_codes = list(sns.color_palette(n_colors=k).as_hex())
colors = [color_codes[label] for label in labels]
colors += ['#000000' for i in range(k)]

plt.figure(figsize=(6, 6))
for x, y in zip(feature[:, 0], feature[:, 1]):
    plt.text(x, y, '', alpha=0.8, size=10)
features = np.append(feature, centroids_pca, axis=0)
plt.scatter(features[:, 0], features[:, 1], alpha=0.8, color=colors)
plt.show()
| メンズ画像のクラスタリングごとのPCAのプロット | レディース画像のクラスタリングごとのPCAのプロット |
|---|---|
 |
 |
クラスタの重心を姿勢にプロット
ここまでで、姿勢推定のクラスタリングが完了したので、それらのクラスタの重心をベクトルからx座標とy座標の姿勢のプロットに変換したいと思います。各body_partを散布図の点で表して、実際の骨格になるように棒グラフの棒で結んでいます
def show_poses(vecs_list, m=50):
    n_poses = len(vecs_list)
    fig, axes = plt.subplots(n_poses, 1, figsize=(276/m, 368/m*n_poses))
    for i, vecs in enumerate(vecs_list):

        x, y = vecs[:14], vecs[14:]
        links = [[0, 1], [1, 2], [2, 3], [3, 4], [1, 5], [5, 6], [6, 7], [1, 8], [8, 9], [9, 10], [1, 11], [11, 12], [12, 13]]

        axes[i].scatter(x, [-y_ for y_ in y]) if n_poses > 1 else plt.scatter(x, [-y_ for y_ in y])
        for l in links:
            axes[i].plot([x[l[0]], x[l[1]]], [-y[l[0]], -y[l[1]]]) if n_poses > 1 else plt.plot([x[l[0]], x[l[1]]], [-y[l[0]], -y[l[1]]])
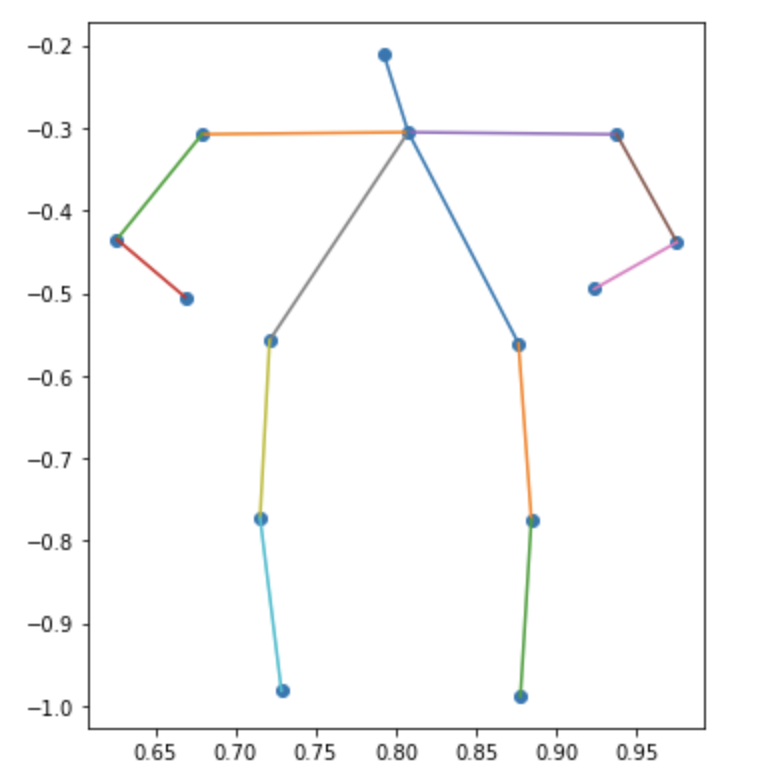
試しにレディースの最初の画像の推定結果を表示してみると次のようになりました。おしゃれな立ち姿が想像できます
show_poses([women_vecs[0]])
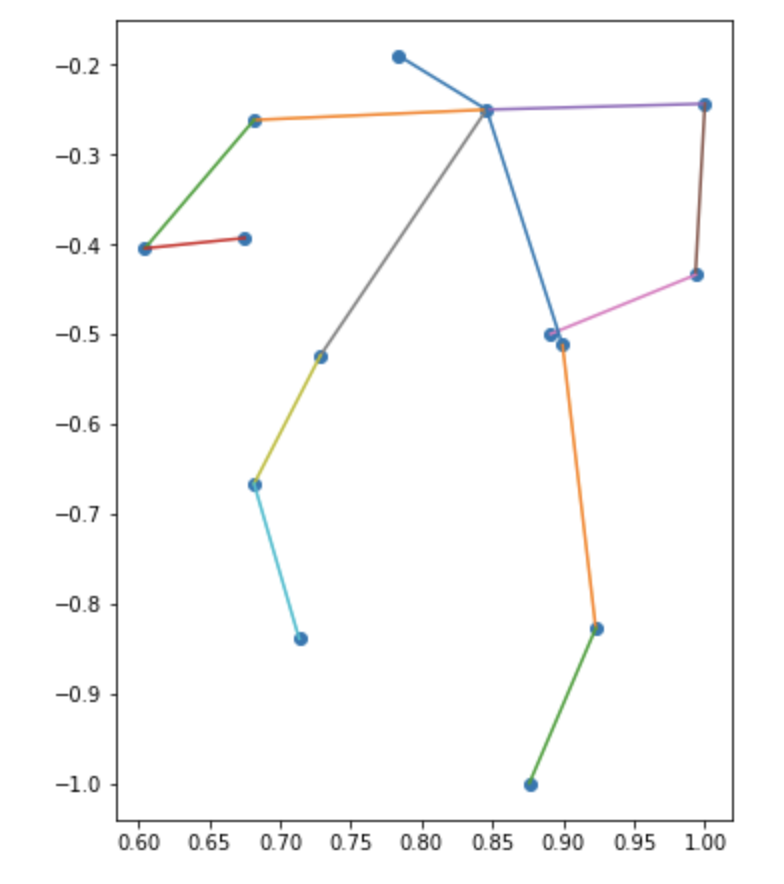
以下が、クラスタの重心を姿勢のプロットに変換した結果になります
show_poses([v.tolist() for v in kmeans_model.cluster_centers_])
| カテゴリ | クラスタ1 | クラスタ2 | クラスタ3 |
|---|---|---|---|
| メンズ | 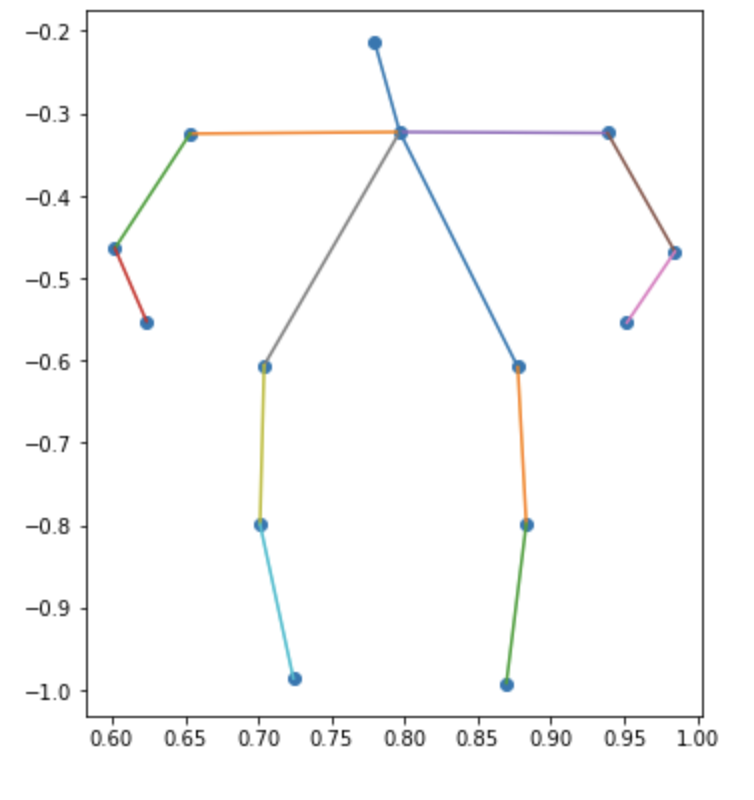 |
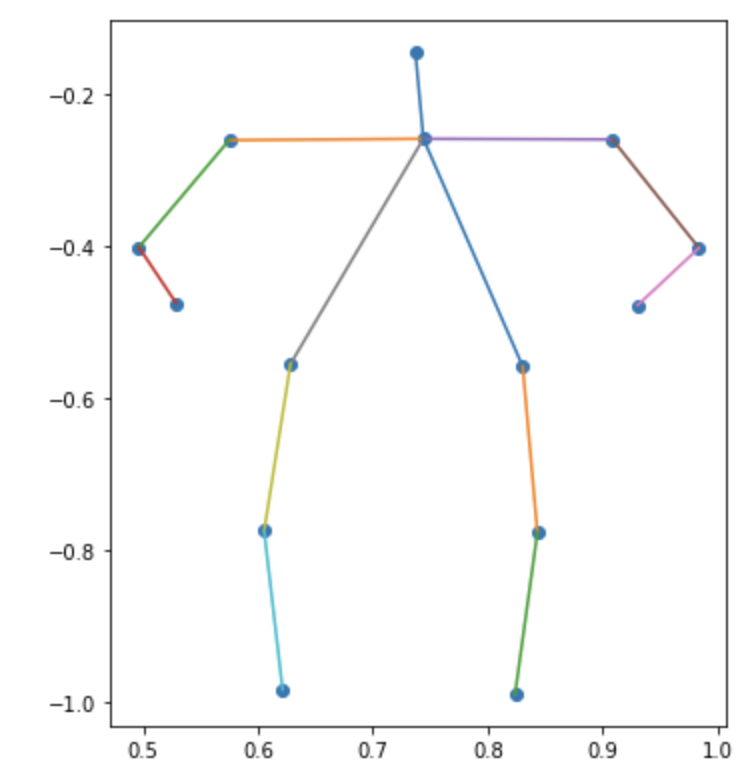 |
 |
| レディース | 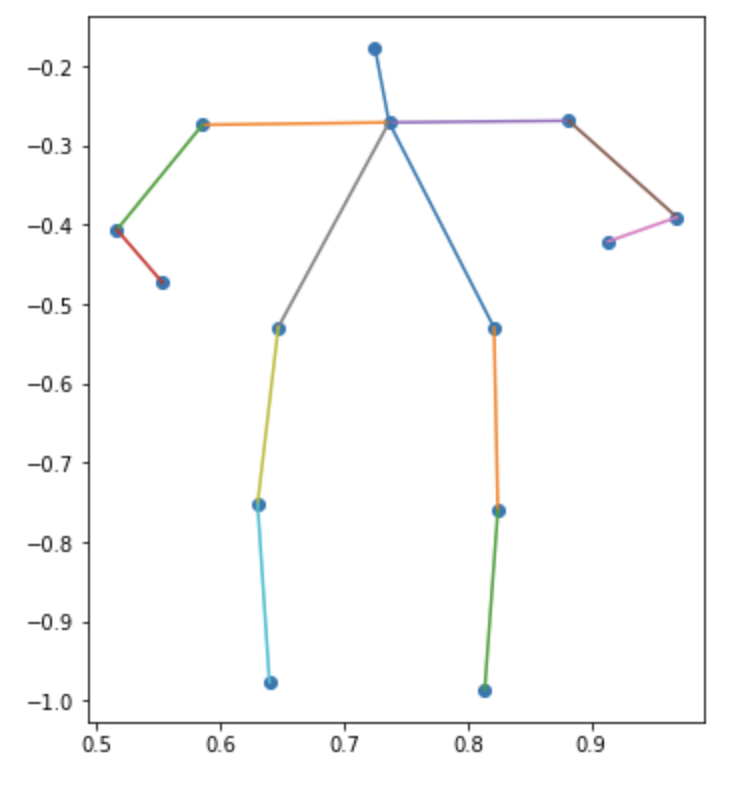 |
 |
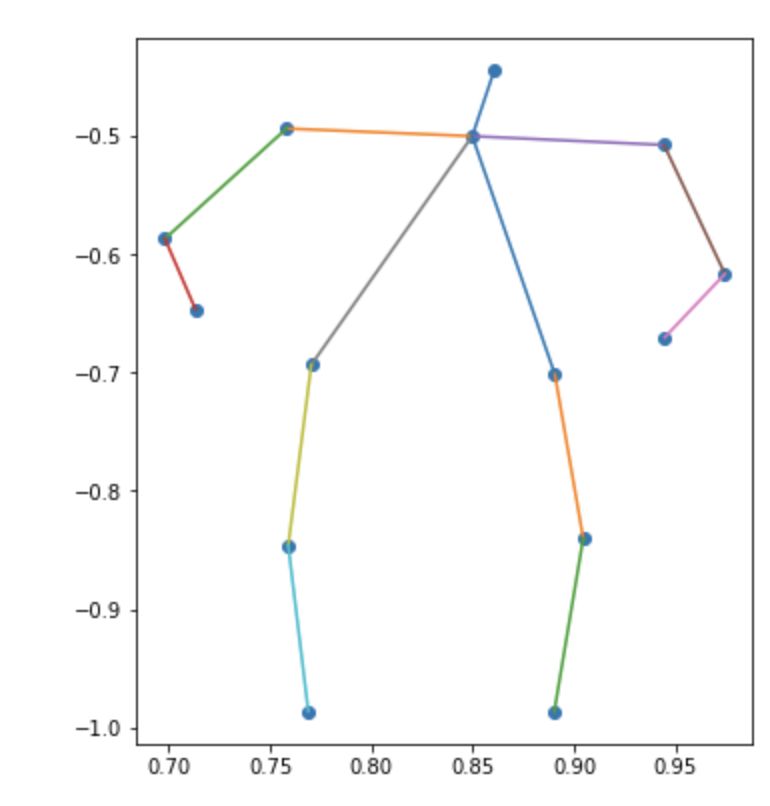 |
メンズの3つ目なんかは斜めに立って片足伸ばしてるんだろうなぁとわかるんですが、全体的にはっきりしない結果になりました
おわりに
手法の改善点として考えられるのは、
- ベクトル化:単純なx座標とy座標の結合ベクトルは単純すぎたかもしれない
- 正規化:x座標とy座標を両方0から1に押し込めたが、実際はそれらの比率が異なる(人間なので縦長になる)
後者の話は記事後半の姿勢のプロットでも、実際の画像より横長になっているようなので、何か良い方法があればいいなと考えております