[2021/03/17 追記]
dart:ffi を使った、実践的な例は https://github.com/sensuikan1973/libedax4dart と https://github.com/sensuikan1973/pedax/blob/main/lib/engine/edax_server.dart あたりが参考になると思います。
こんな場面
「C/C++の優れた資産を、Flutterでも使いたいんじゃあああああああ」
結論
Flutter/Dart => C/C++ は厳しい
FlutterのリポジトリにIssue「Support integrating with C/C++ in plugin framework」がたってる。
残念ながら厳しそう...(2018/6/16時点)
優先度高めてもらうためにたくさん「いいね」を押しましょう!!!
なお、単純にDart => C/C++はいける
JavaやSwiftを経由しよう
「Flutter/Dart => Java/Swift => C/C++」 と駆け抜ける!1
今回は Android/Javaを例に挙げます。
もちろん Kotlin でもいい。
完成デモ
HelloWorldするだけ
実装
Flutter/DartからJavaを呼ぶ
**platform channels**を利用することになる。
Project作成
flutter create -i swift -a java helloworld
channelを使ってJavaを呼ぶ
main.dart に以下をコピペ
import 'dart:async';

import 'package:flutter/material.dart';
import 'package:flutter/services.dart';

void main() => runApp(new MyApp());

class MyApp extends StatelessWidget {
  @override
  Widget build(BuildContext context) {
    return new MaterialApp(
      title: 'Flutter Demo',
      theme: new ThemeData(
        primarySwatch: Colors.blue,
      ),
      home: new MyHomePage(title: 'Flutter Demo Home Page'),
    );
  }
}

class MyHomePage extends StatefulWidget {
  MyHomePage({Key key, this.title}) : super(key: key);
  final String title;

  @override
  _MyHomePageState createState() => new _MyHomePageState();
}

class _MyHomePageState extends State<MyHomePage> {
  static const platform = const MethodChannel('helloworld/hello');
  String _greeting = 'Nothing';

  Future<Null> _getGreeting() async {
    String greeting;
    try {
      final String result = await platform.invokeMethod('getGreeting');
      greeting = result;
    } on PlatformException catch (e) {
      greeting = "Failed to get greeting: '${e.message}'.";
    }

    setState(() {
      _greeting = greeting;
    });
  }

  @override
  Widget build(BuildContext context) {
    return new Material(
    child: new Center(
      child: new Column(
        mainAxisAlignment: MainAxisAlignment.spaceEvenly,
        children: [
          new RaisedButton(
            child: new Text('Get Greeting'),
            onPressed: _getGreeting,
          ),
          new Text(_greeting),
        ],
      ),
    ),
  );
  }
}
ポイントは3つ。
-
static const platform = const MethodChannel('helloworld/hello');← MethodChannel指定 -
Future<Null> _getGreeting() async{}← 非同期で呼び出し -
await platform.invokeMethod('getGreeting');← メソッド名を指定して呼び出し
Android/JavaからC/C++を呼ぶ
ここまででDart => Javaはいけたので、次はJava => C/C++を書く
公式ドキュメントは必読。
Android Studioの環境整備
先のプロジェクトのandroidディレクトリのみをAndroid Studioで開く。
そして、Tool > SDK Manager > SDK Toolsと開き、以下をinstallする。
- NDK
- CMake
- LLDB
C/C++を追加
mainディレクトリにcppディレクトリを追加。(別に名前は何でもいいが、今回はcppとする)
そして、cppディレクトリにnative-lib.cを追加し以下をコピペ。
# include <string.h>
# include <jni.h>

jstring
Java_com_example_helloworld_MainActivity_getGreetingFromJNI( JNIEnv* env, jobject thiz ) {
    return (*env)->NewStringUTF(env, "Hello World. I'm Android.");
}
関数名は、「Java_対象のjavaファイルに到るまでのパス_Hoge.java_メソッド名」とすること。
CMakeLists.txtを作る
appディレクトリにCMakeLists.txtを作り、以下をコピペ
# Sets the minimum version of CMake required to build your native library.
# This ensures that a certain set of CMake features is available to
# your build.

cmake_minimum_required(VERSION 3.4.1)

# Specifies a library name, specifies whether the library is STATIC or
# SHARED, and provides relative paths to the source code. You can
# define multiple libraries by adding multiple add.library() commands,
# and CMake builds them for you. When you build your app, Gradle
# automatically packages shared libraries with your APK.

add_library( # Specifies the name of the library.
             native-lib

             # Sets the library as a shared library.
             SHARED

             # Provides a relative path to your source file(s).
             src/main/cpp/native-lib.c )

# Specifies a path to native header files.
include_directories(src/main/cpp/include/)
最後の1行はヘッダーファイルの場所を教えている。
今回はヘッダーファイルを使ってないので無くてもいいが、普通は使うはずなので書いた。
MainActivity.javaを編集
以下をコピペ。
package com.example.helloworld;

import android.os.Bundle;

import io.flutter.app.FlutterActivity;
import io.flutter.plugins.GeneratedPluginRegistrant;
import io.flutter.plugin.common.MethodCall;
import io.flutter.plugin.common.MethodChannel;
import io.flutter.plugin.common.MethodChannel.MethodCallHandler;
import io.flutter.plugin.common.MethodChannel.Result;

public class MainActivity extends FlutterActivity {

  private static final String CHANNEL = "helloworld/hello";

  @Override
  protected void onCreate(Bundle savedInstanceState) {
    super.onCreate(savedInstanceState);
    GeneratedPluginRegistrant.registerWith(this);

    new MethodChannel(getFlutterView(), CHANNEL).setMethodCallHandler(
            new MethodCallHandler() {
              @Override
              public void onMethodCall(MethodCall call, Result result) {
                if (call.method.equals("getGreeting")) {
                  String greeting = getGreeting();
                  result.success(greeting);
                } else {
                  result.notImplemented();
                }
              }
            });
  }

  private String getGreeting() {
    return getGreetingFromJNI();
  }

  public native String  getGreetingFromJNI();

  static {
      System.loadLibrary("native-lib");
  }
}
ポイントは3つ
-
private static final String CHANNEL = "helloworld/hello";← 先と同じChannel名を指定する -
static { System.loadLibrary("native-lib"); }←.soファイルをロードするようにしている -
public native String getGreetingFromJNI();← 先に定義したCのメソッドを指定する
Gradleのリンク
- appディレクトリを右クリックし、「Link C++ Project with Gradle」を選択
- BuildSystemはCMakeを選択
- ProjectPathに先ほど作成したCMakeLists.txtを指定
- OKをクリック
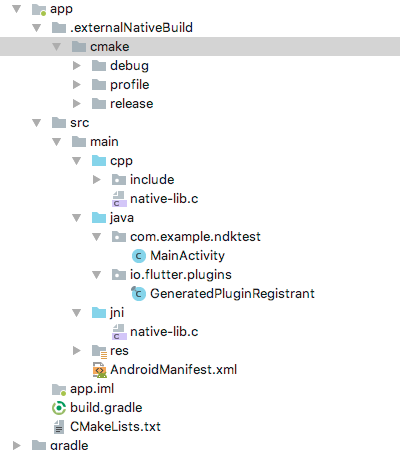
完成図
こんな感じになるはず
(com.example.ndktestの部分は今回だとcom.example.helloworldですね)
cannot resolve symbol が出る場合
File > Invalidate Caches / Restart...を選択して再起動
起動
デモのような挙動が得られればOK!
おわりに
C/C++呼ぶのに、javaとswift両方書くの面倒ですね泣
githubのissueが解決される日が待ち遠しい...