前回の記事 SwiftでのTableView データ表示編 の続きになります。
http://qiita.com/senseiswift/items/9b5476531a843b0e314a
Swiftでの簡単なテーブルビュー 画面遷移編
やること
- 新規ファイルSecondViewControllerを追加
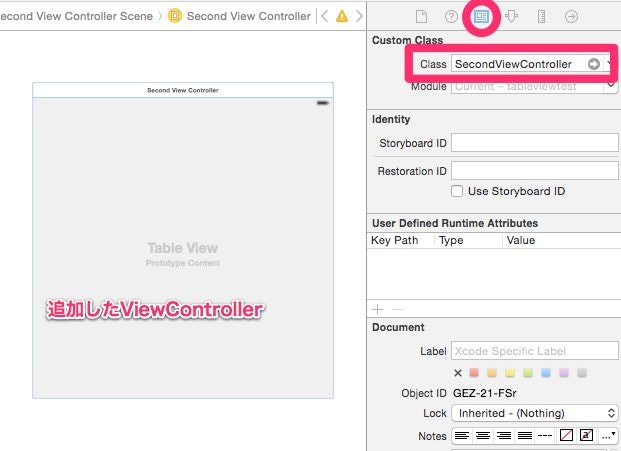
- StoryBoardに新しいViewControllerを配置
- StoryBoardの新ViewControllerのCustomClassのClassに「SecondViewController」を指定
- StoryBoardのSecondViewControllerにTableViewを配置
- StoryBoardのTableViewをファイルのSecondViewControllerに接続
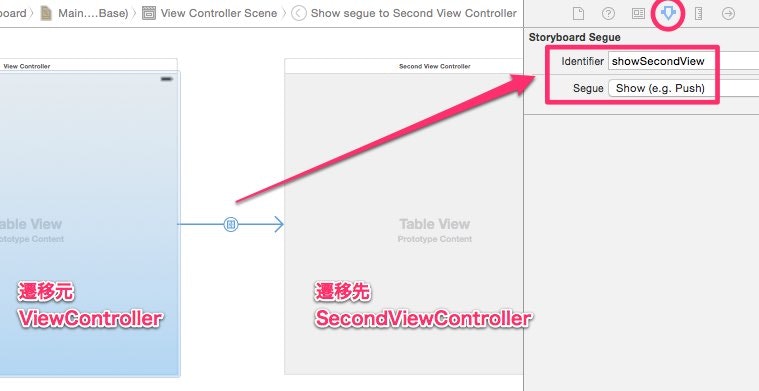
- StoryBoardのViewControllerとSecondViewControllerを接続し、Identiferを「showSecondView」に設定 Segueを「show」に設定
- ViewControllerにSecondViewに渡す文字列を追加
- セルタップ時に渡す文字列をセットし、SecondViewControllerに遷移するSegueを呼び出す
- SecondViewControllerに受け取る文字列の変数を追加
- 受け取った文字列をセルに表示
- ViewControllerのprepareforSegueでSecondViewControllerに文字列を渡す
3. 新規ファイルSecondViewControllerを追加
6. StoryBoardのViewControllerとSecondViewControllerを接続し、Identiferを「showSecondView」に設定 Segueを「show」に設定
ViewController
import UIKit

class ViewController: UIViewController, UITableViewDataSource, UITableViewDelegate {

    @IBOutlet weak var tableView: UITableView!

    // 7. SecondViewに渡す文字列
    var selectedText: String?

    // テーブルに表示するテキスト
    let texts = ["Monday", "Tuesday", "Wednesday", "Thursday", "Friday", "Saturday", "Sunday"]

    override func viewDidLoad() {
        super.viewDidLoad()

        tableView.delegate = self
        tableView.dataSource = self
    }

    override func didReceiveMemoryWarning() {
        super.didReceiveMemoryWarning()
        // Dispose of any resources that can be recreated.
    }

    // セルの行数
    func tableView(tableView: UITableView, numberOfRowsInSection section: Int) -> Int {
        return texts.count
    }

    // セルのテキストを追加
    func tableView(tableView: UITableView, cellForRowAtIndexPath indexPath: NSIndexPath) -> UITableViewCell {
        let cell: UITableViewCell = UITableViewCell(style: UITableViewCellStyle.Subtitle, reuseIdentifier: "Cell")

        cell.textLabel?.text = texts[indexPath.row]
        return cell
    }

    func tableView(table: UITableView, didSelectRowAtIndexPath indexPath:NSIndexPath) {
        println(texts[indexPath.row])

        // 8. SecondViewControllerに渡す文字列をセット
        selectedText = texts[indexPath.row]

        // 8. SecondViewControllerへ遷移するSegueを呼び出す
        performSegueWithIdentifier("showSecondView",sender: nil)

    }

    // Segueで遷移時の処理
    override func prepareForSegue(segue: UIStoryboardSegue, sender: AnyObject!) {
        if (segue.identifier == "showSecondView") {
            let secondVC: SecondViewController = (segue.destinationViewController as? SecondViewController)!

            // 11. SecondViewControllerのtextに選択した文字列を設定する
            secondVC.text = selectedText
        }
    }
}
SecondViewController
import UIKit

class SecondViewController: UIViewController, UITableViewDataSource, UITableViewDelegate {

    @IBOutlet weak var tableView: UITableView!

    // 9. ViewControllerから受け取る文字列を入れる変数
    var text: String?

    override func viewDidLoad() {
        super.viewDidLoad()

        tableView.delegate = self
        tableView.dataSource = self
    }

    override func didReceiveMemoryWarning() {
        super.didReceiveMemoryWarning()
        // Dispose of any resources that can be recreated.
    }

    func tableView(tableView: UITableView, numberOfRowsInSection section: Int) -> Int {
        return 1
    }

    // セルのテキストを追加
    func tableView(tableView: UITableView, cellForRowAtIndexPath indexPath: NSIndexPath) -> UITableViewCell {
        let cell: UITableViewCell = UITableViewCell(style: UITableViewCellStyle.Subtitle, reuseIdentifier: "Cell")

        // 10. 受け取った文字列をセルに表示
        cell.textLabel?.text = text
        return cell
    }

    func tableView(table: UITableView, didSelectRowAtIndexPath indexPath:NSIndexPath) {
        println(text)
    }
}
参考ソース
https://github.com/senseiswift/tableviewtest/blob/master/tableviewtest/ViewController.swift
続き SwiftでのTableView modal画面の非表示
http://qiita.com/senseiswift/items/90be98960b4c9dffe6aa