背景と実施したこと
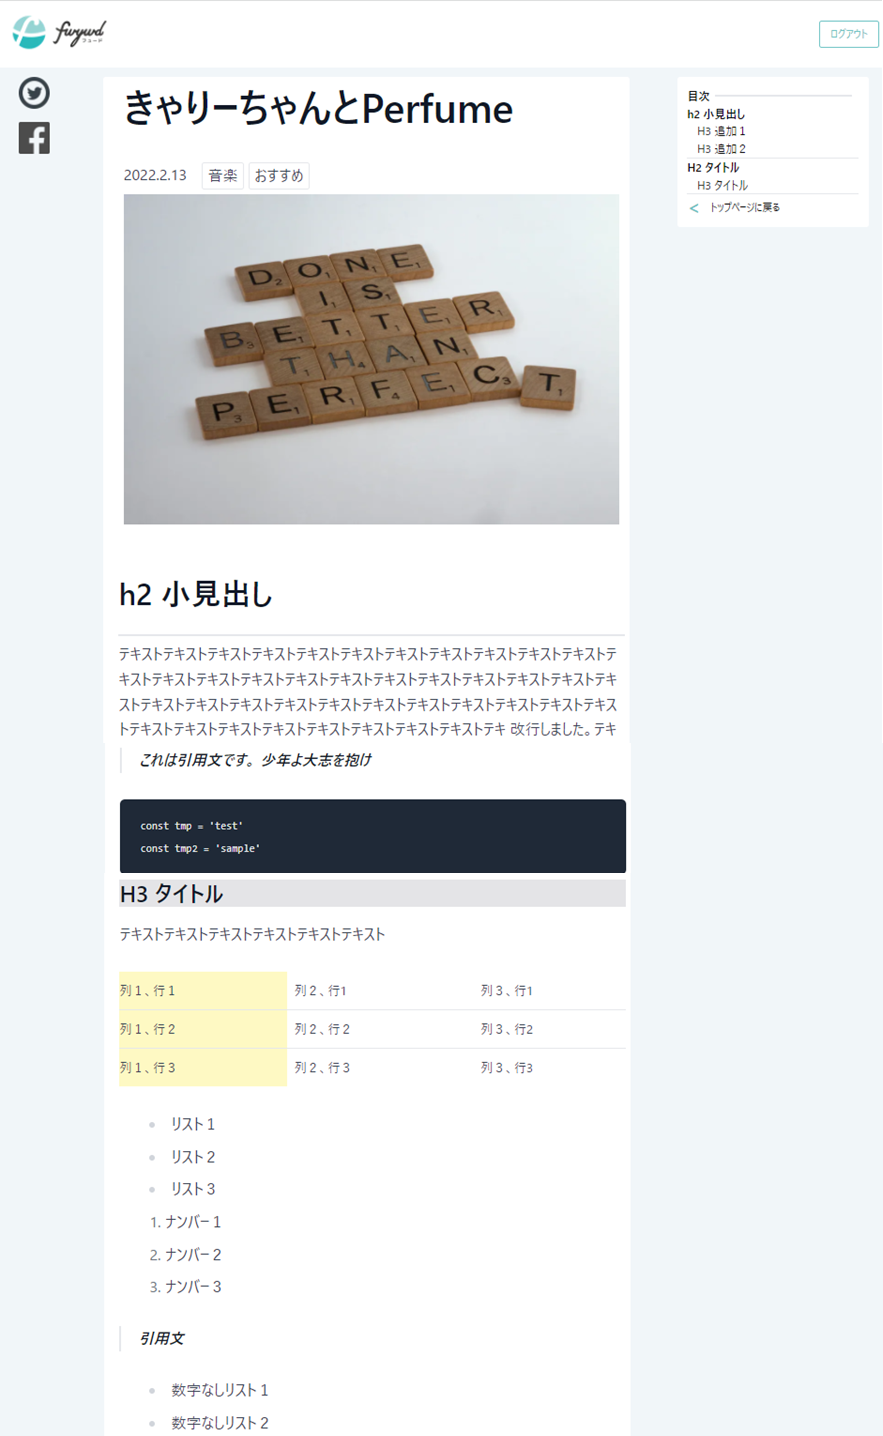
NotionAPIを活用して、Notionで記事を書き、その内容をWebアプリ上に公開するシステムを作りました。
APIから取得した情報の型定義の仕方や取得した情報をマークダウンを加味した内容にレンダリングする方法など、けっこう学びがあったの実装の全体の流れをサマりつつポイントをまとめておきます。
なお、Notion APIは執筆した2022/02/23の時点でBeta版です。
それゆえにところどころ苦しいところがあるのですが、おそらく正式版がリリースされる頃には使い勝手が良くなっていると思われます。
※自分の技術力不足も大いにある…
使用している技術のver情報は以下の通りです。
next: 12.0.7
react: 17.0.2
TailwindCSS: 3.01
typescript: 4.5.4
参考にした記事
Notion APIをTypeScriptで使ったときのAnyを苦しみながらも撲滅しました
How the Notion API Powers My Blog
全体概要
フロントエンド
構成は記事一覧を表示するページと記事の詳細をレンダリングするページの2ページです。
一覧ページ、詳細ページともにAPIで内容を取得するためダイナミックルーティングでページを作っています(詳細は後述)
記事詳細ではAPIで取得した内容をマークダウンで描画されているのと同じようにスタイリングする必要があり、この部分が結構苦労しました。
###バックエンド(APIでの情報取得など)
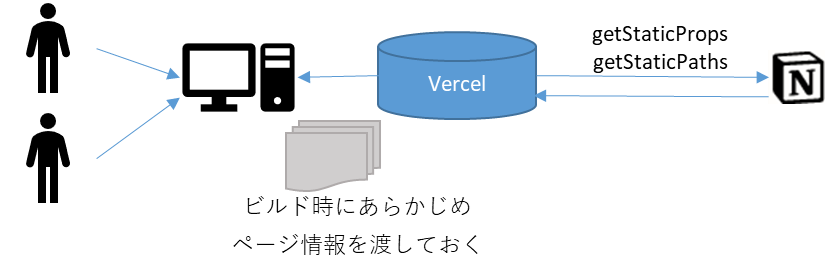
SSG(Static Site Generator)を実現するため、getStaticPropsの中でAPIを呼び出し、その内容を必要に応じて加工してフロントに渡す、ということをしています。
また、ダイナミックルーティングでのURLをgetStaticPathsで生成するためこのメソッドの中でもAPIを呼び出しています。
細かい実装の流れ
記事一覧のページと記事一覧の取得部分を作る
記事一覧の情報取得部分
まずはAPIで記事一覧を取得し、それを一覧ページに渡してあげます。
PerNumは1ページに表示する記事の数です。環境変数とかに埋め込んでもいいと思いますが、ここではハードコードしています。
初期表示は必ず1ページ目なので、1番目から6番目の記事でsliceしています。
※要素数とperNumで割り算をしてページ数を出しますが、割り切れない場合も当然あるのでその点は注意。
import BlogMain from '../components/blogMain';
import PageFooter from '../components/footer';
import PageHeader from '../components/header';
import Hero from '../components/hero';
import getBlogAll from '../lib/post';
import type { Article } from '../components/blogMain';

export async function getStaticProps() {
  const res = await getBlogAll();
  const perNum = 6;
  const result = res.results.slice(0, perNum);

  const itemLength = res.results.length;
  let indexNum = Math.floor(itemLength / perNum);
  if (itemLength % perNum != 0) {
    indexNum += 1;
  }

  let indexList: string[] = [];
  for (let i = 0; i < indexNum; i++) {
    indexList.push((i + 1).toString());
  }

  return {
    props: {
      result,
      indexList,
    },
  };
}

type Props = {
  result: Article[];
  indexList: string[];
};

export default function Index(props: Props): JSX.Element {
  return (
    <>
      <PageHeader></PageHeader>
      <main>
        <Hero />
        <BlogMain items={props.result} indexList={props.indexList} />
      </main>
      <PageFooter></PageFooter>
    </>
  );
}
APIで記事を取得するのにgetBlogAllというメソッドを呼び出していますが中身は以下のようなイメージです。
Notio上でpublishのチェックボックスがONになったもののみ表示されるようにしています。
並び順もここで指定してしまったほうが良いでしょう。
NotionAPIのデータ構造などが不明な人は以下の記事も合わせて御覧ください。
Notion APIのデータ構造を実際にAPIを叩きながら理解する
const dbId = 'XXXXXXXXXXXXXXXXX';

import { Client } from '@notionhq/client';

export default async function getBlogAll() {
  const notion = new Client({
    auth: process.env.NOTION_API_KEY,
  });

  return await notion.databases.query({
    database_id: dbId,
    filter: {
      or: [
        {
          property: 'publish',
          checkbox: {
            equals: true,
          },
        },
      ],
    },
    sorts: [
      {
        property: 'create_time',
        direction: 'ascending',
      },
    ],
  });
}
記事一覧の描画部分
あとは渡ってきたデータを適当にスタイリングしてあげましょう。
個人的に苦労したのはTypescriptでの型定義でした。
最初は
import type { QueryDatabaseResponse } from '@notionhq/client/build/src/api-endpoints.d';
こんな感じで、SDKに同梱されている型定義を流用しようと思ったのですが、どうにもここがいけてなく結局自作しました。
APIで取得できる情報は膨大ですが、各コンポーネントで使う情報だけを都度定義付けしてあげるというのが良い気がします。
タグを表示するのにmapで二重ループを行っている点も要注意です。
interface Props {
  items: Article[];
  indexList: string[];
}

type Tag = {
  name: string;
};

export type Article = {
  id: string;
  properties: {
    tag: {
      multi_select: {
        name: string;
      }[];
    };
    create_time: { created_time: string };
    title: {
      title: {
        text: { content: string };
      }[];
    };
    image: {
      files: {
        file: {
          url: string;
        };
        name: string;
      }[];
    };
  };
};

export default function BlogMain(props: Props): JSX.Element {
  const items = props.items;
  const indexList = props.indexList;
  const lastIndex = indexList[indexList.length - 1];
  const router = useRouter();
  const currentPath = router.asPath;
  const currentPathId = currentPath.slice(-1);

  return (
    <section>
        <div className='p-4 bg-light-blue'>
          <div className='pt-8 ml-10 text-lg font-bold'>
            {`${currentPathId}/${lastIndex}`}ページ
          </div>
          <div className='p-20 mx-auto min-w-[95%]'>
            <div className='grid grid-cols-2 grid-rows-2 gap-4 md:grid-cols-3'>
              {items.map((item: Article, Index: number) => (
                <div className='bg-white rounded ' key={Index}>
                  <Link href={`/blog/${item.id}`}>
                    <a>
                      <div className='pt-2 text-center border-b-2 hover:opacity-50'>
                        <Image
                          src={item.properties.image.files[0].file.url}
                          alt={item.properties.image.files[0].name}
                          width={400}
                          height={200}
                        ></Image>
                      </div>
                    </a>
                  </Link>
                  <h6 className='ml-2'>{sliceDate(item.properties.create_time.created_time)}</h6>
                  <h3 className='ml-2 text-2xl font-bold text-left text-secondary-black'>
                    {item.properties.title.title[0].text.content}
                  </h3>
                  <div className='flex my-2'>
                    {item.properties.tag.multi_select.map((tag: Tag, Index_tag: number) => (
                      <div className='px-2 ml-2 rounded border' key={Index_tag}>
                        {tag.name}
                      </div>
                    ))}
                  </div>
                </div>
              ))}
            </div>
          </div>
          <Pagination indexList={indexList}></Pagination>
        </div>
    </section>
  );
}
記事詳細部分を作る
記事詳細の情報取得部分
一覧ページの
<Link href={`/blog/${item.id}`}>
この部分から各記事の詳細に入ります。
ここでも同じようにgetStaticPropsを使うのですが、その前にgetStaticPathsでルート(遷移先のURL)を作ります。
該当部分は以下です。
export async function getStaticPaths() {
  const res = await getBlogAll();
  const items = res.results;
  const paths = items.map((items) => ({
    params: {
      id: items.id,
    },
  }));

  return { paths, fallback: false };
}
その後getStaticPropsでパラメータとしてクリックした記事のIDをもらい、
そのIDを引数にして記事の詳細情報を取得します。
Promise.allで
記事の詳細情報を描画するためのgetChildBlock
タイトルやサムネなどを取得するためのgetPageInfo
記事詳細からも次の記事や前の記事に移れるように記事の全量を取得するgetBlogAllを並列で動かします。
さらにgetChildBlockに子要素がある場合はその要素も取得したいためfor文でループを掛けています。
ただし、これでは2階層までしか取得できません。。。
ホントは子要素がなくなるまで無限ループをしたいのですが、一旦諦めました。ここを上手にかけそうな人はぜひコメントください。
export const getStaticProps = async (context: Context) => {
  const id = context.params.id;
  const res = await Promise.all([getChildBlock(id), getPageInfo(id), getBlogAll()])
    .then((result) => {
      return result;
    })
    .catch((result) => {
      console.log('失敗', result);
      return result;
    });

  let list = [];

  for (let i = 0; i < res[0].results.length; i++) {
    if (res[0].results[i].has_children === true) {
      list.push(await getChildBlock(res[0].results[i].id));
      let child1: any = await getChildBlock(res[0].results[i].id);
      console.log(child1);

      res[0].results[i].children = child1;

      for (let t = 0; t < child1.results.length; t++) {
        if (child1.results[t].has_children === true) {
          let child2 = await getChildBlock(child1.results[t].id);
          res[0].results[i].children.results[t].children = child2;
        }
      }
    }
  }

  return {
    props: {
      id,
      res,
    },
  };
};
let child1: any = await getChildBlock(res[0].results[i].id);
(このanyも消したかったのですが、ちょっとうまくいかず。。。orz APIの呼び方が良くないのかも知れない)
記事詳細の描画部分
APIで取得した内容をpropsで各コンポーネントに渡してあげます。
記事詳細は
- 記事のサムネやタイトルなど表示するBlogTitle
- h1~h3のブロックを集めたBlogSummary
- 本文を描画するBlogArticle
が主なコンポーネントです。
サマリー用のデータはfilterで抽出しています。
※「prose prose-2xl」見慣れないCSSが適用されているかと思いますが、ここは後述します。
export default function BlogPage(props: Props): JSX.Element {
  const results = props.res[0].results;
  const pageInfo = props.res[1];
  const blogList = props.res[2];
  const indexNum = props.id;
  const sumItems = results.filter((item: SumItems) => {
    if (item.type === 'heading_1' || item.type === 'heading_2' || item.type === 'heading_3') {
      return true;
    }
  });

  const items = listCheck(results);

  return (
    <>
      <PageHeader></PageHeader>
      <div className='flex flex-row-reverse justify-between mx-auto min-w-[95%] bg-light-blue'>
        <div className='basis-3/12 '>
          <BlogSummary items={sumItems} pageInfo={pageInfo}></BlogSummary>
        </div>
        <article className='prose prose-2xl'>
          <div className='basis-8/12 my-4 bg-white rounded'>
            <div className='ml-4'>
              <div className='mx-2 mt-4'>
                <BlogTitle pageInfo={pageInfo}></BlogTitle>
              </div>
              <div className='mx-2 mt-2'>
                <BlogArticle articleItems={items}></BlogArticle>
              </div>
              <div className='py-4 mt-2'>
                <ArticleFooter blogList={blogList} indexNum={indexNum}></ArticleFooter>
              </div>
            </div>
          </div>
        </article>

        <div className='basis-1/12'>
          <div className='mx-2 mt-4 text-center'>
            <Image src='/images/twitter_b.png' alt='twitter' width={50} height={50}></Image>
          </div>
          <div className='mx-2 mt-4 text-center'>
            <Image src='/images/facebook_b.png' alt='facebook' width={50} height={50}></Image>
          </div>
        </div>
      </div>
      <PageFooter></PageFooter>
    </>
  );
}
また、記事の中にlistがある場合
- リスト1
- リスト2
- リスト3
- 数字付きリスト1
- 数字付きリスト2
- 数字付きリスト3
こんな雰囲気でレンダリングしたいのですが、APIの結果だけではリストの最初と最後の要素が判断できません。
(ここが個人的には一番使いづらい)
したがってリストがある場合は前後のブロックのtypeを比較してリストの最初と最後を判断し、最後の要素に今までのリストの中身をすべて詰める、みたいなことをしています。
とはいえ、これも完璧ではなく子要素がある場合などは描画できません。。。
ここも良い書き方があればコメントください。
export function listCheck(item: ArticleItems[]) {
  let listArray = [];

  for (let i = 0; i < item.length; i++) {
    const type = item[i].type;

    let typePre;
    let typeNext;

    if (i === 0) {
      typePre = 'Nan';
    } else if (i === item.length - 1) {
      typeNext = 'Nan';
    } else {
      typePre = item[i - 1].type;
      typeNext = item[i + 1].type;
    }

    if (type === 'numbered_list_item' && type != typePre) {
      const listItem = item[i].numbered_list_item.text[0].plain_text;

      listArray.push(listItem);
      item[i].numbered_list_item.items = undefined;
    } else if (type === 'numbered_list_item' && type === typePre && type === typeNext) {
      const listItem = item[i].numbered_list_item.text[0].plain_text;
      listArray.push(listItem);
      item[i].numbered_list_item.items = undefined;
    } else if (type === 'numbered_list_item' && type != typeNext) {
      const listItem = item[i].numbered_list_item.text[0].plain_text;
      listArray.push(listItem);
      item[i].numbered_list_item.items = listArray;
      listArray = [];
    } else if (type === 'bulleted_list_item' && type != typePre) {
      const listItem = item[i].bulleted_list_item.text[0].plain_text;
      listArray.push(listItem);
      item[i].bulleted_list_item.items = undefined;
    } else if (type === 'bulleted_list_item' && type === typePre && type === typeNext) {
      const listItem = item[i].bulleted_list_item.text[0].plain_text;
      listArray.push(listItem);
      item[i].bulleted_list_item.items = undefined;
    } else if (type === 'bulleted_list_item' && type != typeNext) {
      const listItem = item[i].bulleted_list_item.text[0].plain_text;
      listArray.push(listItem);
      item[i].bulleted_list_item.items = listArray;

      listArray = [];
    }
  }
  return item;
}
BlogArticleの中は以下の様なイメージです。
これだけみるとスタリングが全然足りていないように思うかも知れませんが
実は@tailwindcss/typographyというpluginを追加しています。
このプラグインを適用すると、HTMLのタグをみてそれっぽいCSSをいい感じにあててくれます。
Notionから取得できるtypeは限られていますが、それでも数は多いのでこちらを使うのCSSの記述は多少簡単になるかもしれません。
※さきほどの「prose prose-2xl」はこのプラグインを適用するための記述です。
参考:@tailwindcss/typography
export default function BlogArticle(props: Props): JSX.Element {
  const items = props.articleItems;
  return (
    <>
      {' '}
      {items.map((item: ArticleItems, index: number) => {
        return render(item, index);
      })}
    </>
  );
}

export function render(item: ArticleItems, index: number) {
  const tag = item.type;

  if (tag === 'heading_1') {
    const value = item.heading_1.text[0].plain_text;
    return (
      <h1 key={index} id={item.id} className='mt-2'>
        {value}
      </h1>
    );
  } else if (tag === 'heading_2') {
    const value = item.heading_2.text[0].plain_text;
    return (
      <h2 key={index} id={item.id} className=''>
        {value}
      </h2>
    );
  } else if (tag === 'heading_3') {
    const value = item.heading_3.text[0].plain_text;
    return (
      <h3 key={index} id={item.id} className=' bg-zinc-200'>
        {value}{' '}
      </h3>
    );
  } else if (tag === 'paragraph') {
    const value = item.paragraph.text[0];
    if (value != null) {
      return (
        <p key={index} className='my-2'>
          {item.paragraph.text.map((item: Text, index: number) =>
            item.href != null ? (
              <a href={item.href} key={index}>
                {item.plain_text}
              </a>
            ) : (
              <span key={index}>{item.plain_text}</span>
            ),
          )}
        </p>
      );
    }
  } else if (tag === 'bulleted_list_item' && item.bulleted_list_item.items) {
    const items = item.bulleted_list_item.items;
    return (
      <ul className='my-2 list-disc list-inside' key={index}>
        {items.map((item: string, index: number) => (
          <li key={index}>{item}</li>
        ))}
      </ul>
    );
  } else if (tag === 'numbered_list_item' && item.numbered_list_item.items) {
    const items = item.numbered_list_item.items;
    return (
      <ol className='my-2 list-decimal list-inside' key={index}>
        {items.map((item: string, index: number) => (
          <li key={index}>{item}</li>
        ))}
      </ol>
    );
  } else if (tag === 'image') {
    const url = item.image.file.url;
    return <Image key={index} src={url} alt='twitter' width={800} height={400}></Image>;
  } else if (tag === 'divider') {
    return <div key={index} className=' min-w-[95%] border-t-4'></div>;
  } else if (tag === 'quote') {
    const value = item.quote.text[0].plain_text;
    return (
      <blockquote key={index} className=''>
        {value}
      </blockquote>
    );
  } else if (tag === 'code') {
    const value = item.code.text[0].plain_text;
    return (
      <pre key={index}>
        <code>{value}</code>
      </pre>
    );
  } else if (tag === 'table') {
    if (item.table.has_column_header === true && item.table.has_row_header === true) {
      return (
        <table key={index}>
          <tbody>
            {item.children.results.map((tr: Tr, index: number) => (
              <tr key={index} className={` ${index === 0 ? 'bg-yellow-100' : ''}`}>
                {tr.table_row.cells.map((td: Td, index: number) => (
                  <td key={index} className={` ${index === 0 ? 'bg-yellow-100' : ''}`}>
                    {td[0].plain_text}{' '}
                  </td>
                ))}
              </tr>
            ))}
          </tbody>
        </table>
      );
    } else if (item.table.has_column_header === true && item.table.has_row_header === false) {
      return (
        <table key={index}>
          <tbody>
            {item.children.results.map((tr: Tr, index: number) => (
              <tr key={index} className={` ${index === 0 ? 'bg-yellow-100' : ''}`}>
                {tr.table_row.cells.map((td: Td, index: number) => (
                  <td key={index}>{td[0].plain_text} </td>
                ))}
              </tr>
            ))}
          </tbody>
        </table>
      );
    } else if (item.table.has_column_header === false && item.table.has_row_header === true) {
      return (
        <table key={index}>
          <tbody>
            {item.children.results.map((tr: Tr, index: number) => (
              <tr key={index}>
                {tr.table_row.cells.map((td: Td, index: number) => (
                  <td key={index} className={` ${index === 0 ? 'bg-yellow-100' : ''}`}>
                    {td[0].plain_text}{' '}
                  </td>
                ))}
              </tr>
            ))}
          </tbody>
        </table>
      );
    } else {
      return (
        <table key={index}>
          <tbody>
            {item.children.results.map((tr: Tr, index: number) => (
              <tr key={index}>
                {tr.table_row.cells.map((td: Td, index: number) => (
                  <td key={index}>{td[0].plain_text} </td>
                ))}
              </tr>
            ))}
          </tbody>
        </table>
      );
    }
  }
}
記事のフッターを作成する
最後にArticleFooter の部分を解説します。
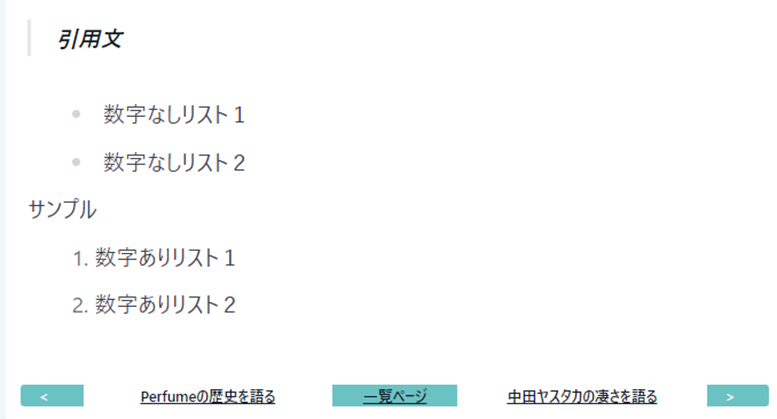
以下の画像のように、記事ん最後に次または前の記事に遷移できるようにしたいと思います。
といってもそこまで難しいことは必要ありません。
コンポーネントに対して渡すのは現在のページIDと記事の一覧の2つの情報です。
記事一覧のリストと現在のページIDと比較し、一致した前後のページの情報を取得します。
IDの部分をダイナミックルーティングの引数として渡してあげれば終了です。
export default function ArticleFooter(props: ArticleFooterProps): JSX.Element {
  const blogList = props.blogList.results;
  const indexNum = props.indexNum;
  const pageIndex = getPageIndex(indexNum, blogList);

  return (
    <div className='flex justify-between items-center mt-10 text-base'>
      <div className='px-5 w-1/12 text-white bg-primary-green rounded-l'>{'<'}</div>
      {pageIndex.preId === '' ? (
        <div className='w-4/12'></div>
      ) : (
        <div className='w-4/12 text-center'>
          {' '}
          <Link href={`/blog/${pageIndex.preId}`}>
            <a className='hover:opacity-50'>{pageIndex.preTitle} </a>
          </Link>
        </div>
      )}
      <div className='px-4 w-2/12 text-center text-white bg-primary-green'>
        {' '}
        <Link href={`/`}>
          <a className='hover:opacity-50'>一覧ページ </a>
        </Link>
      </div>
      {pageIndex.nextId === '' ? (
        <div className='w-4/12'></div>
      ) : (
        <div className='w-4/12 text-center'>
          {' '}
          <Link href={`/blog/${pageIndex.nextId}`}>
            <a className='hover:opacity-50'>{pageIndex.nextTitle} </a>
          </Link>
        </div>
      )}

      <div className='px-5 mr-2 w-1/12 text-white bg-primary-green rounded-r'>{'>'}</div>
    </div>
  );
}

export function getPageIndex(id: string, list: BlogList[]) {
  let pageIndex = {
    preId: '',
    preTitle: '',
    nextId: '',
    nextTitle: '',
  };
  const articleId = id;
  const blogList = list;
  for (let i = 0; i < blogList.length; i++) {
    if (blogList[i].id === articleId && i === 0) {
      pageIndex.preId = '';
      pageIndex.nextId = blogList[i + 1].id;
      pageIndex.nextTitle = blogList[i + 1].properties.title.title[0].plain_text;
    } else if (blogList[i].id === articleId && i === blogList.length - 1) {
      pageIndex.preId = blogList[i - 1].id;
      pageIndex.preTitle = blogList[i - 1].properties.title.title[0].plain_text;
      pageIndex.nextId = '';
    } else if (blogList[i].id === articleId) {
      pageIndex.preId = blogList[i - 1].id;
      pageIndex.preTitle = blogList[i - 1].properties.title.title[0].plain_text;
      pageIndex.nextId = blogList[i + 1].id;
      pageIndex.nextTitle = blogList[i + 1].properties.title.title[0].plain_text;
    }
  }
  return pageIndex;
}
まとめ
ポイントに絞って全体の流れを記載してみましたが、いかがでしたでしょうか?
それっぽい動きにはなりましたが、以下は引き続きの課題として時間があるときに改善していきたいと思います。
- リストの子要素の取得・描画
- 無駄にAPIを呼んでいる箇所がありそう(ブログリストの取得処理などは1回で済ませられそう)
- 記事内での画像の描画(大きさを指定しているので元画像のサイズによっては歪む)
- 画像のExpire Date問題(APIで取得した画像にアクセスできる期限が決まっている)
- Notionで記事を上げた際に再度ビルドが必要(SSGなので当たり前っちゃ当たり前)
一部は先日リリース発表された新機能で解決できそうですが、果たして…
参考:Next.js 12.1 is now available
とはいえNotionのAPIを使えるとできることの幅が増えるのは事実なので、どなたかの参考になれば幸いです。


