概要
「AWSを使って、サーバレスアプリを作りたい!」と思い実践したのですが、Lambda関連で結構な壁があったので備忘がてら残します。
ハマりポイントは以下3つ。
- LambdaのResponseは特定のJSON形式でないとNGな話
- API連携の際に、CROS Policyでエラーになった話
- APIに認証を噛ませる際は、accessTokenではなくidTokenを使用する話
LambdaのResponseは特定のJSON形式でないとNGな話
今回はフロントサイドはvueで作成、そこからAPIGatewayを通してLambdaのFunctionを呼び出すという構成でした。
このFunctionの返却の仕方は何でもよい訳ではなくJSONの形式が決まっています。
参考:https://aws.amazon.com/jp/premiumsupport/knowledge-center/malformed-502-api-gateway/
以下は、Lambdaを通してTwitterに投稿する関数の例です
exports.handler = (event, context, callback) => {
    let date = new Date();
    twitter_client.post('statuses/update', {status: 'テスト投稿。from lambda ' + date},  function(error, tweet, response){
        if(error) {
            //エラーハンドリング
        }
        callback(null, JSON.stringify(response));
    });
};
関数単体はテスト時に動いても、上記のような正しい形式でないと、実際のフロントからの実行時には500エラーを返すので注意。
API連携の際に、CROS Policyでエラーになった話
「JSONを返す必要があるということはわかったぜ!これでオッケーや!」と思ったら、まだ駄目でした。
今度はフロント側でエラーになりました。。。ブラウザのF12コンソールでエラーの内容を確認すると
「Access to XMLHttpRequest at 'http:/~' from origin 'http://localhost:8080' has been blocked by CORS policy:
…」と書いてありました。
あぁーCROSね、なんかAPIGatewayで設定があった気がするなーと思いいろいろググります。
※CROSについては以下の記事が参考になりました。
https://qiita.com/att55/items/2154a8aad8bf1409db2b
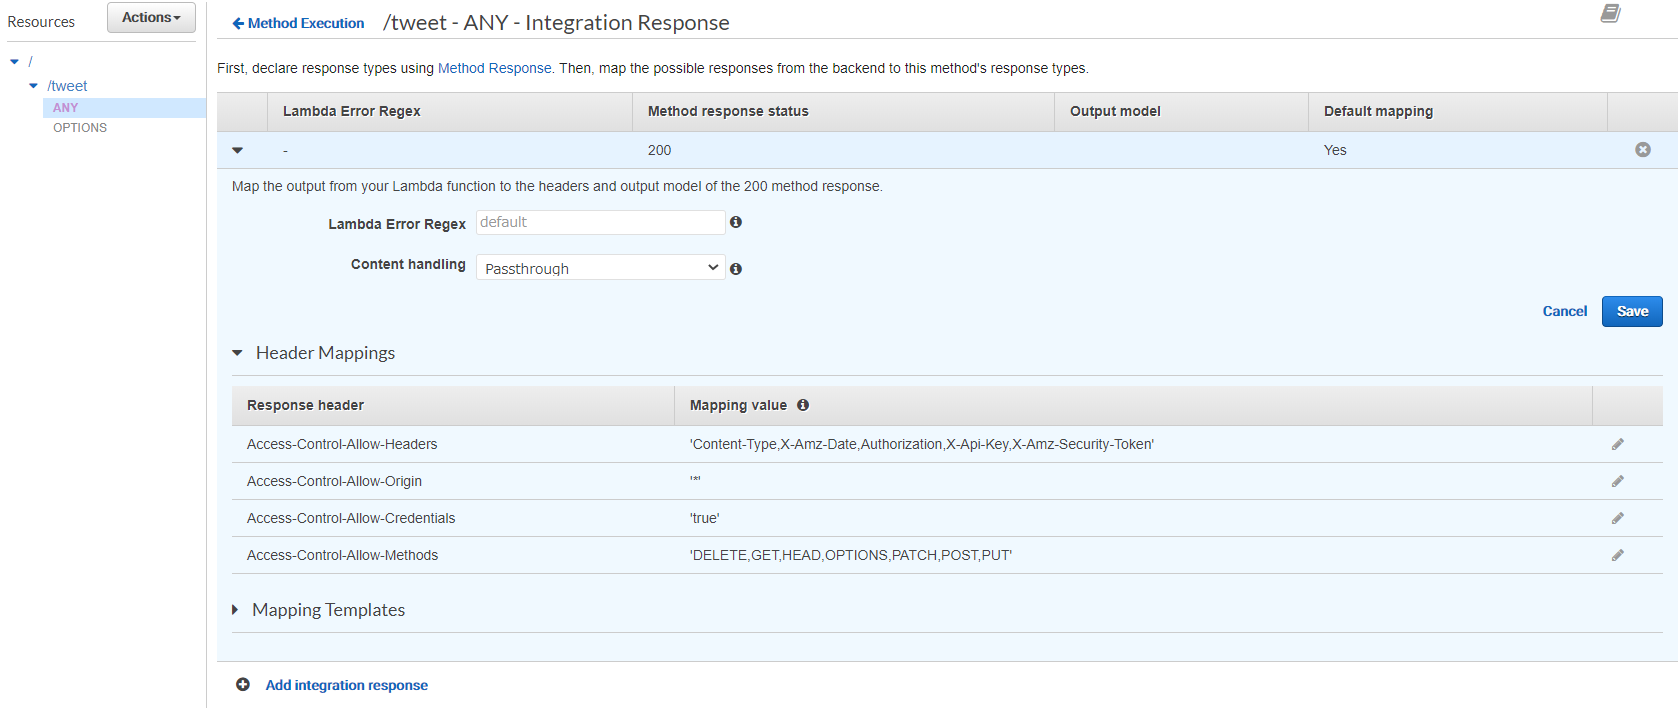
結論から言うと、以下のように設定するのが正解でした。
レスポンスのヘッダーに
Access-Control-Allow-Headers (使用するHeadersの値を追加)
Access-Control-Allow-Origin (許可するリソースを追加)
Access-Control-Allow-Credentials (これはなくてもいいかも)
Access-Control-Allow-Methods (必要なメソッドを追加)
を追加します。

lambdaの関数のレスポンスに直接書いているやり方もありましたが、
調べて実際に動かしたところこれでも大丈夫。(ケースバイケースだが多分ほとんどの場合これがベターな気がする)
APIに認証を噛ませる際は、accessTokenではなくidTokenを使用する話
これはハマったというほどではなかったが、少し勘違いがあったので記載。
上記の問題でAPI通信は問題なく通るようになったが、APIには認証をかけたほうがよい。
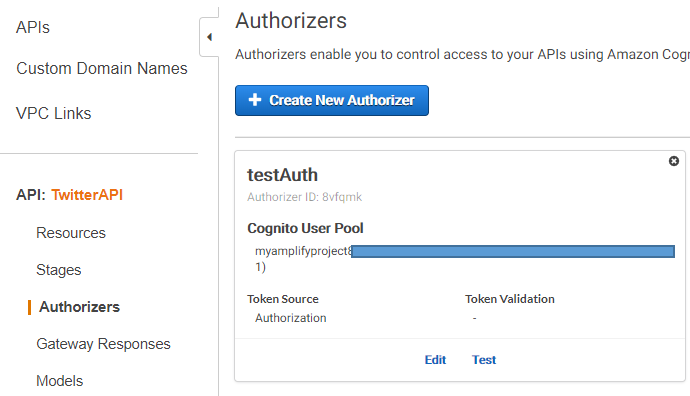
認証のかけ方もいくつか方法があるが、今回はcognitoユーザプールを使った。
※cognitoを使ったログイン機能を実装していることが前提です。
手順としては
1.APIgatewayのコンソールからAuthorizersを作成
2.使用するAPIに適用する
の2 STEEP(めちゃ簡単)

フロントのコードは以下のような感じで実装
import { Auth } from 'aws-amplify'
import axios from 'axios'

let cognitoUser = await Auth.currentAuthenticatedUser()
this.signedIn = true
this.username = cognitoUser.username
let token = cognitoUser.signInUserSession.idToken.jwtToken;
console.log(cognitoUser.signInUserSession);

…中略…
APIfunction(){
        axios
          .get('APIのURL',
            {
              headers: {
                Authorization: token
              }
            }
          )
          .then(function (response) {
            // handle success
            console.log(response);
            alert("success");
            alert(response);
          })
          .catch(function (error) {
            // handle error
            console.log(error);
            alert("error");
            alert(error);
          })
    }
signInUserSessionの中にはaccessTokenという似たプロパティもあるが、こっちではなくidTokenを使用した点に注意。
※accessTokenでも認証機能を作ることはできるかも知れませんが、詳細は調査しきれず…(だれか知っている人がいたら教えてください…)
まとめ
AWSを使いこなすまでの道のりは遠い…
一方で使いこなすと非常に便利だということも実感できた。前進あるのみ。