背景と実施したこと
仕事の都合でAWSでWindowsServerを作る機会がありました。
WindowsServerの構築・設定は慣れていない部分もあったので手順を残しておきます。
IT初心者の方にとっては、Webアプリをインターネットに公開するまでの流れがわかると思うので機会があれば参考にしてみてください。
参考にした記事
freenom
Amazon EC2(Windows OS)で構築したWebサーバ(IIS)のSSL設定
Step
- EC2 WindowsServerの構築
- インスタンスの作成
- Elastic IPアドレスの割当
- セキュリティグループの設定
- リモートデスクトップでの接続
- IISのインストール・ローカルでの確認
- IISのインストール
- ローカルホストでアクセスできることの確認
- 仮想ディレクトリの追加
- SSLの設定
- ドメインとIPアドレスの紐付け
- IISでサイトと取得したドメインの紐付け
- 証明書の発行
- httpsでアクセス
EC2 WindowsServerの構築
インスタンスの作成
まずはインスタンスを作成します。ここでは2019のシンプルな構成のものを選びます。


以降はスペックを選択するフェーズになりますが、ここは個々の目的に合わせて選んでください。
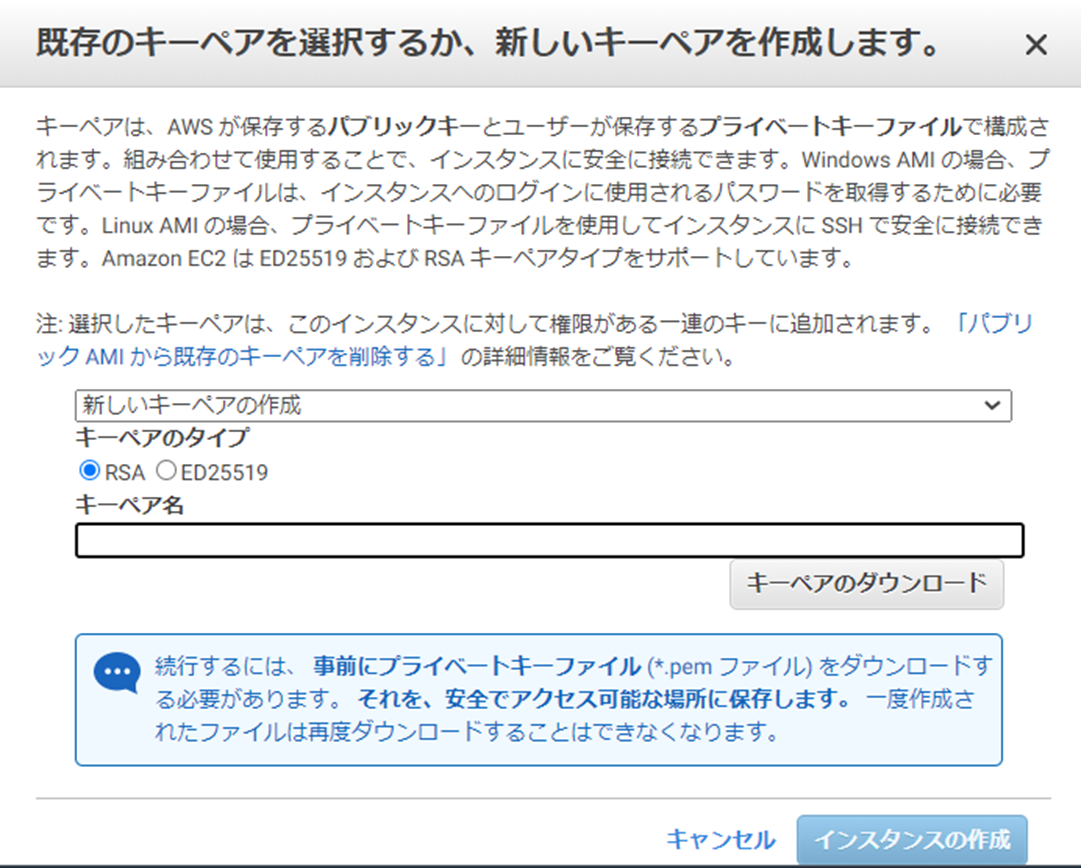
注意点としては、インスタンスに接続するためのキーを聞かれるフェーズがあります。
ここで作成したキーは大事に保存しておきましょう。
Elastic IPアドレスの割当
インスタンスにはデフォルトでIPアドレスが紐付きますが、これは起動毎に変わってしまいます。
そのため静的なIPアドレスを紐付けるためにElastic IPを取得します。

取得後は、作成したインスタンスに紐付けます。

セキュリティグループの設定
次にセキュリティグループ(以下SG)を作成します。
サーバ作業のためのRDP
サイトにアクセスするためのhttp、httpsをインバウンドルールに追加します。

リモートデスクトップでの接続
インスタンスの「接続」から「RDPクライアント」タブに移動します。
「パスワードの取得」を行いadministratorのパスワードを取得します(この際インスタンス構築時に作成したキーが必要)
その後、リモートデスクトップファイルをDLして接続しましょう。
※接続できない場合はSGの設定がうまくいっていないかも知れません。
自分の場合もなぜかデフォルトのSGに設定してもうまく行かなかったので、SGを再作成して再度紐付けなおすとうまくいきました。

IISのインストール・ローカルでの確認
この項はリモートデスクトップでインスタンスにログインしての作業になります。
IISのインストール
IISのインストールを行います。
こだわりがない場合、設定等はひとまずデフォルトで進みます。


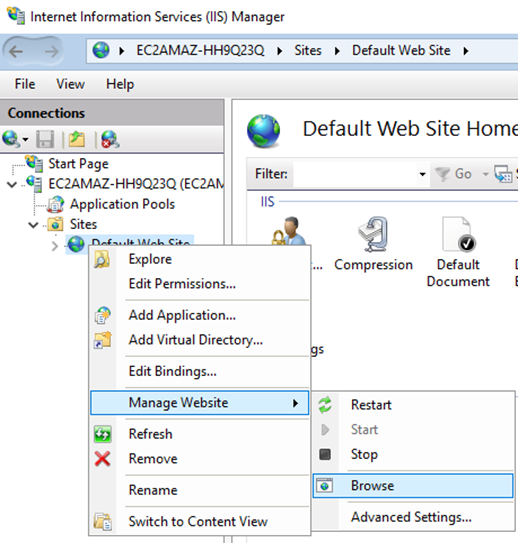
ローカルホストでアクセスできることの確認
IISがインストール後は以下のようにIISマネージャーからデフォルトのページにアクセスしてみましょう。

仮想ディレクトリの追加
デフォルトのページはサーバ内のどこを参照しているかというと
"C:\inetpub\wwwroot\iisstart.htm"
このパスを参照しています。
ここパスに任意のHTMLなどを置いてみてもいいのですが、ここでは仮想ディレクトリを追加して
上記とは違うパスのファイルを参照させてみます。

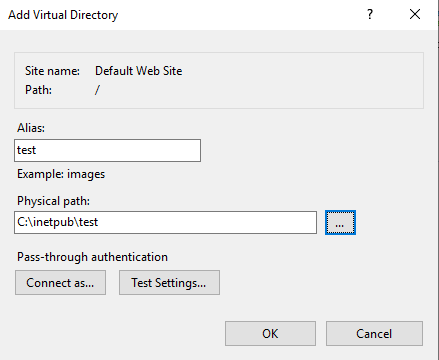
指定したパスに適当なHTMLを配置し、インスタンス内のブラウザから
http://localhost/test
で接続するとファイルの内容にアクセスできます。
ちなみにクライアントPCからIPアドレスでアクセスしてもきちんと表示されます。
SSLの設定
httpでのアクセスは確認できましたが、httpsではアクセスできないままかと思います。
これを解消させます。
ドメインとIPアドレスの紐付け
まずはIPアドレスでのアクセスしかできない状態からドメインでのアクセスができるようにします。
適当なドメイン取得サービスを使って任意のドメインとインスタンスのElastic IPアドレスを紐付けます。
ここではfreenomを使います。
詳しい使い方などは
完全無料の独自ドメインを取得できるFreenomの使い方
を参照ください。
ドメインの取得が完了したら5分ほど待って以下の要領でコマンド打って紐づきができていることを確認しましょう。
タイムアウト等のエラーが表示されなければOKです。
nslookup ec2amaz-hh9q23q.ml
IISでサイトと取得したドメインの紐付け
続いて取得したドメインとサイトの紐付けを行います。
紐付けたいサイトを右クリックして以下の要領で紐付けを行います。(この段階でhttpのみでOK)

証明書の発行
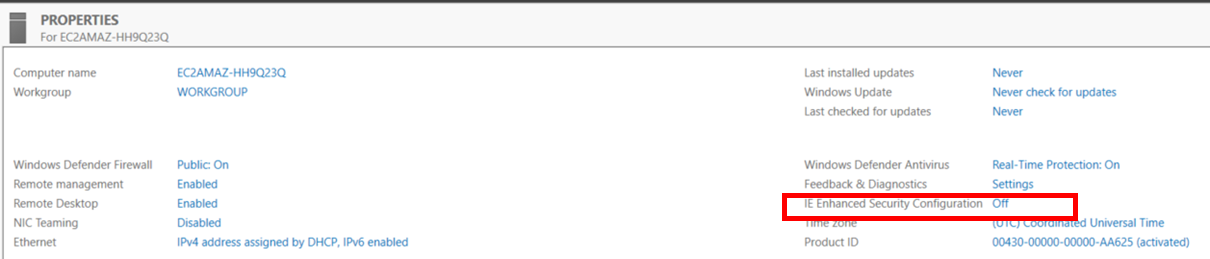
最後に証明書のインストールを行います。
インストールはWebからツールをDLするため以下のセキュリティチェックはOFFにしておきましょう。
(それかクライアントPCでDLしてリモデ先にコピーしましょう)
https://www.win-acme.com/
こちらのページから
win-acme.v2.1.20.1185.x64.pluggable.zip
をDLして展開します。
展開後、管理者権限でexeを実行し以下のように設問に答えていきます。
A simple Windows ACMEv2 client (WACS)
 Software version 2.1.20.1185 (release, pluggable, standalone, 64-bit)
 Connecting to https://acme-v02.api.letsencrypt.org/...
 Scheduled task not configured yet
 Please report issues at https://github.com/win-acme/win-acme

 N: Create certificate (default settings)
 M: Create certificate (full options)
 R: Run renewals (0 currently due)
 A: Manage renewals (0 total)
 O: More options...
 Q: Quit

 Please choose from the menu: n

 Running in mode: Interactive, Simple

 Please select which website(s) should be scanned for host names. You may
 input one or more site identifiers (comma-separated) to filter by those
 sites, or alternatively leave the input empty to scan *all* websites.

 1: Default Web Site (1 binding)

 Site identifier(s) or <Enter> to choose all: 1

 1: ec2amaz-hh9q23q.ml (Site 1)

 Listed above are the bindings found on the selected site(s). By default all
 of them will be included, but you may either pick specific ones by typing the
 host names or identifiers (comma-separated) or filter them using one of the
 options from the menu.

 P: Pick bindings based on a search pattern
 A: Pick *all* bindings

 Binding identifiers(s) or menu option: a

 1: ec2amaz-hh9q23q.ml (Site 1)

 Continue with this selection? (y*/n) - yes

 Source generated using plugin IIS: ec2amaz-hh9q23q.ml

 Terms of service:   C:\ProgramData\win-acme\acme-v02.api.letsencrypt.org\LE-SA-v1.2-November-15-2017.pdf

 Open in default application? (y/n*) - yes

 Do you agree with the terms? (y*/n) - yes

 Enter email(s) for notifications about problems and abuse (comma-separated): xxxx@gmail.com

 [ec2amaz-hh9q23q.ml] Authorizing...
 [ec2amaz-hh9q23q.ml] Authorizing using http-01 validation (SelfHosting)
 [ec2amaz-hh9q23q.ml] Authorization result: valid
 Downloading certificate [IIS] Default Web Site, (any host)
 Store with CertificateStore...
 Installing certificate in the certificate store
 Adding certificate [IIS] Default Web Site, (any host) @ 2022/3/2 12:17:21 to store WebHosting
 Installing with IIS...
 Adding new https binding *:443:ec2amaz-hh9q23q.ml
 Committing 1 https binding changes to IIS
 Adding Task Scheduler entry with the following settings
 - Name win-acme renew (acme-v02.api.letsencrypt.org)
 - Path C:\Users\Administrator\Downloads\win-acme.v2.1.20.1185.x64.pluggable
 - Command wacs.exe --renew --baseuri "https://acme-v02.api.letsencrypt.org/"
 - Start at 09:00:00
 - Random delay 04:00:00
 - Time limit 02:00:00
 Adding renewal for [IIS] Default Web Site, (any host)
 Next renewal scheduled at 2022/4/26 12:16:35
 Certificate [IIS] Default Web Site, (any host) created

 N: Create certificate (default settings)
 M: Create certificate (full options)
 R: Run renewals (0 currently due)
 A: Manage renewals (1 total)
 O: More options...
 Q: Quit

 Please choose from the menu:
httpsでアクセス
ここまでくるとようやくクライアントPCからhttpsで接続できるようになります。
できない場合はSGでの設定を再度見直してみてください。
まとめ
AWSでインスタンスを構築からSSLでのアクセスまでを確認しました。
インフラ作業に慣れていないと戸惑うこともありますが、このくらいの手順は覚えておきたいですね。