Google CalendarとSlackは、スケジュール管理やチームコミュニケーションに欠かせないツールです。この二つを統合することで、Slackチャンネルにカレンダーイベントの通知を自動化し、全員が最新情報を把握できるようにすることができます。本記事では、Google Apps ScriptとSlackを使用してカレンダーイベント通知アプリを作成する方法を紹介します。
目次
-
環境設定
- 必要なツールとアカウント
- グループカレンダーIDの取得
- Slack Webhookの作成
-
Google Apps Scriptプロジェクトとスクリプトの作成
- スクリプトの記述
- Slack通知機能の実装
- 毎日のイベント通知
- 新規・更新イベントの確認・投稿
- デバッグ用ボーナス機能
-
Apps Scriptのトリガー設定
- 毎日のイベント通知トリガー
- カレンダー更新時のトリガー
-
結論
- リソース
環境の設定
必要なツールとアカウント
| 使用用途 | |
|---|---|
| Googleアカウント | Google CalendarとGoogle Apps Scriptにアクセスするため。 |
| Slackワークスペース | Slackチャンネルに通知を送るため。 |
ステップ1. グループカレンダーIDを取得する
Google Calendarと統合する前に、監視したいカレンダーのIDが必要です。
- Google Calendarにアクセスします。
- 設定に遷移し、「自分のカレンダーの設定」セクションに遷移します。
- 監視したいカレンダーを選択します。
- 「カレンダーID」を見つけてコピーします。
ステップ2. Slack Webhookを作成する
Slackに通知を送信するには、Incoming Webhookを作成し、通知を送信する特定のSlackチャンネルにWebhook URLを取得する必要があります。
- Slack APIにアクセス: https://api.slack.com/apps
- 新しいアプリをスクラッチから作成します。
- Incoming Webhooksを設定します:
- 左側の「Features」セクションで「Incoming Webhooks」を選択します。
- 「Activate Incoming Webhooks」をオンにします。
- ワークスペースに新しいWebhookを追加します:
- 下にスクロールして「Add New Webhook to Workspace」をクリックします。
- 通知を投稿したいチャンネルを選択します。
- 追加後、Webhook URLが表示されます。それをコピーします
注: [your app name] にはインストールするボットユーザーがありませんというメッセージが表示された場合は、アプリにボットユーザーが必要であることを示しています。ボットユーザーが有効になっていることを確認してください。
Google Apps Scriptプロジェクトを作成してスクリプトを書く
これで、必要な材料(カレンダーIDとSlack Webhook URL)が揃ったので、新しいApps Scriptプロジェクトを作成する準備ができました。
自分のアプリの機能は3つあります:
- Slackへの通知送信
- 毎日のイベント投稿
- 当日の新規または更新されたイベントの確認・送信
- デバッグに役立つボーナス機能
ステップ1: Google Apps Scriptプロジェクトを作成する
https://script.google.com/home にアクセスし、新しいApps Scriptプロジェクトを作成します。
ステップ2: スクリプトを書く
スクリプトを書く前に、取得したGoogle Calendar IDとSlack Webhook URLを挿入します。
const SLACK_WEBHOOK_URL = 'https://hooks.slack.com/services/YOUR/SLACK/WEBHOOK'; // Slack Webhook URLに置き換える
const CALENDAR_ID = 'your_calendar_id@group.calendar.google.com'; // カレンダーIDに置き換える
Slackへの通知送信
このsendSlackNotification関数は、Webhook URLを使用してSlackチャンネルにメッセージを送信します。詳細はコードコメントを参照してください。
// 🎯 Sending Notifications to Slack
function sendSlackNotification(message) {
  const payload = {
    text: message,
    link_names: 1, // ✅Tips: Ensures that @mentions are recognized by Slack
  };

  const options = {
    method: 'post',
    contentType: 'application/json',
    payload: JSON.stringify(payload),
  };

  UrlFetchApp.fetch(SLACK_WEBHOOK_URL, options);
}
メッセージに@メンション(channel、hereなど)を追加したい場合は、ペイロードに link_names: 1 を追加します。そうしないと、メンションがテキストとして認識されます。
毎日のイベントの投稿
このpostDailyEvents関数は、毎日特定の時間に当日のイベントをSlackチャンネルに投稿します。詳細はインラインコードコメントを参照してください。
postDailyEvents()
// 🎯 Post daily events
function postDailyEvents() {
  const today = new Date();
  today.setHours(0, 0, 0, 0);
  const tomorrow = new Date(today);
  tomorrow.setDate(tomorrow.getDate() + 1);

  const events = CalendarApp.getCalendarById(CALENDAR_ID).getEvents(today, tomorrow);

  let messageHeader =  ':spiral_calendar_pad: *今日の予定を共有します:*\n\n'
  let message = messageHeader;
  let postedEvents = [];

  events.forEach(event => {
    const eventId = event.getId();
    const startTime = event.getStartTime().toLocaleTimeString([], { hour: '2-digit', minute: '2-digit' });
    const endTime = event.getEndTime().toLocaleTimeString([], { hour: '2-digit', minute: '2-digit' });

    message += `▸ *${event.getTitle()}*: \n     時間:(${startTime} ~ ${endTime})\n`;

    // Add event details to postedEvents array
    postedEvents.push({ id: eventId, startTime, endTime });
  });

  // Send a message if there are events
  if (message !== messageHeader) {
    message += `\n 本日もよろしくお願いします!`
    sendSlackNotification(message);
  } else {
    Logger.log('There are no events for today.');
  }

  // Store the posted event details to avoid duplicate posting of the same event by checkNewCalendarEvents()
  const properties = PropertiesService.getScriptProperties();
  properties.setProperty('postedEvents', JSON.stringify(postedEvents));
}
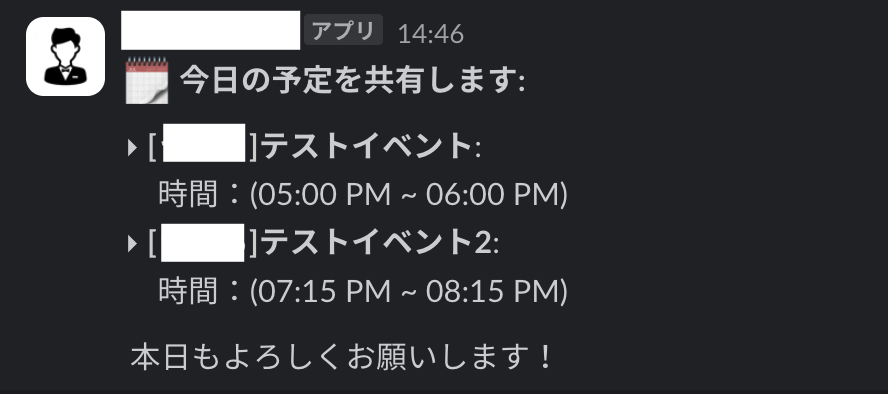
Slackでの結果メッセージ:
新規または更新されたイベントの確認・投稿
このcheckNewCalendarEvents関数は、新規または更新されたイベントを確認し、適宜通知を送信します。具体的には、以下の二つを行います:
- 今日のカレンダーに新しいイベントが追加された場合、Slackチャンネルにメッセージを投稿します。
- 今日のイベントの開始/終了時間が更新された場合、Slackチャンネルにメッセージを投稿します。
詳細はインラインコードコメントを参照してください。初心者向けにコードのロジックを説明するために、多くのコードコメントが含まれていますが、ご了承ください。
checkNewCalendarEvents()
// 1. 🎯  Post newly created events for today
// 2. 🎯  Post today's events when their start/end time gets updated
function checkNewCalendarEvents() {
   // Access the script properties service to store and retrieve persistent key-value pairs.
  const properties = PropertiesService.getScriptProperties();
  // Retrieve the posted events from the previous runs or initialize an empty array if none are found.
  const postedEvents = JSON.parse(properties.getProperty('postedEvents') || '[]');
  // Get the last checked time or use the current time if not found.
  const lastChecked = new Date(properties.getProperty('lastChecked') || new Date().getTime());

  const now = new Date();
  // Create a new Date object representing the start of today.
  const startOfToday = new Date(now);
  // Set the time of the startOfToday to midnight (00:00:00).
  startOfToday.setHours(0, 0, 0, 0);
  // Create a new Date object representing the start of tomorrow.
  const startOfTomorrow = new Date(startOfToday);
  // Move the date to the next day.
  startOfTomorrow.setDate(startOfTomorrow.getDate() + 1);

  // Retrieve events from the calendar for today.
  const events = CalendarApp.getCalendarById(CALENDAR_ID).getEvents(startOfToday, startOfTomorrow);

  // Initialize an array to store the current events.
  let newPostedEvents = [];

  events.forEach(event => {
    const eventId = event.getId();
    // Get the start time of the event in a readable format. Remove milliseconds and only display hours and minutes
    const startTime = event.getStartTime().toLocaleTimeString([], { hour: '2-digit', minute: '2-digit' });
    const endTime = event.getEndTime().toLocaleTimeString([], { hour: '2-digit', minute: '2-digit' });
    // Check if the event already exists in the posted events.
    const existingEvent = postedEvents.find(e => e.id === eventId);

    if (existingEvent) {  // If the event exists in the posted events:
      // Check if event start or end time has changed
      if (existingEvent.startTime !== startTime || existingEvent.endTime !== endTime) {
        // Create a message indicating the event time has changed.
        const message = `@channel \n\n :pencil: *本日の予定の時間が変更されました:* \n  ▸ *${event.getTitle()}* \n        時間:(${startTime} ~ ${endTime})`;
        sendSlackNotification(message);
      }
    } else {  // If the event does not exist in the posted events:
    // Create a message indicating a new event has been added.
      const message = `@channel \n\n :new_1: *本日の新しい予定が追加されました:* \n  ▸ *${event.getTitle()}* \n        時間:(${startTime} ~ ${endTime})`;
      sendSlackNotification(message);
    }

    // Add the current event details to the new posted events array.
    newPostedEvents.push({ id: eventId, startTime, endTime });
  });

  // Update the posted events property with the new posted events array to avoid duplicate posting of the same event by checkNewCalendarEvents() when the calendar updates
  properties.setProperty('postedEvents', JSON.stringify(newPostedEvents));
  // Update the last checked time with the current time.
  properties.setProperty('lastChecked', now.getTime());
}
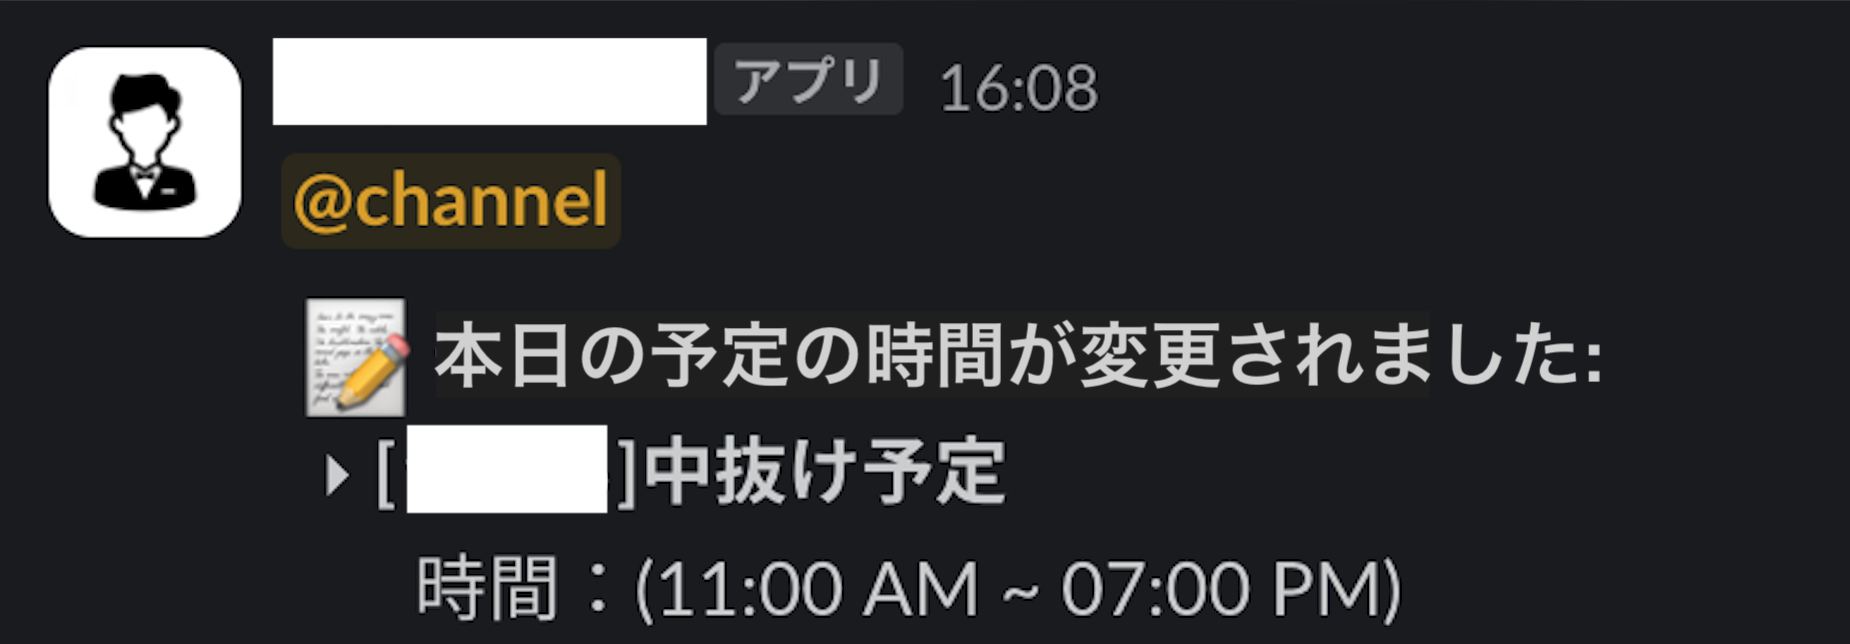
Slackでの結果メッセージ:
デバッグに役立つボーナス機能
デバッグや状態リセットのために「投稿済みイベント」プロパティを確認・クリアする関数です。
スクリプトをテストおよびデバッグするために、手動で関数を実行し、Logger.log()を使用してログを確認できます。
checkProperties()
// 🛠️ Check the state of posted events.
// Use it manually to debug and verify the events that have been posted.
function checkProperties() {
  const properties = PropertiesService.getScriptProperties();
  const postedEvents = JSON.parse(properties.getProperty('postedEvents'));

  Logger.log(`Posted events: ${postedEvents}`);
}
clearChannelProperties()
// 🛠️ Clears the 'postedEvents' property from script properties.
// Use it manually to reset the state if you need to start fresh, ensuring that no previous events are posted and thus avoiding potential duplication in notifications.
function clearChannelProperties() {
  const properties = PropertiesService.getScriptProperties();
  properties.deleteProperty('postedEvents');

  Logger.log('Channel properties cleared.');
}
ステップ3: Apps Scriptトリガーの設定
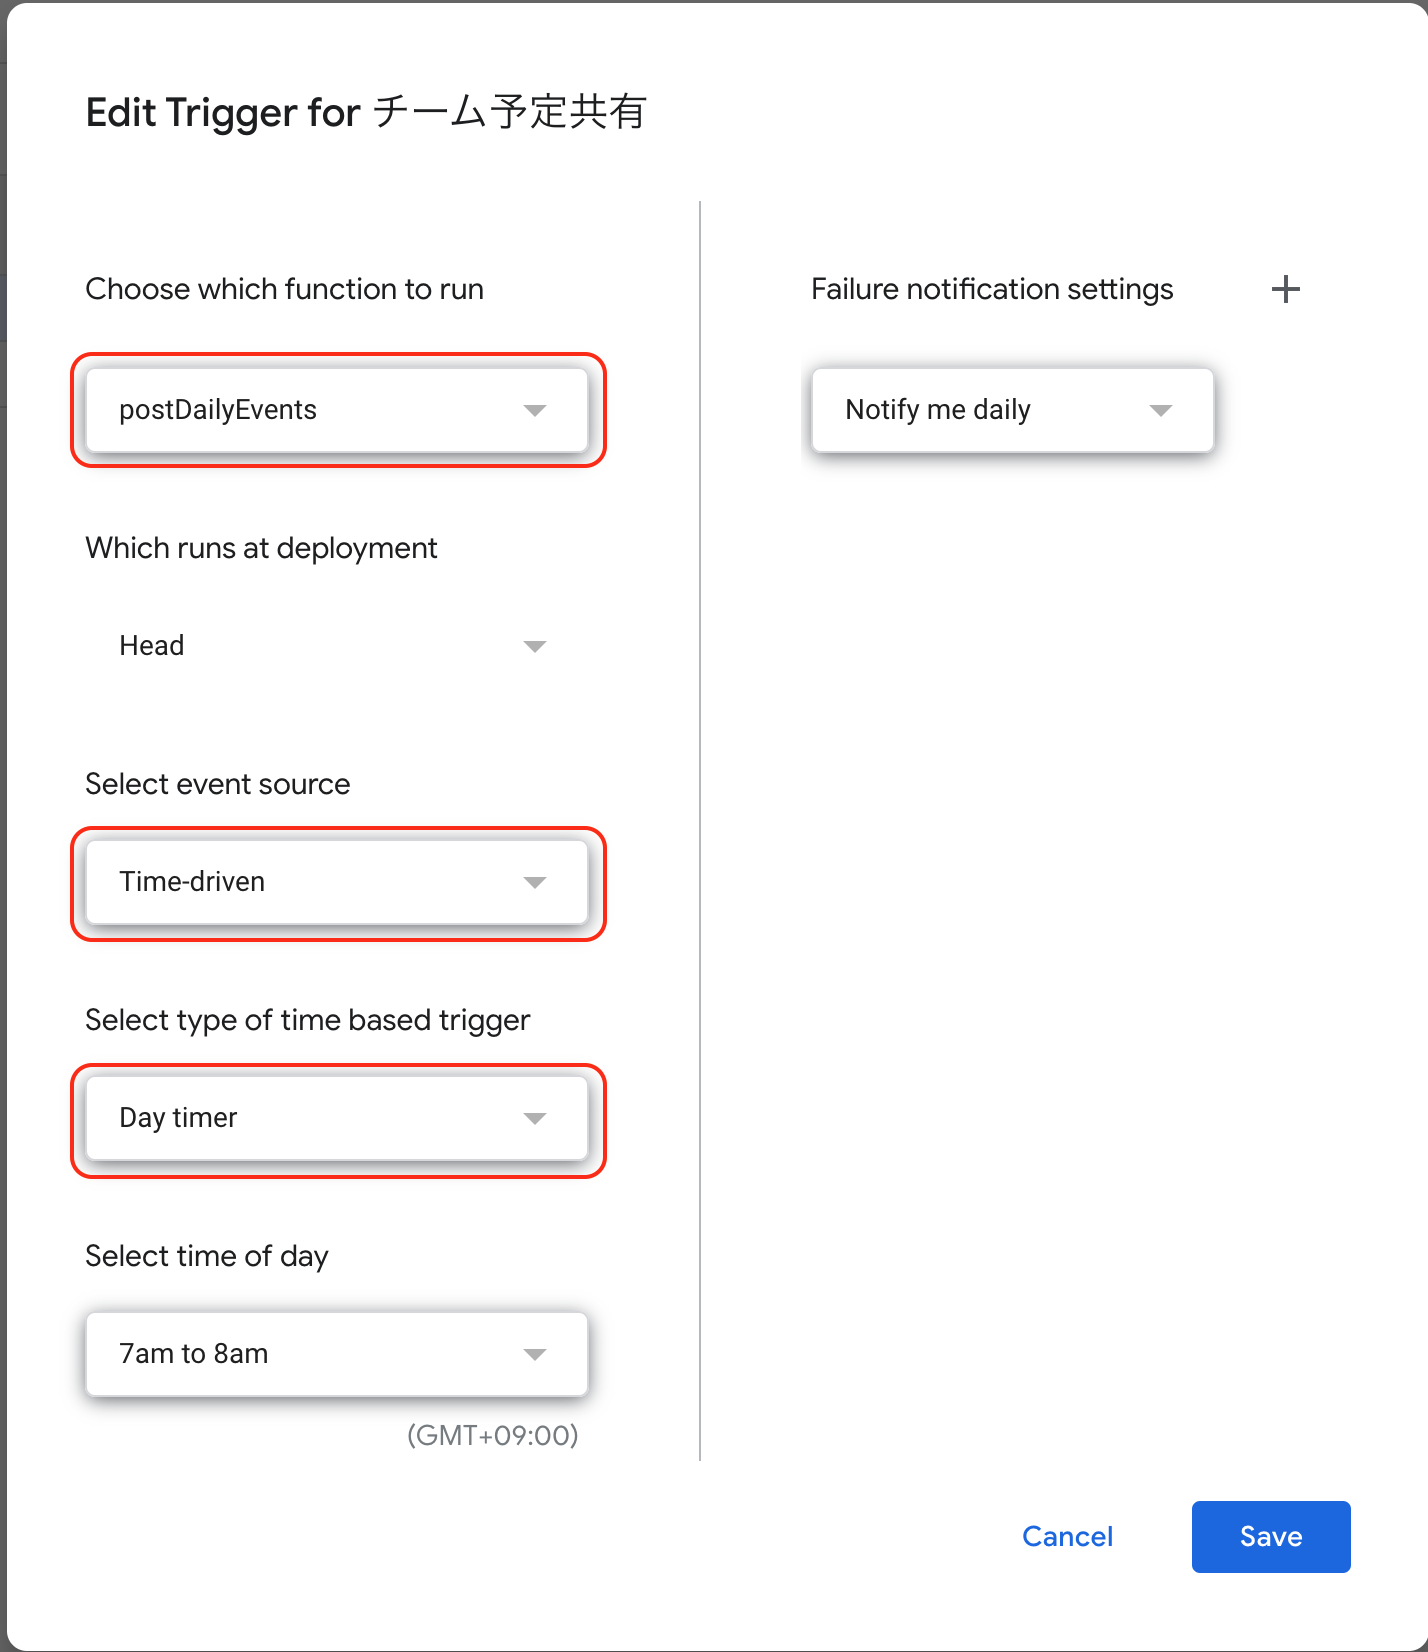
postDailyEvents(毎日のイベントの投稿)とcheckNewCalendarEvents(新規または更新されたイベントの確認・投稿)は、カレンダーを確認してSlackに通知を送信するためにトリガーを設定する必要があります。「トリガー」タブからトリガーを追加します。
ここに、私が追加した2つのトリガーのスクリーンショットがあります:

1. postDailyEvents関数のトリガー
この関数を毎日1回、できれば朝に実行し、その日の予定をすべて送信するためにTime-drivenトリガーを設定します。スクリーンショットのように設定します。

2. checkNewCalendarEvents関数のトリガー
この関数をカレンダーが更新されるたびに実行するために、別のFrom calendarのトリガーを設定します。Apps Scriptがカレンダーの変更を監視できるように、Calendar owner emailにCalendar ID/emailを忘れずに置き換えてください。

結論
Google Apps Scriptを使用してGoogle CalendarとSlackを統合することで、自動化されたリアルタイムのイベント通知を実現できます。このセットアップはチームのコミュニケーションと効率を向上さるでしょう![]() 。特定のニーズに合わせてスクリプトをカスタマイズてください。
。特定のニーズに合わせてスクリプトをカスタマイズてください。


