(2023/07/06追記)
より新しい記事「Windows10でのPEFTの実行方法 (bitsandbytes-windows-webui使用)」があります。
こちらをご参照ください。
概要
背景
- Alpaca-LoraやPEFTを使用したLoRAが実施したい
- これらの利用には、bitsandbytes==0.37.0の使用が必要
- しかし、bitsandbytesはwindows OSには対応していない
-
こちらの記事の方法をもとに設定すれば、bitsandbytes=0.35.0をwindowsで使用することできる模様
- しかし、0.37.0は上記記事の方法では設定できない
- WSL2を使用すれば、おそらくbitsandbytesの使用が可能なはず
- vscode上でのwsl2への切り替えが面倒なので、wsl2を使用せずとも実行できる環境を構築したい
このページでできること
- windows OSでbitsandbytes==0.37.0の使用ができる
- windows OSでPEFTが実行できる
このページの対象者
- venvを使用したpython仮想環境の構築方法がわかる(本ページでは説明しません)
- もし要望が多ければ仮想環境作成部分も追記しますので、コメント欄に投稿してください
- venv+pyenvはこちらが非常に参考になります
- CUDA Toolkitのインストール方法がわかる
謝辞
本記事は、以下の皆様の記事をもとに作成しております。
- Kohya S.様「8-bit optimizer(bitsandbytes)をWindows(非WSL)で動かす」
- ぷらむらいす(PlumRice)様「WSL2でもAlpaca-LoRAを使いたい!(RAMが足りなくて挫折)」
- npaka様「Google Colab で PEFT による大規模言語モデルのファインチューニングを試す」
情報をご提供いただきました皆様に心より感謝申し上げます。
使用環境
| 項目 | 内容 | 備考 |
|---|---|---|
| OS | Windows 10 | WSL不使用 |
| python | ver.3.9.6 | pyenv使用 |
| python仮想環境 | venv | |
| 実行環境 | ローカル | Google Colab不使用 |
| GPU | RTX4070(VRAM 12GB) | PEFTでのLoRAに使用 |
| pythonライブラリ | transformers==4.29.0 bitsandbytes==0.37.0 ...etc |
詳細はこちら |
環境構築
bitsandbytes==0.37.0のwindowsでの設定方法
-
python仮想環境構築し、仮想環境を起動
- python versionは3.9.6を使用(他は未検証)
- 仮想環境はvenv(+pyenv)を使用
-
venvのpipをupgradeしておく
pipが古い場合、pip listを打つと「WARNING: You are using pip version 21.1.3; however, version 23.1.2 is available.」等と表示される。そのあとに表示されるコマンドを実行して、pipをupgradeする。 -
以下のコマンドを実行
pip install bitsandbytes==0.37.0 -
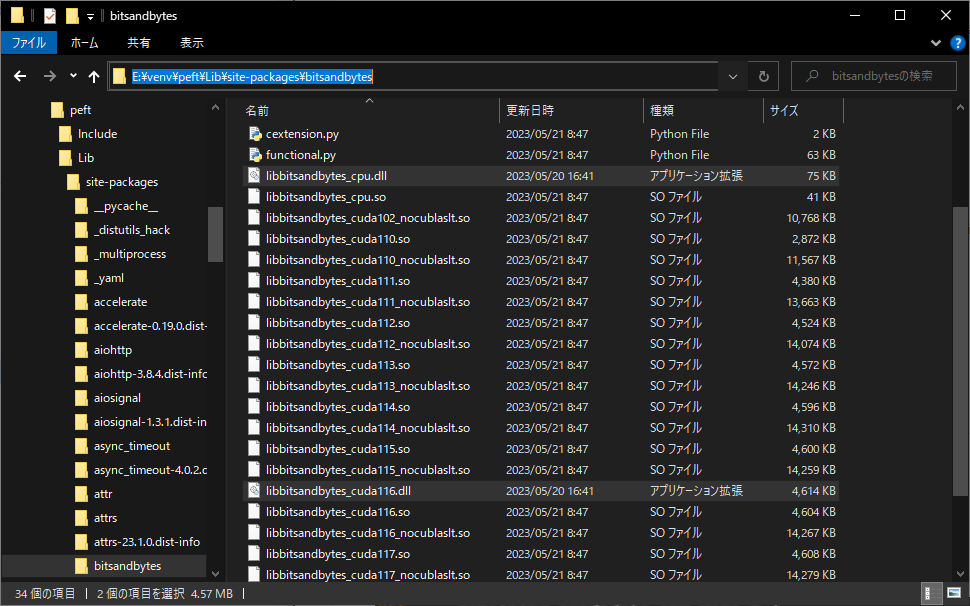
インストールしたbitsandbytesのライブラリフォルダを、vscode等エディタで開く
著者の場合は、venv環境をE:\venvにまとめており、今回の仮想環境はpeftという名称で構築しています。
この場合、エディタで開く場所は\peft\Lib\site-packages\bitsandbytes直下になります。

-
cuda_setup/main.pyの261行目を下記のように変更
下図262行目のように、この1行をif文の外に出します

-
cuda_setup/main.pyの368行目をコメントアウトし、369行目に以下の記述を追加
if torch.cuda.is_available(): return 'libbitsandbytes_cuda116.dll', None, None, None, None -
cuda_setup/main.pyの122行目と126行目をコメントアウトし、下図123と127行目の記述を追加
binary_pathにstr()を追加していますself.lib = ct.cdll.LoadLibrary(str(binary_path)) -
こちらのページからlibbitsandbytes_cpu.dllとlibbitsandbytes_cuda116.dllをダウンロードし、仮想環境のbitsandbytesライブラリのフォルダ直下に入れる
著者の場合、dllを入れる場所は、\peft\Lib\site-packages\bitsandbytes直下になります。

-
venv仮想環境を起動
その他の環境設定
- パッケージのインストール
pip install -q datasets accelerate loralib transformers==4.29.0 pip install -q git+https://github.com/huggingface/peft.git - gpu版torchのインストール(cu117使用)
pip install numpy --pre torch torchvision torchaudio --force-reinstall --index-url https://download.pytorch.org/whl/nightly/cu117
bitsandbytesの動作確認
先ほどの仮想環境上で以下のコマンドを打ち込んで、エラーが出ないことを確認します。
python
>>>import bitsandbytes
出力が以下の表示であればOK。
===================================BUG REPORT===================================
Welcome to bitsandbytes. For bug reports, please submit your error trace to: https://github.com/TimDettmers/bitsandbytes/issues
================================================================================
動作しない場合
こちらのgithubリポジトリに著者の動作確認済みpython環境のrequirements.txtを置いています。
こちらをダウンロードし、以下の手順でpython環境を構築しなおしてみてください。
- bitsandbytes==0.37のwindowsでの設定方法の手順を実施
- 以下のコマンドを実行
pip install -r requirements.txt
pip install numpy --pre torch torchvision torchaudio --force-reinstall --index-url https://download.pytorch.org/whl/nightly/cu117
PEFTを使用したLoRAの実施
基本的に、npaka様のGoogle Colab で PEFT による大規模言語モデルのファインチューニングを試すに記載のプログラムと同一です。
一部、trainerに渡すargs引数のper_device_train_batch_sizeを4→2に変更しています。
ソースコードは以下の通りです。こちらを、先ほど作成したpython仮想環境にて、python main.pyで実行してください。
LoRAの学習時間は、筆者環境において、13分程度でした。
# モデルの読み込み
import os
os.environ["CUDA_VISIBLE_DEVICES"]="0"
import torch
import torch.nn as nn
import bitsandbytes as bnb
from transformers import AutoTokenizer, AutoConfig, AutoModelForCausalLM

model = AutoModelForCausalLM.from_pretrained(
    "facebook/opt-6.7b",
    load_in_8bit=True,
    device_map='auto',
)

tokenizer = AutoTokenizer.from_pretrained("facebook/opt-6.7b")

for param in model.parameters():
  param.requires_grad = False  # モデルをフリーズ
  if param.ndim == 1:
    # 安定のためにレイヤーノルムをfp32にキャスト
    param.data = param.data.to(torch.float32)

model.gradient_checkpointing_enable()
model.enable_input_require_grads()

class CastOutputToFloat(nn.Sequential):
  def forward(self, x): return super().forward(x).to(torch.float32)
model.lm_head = CastOutputToFloat(model.lm_head)

def print_trainable_parameters(model):
    """
    モデル内の学習可能なパラメータ数を出力
    """
    trainable_params = 0
    all_param = 0
    for _, param in model.named_parameters():
        all_param += param.numel()
        if param.requires_grad:
            trainable_params += param.numel()
    print(
        f"trainable params: {trainable_params} || all params: {all_param} || trainable%: {100 * trainable_params / all_param}"
    )


from peft import LoraConfig, get_peft_model

config = LoraConfig(
    r=16,
    lora_alpha=32,
    target_modules=["q_proj", "v_proj"],
    lora_dropout=0.05,
    bias="none",
    task_type="CAUSAL_LM"
)

model = get_peft_model(model, config)
print_trainable_parameters(model)

import transformers
from datasets import load_dataset
data = load_dataset("Abirate/english_quotes")
data = data.map(lambda samples: tokenizer(samples['quote']), batched=True)

trainer = transformers.Trainer(
    model=model,
    train_dataset=data['train'],
    args=transformers.TrainingArguments(
        per_device_train_batch_size=2,
        gradient_accumulation_steps=4,
        warmup_steps=100,
        max_steps=200,
        learning_rate=2e-4,
        fp16=True,
        logging_steps=1,
        output_dir='outputs'
    ),
    data_collator=transformers.DataCollatorForLanguageModeling(tokenizer, mlm=False)
)
model.config.use_cache = False  # 警告を黙らせます。 推論のために再度有効にしてください。
trainer.train()

batch = tokenizer("Two things are infinite: ", return_tensors='pt')

with torch.cuda.amp.autocast():
  output_tokens = model.generate(**batch, max_new_tokens=50)

print('\n\n', tokenizer.decode(output_tokens[0], skip_special_tokens=True))
以下のような推論結果が得られれば成功です。
 Two things are infinite:  the universe, and human stupidity; and I'm not sure about the universe.  -Albert Einstein
I'm not sure about the universe either.

