はじめに
Nuxt3の基礎を学び、実際にアプリを作ることにした。
せっかくなら普段自分が不便に感じている事を助けてくれるアプリを作ろうと思い、趣味である植物の育成を助ける水やり管理ができるアプリを作ってみた。
最近植物が増えてきて、それぞれ管理方法も違うため前回の水やり日を覚えきれない。
そんな問題をアプリで解決!
今回の記事内ではCRUD操作の実装までを解説。
メモ機能、水やり日の登録機能の実装方法、デプロイについてはこちら↓
未経験者のためのNuxt 3、Prisma、MySQL入門!植物の水やり管理アプリを開発してみた②
アプリの概要
フロントエンドはNuxt3、サーバーサイドはNuxt3に含まれるNitroサーバを使用。
データベースはMySQLを使用し、Prismaを使ってNuxt3とデータベースを接続。
データベースの管理はphpMyAdminを使用。
ソースコードはこちら
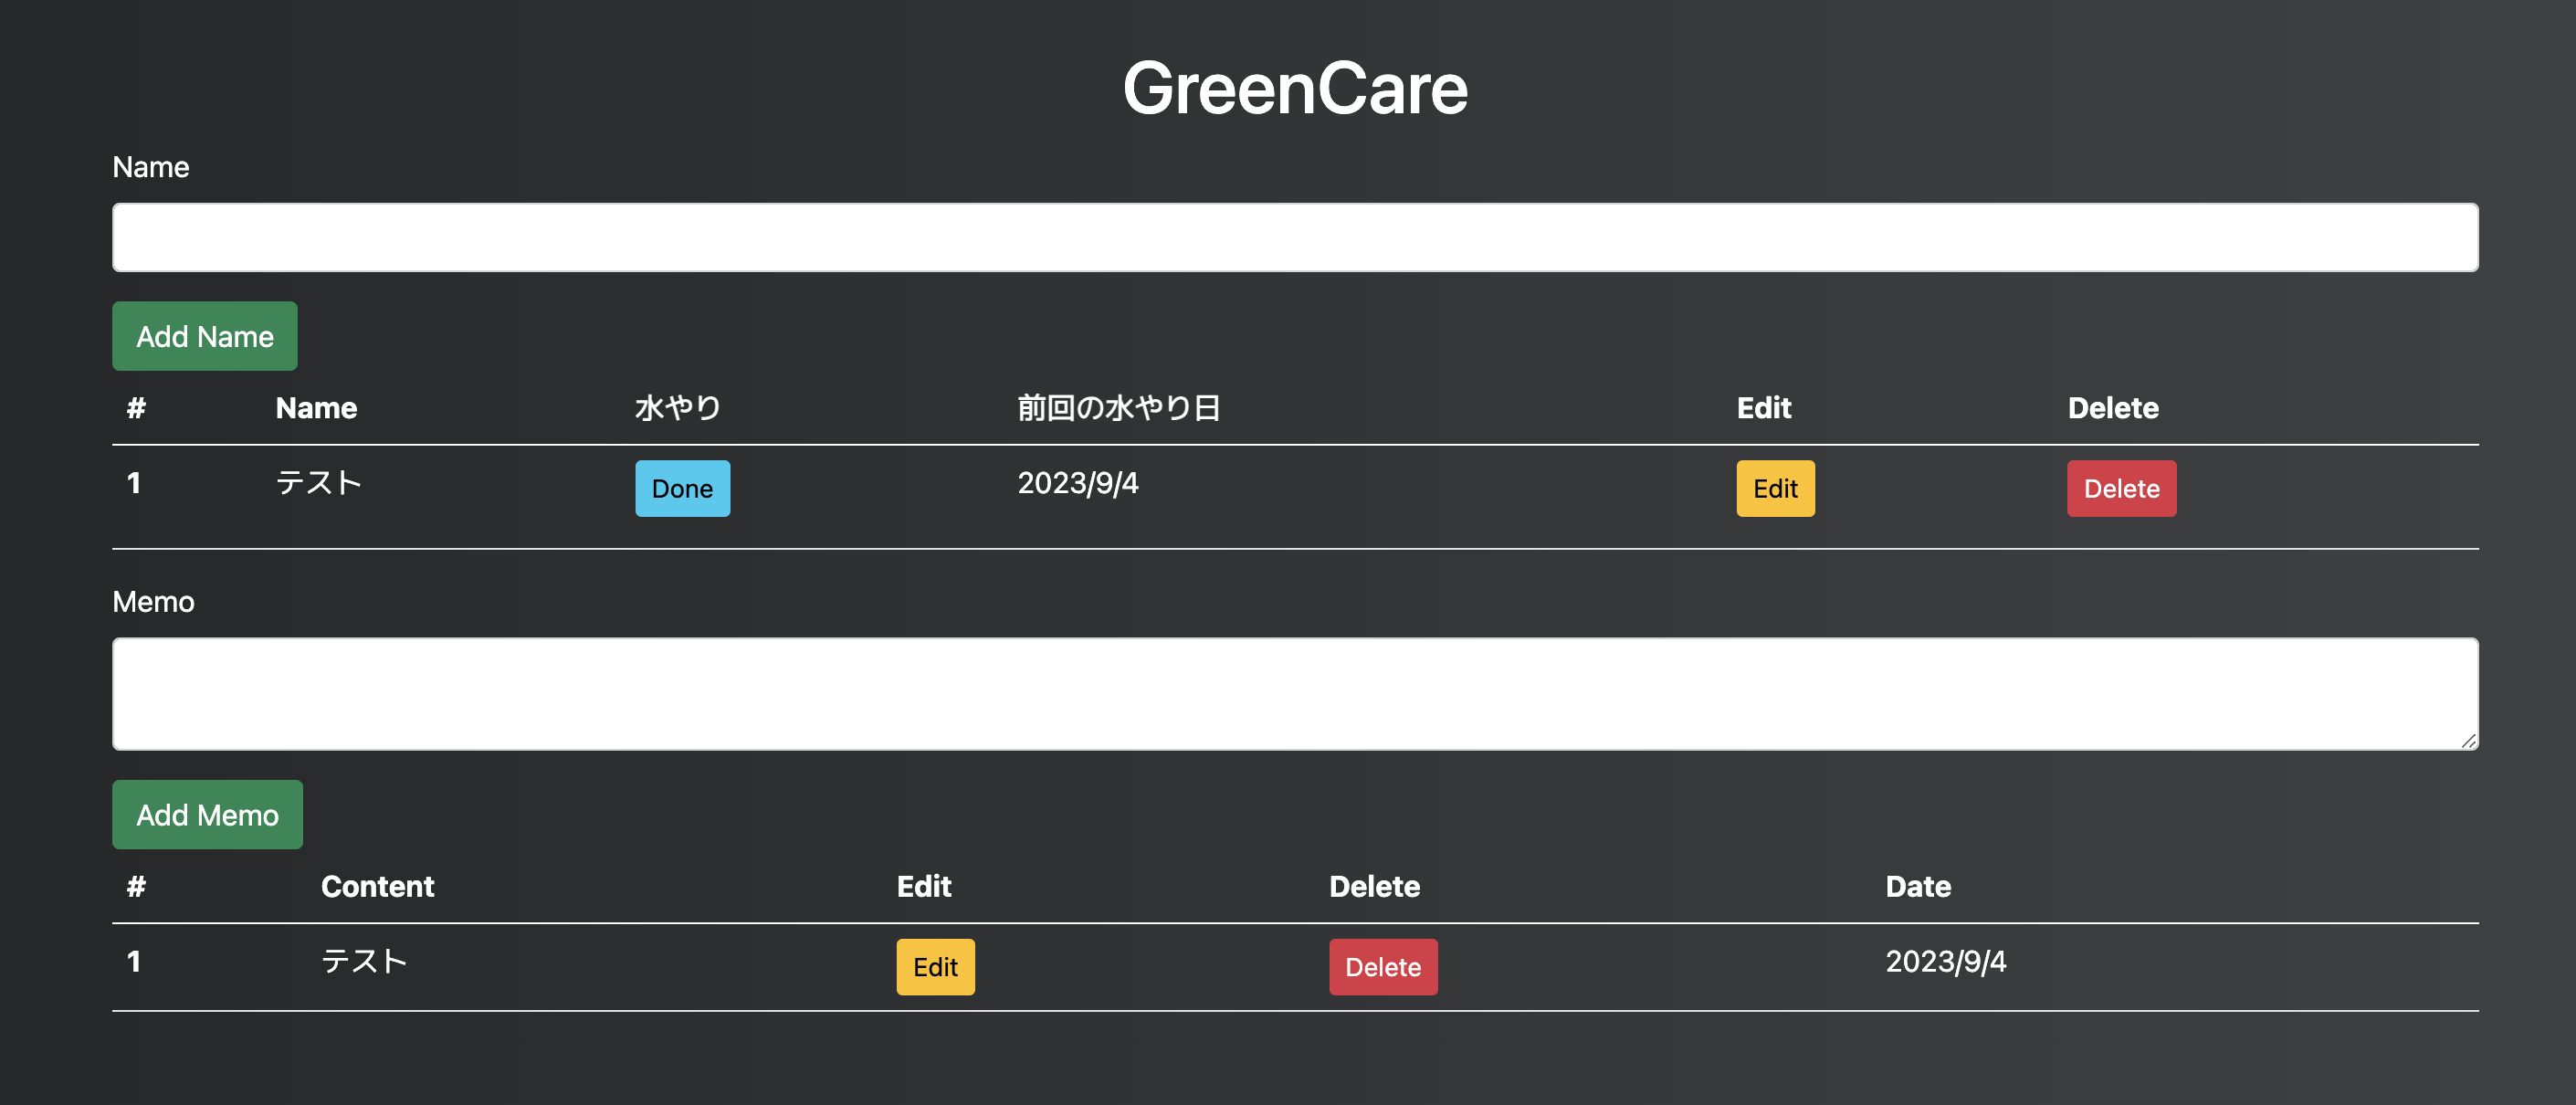
完成イメージ
機能
基本的なCRUD操作、メモ機能、水やり日を登録する機能を実装。
CRUDとは
システムに必要な主要機能である「Create(生成)」「Read(読み取り)」「Update(更新)」「Delete(削除)」の頭文字を並べた用語
Nuxt3プロジェクトの作成
ターミナルにてコマンドを入力し、プロジェクトを作成。
任意の名前を設定可能。今回はGreenCareという名前を設定。
npx nuxi@latest init GreenCare
フォルダが生成されるため、GreenCareフォルダに移動し、コマンドを実行してJavaScriptライブラリのインストールを行う。
yarn install
package.jsonファイルを確認し、Nuxtのバージョンが3以降になっている事を念のため確認。
{
  "name": "nuxt-app",
  "private": true,
  "scripts": {
    "build": "nuxt build",
    "dev": "nuxt dev",
    "generate": "nuxt generate",
    "preview": "nuxt preview",
    "postinstall": "nuxt prepare"
  },
  "devDependencies": {
    "@nuxt/devtools": "latest",
    "@types/node": "^18.16.19",
    "nuxt": "^3.5.1"
  }
}
続いてコマンドを入力し、サーバーを起動。
"-o"を入力すると自動でブラウザを起動するため便利。
yarn dev -o
app.vue
app.vueファイルからNuxtWelcomeを削除し、"Hello World"を記述。
<template>
  <div>
    <h1>Hello World</h1>
  </div>
</template>
ブラウザに"Hello World"が表示されていればOK!
pagesディレクトリ
Nuxtを使用する際に複数ページの構築をする場合はpagesディレクトリを使用する。
pagesディレクトリ配下にindex.vueファイルを作成し、下記コードを入力する。
<template>
  <h1>Top Page</h1>
</template>
次にpages/index.vueのファイルを表示させるために、app.vueファイルを以下のように変更。
<template>
  <div>
    <NuxtPage />
  </div>
</template>
ブラウザに"Top page"と表示されていればOK!
表示がうまくいかない場合は、control + c を入力後、下記コマンドを入力し、再実行する。
yarn dev -o
Prismaの設定
コマンドを使用してprismaライブラリのインストールを行う。
yarn add prisma
prismaの設定ファイルを作成するためにコマンドを実行。
npx prisma init
コマンド実行後、prismaディレクトリが作成されその中にshema.prismaが作成される。
デフォルトではPostgreSQLの設定がされているため、MySQLに変更する。
generator client {
  provider = "prisma-client-js"
}

datasource db {
  provider = "mysql"
  url      = env("DATABASE_URL")
}
phpMyAdmin
phpMyAdminを開き、「新規作成」をクリックし新しくデータベースを作成。
今回は"green_care_db"という名前で作成。
.envファイルのURL変更
下記のサイトを参考に、デフォルトのPostgreSQLの設定からMySQLへのURLへ変更。
モデルの定義
今回DBに保存したいテーブルの列名や型の設定をprisma.shemaファイルに定義する。
generator client {
  provider = "prisma-client-js"
}

datasource db {
  provider = "mysql"
  url      = env("DATABASE_URL")
}

model plants {
  id    Int     @id @default(autoincrement())
  name  String?
  lastWatered_at DateTime?
  created_at  DateTime @default(now()) @db.DateTime(0)
  updated_at  DateTime? @updatedAt
}
マイグレーション
ファイルの設定が終わったら、マイグレーションする。
なんとSQLを書かずにDBのテーブルを作ることができる(便利!)
npx prisma migrate dev
コマンドを実行後、マイグレーションの名前を聞かれるため任意の名前を入力する。
今回は、"initial migration"と入力。
prisma/migrationsディレクトリをチェック。

ディレクトリ内にmigration.sqlが作成されていることを確認。
phpMyadminを開き、先程定義したテーブルが登録されていればOK!
Prisma Client
SQLではなく、JavaScript,TypeScriptのメソッドを使用してデータベースを操作するのに利用する。
以下のコマンドを入力し、追加する。
yarn add @prisma/client
ここまでで下準備完了!
API Routeの追加
新たにserver/apiディレクトリを作成し、そのディレクトリ内にファイルを追加し、CRUD機能を実装していく。
公式ドキュメントがわかりやすくておすすめ。
export default defineEventHandler((event) => {
  return {
    api: 'create plants'
  }
})
export default defineEventHandler((event) => {
  return {
    api: 'read plants'
  }
})
export default defineEventHandler((event) => {
  return {
    api: 'update plants'
  }
})
export default defineEventHandler((event) => {
  return {
    api: 'delete plants'
  }
})
まずはserver/apiディレクトリ内に上記の4つのファイルを作成。
ここまでのディレクトリ構造はこんな感じ。

ここからイベントハンドラを定義したそれぞれのファイルに処理を追加していく。
動作確認
下準備が一通り終えた段階で動作確認をする。
Postmanを使用してAPIエンドポイントへのリクエストを作成し、テストを行う。
コマンドを入力し、サーバーを起動。
yarn dev -o
Postmanを起動し、以下画像のようにURLを入力する。
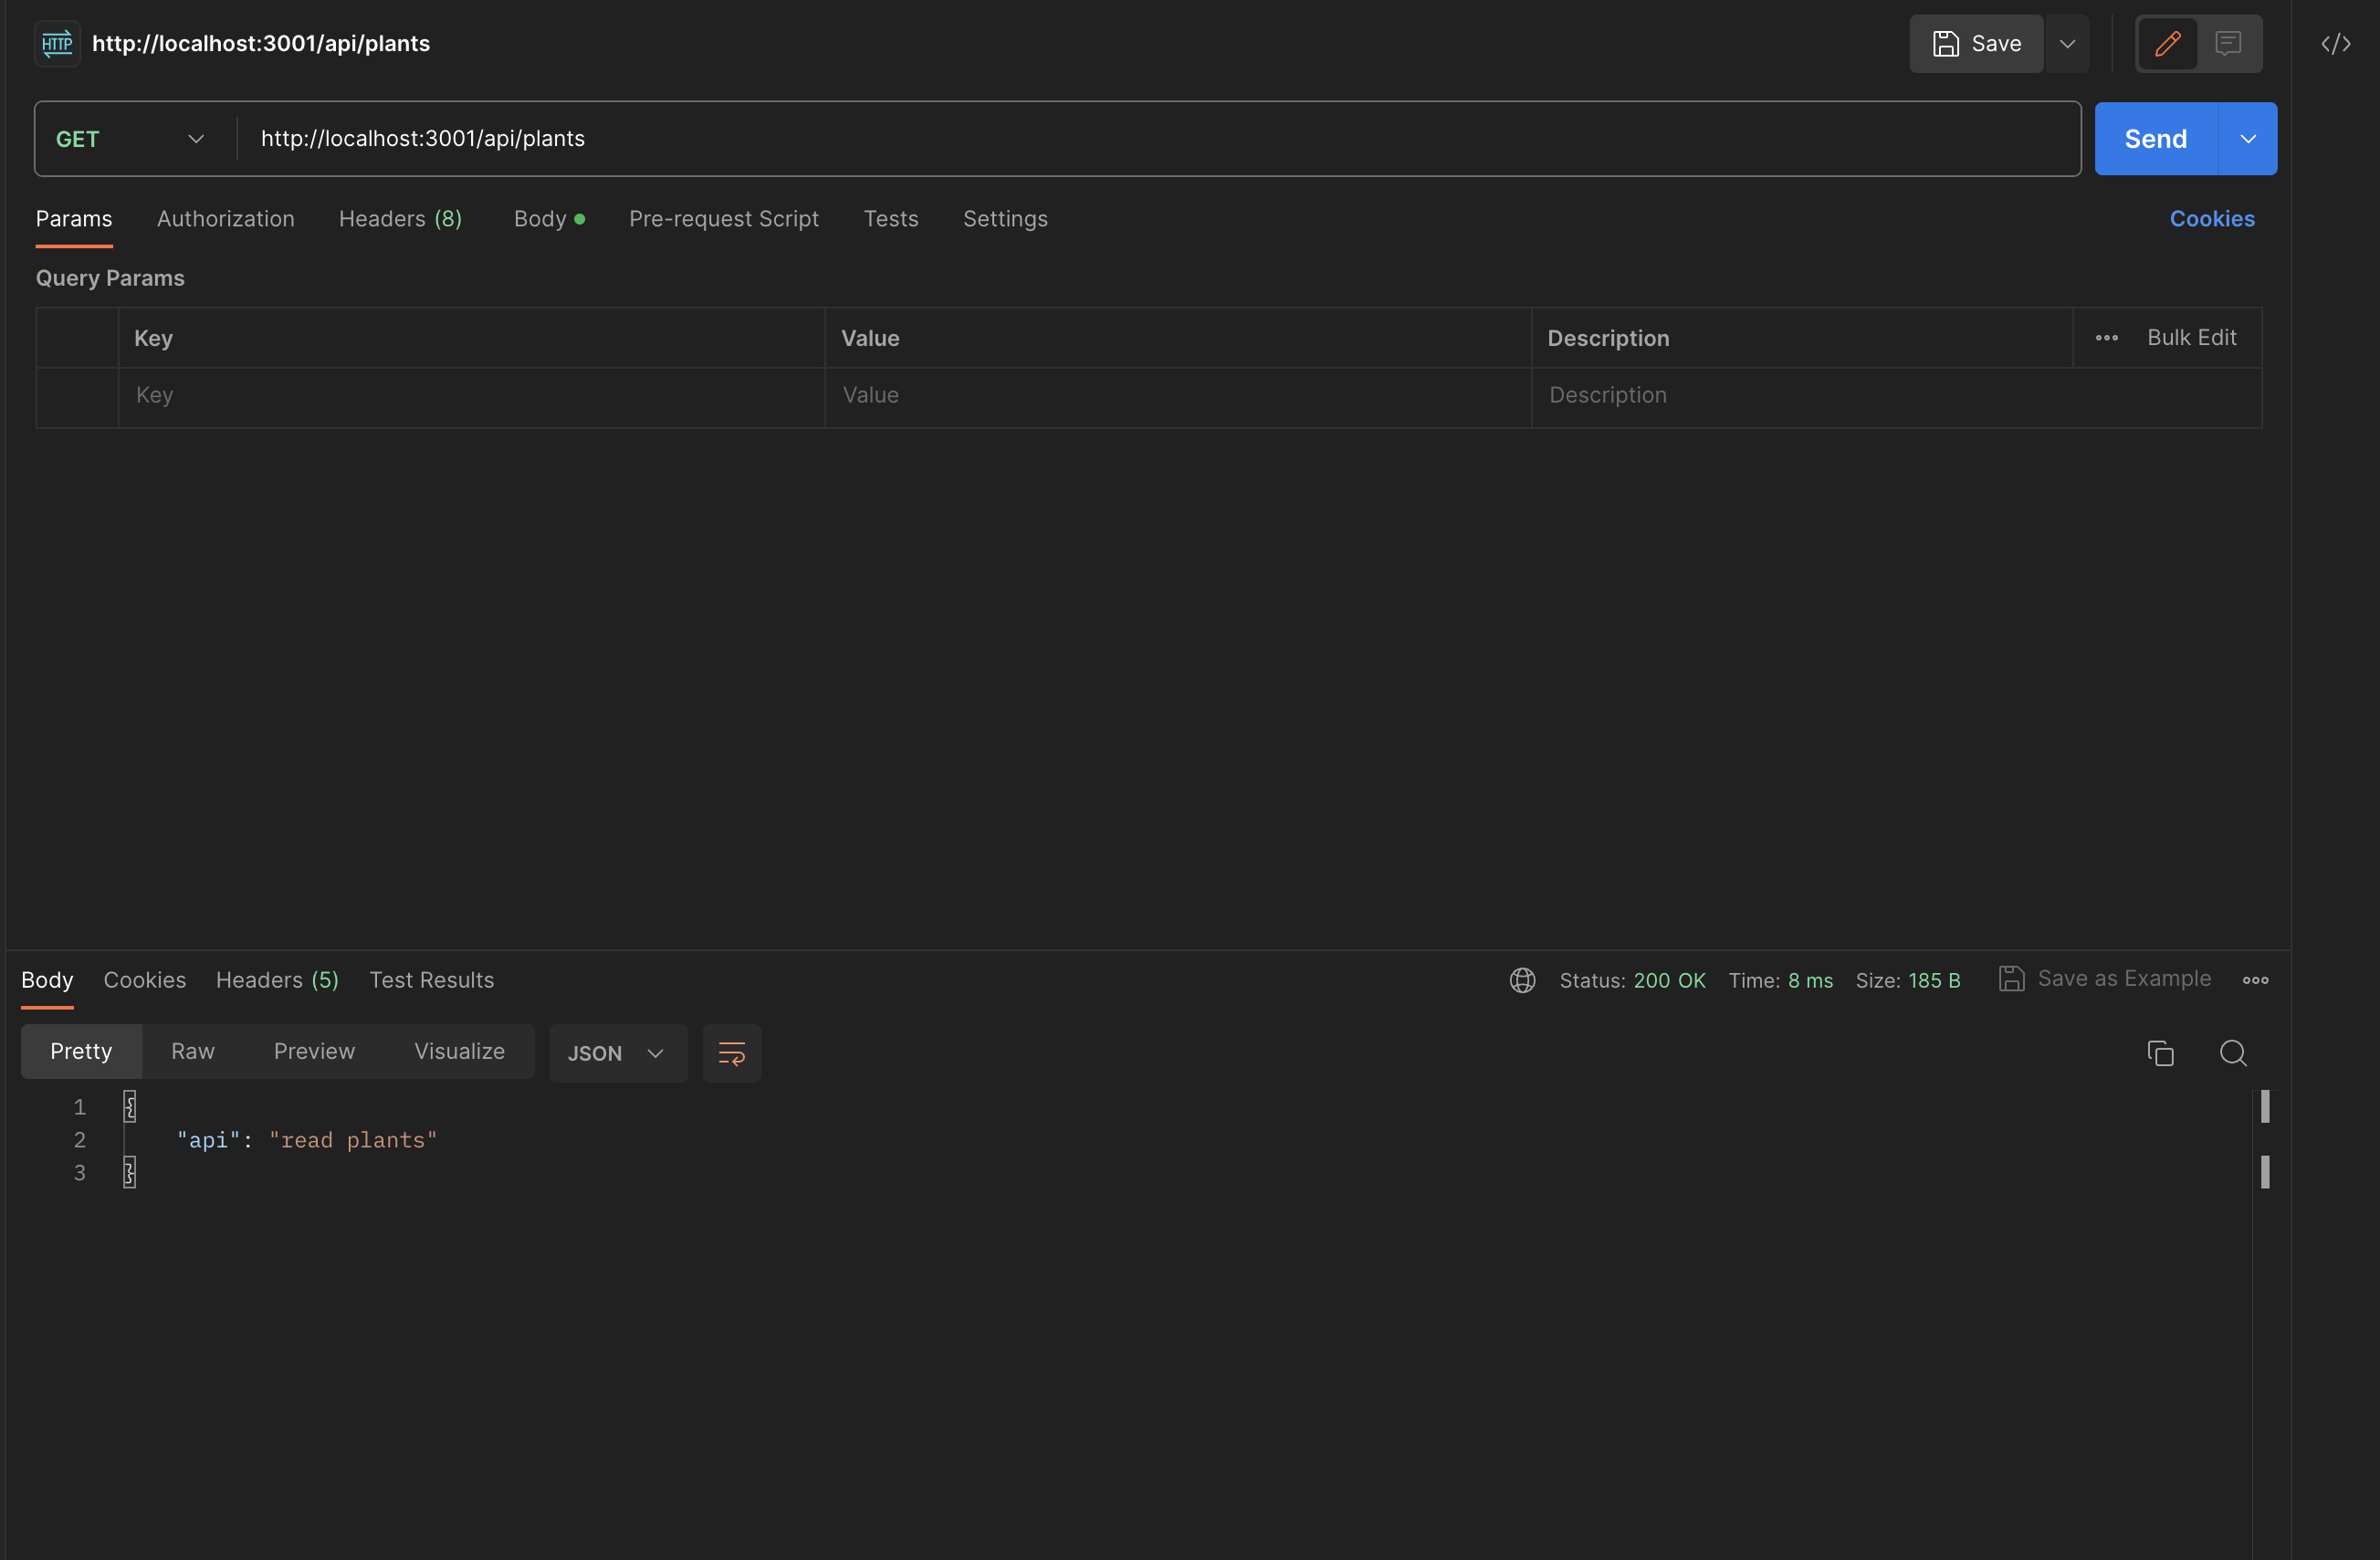
URL入力欄の左側にある箇所からGET,POST,PUT,DELETE
をそれぞれ選択後、"Send"をクリック後に画面下部に対応するオブジェクトが表示されていればOK!
Create
Prismaの公式ドキュメントを参考に進めていく。
import { PrismaClient } from '@prisma/client';
const prisma = new PrismaClient();

export default defineEventHandler(async (event) => {

  const body = await readBody(event)
  let plant = null

  if (body.name)
    await prisma.plants.create({
      data: {
        name: body.name,
      },
    }).then((response) => {
      plant = response
    })

  return {
    plant: plant
  }
})
解説
import { PrismaClient } from '@prisma/client';
まず、PrismaClientをインポートし、データベースの操作を簡単にする。
const prisma = new PrismaClient();
PrismaClientのインスタンスを作成しする。
これによりデータベースへのクエリの実行が可能となる。
export default defineEventHandler(async (event) => { ... })
イベントハンドラのデフォルトエクスポートを行う。
const body = await readBody(event)
イベントオブジェクトからリクエストのボディを読み取取る。
readBody関数が呼び出され、リクエストのボディを非同期で読み取り、body変数に格納する。
let plant = null
plantという変数を初期化。
if (body.name)
リクエストのボディにnameフィールドが存在するか確認する。
リクエストに名前の情報が含まれている場合のみ、新しい情報をデータベースに作成する。
await prisma.plants.create({ ... })
Prismaを使用して、plantsテーブルに新しい植物の情報を作成。
dataオブジェクト内に植物の情報を指定している。
.then((response) => { plant = response })
Promiseが成功した後に実行する処理を定義している。
Promiseって...?
PromiseとはJavaScriptにおいて、非同期処理の操作が完了したときに結果を返すものです。 非同期処理とは、ある処理が実行されてから終わるまで待たずに、次に控えている別の処理を行うことです。
【JavaScript】初心者にもわかるPromiseの使い方
return { plant: plant }
ハンドラの処理が終了した後に、新しく作成された植物の情報を含むオブジェクトを返している。
plant変数には作成された植物の情報が含まれている。
テスト
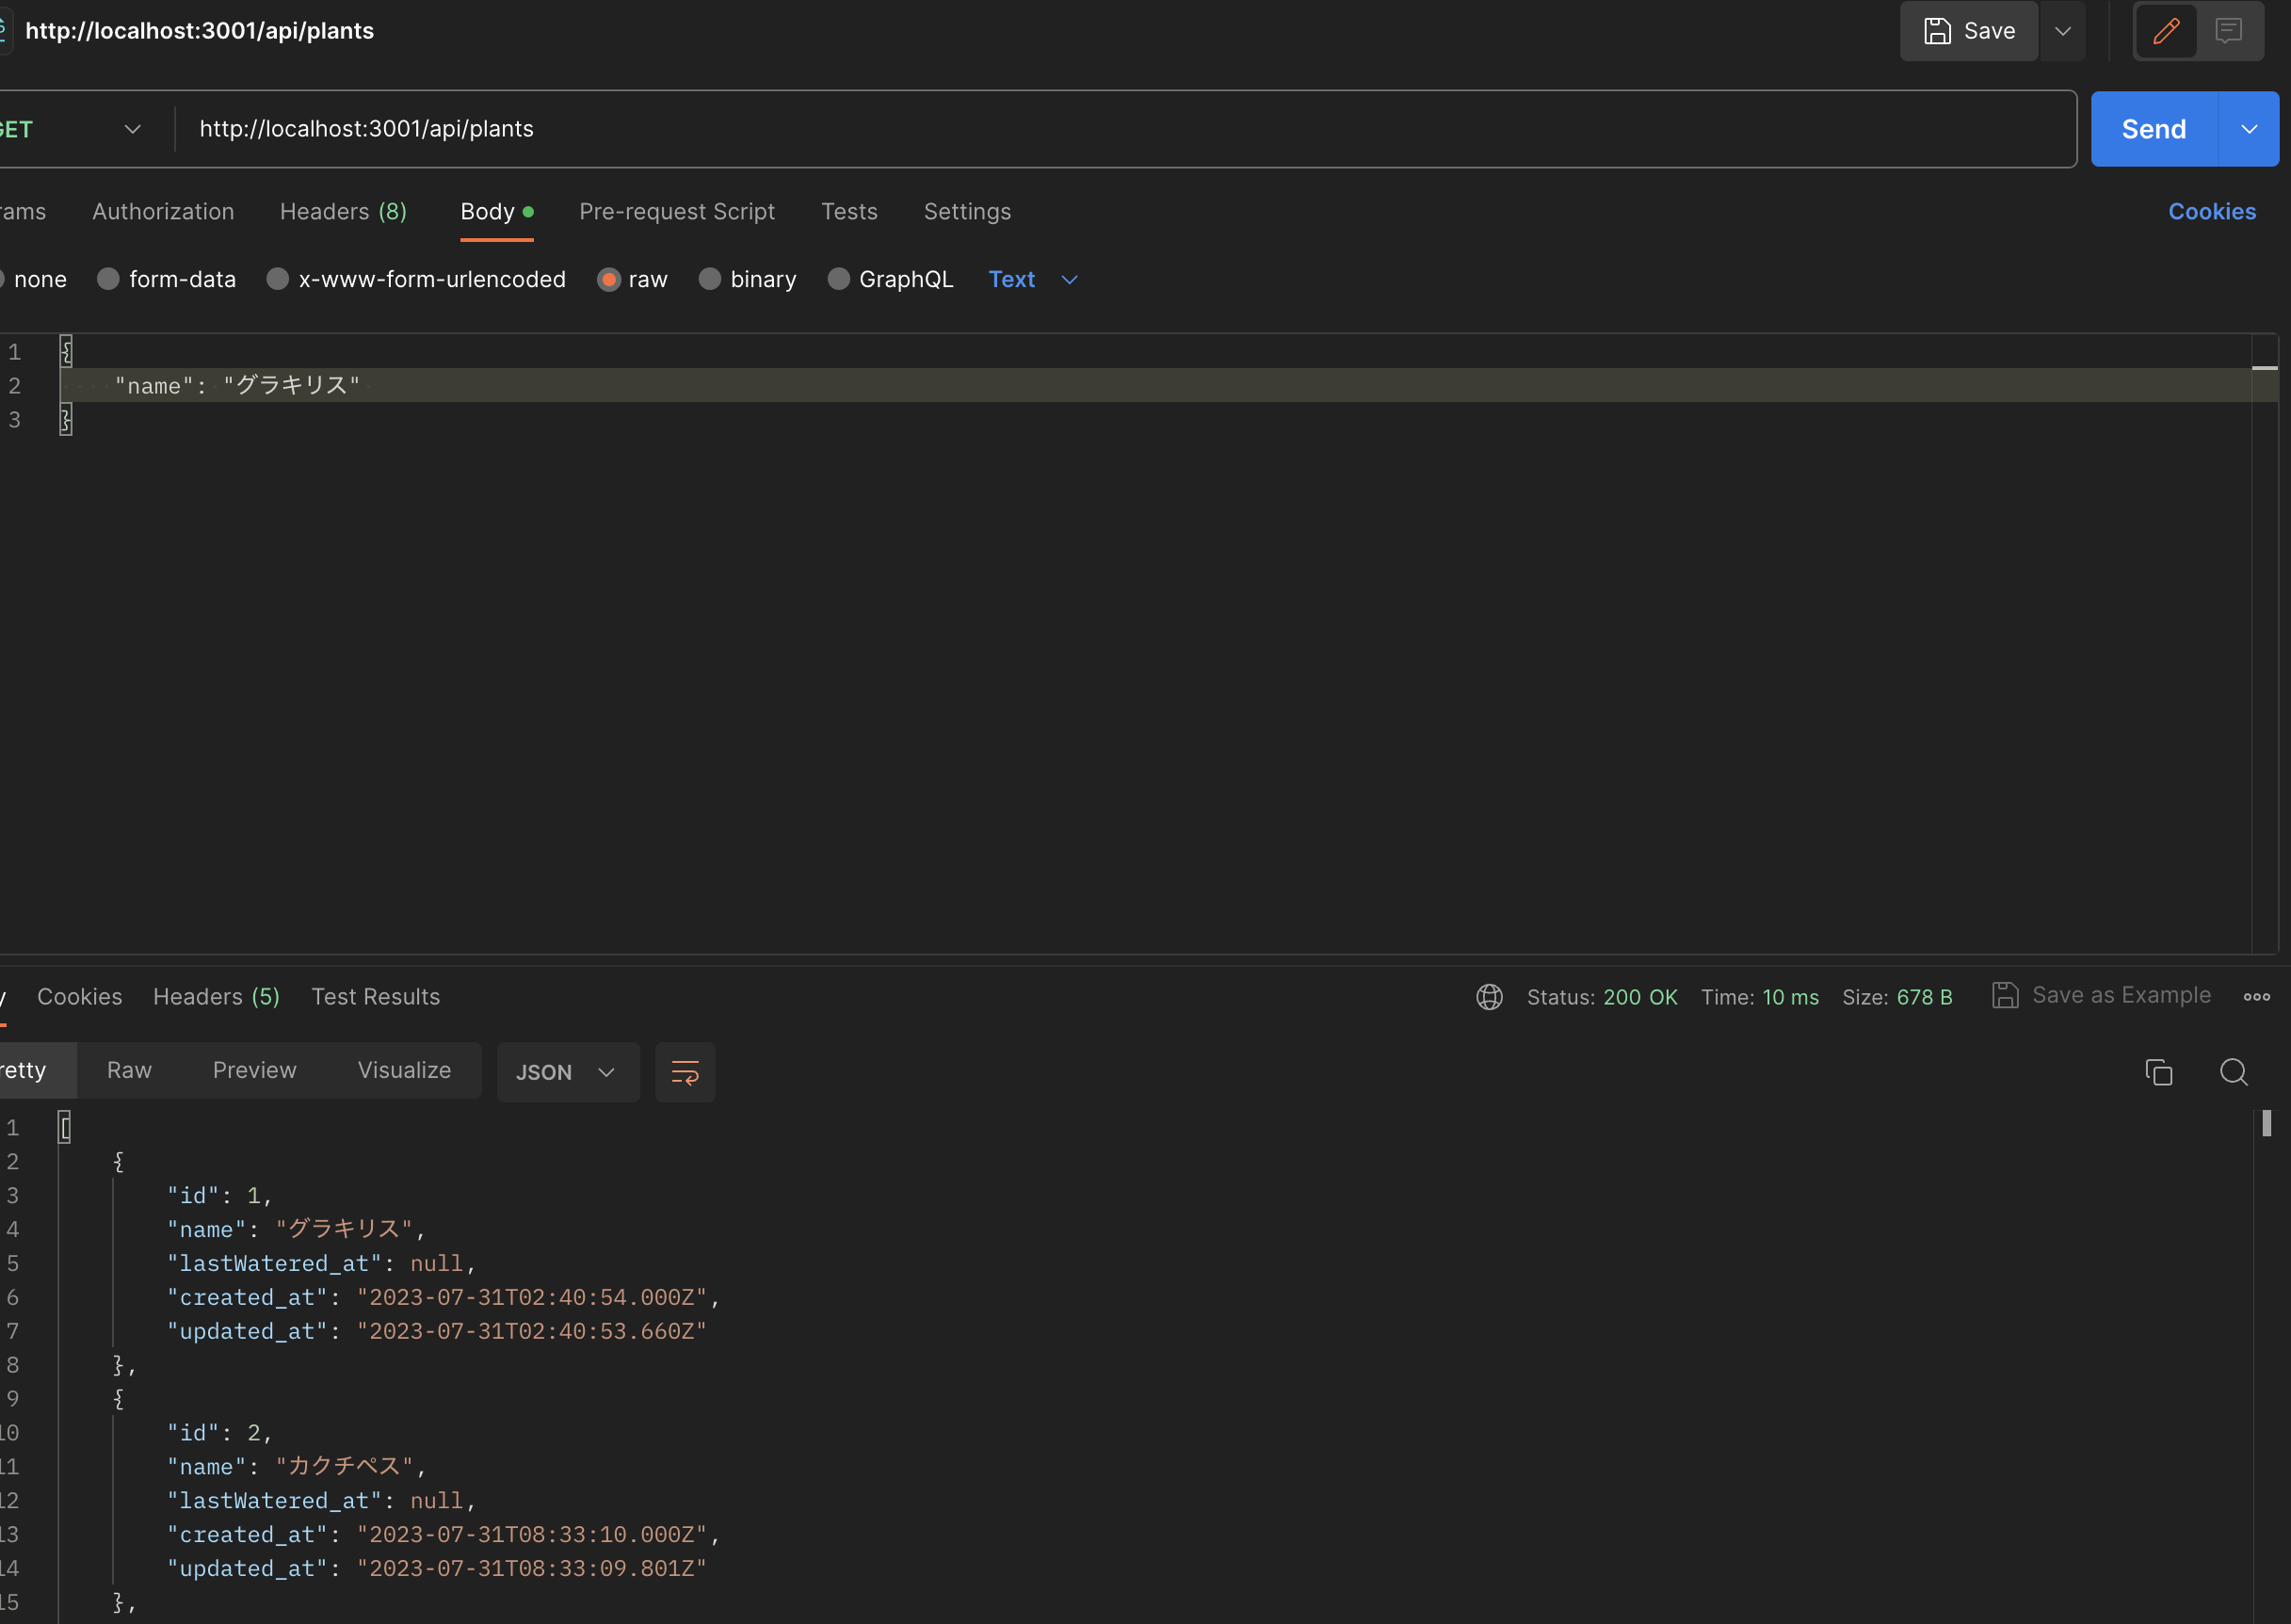
実際に植物の名前を追加できるかPostmanを使用してテストする。

"Body"の箇所をクリックし、コード入力欄に以下のように入力する。
{
    "name": "グラキリス"
}
nameに好きな植物名を入力してsendをクリック。

下画面にidやname等が追加されてることを確認する。
phpMyAdminも確認し、追加されていればOK!

Read
再びPrismaの公式ドキュメントを参考に進めていく。
import { PrismaClient } from '@prisma/client';
const prisma = new PrismaClient();

export default defineEventHandler(async () => {
  return await prisma.plants.findMany()
})
解説
await prisma.plants.findMany()
Prismaの機能を使って、データベース内のplantsテーブルから複数の情報を取得している。
findManyはテーブル内の全てのレコードを取得するための関数。
テスト
Postmanを起動し、URL入力欄の左の項目をGETに変更する。
※ローカルサーバーを起動するのも忘れずに
sendをクリック後に入力した植物一覧が表示されていればOK!
Delete
Prismaの公式ドキュメントのDeleteの項目のコードをベースに作っていく。
import { PrismaClient } from '@prisma/client';
const prisma = new PrismaClient();

export default defineEventHandler(async (event) => {

  const body = await readBody(event)
  let plant = null
  let error = null

  if(body.id)
    await prisma.plants.delete({
      where: {
        id: body.id,
      },
    }).then((response) => {
      plant = response
    }).catch(async(e) => {
      error = e
    })

  if (error) return createError({ statusCode: 500, statusMessage: "Server error"});

  return plant
})
解説
if (body.id)
  await prisma.plants.delete({
    where: {
      id: body.id,
    },
  }).then((response) => {
    plant = response;
  }).catch(async(e) => {
    error = e;
  });
もしbody.idが存在する場合、prisma.plants.deleteを使用してデータベース内のplantsテーブルから対応するレコードを削除する。
削除が成功した場合はresponseに結果が格納され、plantに代入される。
エラーが発生した場合は、eにエラーオブジェクトが格納され、errorに代入される。
if (error) return createError({ statusCode: 500, statusMessage: "Server error"});
エラー処理の実装。
もしエラーが発生していた場合は、createError関数を使用してHTTPレスポンスを作成し、500 Internal Server Errorを返す。
HTTPレスポンスって...?
Webサイトを閲覧する際に、ブラウザからWebサーバーにリクエスト(要求)を送信し、Webサーバーからブラウザに応答が返されます。この応答のことをHTTPレスポンス(HTTP responses)と呼びます。HTTPレスポンスは、Web通信における応答方法の基本概念となっています。
HTTPレスポンス(HTTP responses)とは?Web通信の応答方法の基本概念
テスト
ローカルサーバー、Postmanを起動し、DELETEを選択後に削除したいidを入力する。
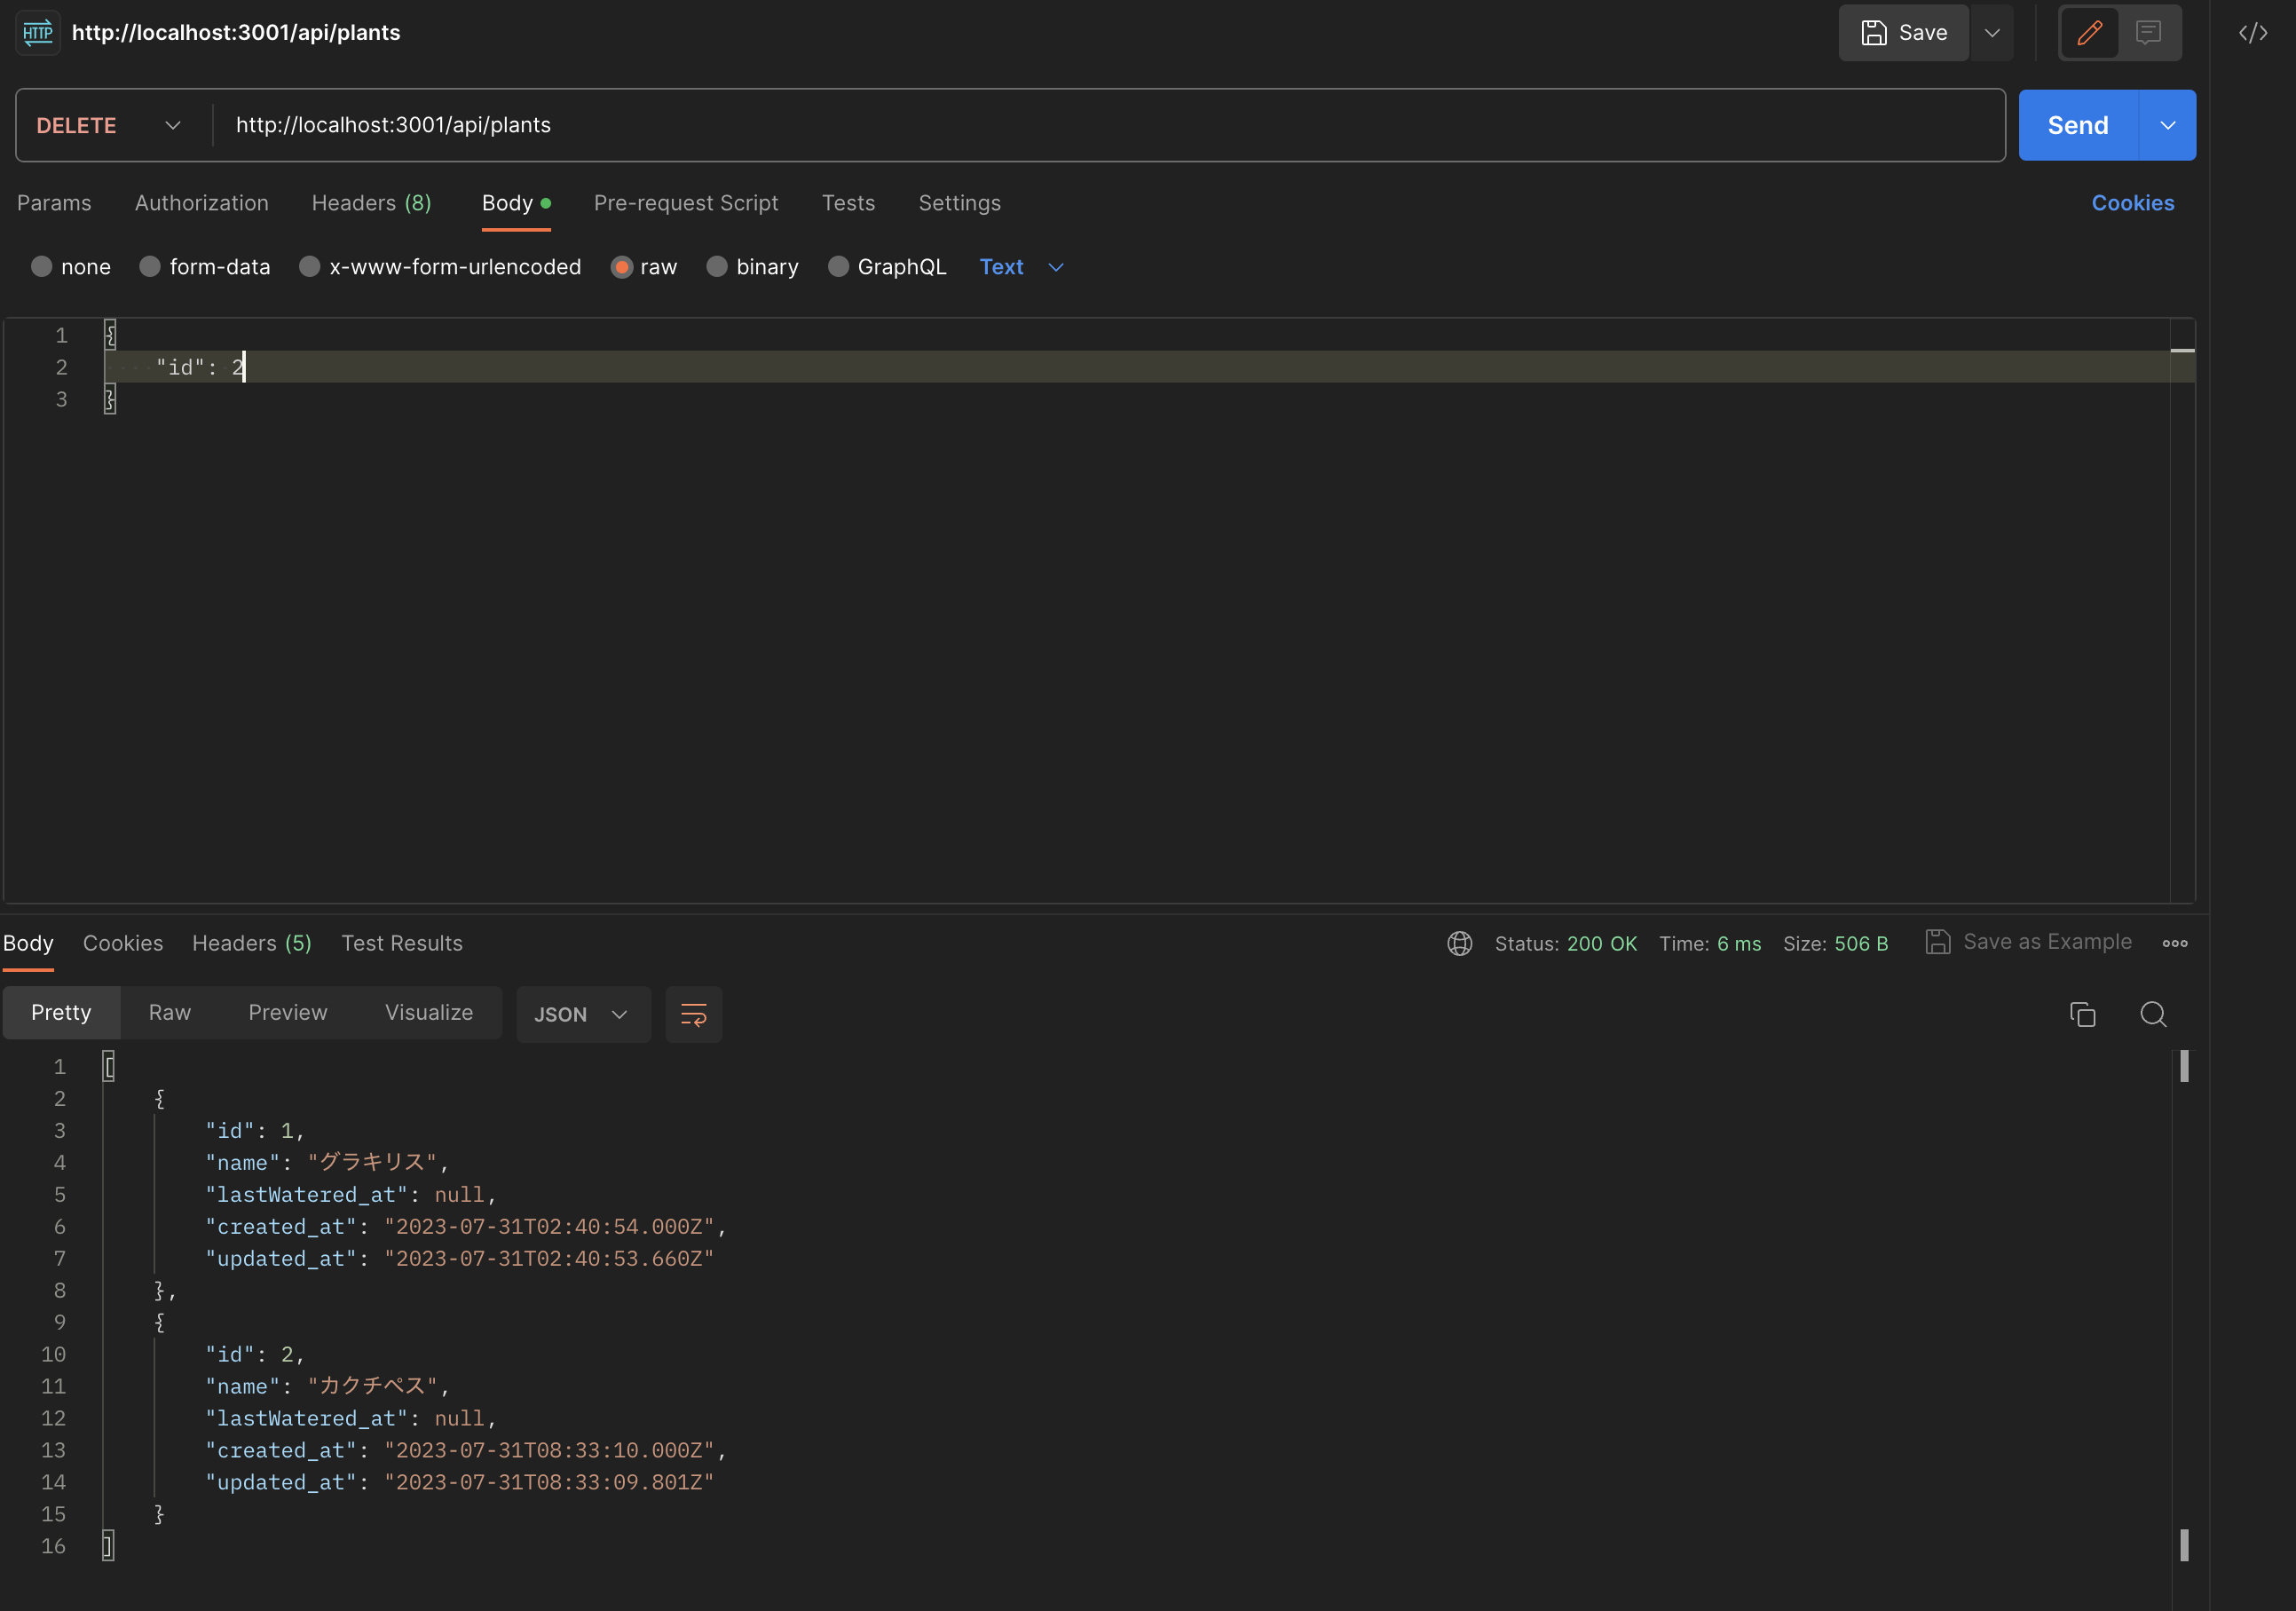
sendをクリック後、GETに切り替え選択したidの項目が削除されている事を確認する。
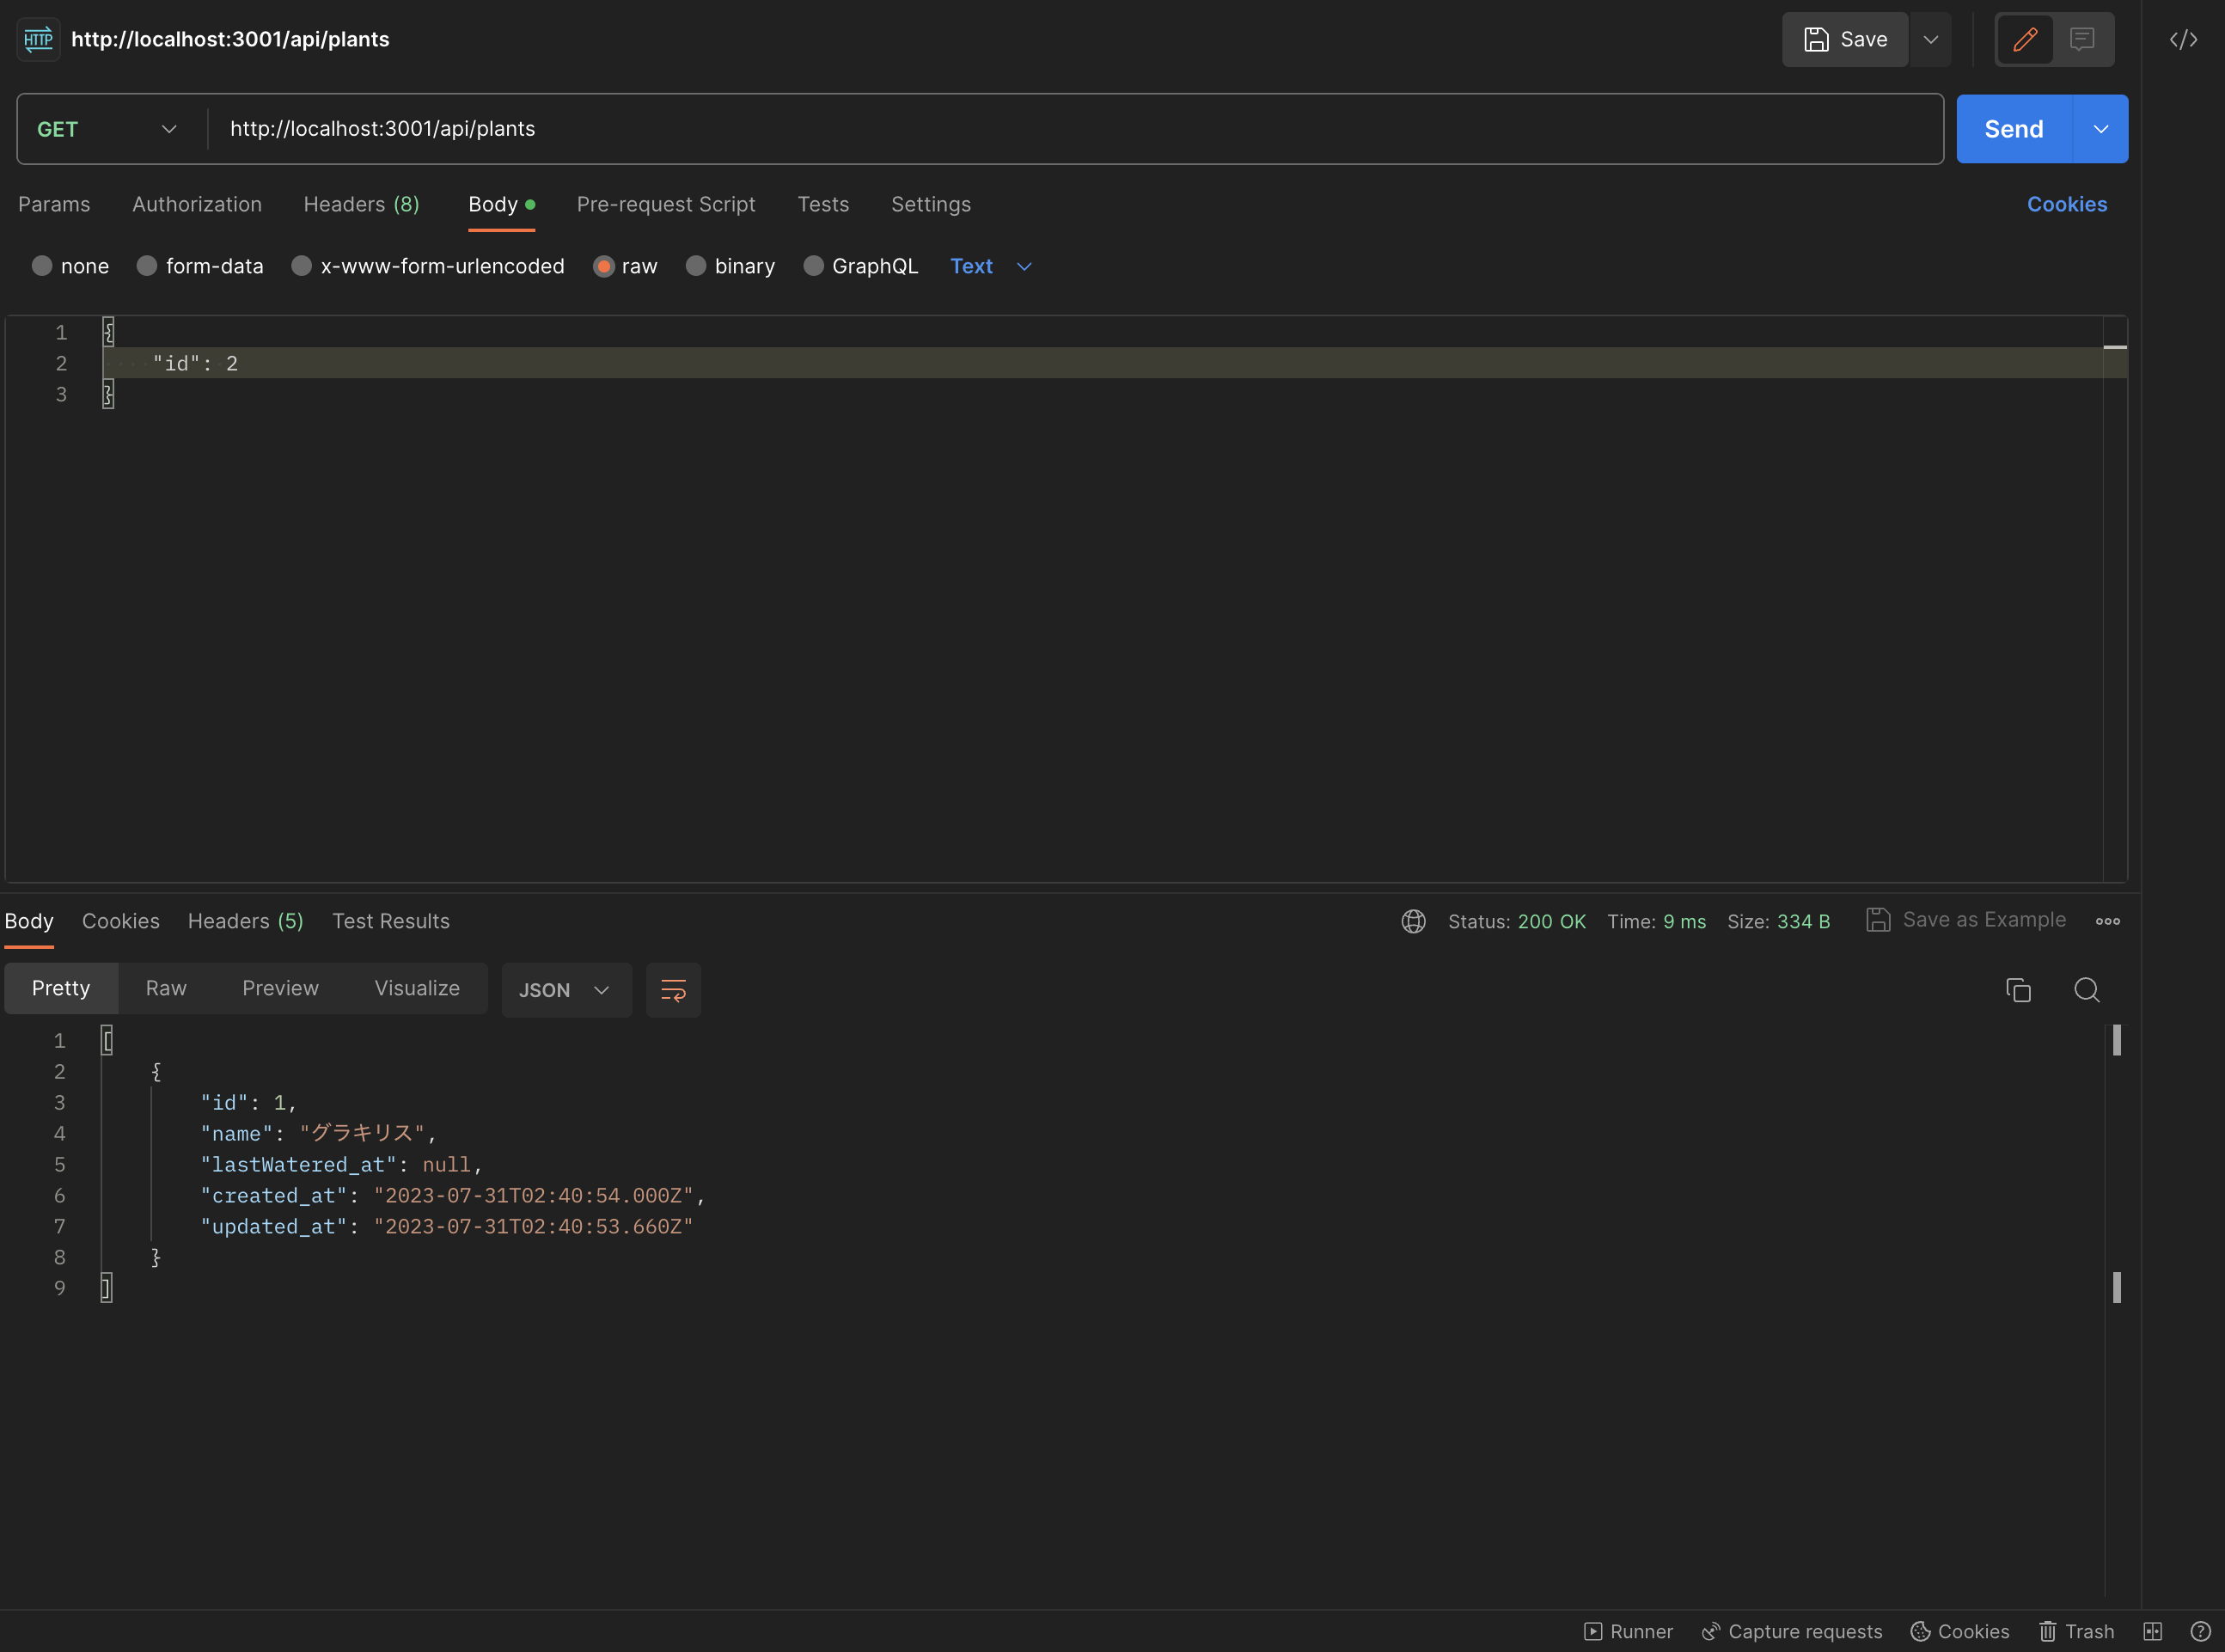
idに適当な数字を入力し、エラーメッセージが正しく表示されることも確認する。

Update
Prismaの公式ドキュメントを参考に最後のUpdate機能を追加していく。
import { PrismaClient } from '@prisma/client';
const prisma = new PrismaClient();

export default defineEventHandler(async (event) => {
  const body = await readBody(event);
  const id = body.id;
  const name = body.name;

  if (!(id && name)) return createError({ statusCode: 400, statusMessage: "Missing id and name"});

  let plant = null;

  if (id && name) {
    plant = await prisma.plants.update({
      where: {
        id: id,
      },
      data: {
        name: name,
      },
    });
  }

  return plant;
});
解説
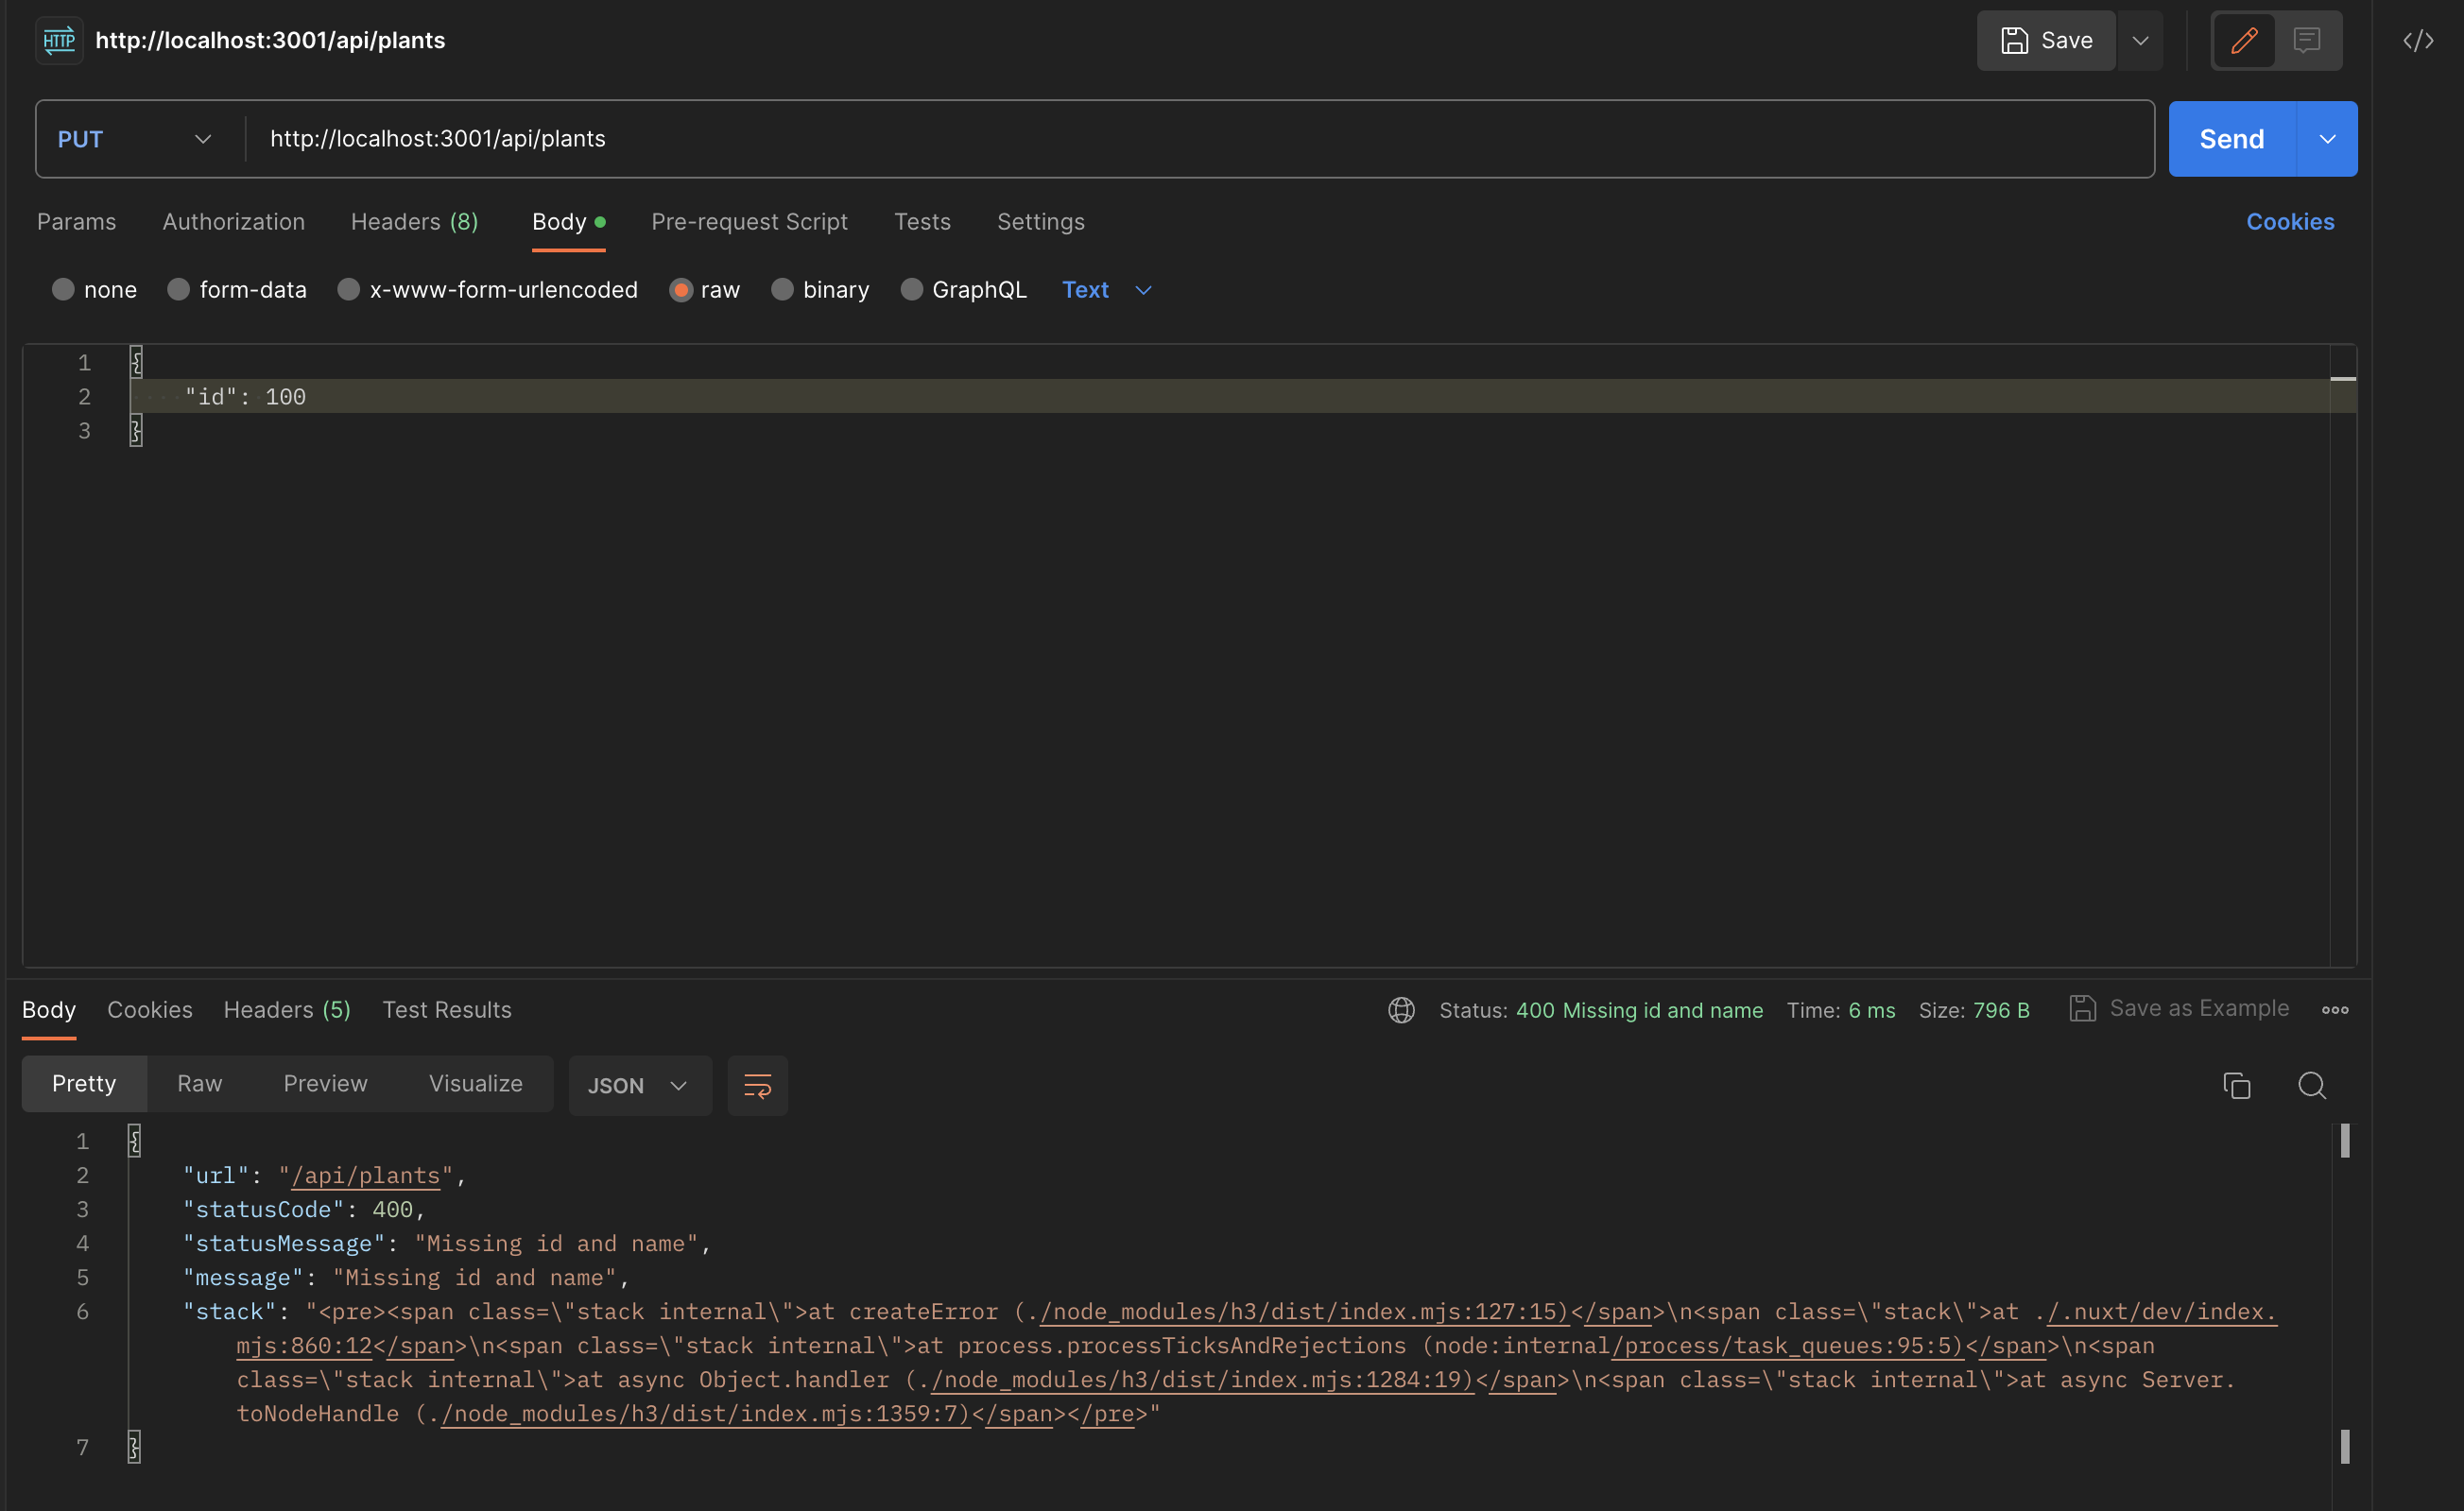
if (!(id && name)) return createError({ statusCode: 400, statusMessage: "Missing id and name"});
idとnameがどちらも存在しない場合、HTTPステータスコード400とエラーメッセージを含むエラーオブジェクトを返す。
let plant = null;
変更される可能性のあるplantオブジェクトを定義し、初期値をnullに設定する。
if (id && name) { ... }
idとnameが共に存在する場合の処理を定義する。
plant = await prisma.plants.update({ ... });
PrismaClientを使用してデータベースのplantsテーブルの該当するレコードを更新する。
idを使って該当するレコードを特定し、nameを新しい値として設定する。
更新されたplantオブジェクトがplant変数に代入される。
return plant;
更新が成功した場合、更新された植物の情報を返す。
テスト
ローカルサーバー、Postmanを起動し、編集したいidを決めて以下のように入力する。
{
    "id": 1,
    "name": "パキポディウム グラキリス"
}

sendをクリック。

name,updated_atが変更されていればOK!
idに適当な数字を入力し、エラーメッセージが正しく表示されることも確認する。
フロントエンドの実装
pages/index.vueにタイトル、Bootstrapを追加する。
<template>
  <h1>Top Page</h1>
</template>

<script>
useHead({
  title: "Green Care",
  link: {
    rel: "stylesheet",
    href: "https://cdn.jsdelivr.net/npm/bootstrap@5.0.2/dist/css/bootstrap.min.css",
    type: "text/css",
  },
  script: {
    src: "https://cdn.jsdelivr.net/npm/bootstrap@5.0.2/dist/js/bootstrap.bundle.min.js",
  },
});
</script>
Bootstrapの公式ドキュメントからテーブルのコードを参考に書いていく。
<template>
  <div class="container">
    <h1>Top Page</h1>
    <table class="table">
      <thead>
        <tr>
          <th scope="col">#</th>
          <th scope="col">Name</th>
          <th scope="col">Edit</th>
          <th scope="col">Delete</th>
        </tr>
      </thead>
      <tbody>
        <tr v-for="(plant, index) in plants">
          <th scope="row">{{ index + 1 }}</th>
          <td>{{ plant.name }}</td>
          <td>
            <button type="button" class="btn btn-warning btn-sm">Edit</button>
          </td>
          <td>
            <button type="button" class="btn btn-danger btn-sm">Delete</button>
          </td>
        </tr>
      </tbody>
    </table>
  </div>
</template>

<script setup>
const plants = ref(null);
plants.value = await getPlants();

// Get plants
async function getPlants() {
  return await $fetch("/api/plants");
}

useHead({
  title: "Green Care",
  link: {
    rel: "stylesheet",
    href: "https://cdn.jsdelivr.net/npm/bootstrap@5.0.2/dist/css/bootstrap.min.css",
    type: "text/css",
  },
  script: {
    src: "https://cdn.jsdelivr.net/npm/bootstrap@5.0.2/dist/js/bootstrap.bundle.min.js",
  },
});
</script>
フロント部分はこんな感じ。

データベースからの情報を取得し、表示できていることを確認。
解説
<tr v-for="(plant, index) in plants">
v-for ディレクティブを使用して、plants 配列の各要素を反復処理。
<th scope="row">{{ index + 1 }}</th>
行番号を表示。indexはv-forディレクティブによって提供されるインデックス。
<td>{{ plant.name }}</td>
plantオブジェクトのnameプロパティを表示。
const plants = ref(null);
plantsというリアクティブな変数を定義。
plants.value = await getPlants();
getPlants() 関数を呼び出してデータを取得し、plants変数に格納する。
awaitは非同期処理を行うことを示す。
async function getPlants() { ... }
非同期関数で、APIから植物のデータを取得。
植物追加機能
フロント側で植物を追加できるようにする処理を追加していく。
Bootstrapの公式ドキュメントのフォームを参考に組み立てていく。
<template>
  <div class="container">
    <h1>Top Page</h1>

    <!-- form追加 -->
    <form>
      <div class="mb-3">
        <label for="exampleInputName1" class="form-label">Name</label>
        <input
          v-model="plant"
          type="text"
          class="form-control"
          id="exampleInputName1"
          aria-describedby="nameHelp"
        />
      </div>
      <button
        type="submit"
        class="btn btn-primary"
        @click.prevent="addPlant(plant)"
      >
        Add Name
      </button>
    </form>

    <table class="table">
      <thead>
        <tr>
          <th scope="col">#</th>
          <th scope="col">Name</th>
          <th scope="col">Edit</th>
          <th scope="col">Delete</th>
        </tr>
      </thead>
      <tbody>
        <tr v-for="(plant, index) in plants">
          <th scope="row">{{ index + 1 }}</th>
          <td>{{ plant.name }}</td>
          <td>
            <button type="button" class="btn btn-warning btn-sm">Edit</button>
          </td>
          <td>
            <button type="button" class="btn btn-danger btn-sm">Delete</button>
          </td>
        </tr>
      </tbody>
    </table>
  </div>
</template>

<script setup>
const plants = ref(null);
const plant = ref(null); //追加
plants.value = await getPlants();

// Get plants
async function getPlants() {
  return await $fetch("/api/plants");
}

// Add plants
async function addPlant(plant) { //追加

  let addedPlant = null;
  if (plant)
    addedPlant = await $fetch("/api/plants", {
      method: "POST",
      body: {
        name: plant,
      },
    });

  if (addedPlant) plants.value = await getPlants();
}

useHead({
  title: "Green Care",
  link: {
    rel: "stylesheet",
    href: "https://cdn.jsdelivr.net/npm/bootstrap@5.0.2/dist/css/bootstrap.min.css",
    type: "text/css",
  },
  script: {
    src: "https://cdn.jsdelivr.net/npm/bootstrap@5.0.2/dist/js/bootstrap.bundle.min.js",
  },
});
</script>
解説
    <form>
      <div class="mb-3">
        <label for="exampleInputName1" class="form-label">Name</label>
        <input
          v-model="plant"
          type="text"
          class="form-control"
          id="exampleInputName1"
          aria-describedby="nameHelp"
        />
      </div>
      <button
        type="submit"
        class="btn btn-primary"
        @click.prevent="addPlant(plant)"
      >
        Add Name
      </button>
    </form>
植物名を入力するフォームを定義。
v-model="plant"
入力された値をplant変数に反映し、plant変数の変更を入力フィールドに反映する。(双方向バインディング)
@click.prevent="addPlant(plant)"
ボタンがクリックされたときにaddPlant関数を呼び出す。
.preventはデフォルトのイベントハンドラをキャンセルし、ページのリロードを防止する。
const plant = ref(null);
植物名を保持するためのリアクティブ変数plantを定義。
async function addPlant(plant) {

  let addedPlant = null;
  if (plant)
    addedPlant = await $fetch("/api/plants", {
      method: "POST",
      body: {
        name: plant,
      },
    });

  if (addedPlant) plants.value = await getPlants();
}
POSTリクエストを行い、植物の追加を行う。
body: { name: plant }
リクエストボディに、新しい植物名をオブジェクトとして含める。
リクエストが成功すると、"addedPlant"に新しい植物の情報が含まれることになる。
if (addedPlant) plants.value = await getPlants();
植物の追加が成功したか確認。
削除機能
フロント側で植物を削除できるようにする処理を追加していく。
<template>
  <div class="container">
    <h1>Top Page</h1>

    <!-- アラート追加 -->
    <div
      v-if="error"
      class="alert alert-danger alert-dismissible fade show"
      role="alert"
    >
      <strong>Error:</strong> Delete Error
      <button
        type="button"
        class="btn-close"
        data-bs-dismiss="alert"
        aria-label="Close"
        @click="error = null"
      ></button>
    </div>

    <form>
      <div class="mb-3">
        <label for="exampleInputName1" class="form-label">Name</label>
        <input
          v-model="plant"
          type="text"
          class="form-control"
          id="exampleInputName1"
          aria-describedby="nameHelp"
        />
      </div>
      <button
        type="submit"
        class="btn btn-primary"
        @click.prevent="addPlant(plant)"
      >
        Add Name
      </button>
    </form>

    <table class="table">
      <thead>
        <tr>
          <th scope="col">#</th>
          <th scope="col">Name</th>
          <th scope="col">Edit</th>
          <th scope="col">Delete</th>
        </tr>
      </thead>
      <tbody>
        <tr v-for="(plant, index) in plants">
          <th scope="row">{{ index + 1 }}</th>
          <td>{{ plant.name }}</td>
          <td>
            <button type="button" class="btn btn-warning btn-sm">Edit</button>
          </td>
          <td>
            <!-- クリックイベント追加 -->
            <button
              type="button"
              class="btn btn-danger btn-sm"
              @click="deletePlant(plant.id)"
            >
              Delete
            </button>
          </td>
        </tr>
      </tbody>
    </table>
  </div>
</template>

<script setup>
import { H3Error } from "h3"; // 追加
const plants = ref(null);
const plant = ref(null);
const error = ref(null); // 追加
plants.value = await getPlants();

// Get plants
async function getPlants() {
  return await $fetch("/api/plants");
}

// Add plant
async function addPlant(plant) {
  let addedPlant = null;
  if (plant)
    addedPlant = await $fetch("/api/plants", {
      method: "POST",
      body: {
        name: plant,
      },
    });

  if (addedPlant) plants.value = await getPlants();
}

// Delete plant
async function deletePlant(id) { // 追加
  let deletePlantOrError = null;
  if (id)
    deletePlantOrError = await $fetch("/api/plants", {
      method: "DELETE",
      body: {
        id: id,
      },
    });

  if (deletePlantOrError instanceof H3Error) {
    error.value = deletePlantOrError;
    return;
  }

  plants.value = await getPlants();
}

useHead({
  title: "Green Care",
  link: {
    rel: "stylesheet",
    href: "https://cdn.jsdelivr.net/npm/bootstrap@5.0.2/dist/css/bootstrap.min.css",
    type: "text/css",
  },
  script: {
    src: "https://cdn.jsdelivr.net/npm/bootstrap@5.0.2/dist/js/bootstrap.bundle.min.js",
  },
});
</script>
解説
async function deletePlant(id) {
  let deletePlantOrError = null;
  if (id)
    deletePlantOrError = await $fetch("/api/plants", {
      method: "DELETE",
      body: {
        id: id,
      },
    });

  if (deletePlantOrError instanceof H3Error) {
    error.value = deletePlantOrError;
    return;
  }

  plants.value = await getPlants();
}
idは削除したい植物の識別子。
let deletePlantOrError = null;
削除された植物の情報、またはエラーが格納される変数。初期値はnullに設定。
error.value
削除操作やデータ取得中に発生したエラーを格納する変数。
if (id)
    deletePlantOrError = await $fetch("/api/plants", {
      method: "DELETE",
      body: {
        id: id,
      },
    });
DELETEメソッドを使用し、削除対象の植物のidをリクエストボディに含める。
if (deletePlantOrError instanceof H3Error) {
    error.value = deletePlantOrError;
    return;
  }

  plants.value = await getPlants();
deletePlantOrErrorがH3Errorという特定のエラーを表すものだった場合、植物の削除が何らかの問題で失敗したことを意味する。
そのエラーの内容を error.value にセットして、エラーを通知する。
もし deletePlantOrError が H3Error のインスタンスでない場合、植物の削除が成功したこととなる。
削除が成功したら、getPlants関数を呼び出して植物リストを再取得。
これにより、削除された植物を含まない最新の植物リストを取得できる。
@click="deletePlant(plant.id)"
deleteボタンにクリックイベントを設定し、deletePlant関数を呼び出すように指定する。
更新機能
最後にフロント側で植物の情報を更新できるようにする処理を追加する。
<template>
  <div class="container">
    <h1>Top Page</h1>

    <!-- PlantsModal 追加 -->
    <div
      class="modal fade"
      id="exampleModal"
      tabindex="-1"
      aria-labelledby="exampleModalLabel"
      aria-hidden="true"
    >
      <div class="modal-dialog">
        <div class="modal-content">
          <div class="modal-header">
            <h5 class="modal-title" id="exampleModalLabel">Edit Plant</h5>
            <button
              type="button"
              class="btn-close"
              data-bs-dismiss="modal"
              aria-label="Close"
            ></button>
          </div>
          <div class="modal-body">
            <input
              v-model="editedPlant.name"
              type="text"
              class="form-control"
              id="exampleInputName1"
              aria-describedby="nameHelp"
            />
          </div>
          <div class="modal-footer">
            <button
              type="button"
              class="btn btn-secondary"
              data-bs-dismiss="modal"
            >
              Close
            </button>
            <button
              type="button"
              class="btn btn-primary"
              data-bs-dismiss="modal"
              @click="editPlant(editedPlant)"
            >
              Save changes
            </button>
          </div>
        </div>
      </div>
    </div>

    <div
      v-if="error"
      class="alert alert-danger alert-dismissible fade show"
      role="alert"
    >
      <strong>Error:</strong> Delete Error
      <button
        type="button"
        class="btn-close"
        data-bs-dismiss="alert"
        aria-label="Close"
        @click="error = null"
      ></button>
    </div>

    <form>
      <div class="mb-3">
        <label for="exampleInputName1" class="form-label">Name</label>
        <input
          v-model="plant"
          type="text"
          class="form-control"
          id="exampleInputName1"
          aria-describedby="nameHelp"
        />
      </div>
      <button
        type="submit"
        class="btn btn-primary"
        @click.prevent="addPlant(plant)"
      >
        Add Name
      </button>
    </form>

    <table class="table">
      <thead>
        <tr>
          <th scope="col">#</th>
          <th scope="col">Name</th>
          <th scope="col">Edit</th>
          <th scope="col">Delete</th>
        </tr>
      </thead>
      <tbody>
        <tr v-for="(plant, index) in plants">
          <th scope="row">{{ index + 1 }}</th>
          <td>{{ plant.name }}</td>
          <td>
            <!-- 追加 -->
            <button
              type="button"
              class="btn btn-warning btn-sm"
              data-bs-toggle="modal"
              data-bs-target="#exampleModal"
              @click="
                {
                  editedPlant.id = plant.id;
                  editedPlant.name = plant.name;
                }
              "
            >
              Edit
            </button>
          </td>
          <td>
            <button
              type="button"
              class="btn btn-danger btn-sm"
              @click="deletePlant(plant.id)"
            >
              Delete
            </button>
          </td>
        </tr>
      </tbody>
    </table>
  </div>
</template>

<script setup>
import { H3Error } from "h3";
const plants = ref(null);
const plant = ref(null);
const error = ref(null);
// 追加
const editedPlant = ref({
  id: null,
  name: null,
});
plants.value = await getPlants();

// Get plants
async function getPlants() {
  return await $fetch("/api/plants");
}

// Add plant
async function addPlant(plant) {
  let addedPlant = null;
  if (plant)
    addedPlant = await $fetch("/api/plants", {
      method: "POST",
      body: {
        name: plant,
      },
    });

  if (addedPlant) plants.value = await getPlants();
}

// Edit plant 追加
async function editPlant(editedPlant) {
  let plant = null;

  if (editedPlant.id && editedPlant.name)
    plant = await $fetch("/api/plants", {
      method: "PUT",
      body: {
        id: editedPlant.id,
        name: editedPlant.name,
      },
    });

  if (plant) plants.value = await getPlants();
}

// Delete plant
async function deletePlant(id) {
  let deletePlantOrError = null;
  if (id)
    deletePlantOrError = await $fetch("/api/plants", {
      method: "DELETE",
      body: {
        id: id,
      },
    });

  if (deletePlantOrError instanceof H3Error) {
    error.value = deletePlantOrError;
    return;
  }

  plants.value = await getPlants();
}

useHead({
  title: "Green Care",
  link: {
    rel: "stylesheet",
    href: "https://cdn.jsdelivr.net/npm/bootstrap@5.0.2/dist/css/bootstrap.min.css",
    type: "text/css",
  },
  script: {
    src: "https://cdn.jsdelivr.net/npm/bootstrap@5.0.2/dist/js/bootstrap.bundle.min.js",
  },
});
</script>
解説
    <div
      class="modal fade"
      id="exampleModal"
      tabindex="-1"
      aria-labelledby="exampleModalLabel"
      aria-hidden="true"
    >
      <div class="modal-dialog">
        <div class="modal-content">
          <div class="modal-header">
            <h5 class="modal-title" id="exampleModalLabel">Edit Plant</h5>
            <button
              type="button"
              class="btn-close"
              data-bs-dismiss="modal"
              aria-label="Close"
            ></button>
          </div>
          <div class="modal-body">
            <input
              v-model="editedPlant.name"
              type="text"
              class="form-control"
              id="exampleInputName1"
              aria-describedby="nameHelp"
            />
          </div>
          <div class="modal-footer">
            <button
              type="button"
              class="btn btn-secondary"
              data-bs-dismiss="modal"
            >
              Close
            </button>
            <button
              type="button"
              class="btn btn-primary"
              data-bs-dismiss="modal"
              @click="editPlant(editedPlant)"
            >
              Save changes
            </button>
          </div>
        </div>
      </div>
    </div>
まずはBootstrapのモーダルを追加。
async function editPlant(editedPlant) {
  let plant = null;

  if (editedPlant.id && editedPlant.name)
    plant = await $fetch("/api/plants", {
      method: "PUT",
      body: {
        id: editedPlant.id,
        name: editedPlant.name,
      },
    });

  if (plant) plants.value = await getPlants();
}
editPlantという非同期関数を定義。
let plant = null;
変数plantを宣言し、初期値としてnullを代入。
後にplantが更新された場合、更新後の情報が格納される変数。
if (editedPlant.id && editedPlant.name) { ... }
editedPlantオブジェクト内のidとnameのプロパティが存在する場合の条件分岐。
更新されたプラントのidとnameが存在するときのみ更新処理が実行される。
if (plant) plants.value = await getPlants();
plantが正常に更新された場合の条件分岐。
getPlants関数を使用して最新のplantリストを再取得し、plants変数に代入。
これによって、ブラウザ上で最新の情報が更新される。
以上でCRUD機能の完成!
今回学んだこと
英語から逃げない
Nuxt3という比較的新しい技術ということもあるが、エラーの解決方法を教えてくれたのは英語の記事が多かった。
当然英語で検索した方が圧倒的に情報が多く、新しい技術を学ぶ際には英語で情報を探す必要があると感じた。
今回はUdemyで基礎学習を終えてからアプリを作り始めたこともあり、英語の情報でもコードを読めば何となく理解することはできた。
公式ドキュメントを読もう
エラーで手が止まっていしまい、様々な記事を読むと多くの先輩エンジニアの方々がまずは公式ドキュメントを読むことを勧めていることをよく目にした。
今までは公式ドキュメントはあまり意識せず、検索して欲しい情報が載っていそうな記事を片っ端から読んでいたことを反省した。
確かに目先のエラーの解決には至るかもしれないが浅い知識ばかり蓄積してしまうのではないかと不安を覚えた。
公式ドキュメントには簡単なチュートリアルもあるため、まずは解決したい問題の周辺知識のコードを触って動かしてみる姿勢を大切にしていきたい。
Nitroサーバが便利
今回Nuxt3を使用して簡易的なアプリを実装したが、バックエンド部分を書くことなくAPI通信ができたことに衝撃を受けた。
おわりに
ここまで読んでいただきありがとうございました。
初学者向けということでコードを1行ずつ解説した結果、かなりの長文になってしまいました。
自分がエラーに困った時に様々な記事に助けられたように、今後新たに学習する方に向けて少しでも力になれたらと思い細かく書いてみました。
そして何より解説記事を書くことで自分が学びなおすことができるメリットも感じています。
なぜ先輩エンジニアの方々は、惜しげもなく解説記事を書いてくれるのだろう...と不思議に思ったこともありましたが、自分が実際に書いてみて思考の整理にもなることに気づいて腑に落ちました。
今後も新しい技術を学ぶ際には発信もセットで取り組みたいと思います。
次の記事
メモ機能、水やり日の登録機能の実装方法、デプロイについてはこちら↓
未経験者のためのNuxt 3、Prisma、MySQL入門!植物の水やり管理アプリを開発してみた②
参考記事
Nuxt 3 Prisma Tutorial
Nuxt 3を使いこなすために基礎から徹底解説
Prisma CRUD
Bootstrap
Nuxt3、Firebase、Prismaを利用し、SQL文を書かずに簡単なToDoアプリを作ってみる
