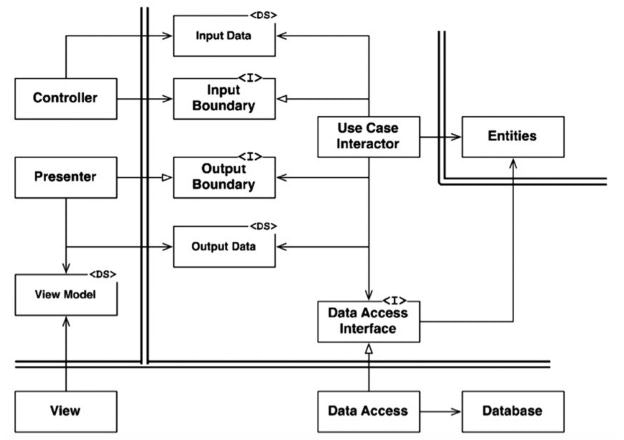
この前クリーンアーキテクチャのルールについての記事を書いたので、今回は現場で利用している技術でクリーンアーキテクチャを実装しました。
書籍で紹介されていた上記クラス図を参考にしています。対象のチュートリアルアプリはこちらです
変更前のクラス図・コード
クリーンアーキテクチャにする前のチュートリアルアプリのクラス図・コードです。
クラス図はシンプルなMVCになっています。
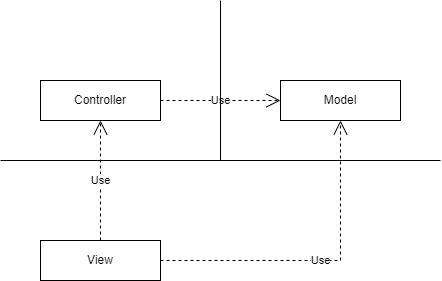
コードはControllerで保持しているProductクラスの配列をViewが表示しています。
namespace ProductApp.Models
{
    public class Product
    {
        public int Id { get; set; }
        public string Name { get; set; }
        public string Category { get; set; }
        public decimal Price { get; set; }
    }
}
namespace ProductsApp.Controllers
{
    public class ProductsController : ApiController
    {
        Product[] products = new Product[]
        {
            new Product { Id = 1, Name = "Tomato Soup", Category = "Groceries", Price = 1 },
            new Product { Id = 2, Name = "Yo-yo", Category = "Toys", Price = 3.75M },
            new Product { Id = 3, Name = "Hammer", Category = "Hardware", Price = 16.99M }
        };

        public IEnumerable<Product> GetAllProducts()
        {
            return products;
        }

        public IHttpActionResult GetProduct(int id)
        {
            var product = products.FirstOrDefault((p) => p.Id == id);
            if (product == null)
            {
                return NotFound();
            }
            return Ok(product);
        }
    }
}
<!DOCTYPE html>
<html xmlns="http://www.w3.org/1999/xhtml">
<head>
    <title>Product App</title>
</head>
<body>

    <div>
        <h2>All Products</h2>
        <ul id="products" />
    </div>
    <div>
        <h2>Search by ID</h2>
        <input type="text" id="prodId" size="5" />
        <input type="button" value="Search" onclick="find();" />
        <p id="product" />
    </div>

    <script src="https://ajax.aspnetcdn.com/ajax/jQuery/jquery-2.0.3.min.js"></script>
    <script>
    var uri = 'api/products';

    $(document).ready(function () {
      // Send an AJAX request
      $.getJSON(uri)
          .done(function (data) {
            // On success, 'data' contains a list of products.
            $.each(data, function (key, item) {
              // Add a list item for the product.
              $('<li>', { text: formatItem(item) }).appendTo($('#products'));
            });
          });
    });

    function formatItem(item) {
      return item.Name + ': $' + item.Price;
    }

    function find() {
      var id = $('#prodId').val();
      $.getJSON(uri + '/' + id)
          .done(function (data) {
            $('#product').text(formatItem(data));
          })
          .fail(function (jqXHR, textStatus, err) {
            $('#product').text('Error: ' + err);
          });
    }
    </script>
</body>
</html>
作業の流れ
クラス図をクリーンアーキテクチャにするために、以下の順に作業をしていきます。
- 関心事の分離
- 依存関係の逆転
依存関係を逆転させるためには、既に依存関係が成立している状態である必要があります。
そのため、依存関係の逆転は関心事を分離して依存関係が一度成立している後に実施します。
最初から完成形を作成しようとも考えましたが、実務では一気に行うのではなく、段階的に行うと想定しているため作業を分けています。
①関心事の分離
変更前のクラス図は責務が明確になっていないため、クラスの責務をもう少し細かく整理します。
クラス分け
| クラス | 責務 |
|---|---|
| Entity | システムが扱うデータのモデル |
| UseCase | そのシステムができること(ユースケース) |
| Controller | ユーザーの入力を受け取り、UseCaseへ伝える |
| Presenter | Viewに表示するデータの加工 |
| Repository | UseCaseからDBへデータの保存や変更を行う |
| DB | データの保持 |
| View | ユーザーへのデータの表示 |
※変更前のクラス図にあったModelは、冒頭に挙げたクリーンアーキテクチャの図を参考に名前をEntityに変更しました。
またクラス間のデータの受け渡しは専用のDTO(Data Transfer Ojbect)で行います。
| クラス | 責務 |
|---|---|
| InputData | ControllerからUseCase間の入力データ |
| OutputData | ControllerからUseCase間の出力データ |
| ViewModel | PresenterからView間のデータ |
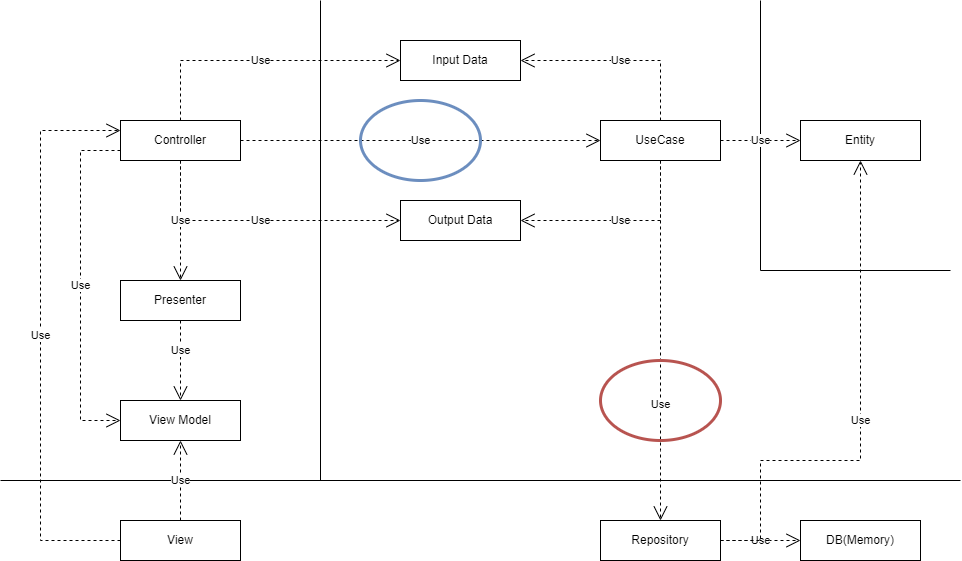
クラス図
ここまでのクラス図です。※今回DBは利用しないため、DBはMemoryとしています。
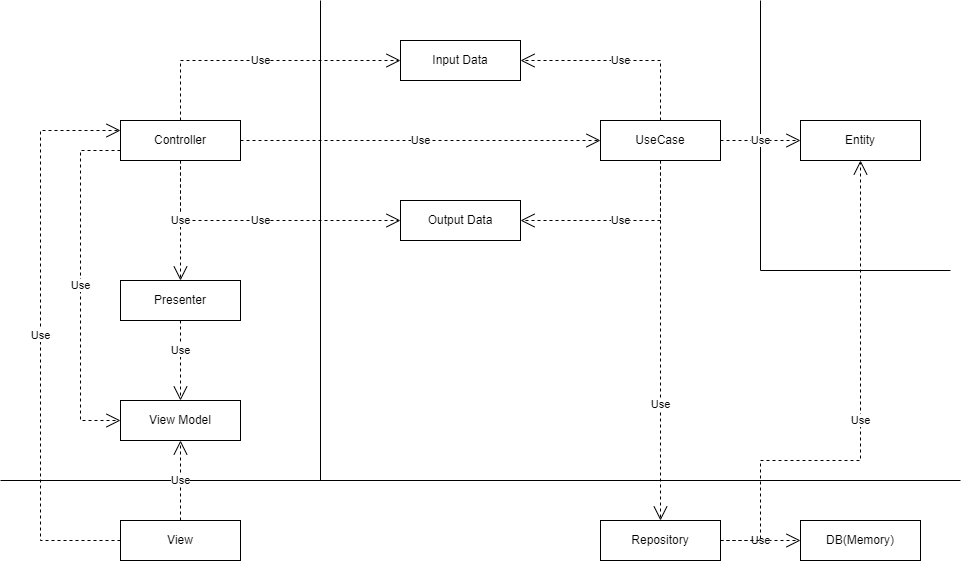
Presenterが冒頭の図と異なる理由
Presenterは冒頭の図ではUseCaseInteractorから参照されていますが、Controllerから参照するようにしています。
当初は冒頭の図の通りにUseCaseInteractorからPresenterを参照するようにしましたが、Presenterが処理後の値であるViewModelをViewに渡すためにはControllerを経由する必要があるためです。
そのためControllerからPresenterと処理後の値であるViewModelを参照するように変更しました。
②依存関係の逆転
先程の作業で責務を分割することができましたが、円の内側から外側(抽象から具体)に依存している箇所(下記赤枠)があるため、この箇所の依存関係を逆転します。
また、依存の向きは円の内側に向かっていますが、自分が直接使っていないEntityに推移的に依存している箇所があります。(下記青枠)
推移的な依存関係について、クリーンアーキテクチャの著書の中では以下の記述があります。
推移的な依存関係は「ソフトウェアのエンティティは自分が直接使っていないものに依存するべきではない」という大原則に違反している
推移的に依存していると、直接依存している箇所以外からの影響を受ける可能性が高くなってしまいます。
そのため、依存関係の逆転を利用して推移的な依存関係を解消します。
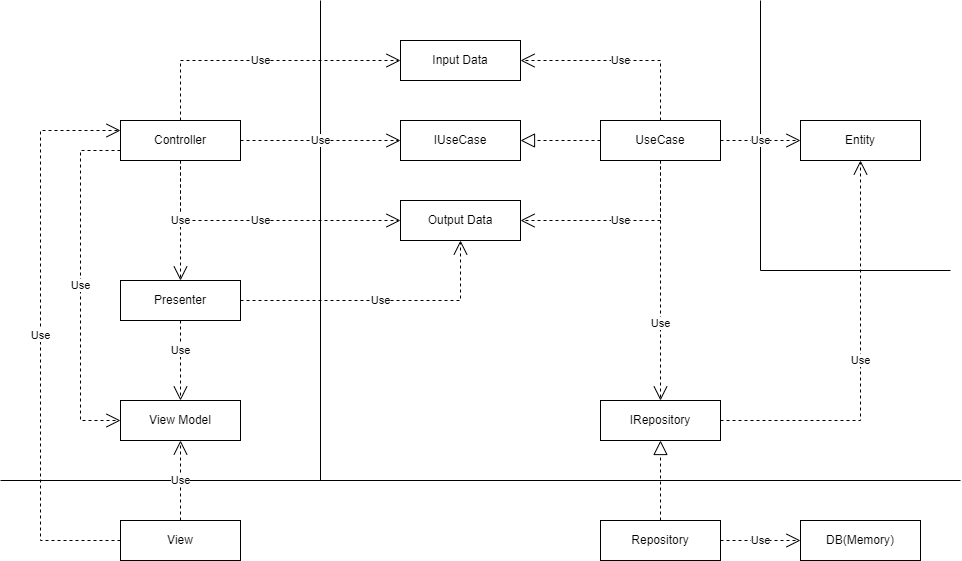
追加するインターフェース
| インターフェース | 役割 |
|---|---|
| IRepository | UseCaseとRepositoryの依存関係を逆転させる |
| IUseCase | Controllerの推移的な依存関係を解消する |
クラス図
依存関係の逆転をしたことで、冒頭で紹介したクリーンアーキテクチャのクラス図にすることができました。
Presenterにインターフェースがない理由
Presenterについて、冒頭の図ではUseCase InteractorがOutput Boundary インターフェースからPresenterを呼び出しています。
これはクリーンアーキテクチャのルールである、内側のレイヤーが外側のレイヤーを直接参照しないようにするためです。
しかし、今回Presenter用のインターフェースは下記理由から設置していません。
-
Presenterを呼び出すControllerは同じレイヤーで、内側のレイヤーから外側のレイヤーを参照していない。 -
Presenterが参照しているViewModelはControllerも参照しているため、推移的な依存関係が発生していない。
依存関係の注入
インターフェースとそれを実装する具象クラスの依存関係の登録は、DIコンテナーを利用します。
今回はMicrosoftの記事を参考にUnityコンテナを使用しています。
 public static void Register(HttpConfiguration config)
{
    var container = new UnityContainer();
    container.RegisterType<IGetAllProductsRepository, GetAllProductsRepository>(new HierarchicalLifetimeManager());
    container.RegisterType<IGetAllProducts, GetAllProducts>(new HierarchicalLifetimeManager());

    config.DependencyResolver = new UnityResolver(container);
    // 以下はAPIのルーティングに関する処理のため略
変更後のコード
量が多くなってしまうため、初期表示の際にすべてのProductを取得するコードのみ記載しています。
全体はGitHubに載せています。
Entity
namespace Domain.Products
{
    public class Product
    {
        public int Id { get; set; }
        public string Name { get; set; }
        public string Category { get; set; }
        public decimal Price { get; set; }
    }
}
UseCase
namespace Application.Products.GetAllProducts
{
    public interface IGetAllProducts
    {
        List<GetAllProductsOutputData> Handle();
    }
}
namespace Application.Products.GetAllProducts
{
    public class GetAllProducts : IGetAllProducts
    {
        private readonly IGetAllProductsRepository getAllProductsRepository;

        public GetAllProducts(IGetAllProductsRepository getAllProductsRepository)
        {
            this.getAllProductsRepository = getAllProductsRepository;
        }

        public List<GetAllProductsOutputData> Handle()
        {
            return this.getAllProductsRepository.GetAllProducts().Select(x => new GetAllProductsOutputData(x.Name, x.Price)).ToList();
        }
    }
}
Repository
namespace Application.Products.GetAllProducts
{
    public interface IGetAllProductsRepository
    {
        List<Product> GetAllProducts();
    }
}
namespace InMemoryInfrastructure.Products
{
    public class GetAllProductsRepository : IGetAllProductsRepository
    {
        public List<Product> GetAllProducts()
        {
            return InMemoryProduct.products.ToList();
        }
    }
}
namespace InMemoryInfrastructure.Products
{
    public static class InMemoryProduct
    {
        public static Product[] products = new Product[]
        {
            new Product { Id = 1, Name = "Tomato Soup", Category = "Groceries", Price = 1 },
            new Product { Id = 2, Name = "Yo-yo", Category = "Toys", Price = 3.75M },
            new Product { Id = 3, Name = "Hammer", Category = "Hardware", Price = 16.99M }
        };
    }
}
Controller
namespace ProductsApp.Controllers
{
    public class ProductsController : ApiController
    {
        private readonly IGetAllProducts getAllProducts;
        private readonly GetAllProductsPresenter getAllProductsPresenter;

        public ProductsController(IGetAllProducts getAllProducts, IGetProduct getProduct)
        {
            this.getAllProducts = getAllProducts;
            this.getAllProductsPresenter = new GetAllProductsPresenter();
        }

        public List<GetAllProductsViewModel> GetAllProducts()
        {
            var getAllProductsOutputDataList = this.getAllProducts.Handle();
            return this.getAllProductsPresenter.Complete(getAllProductsOutputDataList);
        }
    }
}
Presenter
namespace ProductsApp.Controllers.GetAllProducts
{
    public class GetAllProductsPresenter
    {
        public List<GetAllProductsViewModel> Complete(List<GetAllProductsOutputData> getAllProductsOutputData)
        {
            var getAllProductsViewModelList = new List<GetAllProductsViewModel>();

            getAllProductsOutputData.ForEach(x =>
                getAllProductsViewModelList.Add(new GetAllProductsViewModel(x.Name, x.Price))); ;

            return getAllProductsViewModelList;
        }
    }
}
DTO
namespace Application.Products.GetAllProducts
{
    public class GetAllProductsOutputData
    {
        public string Name { get; set; }
        public decimal Price { get; set; }

        public GetAllProductsOutputData(string name, decimal price)
        {
            Name = name;
            Price = price;
        }
    }
}
namespace ProductsApp.Controllers.GetAllProducts
{
    public class GetAllProductsViewModel
    {
        public string Name { get; set; }
        public decimal Price { get; set; }

        public GetAllProductsViewModel(string name, decimal price)
        {
            Name = name;
            Price = price;
        }
    }
}
※ViewからControllerへ渡すデータがないため、InputData用のクラスはありません。
