目的
日常的に家電を赤外線リモコンで操作していると思いますが、
これをArduinoから操作できるようになることを目的としています。
今回はTVのリモコンの電源OFF/ON、ch切替えを行います。
もし家電のリモコンを連打したくなった際は改良して使えるかもしれません。
準備
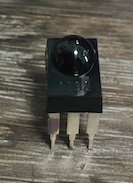
赤外線リモコン受信モジュール SPS-440-1(38kHz)
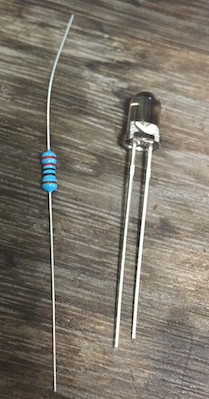
5mm赤外線LED 940nm OSI5LA5113A
Arduino UNO
抵抗 100Ω
赤外線リモコン受信モジュールはこちら
5mm赤外線LEDはこちら
接続図
下記のように繋げます。
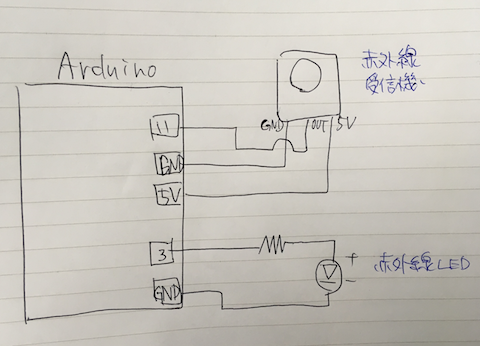
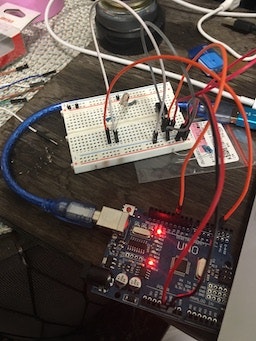
Arduinoと繋げた際は下記のようになります。
コード
俺より凄いやつしかいないのサイトを参考にさせて頂き受信用コードを使用して、電源ON/OFF/CH切り替え信号をキャプチャする。
その後、送信用コードでキャプチャした電源ON/OFF/CH切り替え信号を送る。
受信用(IRremoteライブラリ サンプルコード)
IRrecvDump
/*
 * IRremote: IRrecvDump - dump details of IR codes with IRrecv
 * An IR detector/demodulator must be connected to the input RECV_PIN.
 * Version 0.1 July, 2009
 * Copyright 2009 Ken Shirriff
 * http://arcfn.com
 * JVC and Panasonic protocol added by Kristian Lauszus (Thanks to zenwheel and other people at the original blog post)
 * LG added by Darryl Smith (based on the JVC protocol)
 */

# include <IRremote.h>

/*
*  Default is Arduino pin D11.
*  You can change this to another available Arduino Pin.
*  Your IR receiver should be connected to the pin defined here
*/
int RECV_PIN = 11;

IRrecv irrecv(RECV_PIN);

decode_results results;

void setup()
{
  Serial.begin(9600);
  irrecv.enableIRIn(); // Start the receiver
}


void dump(decode_results *results) {
  // Dumps out the decode_results structure.
  // Call this after IRrecv::decode()
  int count = results->rawlen;
  if (results->decode_type == UNKNOWN) {
    Serial.print("Unknown encoding: ");
  }
  else if (results->decode_type == NEC) {
    Serial.print("Decoded NEC: ");

  }
  else if (results->decode_type == SONY) {
    Serial.print("Decoded SONY: ");
  }
  else if (results->decode_type == RC5) {
    Serial.print("Decoded RC5: ");
  }
  else if (results->decode_type == RC6) {
    Serial.print("Decoded RC6: ");
  }
  else if (results->decode_type == PANASONIC) {
    Serial.print("Decoded PANASONIC - Address: ");
    Serial.print(results->address, HEX);
    Serial.print(" Value: ");
  }
  else if (results->decode_type == LG) {
    Serial.print("Decoded LG: ");
  }
  else if (results->decode_type == JVC) {
    Serial.print("Decoded JVC: ");
  }
  else if (results->decode_type == AIWA_RC_T501) {
    Serial.print("Decoded AIWA RC T501: ");
  }
  else if (results->decode_type == WHYNTER) {
    Serial.print("Decoded Whynter: ");
  }
  Serial.print(results->value, HEX);
  Serial.print(" (");
  Serial.print(results->bits, DEC);
  Serial.println(" bits)");
  Serial.print("Raw (");
  Serial.print(count, DEC);
  Serial.print("): ");

  for (int i = 1; i < count; i++) {
    if (i & 1) {
      Serial.print(results->rawbuf[i]*USECPERTICK, DEC);
    }
    else {
      Serial.write('-');
      Serial.print((unsigned long) results->rawbuf[i]*USECPERTICK, DEC);
    }
    Serial.print(" ");
  }
  Serial.println();
}

void loop() {
  if (irrecv.decode(&results)) {
    Serial.println(results.value, HEX);
    dump(&results);
    irrecv.resume(); // Receive the next value
  }
}
ir_send
/*
 * IRremote: IRsendDemo - demonstrates sending IR codes with IRsend
 * An IR LED must be connected to Arduino PWM pin 3.
 * Version 0.1 July, 2009
 * Copyright 2009 Ken Shirriff
 * http://arcfn.com
 */


# include <IRremote.h>

IRsend irsend;
unsigned int address = 0x4004;
unsigned long data;

void setup()
{
  Serial.begin(115200);
}

void printfunc(unsigned int _address, unsigned long _data) {
  Serial.print("address :");Serial.println(_address);
  Serial.print("data    :");Serial.println(_data);
  Serial.println("---");
}

void loop() {

  // 電源ON
  data = 0x100BCBD;
  irsend.sendPanasonic(address, data);
  printfunc(address, data);
	delay(5000);

  // CH -->
  data = 0x1002C2D;
  irsend.sendPanasonic(address, data);
  printfunc(address, data);
  delay(3000);

  // CH <--
  data = 0x100ACAD;
  irsend.sendPanasonic(address, data);
  printfunc(address, data);
  delay(3000);

  // 電源OFF
  data = 0x100BCBD;
  irsend.sendPanasonic(address, data);
  printfunc(address, data);
  delay(5000);
}
送信時はコードコメントにあるように赤外線LEDをピン3に接続して下さい。
- An IR LED must be connected to Arduino PWM pin 3.
Panasonicのリモコンは、sendPanasonic()関数を使えば良いですが、
Sonyや他メーカの場合は別関数を使う必要があるみたいです。
テスト
TVに赤外線LEDを向けてコード実行時に、TVをいい感じにON/OFF/CH切り替えできればOKです。
control infrared signal pic.twitter.com/v6i8VgK3NI
— st (@st17890027) February 24, 2019
参考
Arduinoでパーツやセンサーを使ってみよう~赤外線リモコン
俺より凄いやつしかいない
Arduino-IRremote