目的
音楽データ形式にMIDI(Musical Instrument Digital Interface)というものがあります。
MP3等の周波数データと違い、音階そのものを記録するデータ構造になっているようです。
今回はMIDI形式のデータを、MIDIシールドを使ってPC(Mac)-Arduino間で通信させた手順について記録します。
準備
・Arduino UNO/Megaなどを準備する(今回はMEGA)
・SparkFun MIDI Shield
・Proster USB MIDI ケーブル
・MidiPlayer、Midi形式のファイルをPC側で準備する
・100均のスピーカ3つ
Midiシールドはパーツに別れて届くため、はんだ付けが必要です。
また色々スイッチが付いていると思いますが、それぞれ下記の用途であるようです。
Potentiometers are connected to analog pins 1 and 2, and can be used to control volume, pitch, tone or anything else you'd like. The shield also comes with three momentary push buttons, a reset button, and green and red stat LEDs. The RUN/PROG switch allows you to program the Arduino over serial without having to remove the shield.
ポテンショメータ(可変抵抗)はアナログピン1、2に繋がっており、ボリューム、ピッチなどの制御に使います。
3つのモーメンタリスイッチ(プッシュスイッチ)は、リセットボタン、LED green,red status表示のためにある。
RUN/PROGスイッチは、シールド取り外しなしにArduinoプログラム更新することを可能にする。
(RUNにするとMidi信号がhardserial使用するため、PROGでOFFにしてソフト更新する用途のものと思われます)
MIDIライブラリ
MIDI LibraryのページからDownloadしてインストールします。
Toneライブラリ
[Arduino Tone Library]
(https://code.google.com/archive/p/rogue-code/wikis/ToneLibraryDocumentation.wiki)のページからDownloadしてインストールします。
配線図
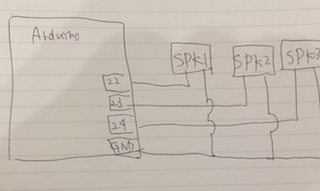
Arduino MEGAのPIN22,23,24とスピーカを接続します。
コード
コードはこちらのサイトのものを使わせて頂きます。
# include <Tone.h>
# include <MIDI.h>

// MIDI IN Channel
const int MIDI_CH = 1;

// Tones
const int CH_CNT = 3;
int intervals[CH_CNT] = {0,0,0};
Tone tones[CH_CNT];
const byte SND_PINS[CH_CNT] = {22,23,24};

MIDI_CREATE_DEFAULT_INSTANCE();

const word noteFreq[] = {
  0,  9,  9, 10,  10, 11,   12,  12, 13, 14, 15, 15,
  16,  17, 18, 19,  21, 22,  23,  25, 26, 28, 29, 31,
  33,  35, 37,  39,  41, 44,  46, 49, 52, 55, 58, 62,
  65, 69, 73, 78,  82, 87,  93, 98, 104,  110,  117,  124,
  131, 139, 147, 156, 165, 175, 185,  196,  208,  220,  233,  247,
  262, 277, 294, 311, 330, 349, 370,  392,  415,  440,  466,  494,
  523, 554, 587, 622, 659, 699, 740,  784,  831,  880,  932,  988,
  1047, 1109, 1175, 1245, 1319, 1397, 1480, 1568, 1661, 1760, 1865, 1976,
  2093, 2218, 2349, 2489, 2637, 2794, 2960, 3136, 3322, 3520, 3729, 3951,
  4186, 4435, 4699, 4978, 5274, 5587, 5920, 6272, 6645, 7040, 7459, 7902,
  8372, 8870, 9397, 9956, 10548,11175,  11840,  12544
};

void setup()
{
  for (int i = 0; i < CH_CNT; i++){
    pinMode(SND_PINS[i], OUTPUT);
    tones[i].begin(SND_PINS[i]);
  }
  MIDI.begin();
}

void loop()
{
  uint8_t data1, data2;
  if (MIDI.read()) {
    MIDI.setInputChannel(MIDI_CH);

    switch (MIDI.getType()) {
      case midi::NoteOn:
        data1 = MIDI.getData1();    // note no
        data2 = MIDI.getData2();    // velocity
        if (data2 > 0){
          for (int i = 0; i < CH_CNT; i++){
            if (intervals[i] == 0){
              intervals[i] = data1;
              tones[i].play(noteFreq[data1]);
              break;
            }
          }
        }
        break;

      case midi::NoteOff:
        data1 = MIDI.getData1();  // note no
        for (int i = 0; i < CH_CNT; i++){
          if (intervals[i] == data1){
            intervals[i] = 0;
            tones[i].stop();
            break;
          }
        }
        break;
    }
  }
}
テスト
テストとしてMIDI音源はこちらのサイトで紹介されているものなどを使わせて頂きました。
PCからUSB-MIDI経由でarduinoへMIDI信号を送り、スピーカから音声再生できればOK
midi shield pic.twitter.com/7Pn0bNMWiA
— st (@st17890027) April 29, 2019
MIDI再生エラー対策
MIDI-USBケーブルが働いていることを確認するには、ケーブルのMIDI-OUTのランプが点灯していることを確認すれば良い。
midi-USBケーブルはamazonにて色々販売されていると思いますが、機器と相性があるみたいで気をつける必要がありそうです。
(安いMidi-USBケーブルを一度購入しましたが、macとmidi_shield間で通信できませんでした)
参考
Arduino UNO+MIDIキーボードで3和音鳴らしてみる
Arduino MIDI Library
[Arduino Tone Library]
(https://code.google.com/archive/p/rogue-code/wikis/ToneLibraryDocumentation.wiki)
Proster USB MIDI ケーブル
2万4000以上のゲームミュージックが大量にダウンロードできる「VGMusic」
