目的
AGL(Automotive Grade Linux)の公開ブランチに、ソースコードをcommitするまでの備忘録です。
AGLについてはこちらやAutomotive Linux Wikiをご参照
本記事は以下の更新版です
準備
AGLの公開コードに対しては、誰でも更新リクエストを送ることが可能になっています。
Contributing to the AGL Distro
The AGL community appreciates feedback, ideas, suggestion, bugs and documentation just as much as code.
リクエストしたコードはgerritを通じてtrackおよびreviewが行われます。
Contributing Code
We use Gerrit to track and review changes to AGL software (i.e. projects at gerrit.automotivelinux.org).
以下の開発向けドキュメントに詳細が記載されているのでご参考ください。
Welcome to the Automotive Grade Linux (AGL) documentation.
5_How_To_Contribute
ソースコード取得
以下を参考にソースコード取得します。
1.Define Your Top-Level Directory
export AGL_TOP=$HOME/AGL
echo 'export AGL_TOP=$HOME/AGL' >> $HOME/.bashrc
mkdir -p $AGL_TOP
2.Download the repo Tool and Set Permissions
mkdir -p $HOME/bin
export PATH=$HOME/bin:$PATH
echo 'export PATH=$HOME/bin:$PATH' >> $HOME/.bashrc
curl https://storage.googleapis.com/git-repo-downloads/repo > $HOME/bin/repo
chmod a+x $HOME/bin/repo
以下はstableブランチではなく、masterブランチを取得する場合
3.Cutting-Edge Files: Using the "cutting-edge" AGL files gives you a snapshot of the "master" branch.
cd $AGL_TOP
mkdir master
cd master
repo init -u https://gerrit.automotivelinux.org/gerrit/AGL/AGL-repo
repo sync
commit用コード作成
元記事同様に、以下のような観点でcommit用コードを作成してみます。
commit用コード作成
いきなりの機能追加は大変なので、期限切れリンクの修正や、ビルドワーニング修正で何か貢献できないか、という観点で確認します。
commitのための前準備
元記事記を参考に、前準備をします
AGLのコードリリースの際、
CIATという継続的インテグレーションの評価システムにcommitすることになります。
CIATについては以下が詳しいです。
Building and testing an automotive platform
How to Write Tests for the AGL HW Test Infra
20161210_第8回jenkins勉強会
Gerrit Serverは以下URLからアクセスすることが可能です。
gerrit.automotivelinux.org
Building AGL with the Yocto Project - A Crashcourse -
Gerritはレビューシステムであり、commitは最終的にExpert Memberの承認を受けてMergeされます。
また、自動評価も実行されます。Gerrit上は以下の通り記載されています。
CR   : Code review
V    : Verified
CIB  : ci-image-build
CIBT : ci-image-boot-test
commit手順
アカウント作成
以下を参考にLinuxFoundationのアカウント作成します。
Creating Linux Foundation ID
Go to the Linux Foundation ID website.
上記Documentの通り作成し、Gerritにsign inできればOK
Access Gerrit by selecting Sign In, and use your new Linux Foundation account ID to sign in.
gerritのconfiguring
次に、gerritとssh通信できるようにします。commitのために必要です。
SSH key生成
こちらを参考に、ssh-keygenします。
生成したprivate key,public keyのうち、public keyをgerrit側に登録します。
public keyをgerritに登録
元記事同様に、こちらを参考に、gerritに生成したpublic keyを登録します。(private keyではない)
Finally, add the public key of the generated key pair to the Gerrit server, with the following steps:
1.Go to Gerrit.
2.Click on your account name in the upper right corner.
3.From the pop-up menu, select Settings.
4.On the left side menu, click on SSH Public Keys.
5.Paste the contents of your public key ~/.ssh/id_rsa.pub and click Add key.
gerritとssh通信する際に正しい鍵ペアが使われるように、~/.ssh/configに以下のように記載しておく。
you need to create a ~/.ssh/config file modeled after the one below.
host gerrit.automotivelinux.org
HostName gerrit.automotivelinux.org
IdentityFile ~/.ssh/id_rsa_automotivelinux_gerrit
User
is your Linux Foundation ID and the value of IdentityFile is the name of the public key file you generated.
いざ、commit
上記が完了し、修正ファイルも準備できたら、以下記事を参考にcommitを進めます。
コマンドは以下を参考
修正対象のリポジトリに移動し、remote branchが意図通りか確認する
(以下はmeta-aglにcommitする場合の例)
cd meta-agl
git remote -v
     agl	https://gerrit.automotivelinux.org/gerrit/AGL/meta-agl (fetch)
     agl	ssh://gerrit.automotivelinux.org:29418/AGL/meta-agl (push)
修正対象ファイルをgit add,git commit --signoffする。
git add (修正対象ファイル)
git commit --signoff

> Please sign you commit before you submit the change (otherwise it will not be accepted by gerrit): git commit --signoff
remoteのレビューリクエスト用ブランチにpushする。
以下はmasterブランチにpushする場合。
git push agl HEAD:refs/for/master
# git push <remote> HEAD:refs/for/<targetbranch>
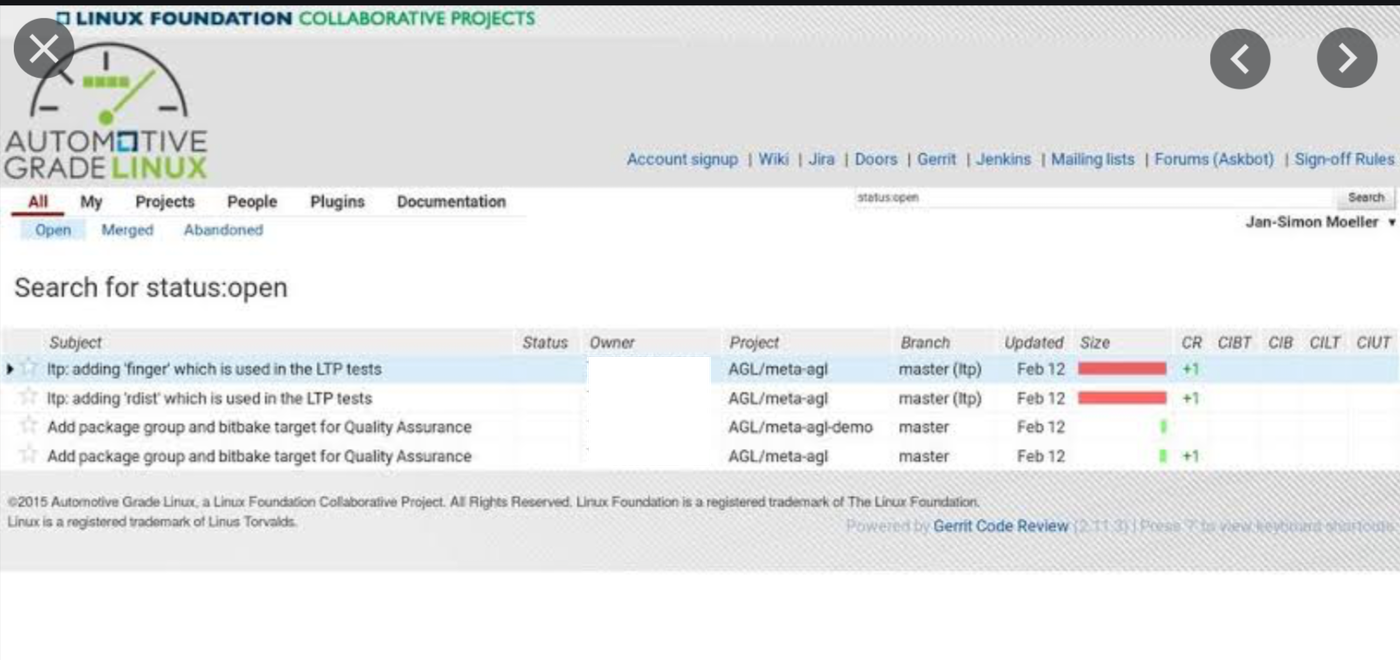
以下記事のように、commitした内容がgerrit上から確認できればOK
Commit message記載の注意点
Commit messageはしっかり書く必要があります。(更新内容,JIRA番号,を記述する必要がある)
相手にどんな変更点かを伝える手段であるCommit メッセージを分かりやすく書く事は重要です。
特に、リモートで直接対話したことがない相手に対して意図を伝えるために尚更重要となります。
How to Write a Git Commit Message
例えばbugを見つけた場合は、JIRAに類似bugがないかチェックの上、新規JIRAを発行して番号をcommit messageに書く必要がある。
Reporting bugs
If you are a user and you have found a bug, please submit an issue using JIRA. Before you create a new JIRA issue, please try to search the existing items to be sure no one else has previously reported it.
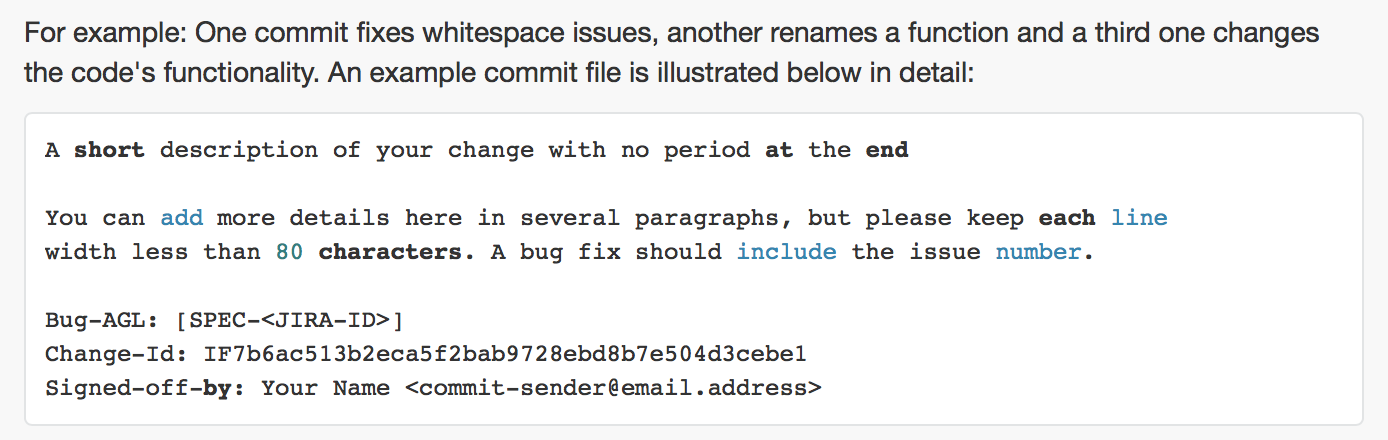
commit messageのフォーマットは以下の記述を参考
4_Submitting_Changes
For example: One commit fixes whitespace issues, another renames a function and a third one changes the code's functionality. An example commit file is illustrated below in detail:
無事にmerge頂けました
簡単なtypo修正をcommitさせて頂いたところ、
無事にレビューを終え、Merged Statusになりました。

git review時にエラーCould not connect to gerrit
$ git review
...
fatal: Could not read from remote repository.

Please make sure you have the correct access rights
and the repository exists.
We don't know where your gerrit is. Please manually create a remote
named 'origin' and try again.
Could not connect to gerrit at ssh://seigot@gerrit.automotivelinux.org:29418/AGL/meta-agl-devel
https://www.mediawiki.org/wiki/Gerrit/Tutorial#Set_Up_SSH_Keys_in_GerritのSet Up SSH Keys in Gerritを見直すと良い
もしくは、
https://docs.automotivelinux.org/en/master/#6_How_To_Contributeを見直すと良い。(何度もハマった、、、)
$ ssh-keygen -t rsa -C "gerrituser@example.com" #"gerrituser@example.com"はユーザのemail addressに置き換え
$ cat ~/.ssh/id_rsa.pub                         #公開鍵を手動でコピーする(鍵の名前は作成時のファイル名に置き換え)
$ eval `ssh-agent`                              #agent起動
$ ssh-add ~/.ssh/id_rsa                         #秘密鍵をagentに追加(鍵の名前は作成時のファイル名に置き換え)
$ ssh -p 29418 seigot@gerrit.automotivelinux.org  #"gerrituser@example.com"はユーザ名に置き換え(@の先はAGLのgerrit(gerrit.automotivelinux.org)を指定する)
proxy環境下でのgit review時にエラーCould not connect to gerrit
ssh実行時にProxyCommandを加える必要があるかもしれない。
Macで HTTP Proxy 経由のSSH
# ssh configの例(プロキシ=win_proxy:3128 の例)
host    gerrit.automotivelinux.org
        IdentityFile ~/.ssh/xxx
        User xxxx
        ProxyCommand nc -X connect -x win_proxy:3128 %h %p
感想
何か至らぬ点がありましたら、アドバイス頂けると幸いです。
参考
Automotive Linux Wiki
Contributing to the AGL Distro
Welcome to the Automotive Grade Linux (AGL) documentation.