はじめに
Google AuthenticatorとVIP Accessに対応したジェネレータを作って見るだけの話でございます。
どうせならアドベントカレンダー埋めたいし、1日目が開いてたから書きました。
難易度については、純粋な技術的観点で比較するとGoogle AuthenticatorもVIPAccessに差はほぼないです。
とはいえ、色々問題があるので、Google Authenticatorだけ書きます。
問題ってなに?
VIPAccessはそもそもTOTPシークレットが非公開(後述)な上、秘密鍵自体マスターキー(復号キー)で保護されています。
マスターキーが変更されると、TOTPシークレットが取り出せなくなる問題があります。
上記のプロビジョニング処理と認証処理以外は、似たような感じなのでコード自体は省略します。
一応、日本語でVIPAccessのプロビジョニングからTOTPの生成から利用までのフローは両者の差分を明確にするため、書いておきます。
TOTPとかHOTPとか
Hash-based-OTP:HMACとカウンタを使ったOTPアルゴリズムです、詳しくはRFC 4226を読むと良いです。
Time-based-OTP:HOTPと時間を使ったアルゴリズムです、詳しくはRFC 6238を読むと良いです。
今回はTOTPのみ実装していこうと思います。(2022年現在、大体のサービスTOTPの実装がほとんどですし(ほんとか???))
といっても、このあたりの細かい話はライブラリを使いますので今回は触れません。
マジでここから実装したい人はこのあたりの記事を読むと良いと思います。
やりたいこと
- OTPを生成する
-
otpauth://から始まるURIを生成する
OTPの生成をする
使うライブラリ
これをまるっと使っていこうと思って途中まで使ってたんですが、APIを使っていくとSecretを渡すあたりの処理の引数がString型しか受け取らなかったんですよね。
普通に考えてbase64/base32 decodeしたSecretはバイナリ値であることが前提だと思っているのでVec<u8>型を受け取らせるように修正した物をおいておきます。
(Cとかならchar*でいいけど、RustはUTF-8シーケンスにバイト列が一致しないとString型に入れられないはずなので)
otpauth://から始まるURIを生成する
otpauth://から始まるURIはKey-Uri-Formatというらしいですね。
詳しくは以下の記事を読んでもらえれば良いかなと言うところです。
とりあえずこのURIを生成するということを念頭に置いて、インタフェース部分を作ってみます。
URLの基本構文: otpauth://[TYPE]/[LABEL]?[PARAMETERS]
TYPE
hotp または totp が指定されます。
LABEL
accountname または issuer (":" / "%3A") *"%20" accountname
が指定される必要があります。
| ラベル | 説明 |
|---|---|
| issuer | 発行者名です。一般的にサービス名が入ります。値はURLエンコードします。 |
| account | アカウント名です。一般的に利用者名が入ります。値はURLエンコードします。 |
PARAMETERS
| ラベル | 説明 |
|---|---|
| secret | 秘密鍵です。Base32エンコードした値が入ります。 |
| issuer | 発行者名です。LABELで指定したissuerをここにも指定します。(実装により、指定されていないと、生成したURIを正しく読み取れない実装もあります。) |
| algorithm | SHA1(デフォルト)/SHA256/SHA512のいずれかが入ります。実装によっては無視されます。 |
| digits | トークンの表示桁数です。(6または8)6がデフォルトです。対応しているサービスによっては8桁は使えない可能性があります。 |
| period | 更新間隔(秒)任意ですが、大体のサービスは30秒がデフォルトです。 |
| counter | hotpのプロビジョニング時に使用するカウンタ用パラメータです。 |
というわけで、インタフェースをこういうふうに作っていきます。
pub trait Authenticator {
    fn get_account(&self) -> String;
    fn get_type(&self) -> String;
    fn get_secret(&self) -> String;
    fn get_issuer(&self) -> String;
    fn get_algorithm(&self) -> String;
    fn get_digits(&self) -> u32;
    fn get_period(&self) -> Option<u64>;
    fn get_counter(&self) -> Option<u64>;
    fn get_totp(&self) -> String;
    fn get_hotp(&self) -> String;
}
インタフェースができたのでURIを構成するメソッドも作ります。
use percent_encoding::{utf8_percent_encode, NON_ALPHANUMERIC};
macro_rules! url_encode {
    ($s:expr) => {{
        utf8_percent_encode(&$s, NON_ALPHANUMERIC).to_string()
    }};
}
pub fn generate_uri(auth: &dyn Authenticator) -> String {
    let scheme = "otpauth:";
    let account = auth.get_account();

    let counter = auth.get_counter();
    let period = auth.get_period();
    let parameter = if counter.is_some() {
        format!("counter={}", counter.unwrap())
    } else if auth.get_period().is_some() {
        format!("period={}", period.unwrap())
    } else {
        panic!("HOTPカウンタ、TOTPピリオド(タイムステップ値)いずれのパラメータもAuthenticatorに存在しませんでした。");
    };

    format!(
        "{}//{}/{}:{}?secret={}&issuer={}&algorithm={}&digits={}&{}",
        scheme,
        url_encode!(auth.get_type()),   // TYPE
        url_encode!(auth.get_issuer()), // LABEL
        url_encode!(account),           // LABEL
        url_encode!(auth.get_secret()), // 以降PARAMETER
        url_encode!(auth.get_issuer()),
        url_encode!(auth.get_algorithm()),
        auth.get_digits(),
        parameter
    )
}
generate_uriに生成したAuthenticatorを突っ込むとURIが作られるという便利な代物が作れました。
これで、GoogleAuthenticatorであろうが、SymantecVIP Access、MicrosoftAuthenticatorどのロジックであっても
とりあえずAuthenticatorTraitを実装してあれば、Authenticatorとして振る舞うことが保証され、このメソッドでURIを作れるようになる。はず!
ここまでが、Authenticator共通のロジックのお話でした。
次から詳細なAuthenticatorの実装をしていきます。
Google Authenticator(TOTP)の説明
とりあえずコードをペタリ
use crate::*;
use data_encoding::{DecodeError, BASE32_NOPAD};
use ootp::totp::*;
use rand::prelude::*;
use rand_chacha::ChaCha20Rng;

pub struct GoogleAuthenticator {
    account: String,
    secret: Vec<u8>,
    issuer: String,
    period: Option<u64>,
    digits: u32,
    algorithm: ootp::hmacsha::ShaTypes,
}

impl GoogleAuthenticator {
    /// 使い方
    ///  ```
    ///  use crate::authenticator::{*,google_authenticator::*};
    ///  let ga = GoogleAuthenticator::new("account@example.com");
    ///  println!(
    ///      "Google Authenticator({}): {}",
    ///     ga.get_account(),
    ///     ga.get_totp()
    ///  );
    ///  ```
    /// ランダムな10バイトのシークレットを作ってインスタンスを生成します。
    /// Googleに通信して、クレデンシャルの登録とか、端末の紐づけとか特にやらなくて良いです
    /// なので、自作アプリでMFAやるならまずはこれを実装すればいい感じにMFA対応してます!って言えますね。
    pub fn new<S: Into<String>>(account: S) -> Self {
        let mut csprng = ChaCha20Rng::from_entropy();
        let mut random = [0u8; 10];
        csprng.fill_bytes(&mut random);
        GoogleAuthenticator::new_with_raw_secret(account, random.to_vec())
    }
    /// 使い方は、newの中を見て
    pub fn new_with_raw_secret<S: Into<String>>(account: S, secret: Vec<u8>) -> Self {
        GoogleAuthenticator {
            account: account.into(),
            secret: secret,
            issuer: "GoogleAuthenticator".to_owned(),
            period: Some(30),
            digits: 6,
            algorithm: ootp::hmacsha::ShaTypes::Sha1,
        }
    }
    /// 使い方
    /// 既存のシークレットを使いまわしたいとき。
    /// ```
    /// let ga = GoogleAuthenticator::new_with_base32secret(
    ///     "example@exmaple.com",
    ///     "76ZKJD74CS53PPJQ".to_string(),
    /// ).unwrap();
    /// println!(
    ///     "Google Authenticator({}): {}",
    ///     ga.get_account(),
    ///     ga.get_totp()
    /// );
    /// ```
    pub fn new_with_base32secret<S: Into<String>>(
        account: S,
        secret: S,
    ) -> Result<Self, DecodeError> {
        let secret = BASE32_NOPAD.decode(&secret.as_bytes())?;
        Ok(GoogleAuthenticator::new_with_raw_secret(account, secret))
    }
}

// Authenticator Traitの実装
impl Authenticator for GoogleAuthenticator {
    fn get_secret(&self) -> String {
        // パディングは入れてはいけないので、NOPADモードでBASE32エンコードしたものを返すようにします。
        BASE32_NOPAD.encode(&self.secret)
    }

    fn get_issuer(&self) -> String {
        self.issuer.clone()
    }

    fn get_algorithm(&self) -> String {
        // self.algorithmを文字列化するだけのメソッド。後で説明します。
        get_algorithm(&self.algorithm)
    }

    fn get_digits(&self) -> u32 {
        self.digits
    }
    fn get_period(&self) -> Option<u64> {
        self.period
    }

    fn get_counter(&self) -> Option<u64> {
        None
    }
    // ここはもはやシンプルに各値を設定してライブラリを呼ぶだけ
    fn get_totp(&self) -> String {
        let totp = Totp::secret(
            self.secret.clone(), // 秘密鍵
            CreateOption::Full {
                digits: self.digits, // 生成する桁数(6桁)
                period: self.period.unwrap(), // 更新する間隔(秒)
                algorithm: &self.algorithm, // ハッシュアルゴリズム(SHA1)
            },
        );
        totp.make()
    }
    fn get_hotp(&self) -> String {
        todo!();
    }
    fn get_type(&self) -> String {
        "totp".to_owned()
    }

    fn get_account(&self) -> String {
        self.account.clone()
    }
}
使ってるアルゴリズム文字列化するだけのメソッド
pub fn get_algorithm(types: &ootp::hmacsha::ShaTypes) -> String {
    match types {
        ootp::hmacsha::ShaTypes::Sha1 => "SHA1",
        ootp::hmacsha::ShaTypes::Sha2_256 => "SHA2_256",
        ootp::hmacsha::ShaTypes::Sha2_512 => "SHA2_512",
        ootp::hmacsha::ShaTypes::Sha3_256 => "SHA3_256",
        ootp::hmacsha::ShaTypes::Sha3_512 => "SHA3_512",
    }
    .to_owned()
}
とりあえずうまく動いているようにみえるだけのメソッド。
多分将来動かなくなる気がする(まだどんな文字列をURIに入れるべきか知らない状態で書いているので)
その時になったら修正をかけよう。
で、main.rsにちょろっと書く
mod authenticator;
use authenticator::{
    google_authenticator::*,
    *,
};

fn main() {
    let ga = GoogleAuthenticator::new_with_base32secret(
        "example@exmaple.com",
        "76ZKJD74CS53PPJQ",
    )
    .unwrap();
    println!(
        "Google Authenticator({}): {}",
        ga.get_account(),
        ga.get_totp()
    );
    println!("URI: {}", generate_uri(&ga));
}
Google Authenticator(example@exmaple.com): 007254
URI: otpauth://totp/GoogleAuthenticator:example%40exmaple%2Ecom?secret=76ZKJD74CS53PPJQ&issuer=GoogleAuthenticator&algorithm=SHA1&digits=6&period=30
otpauth://totp/GoogleAuthenticator:example%40exmaple%2Ecom?secret=76ZKJD74CS53PPJQ&issuer=GoogleAuthenticator&algorithm=SHA1&digits=6&period=30
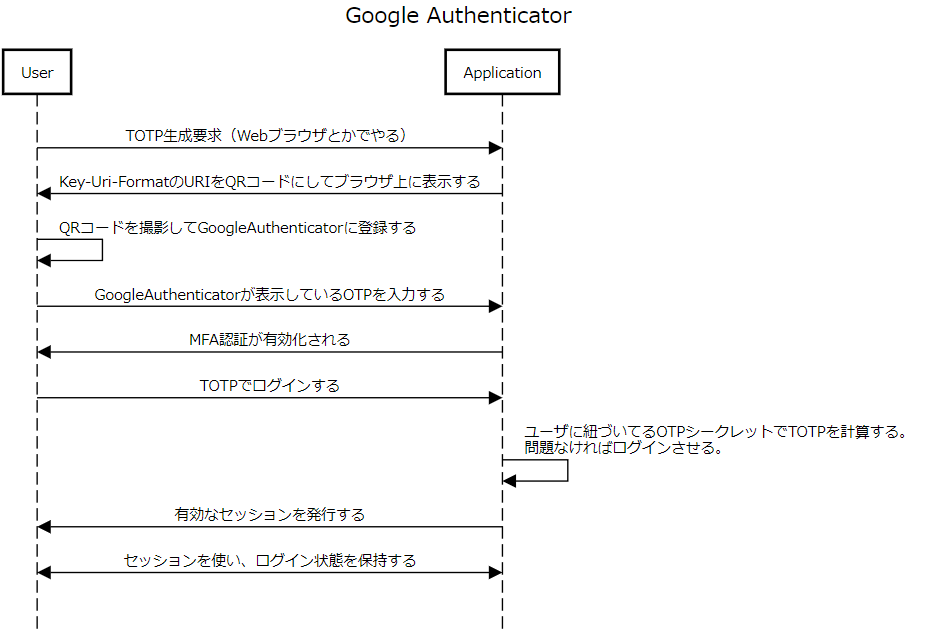
この文字列をQRコードにして、スマホのGoogleAuthenticatorに読み込ませるとプログラムと同じOTPを生成します。
ここまでがGoogleAuthenticatorの実装と説明でした。
特に鍵生成等で通信というのは発生しません。
VIP Accessの説明
Pythonの実装を上記のTraitを基本に移植しただけのやつなので、特に書くことはないんですが、仕組みだけサラッと説明して終わりにします。
GoogleAuthenticatorのときは、Secretをアプリが自分で生成するよ。ということを説明しました。
VIP Accessは方式が違います。全く真逆です。
アプリは原則としてシークレットを勝手に作ってはいけません。
プロビジョニングする必要があります。
横文字分かりづらいので日本語で言います。
Symantecのサーバに対して「私はこういうものです。あなたが管理してるTOTPのクレデンシャル情報を発行してください」
みたいなことを申請せねばなりません。
この申請には、申請用のHMAC署名用のキーが必要です。
さらに、単に申請するだけではなく、AES256-CBCでシークレット情報が暗号化されて降ってきます。
つまり、なんとかHMACシークレットを手に入れて申請ができたとしても、AES256-CBCでシークレット情報を復号しなければなりません。
この点がVIPアクセスの厄介な点でして、署名用HMACキーとシークレット復号用キーといった情報は一般に公開・提供されていません。
なのでいい感じの手法(リバースエンジニアリングや既存コードからの抽出等)で得るしか無いわけです。
なので、様々な問題があるから大っぴらにはやりません、と言っています。
とりあえずここまでの話とTOTP生成までの道のりをざっと図解して終わろうと思います。
GoogleAuthenticatorとSymantecVIPのTOTP生成フロー
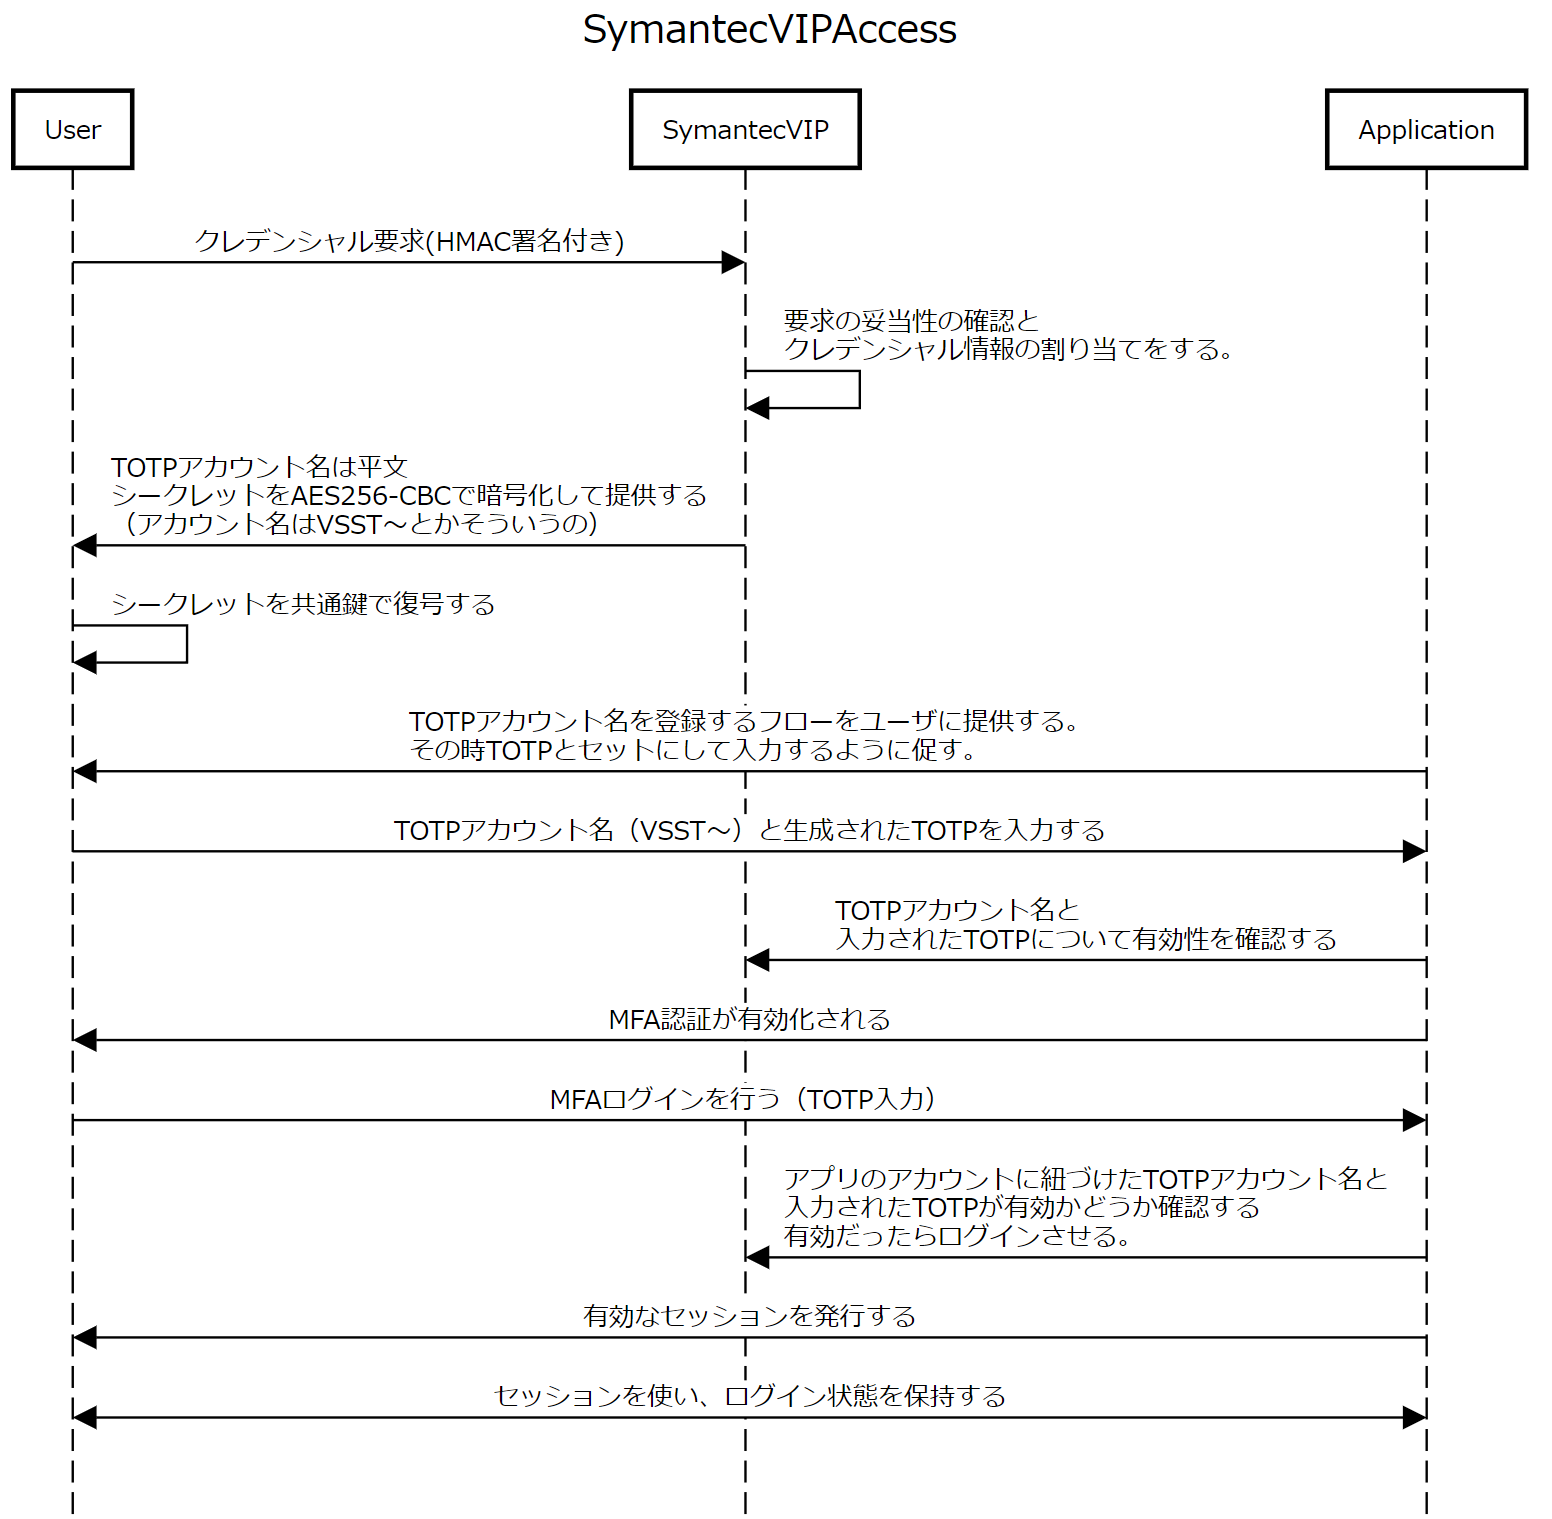
なお、上記の図でVSST~みたいな と言っている部分はクレデンシャルプレフィックスと言うようです。
詳細は以下のページに書いてあります。
実行したところ(VIP Accessはトークンが使えることを検証しました)

おわり。