Developing your application in an isolated environment, like a Docker container, makes it easy to run on different platforms. Developer on different Operating Systems like MacOS, Windows or Linux can install the development environment easy and fast with one command to run. No "Works on my machine" problems anymore, you can focus on write your application instead of setup your environment.
We setup a development environment for Python projects using Docker with separated development and production environment. As an example, we create a Flask web application. On the development build we install a debugger and setup remote debug into the Docker container. The production build installs a dedicated web server running our application.
We use the Docker Multistage Build feature to separate a development and production build but using the same Dockerfile.
To debug the application we use Visual Studio Code with Microsoft Python Extension.
Let's get started.
The Project Folder
First we create a Python Project with the following structure.
MyFlaskApp/
├ app.py
├ docker-compose.yaml
├ Dockerfile
└ requirements.txt
The project folder contains the file app.py with Flask application code, the Dockerfile to build the docker images, docker-compose.yaml is used to setup our development environment and requirements.txt contains a list with python modules needed for our Flask application.
Simply create empty files first, we fillup the content in the following paragraphs.
mkdir MyFlaskApp
cd MyFlaskApp
touch app.py
touch docker-compose.yaml
touch Dockerfile
touch requirements.txt
The Application Code
In the app.py file, we just copy & paste the demo HelloWorld application from the Flask documentation for simple demonstration.
from flask import Flask
app = Flask(__name__)


@app.route('/')
def hello_world():
    return 'Hello, World!'


if __name__ == "__main__":
    app.run(
        debug=True,
        host='0.0.0.0',
        port=5000
    )
The following block
@app.route('/')
def hello_world():
    return 'Hello, World!'
assign the route / to return the static string "Hello World!".
The last block
if __name__ == "__main__":
    app.run(
        debug=True,
        host='0.0.0.0',
        port=5000
    )
starts the Flask application when the script got executed from the command line (e.g. python app.py or python -m app)
The Dockerfile
Copy & Paste the following lines into the Dockerfile.
FROM python:3.7-alpine AS base

WORKDIR /app

COPY requirements.txt requirements.txt
RUN pip install --no-cache-dir -r requirements.txt

ENV FLASK_ENV="docker"
ENV FLASK_APP=app.py
EXPOSE 5000

# Development Stage
FROM base AS develop
RUN pip install debugpy
# Keeps Python from generating .pyc files in the container
ENV PYTHONDONTWRITEBYTECODE 1
# Turns off buffering for easier container logging
ENV PYTHONUNBUFFERED 1

# Production Stage
FROM base AS production
RUN pip install --no-cache-dir gunicorn
COPY . .
CMD ["gunicorn", "--reload", "--bind", "0.0.0.0:5000", "app:app"]
We use a Docker feature called Multistage Builds which allows us to build multiple stages (Docker images) with one Dockerfile. Here we build 3 stages:
-
base: install required dependencies -
development: install additional development dependencies (e.g. a debugger) -
production: copy the source files into the image and installs a proxy server for production build
The Base Stage
We declare our base stage in the first line inside the Dockerfile.
FROM python:3.7-alpine AS base
The FROM keyword specifies on environment we want to build our application. Since we are creating a python application, we choose a pre build python 3.7 Docker image. The Operating System depends on what we want to develop. We choose Alpine, a lightweight Ubuntu distribution.
With the suffix AS base we declare a stage with the name base. The name is free to choose.
The following commands are related to the base stage until another FROM commands appears.
WORKDIR /app creates a folder for the application in the image and change into that folder.
In in the following two lines
COPY src/requirements.txt requirements.txt
RUN pip install --no-cache-dir -r requirements.txt
we copy the python module dependencies list into the folder app/ and install the dependencies.
With the following three lines we define some environment variables specific for Flask.
ENV FLASK_ENV="docker"
ENV FLASK_APP=app.py
EXPOSE 5000
In the line ENV FLASK_ENV="docker" we define an environment for which we can define a .env setting file with settings (e.g. database login information) which Flask is looking up
automatically on startup. We don't use the .env file in this tutorial, but keep the structure for additional settings in the future. The second line ENV FLASK_APP=app.py tells Flask, which file to run on startup. With the last line EXPOSE 5000 we set the port of the Flask application to 5000 which we already set in the app.py file.
The Development Stage
In the development stage we reuse the base stage but install the debugger additionally. We define the development stage with the following line.
FROM base as develop
The following commands are related to the develop stage until another FROM commands appears.
As python debugger we install debugpy.
RUN pip install debugpy
Then we do some python setup, specific for our development environment.
# Keeps Python from generating .pyc files in the container
ENV PYTHONDONTWRITEBYTECODE 1
# Turns off buffering for easier container logging
ENV PYTHONUNBUFFERED 1
The first line ENV PYTHONDONTWRITEBYTECODE 1 disable the python byte-code generation, an optimization step which should be enabled in the production environment but in the development with frequent code changes results in increased memory on hard disc.
If you feel, that your python runs too slow during development, you can enable this setting.
The second line ENV PYTHONUNBUFFERED 1 disable the buffer for logs and send messages directly to the docker container runtime.
We don't copy any source files into the docker image, the source code is linked from our local directory with the docker container directly on startup. The setup is done in the docker-compose.yaml file, which we fill up in later.
The Production Stage
In the production stage we don't want a debugger installed and shipped with our production release. So we start again from the base stage.
FROM base as production
We install gunicorn as HTTP server for accessing the application in production.
RUN pip install --no-cache-dir gunicorn
Then we copy our source files into the image, because they don't change anymore for this specific production build version.
COPY . .
In the last line we run the gunicorn HTTP server on startup, who starts our app.py application and listen to port 5000 which we already set in the base stage.
CMD ["gunicorn", "--reload", "--bind", "0.0.0.0:5000", "app:app"]
The Docker Compose File
We use Docker Compose to setup our development environment. In the docker-compose.yaml paste the following.
version: "3.9"

services:
  flask-app:
    image: my_flask_app-develop
    container_name: my_flask_app-develop
    build:
      context: .
      target: develop
    ports:
      - 5000:5000
      - 5678:5678
    volumes:
      - .:/app
    environment:
      - FLASK_DEBUG=1
    entrypoint: [ "python", "-m", "debugpy", "--listen", "0.0.0.0:5678", "-m", "app",  "--wait-for-client", "--multiprocess", "-m", "flask", "run", "--host", "0.0.0.0", "--port", "5000" ]
    networks:
      - my_flask_app-develop

networks:
  my_flask_app-develop:
    name: my_flask_app-develop
The following paragraphs explain each section the setup
The Services Section
We define all services to use in the services part of the file. We only setup our Flask application here, but could add additional services like a database service in a separate docker image.
With the following lines we define our Flask application service.
services:
  flask-app:
    image: my_flask_app-develop
    container_name: my_flask_app-develop
image tells docker the tag to assign when the image is build. This helps us to find the image later in the image list with the command docker images.
With container_name we give the container a name on startup. If we don't set a name here, randomly assign a name to the spawned container.
Under the build section we tell docker what to build.
    build:
      context: .
      target: develop
The docker-compose.yaml file is located in our application directory and context points to that directory to look for the Dockerfile with the build instructions. With target we say which stage to build. In our case the development stage.
The ports section defines the ports to use.
    ports:
      - 5000:5000
      - 5678:5678
Here we map the local ports 5000 and 5678 to the same ports in the container. Port 5000 is for our Flask application to connect, allowing us to open a browser and view the application under http://localhost:5000. Port 5678 is used by the debugger to listen for debug requests.
With volumes we assign our local application folder with the container.
    volumes:
      - .:/app
This allows us to change the source code without the need to rebuild our docker image after every change.
The environment section allows us to define environment variables.
    environment:
      - FLASK_DEBUG=1
Here we enable the debug mode in Flask, which shows us detailed error messages in the browser instead of an error-page.
entrypoint is the most important section and defines what to run on startup.
entrypoint: [ "python", "-m", "debugpy", "--listen", "0.0.0.0:5678", "-m", "app", "--wait-for-client", "--multiprocess", "-m", "flask", "run", "--host", "0.0.0.0", "--port", "5000" ]
We run the debugger first listening on port 5678. Then we assign our Flask application to the debugger and tell the debugger to wait for a client to connect on port 5678. The multiprocess flag allows us to access our running application beside debugging on port 5000 as well. The last part starts our Flask application on port 5000.
The Networks Section
The networks part let us define networks and assign them to services allowing us to control the communication between different services. We define only one network for our Flask application here. For detailed information and how to establish a connection between Docker containers see the Networking in Docker Compose Documentation.
services:
  flask-app:
    # ...
    networks:
      - my_flask_app-develop

networks:
  my_flask_app-develop:
    name: my_flask_app-develop
The Requirements File
The file requirements.txt lists all python modules we need in order to run our Flask application. This time the only module we need is Flask, so copy and paste the following into the requirements.txt file.
Flask
We don't set any specific version of Flask here, it is up to you if you want to set a fixed version instead (e.g. Flask==1.1.2).
Start the Development Environment
To run our development environment, we only need to run the following command inside our application directory.
docker-compose up -d
This builds the develop stage docker image and spawn the docker container of the application. To stop the application container run the following command.
docker-compose down
If you want to run docker compose in the foreground, omit the -d flag. You can stop the application then with the CTRL+C key shortcut.
Start Debugging
We use Visual Studio Code to debug our application.
If you want to use PyCharm instead of Visual Studio Code, you need a PyCharm Professional Edition license in order to remote debug into a Docker container. The free PyCharm Community Edition do not support remote debugging.
First we got into our application folder and start Visual Studio Code in that folder.
cd MyFlaskApp
code .
If you get an error message
code: command not found, then open Visual Studio Code by clicking on the program icon and start the command palette with Command+Shift+P on a Mac (Ctrl+Shift+P on Windows or Linux) and type "Shell Command", then select "Shell Command: Install 'code' command in PATH".
This should open Visual Studio Code with the contents of our application folder.
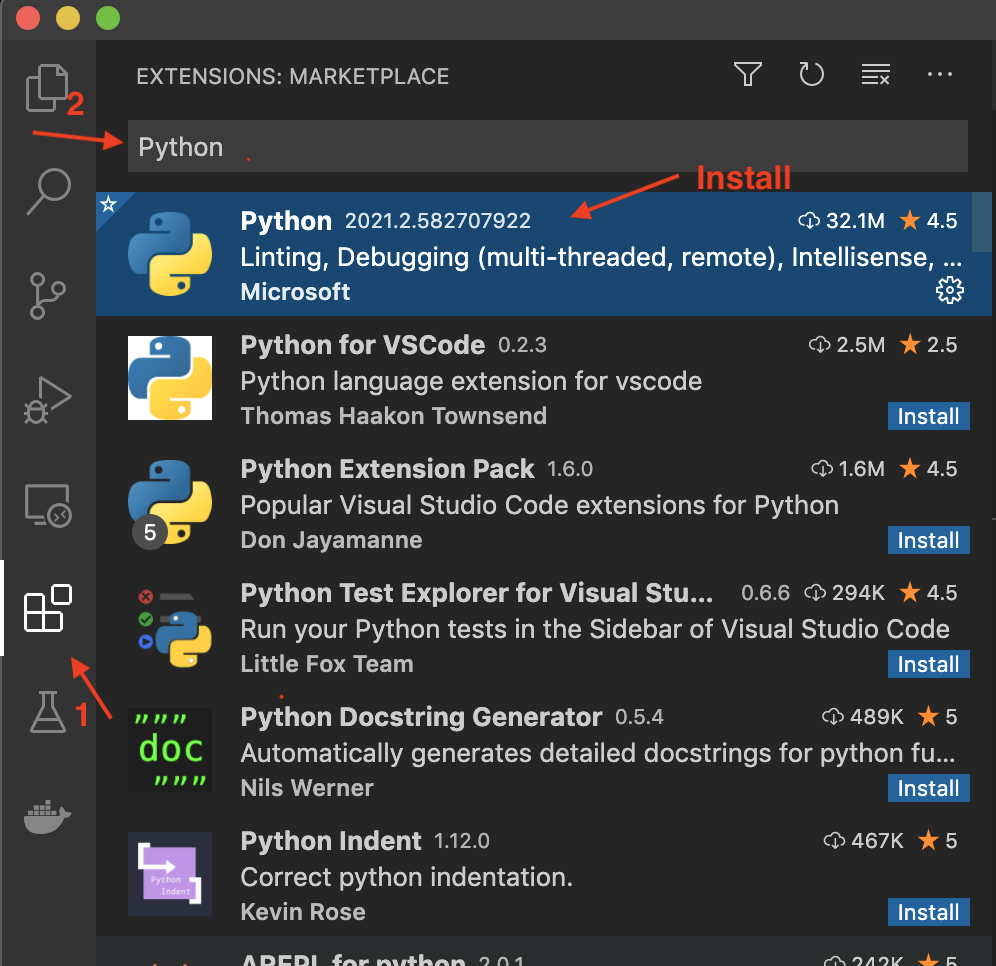
Install the Python Extension
Click on the Extensions icon on the left side. In the search field write "python" and select and install the Microsoft Python Extension in order to debug.
Setup Remote Debugging
The debug configuration is saved in the file launch.json inside the folder .vscode/.
The steps to setup your remote debugging differs in order to if a launch.json file already exist in your project folder or if you have to create a new file.
Create the launch.json File
If you don't have launch.json file, you can generate one with the following steps.
Open the file app.py in Visual Studio Code and make sure Python Language Mode is automatically detected by looking at the bottom bar.

Click on the Debug icon on the left side, then create a launch.json file.
 A launch.json file do not exist
If you successfully installed the Python Extension, then you should be able to select Python from the debug configuration list.
 Create a launch.json file
Then select Remote Attach.
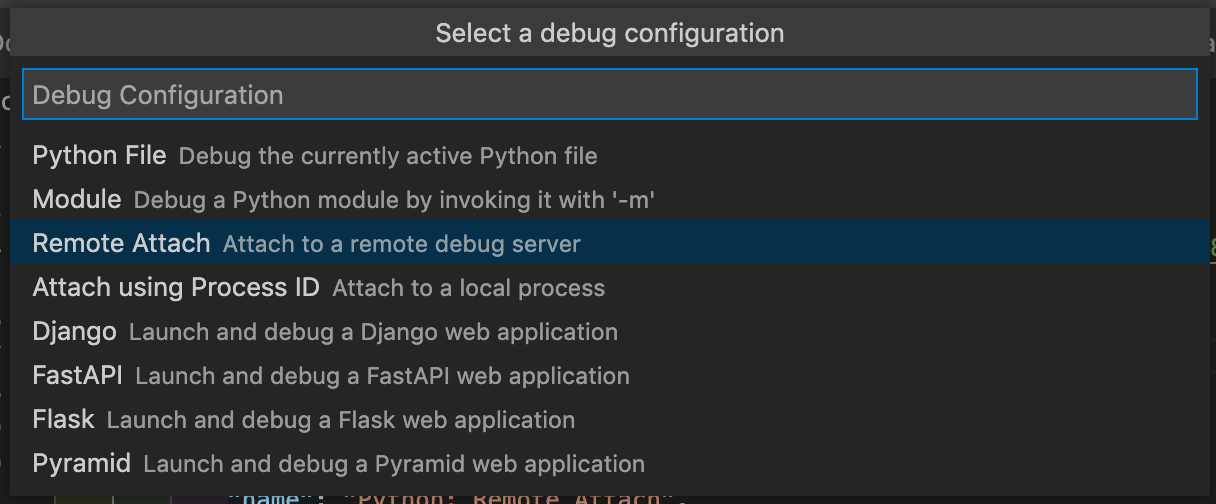
Then you need to select the remote debugger to connect. We use the defaults host name localhost and port 5678.


Add the Debug Configuration to an existing launch.json file
You can also generate the configuration with the following steps.
Open the file app.py in Visual Studio Code and make sure Python Language Mode is automatically detected by looking at the bottom bar.
Click on the Debug icon on the left side, then you should see a debug configuration combo-box instead. Click the down arrow and select Add Configuration....
 A launch.json already exist
If you successfully installed the Python Extension, then you should be able to select Python from the debug configuration list.
 Add configuration to existing launch.json
Then select Remote Attach.
Then you need to select the remote debugger to connect. We use the defaults host name localhost and port 5678.
The new configuration should be add to launch.json like this
{
    // Use IntelliSense to learn about possible attributes.
    // Hover to view descriptions of existing attributes.
    // For more information, visit: https://go.microsoft.com/fwlink/?linkid=830387
    "version": "0.2.0",
    "configurations": [
        {
            "name": "Python: Remote Attach",
            "type": "python",
            "request": "attach",
            "connect": {
                "host": "localhost",
                "port": 5678
            },
            "pathMappings": [
                {
                    "localRoot": "${workspaceFolder}",
                    "remoteRoot": "."
                }
            ]
        }

        // ...

    ]
}
Set a breakpoint and attach
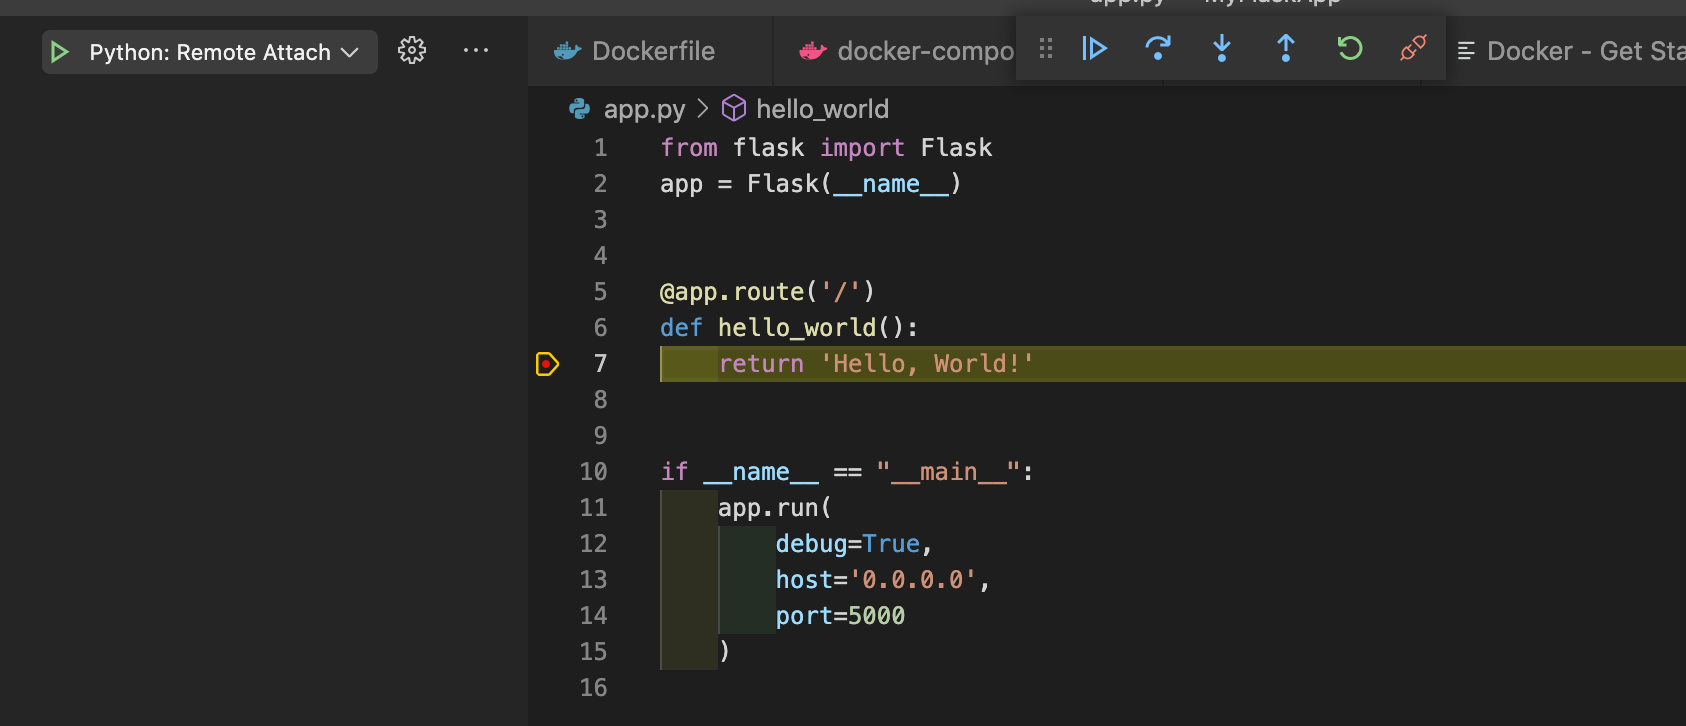
Open app.py and set a breakpoint at line 7. Then attach to the debugger by clicking the green play button on the left side. Open the application in the browser by going to the url http://localhost:5000. The application should stop at the break point.
You can attach and detach as often as you want.
Build the Production Stage
Building the production stage we run the following command inside our application folder.
docker build --target production -t my_flask_app .
With the --target parameter we tell docker which stage to build and with the tag parameter -t my_flask_app we give the image an appropriate name. Important is the . at the end telling Docker where to find our Dockerfile, that is the current directory we are running this command.
You can assign any tag you want to the built image, but take care not to use the same take for development and production build.
List the built Images
You can see the built image in the image list with the docker images command.
docker images

REPOSITORY                          TAG          IMAGE ID       CREATED        SIZE
my_flask_app                        latest       a72b11d35c59   2 days ago     52.2MB
my_flask_app-develop                latest       5916db28c0ff   2 days ago     80.5MB
You can also see the difference in image size with debugger (80.5MB) and without debugger (52.2MB).
Run the Production build
To spawn a container running the production image use the following command.
docker run -d --rm -p 5001:5000 --name my_flask_app my_flask_app:latest
We map the local port 5001 to the container port 5000 here, allowing us to run the production stage and the development stage at the same time.
| Stage | URL |
|---|---|
| development | http://localhost:5000 |
| production | http://localhost:5001 |
You can list running container with the following command.
docker ps

CONTAINER ID   IMAGE                 COMMAND                  CREATED         STATUS         PORTS                    NAMES
a8bc12d89d9f   my_flask_app:latest   "gunicorn --reload -…"   7 seconds ago   Up 6 seconds   0.0.0.0:5001->5000/tcp   my_flask_app
To stop the container simply use the command
docker stop my_flask_app
If you want to run the command in the foreground, omit the -d flag. You can stop the application then with the CTRL+C key shortcut.
Troubleshoot
Remote Attach
Problem: Debugger disconnect button is not working.

Solution: Go to the vscode settings an validate, that the setting Show Sub Sessions In Tool Bar is enabled.

Github Issue