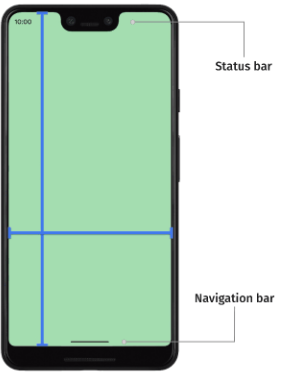
Android 15 の動作変更点の一つである Edge-to-edge enforcement を読みましたか? アプリの対象 API レベル 35 に上げると edge-to-edge が強制適用されるようだ。これまで edge-to-edge を無視して来てしまい、既存アプリに edge-to-edge が適用されたらどうなってしまうのかわからない、そしてどう対処すれば良いのか悩んでいる人に読んでほしい。
edge-to-edgeとは
まずは edge-to-edge が何かを知る必要がある。

edge-to-edge とは以下の仕様が適用されている状態のこと。
- 3ボタンナビゲーションバーが半透明
- ジェスチャーナビゲーションバーが透明
- ステータスバーが透明
- コンテンツは、インセットかパディングが適用されない限り、ナビゲーション バー、ステータスバー、キャプション バーなどのシステムバーの背後に描画される
💡 インセットって何?
画面の端に配置されたシステムのUI(ステータスバーやナビゲーションバーなど) に隠れてしまう領域のこと。
上記は公式ドキュメントの文章ほぼそのままだが、わかるようでわからないだろう。 次の章で edge-to-edge が有効のケースと無効のケースを比較することで edge-to-edge が何かが見えてくるはず。
edge-to-edge が有効になるケースは?
Android 端末、API レベル、enableEdgeToEdge() の使用・未使用の組み合わせによって、アプリが edge-to-edge(画面端までコンテンツを表示するデザイン)になるかどうかを検証してみる。
class MainActivity : AppCompatActivity() {
    override fun onCreate(savedInstanceState: Bundle?) {
        super.onCreate(savedInstanceState)
        enableEdgeToEdge() // API 34 以下で edge-to-edge にする場合
        setContentView(R.layout.activity_main)
    }
}
<?xml version="1.0" encoding="utf-8"?>
<androidx.constraintlayout.widget.ConstraintLayout
    xmlns:android="http://schemas.android.com/apk/res/android"
    xmlns:tools="http://schemas.android.com/tools"
    xmlns:app="http://schemas.android.com/apk/res-auto"
    android:id="@+id/main"
    android:layout_width="match_parent"
    android:layout_height="match_parent"
    android:background="#e1f6cf"
    tools:context=".MainActivity">

    <TextView
      android:layout_width="wrap_content"
      android:layout_height="wrap_content"
      android:text="Hello Android!"
      app:layout_constraintStart_toStartOf="parent"
      app:layout_constraintTop_toTopOf="parent" />

  </androidx.constraintlayout.widget.ConstraintLayout>
<resources xmlns:tools="http://schemas.android.com/tools">
  <!-- Base application theme. -->
  <style name="Base.Theme.EdgeXml" parent="Theme.Material3.DayNight.NoActionBar">
      <!-- Customize your light theme here. -->
      <!-- <item name="colorPrimary">@color/my_light_primary</item> -->
  </style>

  <style name="Theme.EdgeXml" parent="Base.Theme.EdgeXml" />
</resources>
Android 14 端末(Pixel8)
Android 14 端末は enableEdgeToEdge() が有効の場合のみ edge-to-edge が有効になる。
-
API 34 +
enableEdgeToEdge()無効
-
API 34 +
enableEdgeToEdge()有効 -
API 35 +
enableEdgeToEdge()無効
-
API 35 +
enableEdgeToEdge()有効
Android 15 端末(Pixel8)
Android 15 端末は enableEdgeToEdge() が有効の場合に加え、API 35 の場合に edge-to-edge が有効となる。
-
API 34 +
enableEdgeToEdge()未使用 -
API 34 +
enableEdgeToEdge()使用edge-to-edge が有効。ただ、コンテンツとステータスバーが被っているが Android 14 端末と微妙に異なる。

-
API 35 +
enableEdgeToEdge()未使用edge-to-edge が有効。ただ、コンテンツとステータスバーが被っているが Android 14 端末と微妙に異なる。また、ステータスバーのアイコンが白になるのも気になる。

-
API 35 +
enableEdgeToEdge()使用edge-to-edge が有効。ただ、コンテンツとステータスバーが被っているが Android 14 端末と微妙に異なる。

ターゲット API 35 にアップデートすることによる影響
ターゲット API が 34 以下の既存アプリにおいて edge-to-edge を意識していないもしくは edge-to-edge にしたくない状態、つまりenableEdgeToEdge() 未使用状態の場合、ターゲット API を 35 にアップデートするとAndroid 15 端末で edge-to-edge になってしまう。
💡
enableEdgeToEdge()は androidx.activity:activity- ktx:1.5.0-alpha01 から使用可能。1.5.0-alpha01 は Jan 26, 2022 にリリースされている。
💡
enableEdgeToEdge()を使用せずに edge-to-edge にする方法は Manually set up the edge-to-edge display を参照。
edge-to-edge 有効時にステータスバー・ナビゲーションバーとコンテンツが被らないようにする
公式ドキュメント インセットを使用して重なりを処理する の「システムバーのインセット」について説明する。 公式ドキュメントは FAB という特殊な場合しか説明してくれないので、ここでは「ステータスバー・ナビゲーションバーとコンテンツを被らないようにするにはどうすれば良いのか?」という最も基本的なところを説明をしたい。
ステータスバー・ナビゲーションバーとコンテンツが被らないようにする。
class MainActivity : AppCompatActivity() {
    override fun onCreate(savedInstanceState: Bundle?) {
        super.onCreate(savedInstanceState)
        enableEdgeToEdge() // API 35 化時に Android 14 端末も edge-to-edge にする場合
        setContentView(R.layout.activity_main)
+       ViewCompat.setOnApplyWindowInsetsListener(findViewById(R.id.main)) { v, insets ->
+           val systemBars = insets.getInsets(WindowInsetsCompat.Type.systemBars())
+           v.setPadding(systemBars.left, systemBars.top, systemBars.right, systemBars.bottom)
+           insets
+       }
    }
}

activity_main.xml の Top レベルに配置した ConstraintLayout はステータスバー領域に表示されるが、その子ビューは ステータスバーに被らないように表示される。
ページの一番下に <TextView> を配置し、ナビゲーションバー領域はどのように表示されるのを確認してみる。
<?xml version="1.0" encoding="utf-8"?>
<androidx.constraintlayout.widget.ConstraintLayout
...
    <TextView
        android:layout_width="wrap_content"
        android:layout_height="wrap_content"
        android:text="Hello Android!"
        app:layout_constraintStart_toStartOf="parent"
        app:layout_constraintBottom_toBottomOf="parent" />

  </androidx.constraintlayout.widget.ConstraintLayout>

【課題】 edge-to-edge 対処は ステータスバー・ナビゲーションバーとコンテンツが被らないようにすればいいだけではない?
公式ドキュメント ディスプレイ カットアウト インセットや システム ジェスチャー インセットの記載があり、ステータスバー・ナビゲーションバーとコンテンツが被らないようにするだけで edge-to-edge 対処が完了するわけではない。例を以下に示す。
3ボタンナビゲーションの背景が半透明
ステータスバー・ナビゲーションバーの背景を設定した状態で、ナビゲーションモードが3ボタンナビゲーションの場合とジェスチャーナビゲーションの場合で比較してみる。
<?xml version="1.0" encoding="utf-8"?>
<androidx.constraintlayout.widget.ConstraintLayout
    xmlns:android="http://schemas.android.com/apk/res/android"
    xmlns:tools="http://schemas.android.com/tools"
    xmlns:app="http://schemas.android.com/apk/res-auto"
    android:id="@+id/main"
    android:layout_width="match_parent"
    android:layout_height="match_parent"
    android:background="#e1f6cf" //ステータスバー・ナビゲーションバーを含めた全背景
    tools:context=".MainActivity">

    <TextView
        android:layout_width="wrap_content"
        android:layout_height="wrap_content"
        android:text="Hello Android!"
        app:layout_constraintStart_toStartOf="parent"
        app:layout_constraintTop_toTopOf="parent" />

</androidx.constraintlayout.widget.ConstraintLayout>
3ボタンナビゲーションの背景が半透明になっているのがお分かりだろうか。半透明を解消し、指定した通りの背景にするには window.isNavigationBarContrastEnforced プロパティを false にする。
class MainActivity : AppCompatActivity() {
    override fun onCreate(savedInstanceState: Bundle?) {
        super.onCreate(savedInstanceState)
        enableEdgeToEdge() // API 35 化時に Android 14 端末も edge-to-edge にする場合
        setContentView(R.layout.activity_android_view)
        ViewCompat.setOnApplyWindowInsetsListener(findViewById(R.id.main)) { v, insets ->
            val systemBars = insets.getInsets(WindowInsetsCompat.Type.systemBars())
            v.setPadding(systemBars.left, systemBars.top, systemBars.right, systemBars.bottom)
            insets
        }

+       // 3ボタンナビゲーションの背景の半透明を無効化する
+       if (Build.VERSION.SDK_INT >= Build.VERSION_CODES.Q) {
+           window.isNavigationBarContrastEnforced = false
+       }
    }
}
3ボタンナビゲーションの背景が半透明になる事象が解消された。


