Unity 5.3 から Unity で JSON を扱うことのできる API が追加されました。
Unity 5.3 リリースノート
今まで JSON を扱うためには、アセットやライブラリを追加する必要がありましたが、これからは JsonUtility を使って JSON 扱うことができるようになります。
そこで今まで利用していたライブラリ (MiniJSON) を意識しつつ、JsonUtility の使い方をまとめます。
本記事では Unity 5.3.4f1 を使用しています。
MiniJSON とは
MiniJSON とは以下で公開されている MIT ライセンスの JSON パーサです。
MiniJSON の使い方
MiniJSON では以下のように JSON を Dictionary にしたり、Dictionary を JSON にします。
そのため、JSON の構造が確定していなくても、受け取った JSON のすべてのパラメータを Dictionary の値として取得できます。
{
   "id":100,
   "name":"テストアイテム",
   "description":"説明だよ"
}
string itemJson = "{ \"id\": 100, \"name\": \"テストアイテム\", \"description\": \"説明だよ\" }";
// JSON(string) -> Dictionary
Dictionary<string, object> itemDic = Json.Deserialize(itemJson) as Dictionary<string, object>;

Debug.Log("item id " + int.Parse(itemDic["id"].ToString()));
Debug.Log("item name " + (string)itemDic["name"]);
Debug.Log("item description " + (string)itemDic["description"]);
// Dictionary -> JSON(string)
string json = Json.Serialize(itemDic);
Debug.Log("Json str " + json);
JsonUtility とは
Unity 5.3 から追加された Unity で JSON を扱うための API です。
Unity 公式ドキュメント JsonUtility API
Unity 公式ドキュメント JSON 形式にシリアライズ
JsonUnitity の使い方
JsonUtility では、まず JSON の構造を記述する必要があります。その構造を元にシリアライズするのが JsonUtility です。
そのため、構造に規定されていないパラメータや、Dictionary 等の対応していない型に関しては無視されます。 (制約に関しては後の節で述べます)
以下のように JSON 構造の規定し、各 API を使ってみます。
[Serializable]
public class Item
{
    public int id;
    public string name;
    public string description;
}
JSON からインスタンスを作成 ( FromJson() )
string itemJson = "{ \"id\": 100, \"name\": \"テストアイテム\", \"description\": \"説明だよ\" }";
Item item = JsonUtility.FromJson<Item>(itemJson);

Debug.Log("item id " + item.id);
Debug.Log("item name " + item.name);
Debug.Log("item description " + item.description);
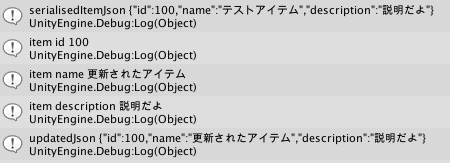
規定したクラスのプロパティ名と同じキー名の値が代入されていることがわかります。
JSON へのシリアライズ ( ToJson() )
先に作成した item インスタンスのパラメータを JSON として取得します。
string serialisedItemJson = JsonUtility.ToJson(item);
Debug.Log("serialisedItemJson " + serialisedItemJson);
JSON の変更をインスタンスに反映する
// 特定のデータのみ更新する
string updatedData = "{ \"name\": \"更新されたアイテム\" }";
JsonUtility.FromJsonOverwrite(updatedData, item);

Debug.Log("item id " + item.id);
Debug.Log("item name " + item.name);
Debug.Log("item description " + item.description);

// 試しに再度 JSON にしてみる
string updatedJson = JsonUtility.ToJson(item);
Debug.Log("updatedJson " + updatedJson);
name の値だけが更新されました。
ドキュメントによると、再度アロケーションが走らずに、値の更新が行われます。また、Serializer が対応していないフィールド (private フィールド、static フィールド、 NonSerialized アトリビュートがついてるフィールド) の場合は無視される様です。
Unity API リファレンス FromJsonOverwrite
他の構造を試してみる
private フィールドの場合
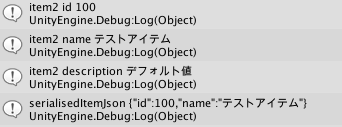
private のままでは FromJson や ToJson 時に無視されます。
[Serializable]
public class Item2
{
	public int id;
	public string name;
	private string description = "デフォルト値";
}
string itemJson = "{ \"id\": 100, \"name\": \"テストアイテム\", \"description\": \"説明だよ\" }";
// JSON -> Item2 インスタンス
Item2 item2 = JsonUtility.FromJson<Item2>(itemJson);

Debug.Log("itemJson " + itemJson);
Debug.Log("item2 id " + item2.id);
Debug.Log("item2 name " + item2.name);

// private な値なためリフレクションで取得する
FieldInfo field = item2.GetType().GetField("description", (BindingFlags.GetField | BindingFlags.NonPublic | BindingFlags.Instance));
string description = field.GetValue(item2) as string;

Debug.Log("item2 description " + description);

// Item2 インスタンス -> JSON
string serialisedItemJson = JsonUtility.ToJson(item2);
Debug.Log("serialisedItemJson " + serialisedItemJson);
そこで、 SerializeField 属性を追加するとシリアライズ対象にすることが出来ます。
参考サイト: 【Unity5.3】JsonUtility使い方まとめ
[Serializable]
public class Item2
{
	public int id;
	public string name;
	[SerializeField]
	private string description = "デフォルト値";
}
以下は、 [SerializeField] を設定して、同じ JSON string とシリアライズ・デシリアライズ処理をした場合の結果です。
JSON string で設定した description が代入されていることが分かります。
JSONにクラスに定義されていないキー名のデータが存在する場合
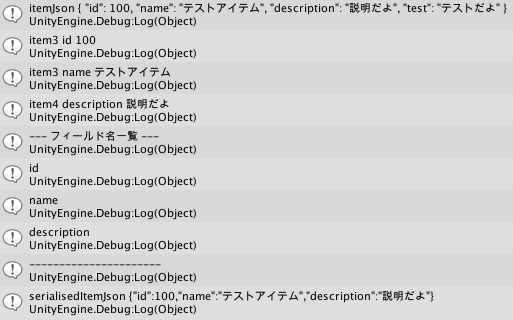
クラスに定義されていない値が JSON に存在する場合は無視されます。
[Serializable]
public class Item3
{
	public int id;
	public string name;
	public string description = "デフォルト値";
}
JSON に test というパラメータを追加してみます。
string itemJson = "{ \"id\": 100, \"name\": \"テストアイテム\", \"description\": \"説明だよ\", \"test\": \"テストだよ\" }";
Item3 item3 = JsonUtility.FromJson<Item3>(itemJson);

Debug.Log("itemJson " + itemJson);
Debug.Log("item3 id " + item3.id);
Debug.Log("item3 name " + item3.name);
Debug.Log("item4 description " + item3.description);

Debug.Log("--- フィールド名一覧 ---");
FieldInfo[] fields = item3.GetType().GetFields();
for (int i = 0; i < fields.Length; i++) {
	Debug.Log(fields[i].Name);
}
Debug.Log("----------------------");

string serialisedItemJson = JsonUtility.ToJson(item3);
Debug.Log("serialisedItemJson " + serialisedItemJson);
インスタンスにそのパラメータは存在していません。もちろん、そのインスタンスを JSON にシリアライズした時も存在しません。
配列がある場合
そのまま問題なくシリアライズ・デシリアライズできました。
[Serializable]
public class Item4
{
	public int id;
	public string name;
	public string description = "デフォルト値";
	public int[] children;
}
string itemJson = "{ \"id\": 100, \"name\": \"テストアイテム\", \"description\": \"説明だよ\", \"children\": [1, 2, 3] }";
Item4 item4 = JsonUtility.FromJson<Item4>(itemJson);

Debug.Log("itemJson " + itemJson);
Debug.Log("item4 id " + item4.id);
Debug.Log("item4 name " + item4.name);
Debug.Log("item4 description " + item4.description);

string serialisedItemJson = JsonUtility.ToJson(item4);
Debug.Log("serialisedItemJson " + serialisedItemJson);
ネストした要素の場合
以下の様な JSON の場合、ネストしている要素の Serializable なクラスを作成するとシリアライズ・デシリアライズできました。
{
   "id":100,
   "name":"テストアイテム",
   "description":"説明だよ",
   "color":{
      "id":1,
      "name":"black"
   }
}
[Serializable]
public class Item5
{
	public int id;
	public string name;
	public string description = "デフォルト値";
	public ItemColor color;
}

[Serializable]
public class ItemColor
{
	public string id;
	public string name;
}
string itemJson = "{ \"id\": 100, \"name\": \"テストアイテム\", \"description\": \"説明だよ\", \"color\": { \"id\" : 1, \"name\": \"black\" } }";
Item5 item5 = JsonUtility.FromJson<Item5>(itemJson);

Debug.Log("itemJson " + itemJson);
Debug.Log("item5 id " + item5.id);
Debug.Log("item5 name " + item5.name);
Debug.Log("item5 description " + item5.description);

string serialisedItemJson = JsonUtility.ToJson(item5);
Debug.Log("serialisedItemJson " + serialisedItemJson);
JsonUtility の制約
公式ドキュメント によると JsonUtility には以下の制約があります。
- Dictionary はサポートされない
- プリミティブ型を直接指定できない
- クラスや構造体でラップすれば使える
使用できる型は Unity の Inspector と同様だと理解すればよさそうです。
JsonUtility でどうしても Dictionary を使いたい時
- 参考
シリアライズのタイミングで以下のコールバックを受け取ることができるため、これを利用してデータを詰める処理を書く事ができるようです。
JsonUtility のメリット
パフォーマンス面で他の JSON パーサよりも優れている
JsonUtilityは(機能は .NET JSON より少ないですが)、よく使用されている .NET JSON よりも著しく早いことが、ベンチマークテストで示されています。
GCメモリの使用が、以下のように最小に抑えられています。
- ToJson()は、返されたストリングにのみ GC メモリをアロケーションします。
- FromJson()は、返されたオブジェクトにのみ GC メモリをアロケーションします。必要な場合は、サブオブジェクトも同様です (例えば、配列を含むオブジェクトをデシリアライズする場合、GC メモリは配列にアロケーションされます)。
- FromJsonOverwrite()は、書き込まれたフィールド (例えば、ストリングと配列) に必要な場合にのみ GC メモリをアロケーションします。JSON に上書きされたすべてのフィールドが値型の場合は、GC メモリはアロケーションされません。
通常、JSON パーサを使うと対象の JSON がすべてメモリに展開されてしまいますが、JsonUtility ではその点を考慮されているようですね。 ( Serializable を指定しなければいけない分、この恩恵を受けられるのだろうと思っています)
Unite 2016 のセッション でも、通常の JSON パーサはリフレクションを多用しているため、重くなってしまうので、 JsonUtility を使ってみて欲しいという話がありました。
バックグラウンドスレッドでの呼び出しが可能
JsonUtility API はバックグラウンドスレッドで処理することが可能です。他のマルチスレッドコードの場合と同様に、一方でシリアライズ/デシリアライズを行っている間に、他のスレッド上のオブジェクトにアクセスしたり変えたりしないように注意してください。
Unity のほとんどの API はメインスレッドから呼び出す必要がありますが、 JsonUtility はバックグラウンドで呼び出せる様です。
これなら、JSON データを扱う処理をすべてバックグラウンドに移せますね。
まとめ
今まで使っていた JSON パーサ (MiniJSON) ではどんなデータでも Dictionary にできる反面、メモリ使用量などの問題がありました。
JsonUtility を使うことでこの問題に対応出来ますが、事前に JSON 形式を定義しておく必要があります。
MiniJSON と JsonUtility でそれぞれ JSON の扱い方や、API インターフェースもかなり異なるため、上記を参考に、色んな形式の JSON を扱ってみてください。


