概要
Google Maps JavaScript APIとGeocoding APIを用いてユーザーが登録した住所から投稿詳細ページに地図を表示した時のことを備忘録として記録します。
環境
・ruby '2.5.7'
・rails '5.2.3'
前提
・Google MapsのAPIキーを取得済であること
・Geocoding APIを有効化済であること
・投稿モデル(ここではDatespotモデル)に住所(adress)カラムがあること
【参考】
Google MapsのAPIキーを取得する
Geocoding API を利用するには
過程
1.投稿詳細ページの作成
投稿詳細ページは、各自の仕様に合わせて作成してください。
<div class="container">
  <div class="row">
  (省略)
    <div class="col-md-8">
      <h2 class="datespot-name"><%= @datespot.name %></h2>
      <div class="datespot-info">
    (省略)
        <h4 id="address">【住所】<%= @datespot.address %></h4>
    (省略)
      </div>
    </div>
  </div>
</div>
<%= render "map-show" %>
2.地図を表示するビューを作成
地図を表示するビューを作成します。
<div class="map-container">
  <div class="map_wrapper">
    <div id="map" class="map"></div>
  </div>
</div>
<script src="https://maps.googleapis.com/maps/api/js?key=<%= ENV['GOOGLE_MAP_API_KEY']%>&callback=initMap"></script>
取得したAPIキーは、不正利用を防ぐためにも環境変数に入れておきましょう。
# map{
  height: 310px;
  width: 550px;
}
地図の大きさを明示的に指定しないと表示されないので、必ず指定しましょう。
3.コールバック関数を定義する
2.で記載したコールバック関数を定義します。
function initMap() {
  //地図を表示する領域の div 要素のオブジェクトを変数に代入
  const target = document.getElementById('map');
  //マーカーのタイトルを設定
  const title = $('.datespot-name').text();
  //表示したい住所を取得
  const inputAddress = document.getElementById('address').textContent;
  //ジオコーディングのインスタンスの生成
  const geocoder = new google.maps.Geocoder();

  //geocoder.geocode() にアドレスを渡して、コールバック関数を記述して処理
  geocoder.geocode({ address: inputAddress }, function(results, status){
  //ステータスが OK で results[0] が存在すれば、地図を生成
    if (status === 'OK' && results[0]){
      //マップのインスタンスを変数に代入
      const map = new google.maps.Map(target, {
      //results[0].geometry.location に緯度・経度のオブジェクトが入っている
        center: results[0].geometry.location,
        zoom: 15
      });
      //マーカーの生成
      const marker = new google.maps.Marker({
        position: results[0].geometry.location,
        map: map,
      });
      //取得した座標の生成
      const latlng = new google.maps.LatLng(results[0].geometry.location.lat(), results[0].geometry.location.lng());
      //情報ウィンドウに表示するコンテンツを作成
      const content = '<div id="map_content"><p>' + title + '<br/>' + inputAddress + '<br/><a href="https://maps.google.co.jp/maps?q=' + latlng + '&iwloc=J" target="_blank" rel="noopener noreferrer">Googleマップで見る</a></p></div>';
      //情報ウィンドウのインスタンスを生成
      var infowindow = new google.maps.InfoWindow({
        content: content,
      });
      //marker をクリックすると情報ウィンドウを表示(リスナーの登録)
      google.maps.event.addListener(marker, 'click', function() {
        //第2引数にマーカーを指定して紐付け
        infowindow.open(map, marker);
      });
    } else {
    //ステータスが OK 以外の場合や results[0] が存在しなければ、アラートを表示して処理を中断
      alert("住所から位置の取得ができませんでした。: " + status);
      return;
    }
  });
}
4.補足
Geocoding APIを用いて住所を座標値に変換し、地図を表示するところをもう少し詳細に解説します。
//ジオコーディングのインスタンスの生成
const geocoder = new google.maps.Geocoder();
Geocoding APIを利用するには、Geocoder() コンストラクタで生成したインスタンスでアクセスします。Geocoding APIを利用する場合は必ず書きましょう。
geocoder.geocode({ address: inputAddress }, function(results, status){
   //status を確認して処理開始
   if (status === 'OK' && results[0]){
      new google.maps.Map(target, {
        center: results[0].geometry.location,
        zoom: 15
      });
   } else {
     alert('失敗しました。理由: ' + status);
   }
});
そしてgeocoder.geocode() メソッドでリクエスト(GeocoderRequest)を送信します。
第1引数の{ address: inputAddress }でフォームに入力された文字列をaddressの形でリクエストします。
addressは地名、施設名、住所などから緯度経度を取得するために必要なオプションです。
第2引数のfunction(results, status)はレスポンスで受け取った結果を処理するために必要なコールバック関数です。
resultsはGeocodingからのレスポンス結果、内容を受け取ります。
statusはGeocodingからのレスポンスステータスコードを受け取ります。
if (status == 'OK') {} else {}はコールバック関数で受け取ったstatusがOKだった場合に処理し、それ以外ならelseを処理するというコードです。
ちなみに、statusに返されるステータスコードは以下のとおりです。
・"OK":成功。レスポンスには少なくとも1つの有効な GeocoderResponse が含まれています。
・"ZERO_RESULTS":リクエストは成功したが、結果なし。存在しないアドレスの可能性が高い。
・"OVER_QUERY_LIMIT":リクエストの制限回数超過。リクエストが割り当て量を超えています。
・"REQUEST_DENIED":何らかの理由でリクエストが拒否されたことを意味します。
・"INVALID_REQUEST": 無効リクエスト。情報(address または latLng)が不足している可能性大。
・"UNKNOWN_ERROR":サーバーエラーのため、処理できなかったことを意味します。もう一度試すと正常に処理される可能性があります。
・"ERROR":Google サーバーへの接続に問題が発生しました。もう一度試すと正常に処理される可能性があります。
あとは、コールバック関数で受け取ったresultsを利用して、map、marker、infowindowを設定していきます。
const map = new google.maps.Map(target, {
 //地図の中心になる座標を指定
  center: results[0].geometry.location,
 //0~20の間の数値で、表示する地図の大きさを指定
  zoom: 15
});
results[0].geometry.locationに緯度・経度のオブジェクトが入っているので、これを利用してmapを設定します。
const marker = new google.maps.Marker({
 //ピンの表示位置を座標で指定
  position: results[0].geometry.location,
 //ピンを表示する地図を指定
  map: map,
});
markerも同様です。
//取得した座標の生成
const latlng = new google.maps.LatLng(results[0].geometry.location.lat(), results[0].geometry.location.lng());
//情報ウィンドウに表示するコンテンツを作成
const content = '<div id="map_content"><p>' + title + '<br/>' + address + '<br/><a href="https://maps.google.co.jp/maps?q=' + latlng + '&iwloc=J" target="_blank" rel="noopener noreferrer">Googleマップで見る</a></p></div>';
//情報ウィンドウのインスタンスを生成
const infowindow = new google.maps.InfoWindow({
  content: content,
});
//marker をクリックすると情報ウィンドウを表示(リスナーの登録)
google.maps.event.addListener(marker, 'click', function() {
  //第2引数にマーカーを指定して紐付け
  infowindow.open(map, marker);
});
results[0].geometry.location.lat()と results[0].geometry.location.lng()で緯度と経度の値を取得しています。
それを利用して、
<a href="https://maps.google.co.jp/maps?q=' + latlng + '&iwloc=J" target="_blank" rel="noopener noreferrer">Googleマップで見る</a>
でGoogleマップを参照できるようにしています。
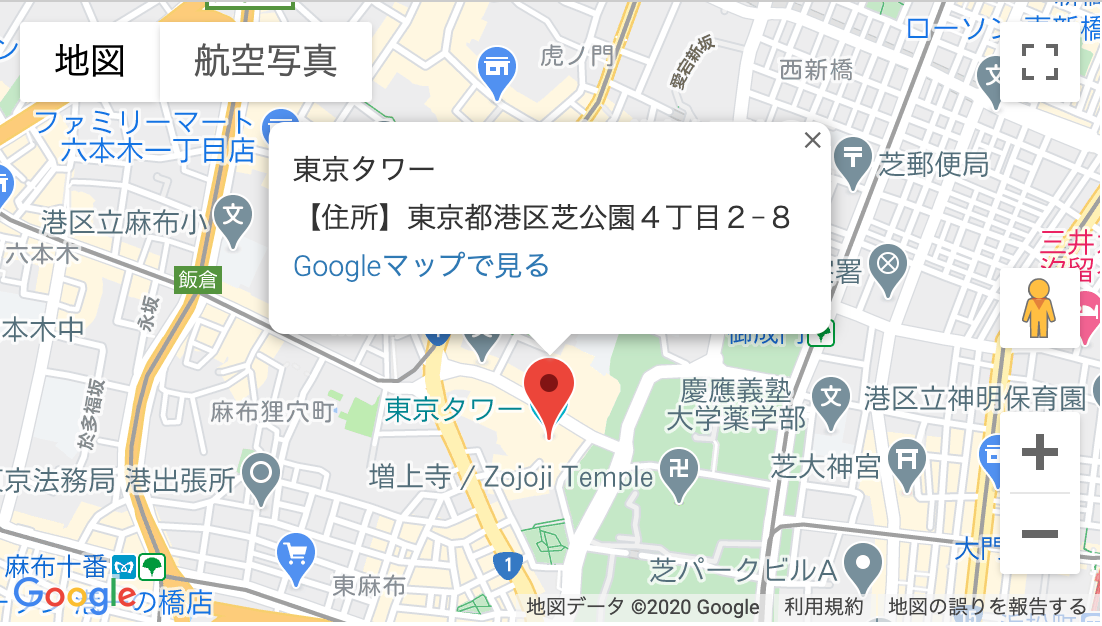
結果
これで、ユーザーが登録した住所から投稿詳細ページに地図を表示できました!
参考
Google Maps API の使い方・利用方法
Google Mapsを使ってみよう
Google Maps APIで観光地、施設名等から住所を表示する