はじめに
この記事でわかること
- Spring BootにおけるWebアプリケーションの具体的な実装方法
開発環境
| Java | 22 |
| ビルドツール | Maven |
| IDE | InteliJ IDEA 2022.1.3 |
| DB | MySQL Ver 8.3.0 |
今回のMVCの概要
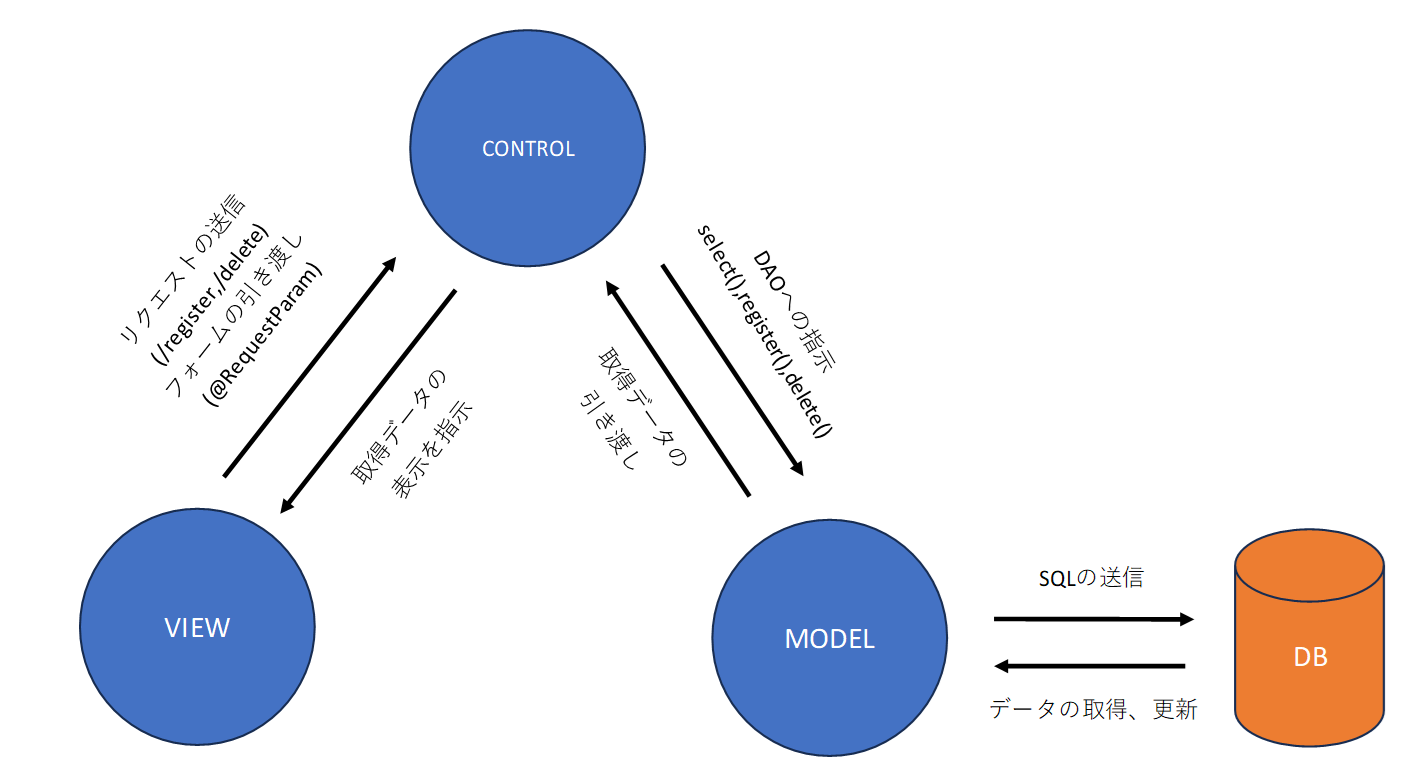
今回の各クラスの関係性は大雑把に書くと図のようになります。
ユーザーが入力した情報をJavaのコントローラークラスに引き渡して、CONTROLがDaoクラスにDBのアクセスとSQL送信を指示、DAOが取得したデータをCONTROLに返して、CONTROLがVIEWに表示を指示しての繰り返しです。
Spring Bootの大きな特徴はVIEWとCONTROLのやり取りがxmlなどの設定ファイルではなく、Javaのアノテーションを使用することができる点です。
テーブルの作成
今回はデータベースにMySQLを使用します。MySQLのインストールやユーザーの作成などは前回の記事でまとめました。
収支データを記録するテーブルを作成します。
CREATE TABLE TExpenses (
    Id varchar(8) NOT NULL PRIMARY KEY,
    RecordingDateTime datetime NOT NULL,
    InOrOut smallint NOT NULL,
    Category smallint NOT NULL,
    Amount int(11) NOT NULL,
    Memo varchar(200)
);
これでデータを格納する箱を準備することができました。
実装
VIEW
ホーム画面のHTML,CSSを作成します。なお、今回は家計簿アプリなので、以下の項目を定義します。
- ID 任意の5文字 (非表示)
- 記録日付
- 収支区分 収入か支出かの区分 (非表示)
- カテゴリ 収支のカテゴリ
- 金額
- 備考
<!DOCTYPE html>
<html xmlns:th="http://www.thymeleaf.org">
<head>
  <meta charset="UTF-8">
  <meta name="viewport" content="width=device-width, initial-scale=1.0">
  <title>家計簿Webアプリケーション</title>
  <link rel="stylesheet" th:href="@{/css/style.css}">
</head>
<body>
<div class="container"> <h1>家計簿アプリケーション</h1>
  <form action="/register">

    <div class="form-group">
      <label for="recordingDateTime">記録日付:</label>
      <input type="date" id="recordingDateTime" name="recordingDateTime" style="width:150px" required>
    </div>

    <div class="form-group">
      <label for="category">カテゴリ:</label>
      <select id="category" name="category" style="width:150px" required>
        <option value="1">1:食費</option>
        <option value="2">2:水道光熱費</option>
        <option value="3">3:日用品費</option>
        <option value="4">4:交際費</option>
        <option value="5">5:美容費</option>
        <option value="6">6:交通費</option>
        <option value="7">7:家賃</option>
        <option value="51">51:給料</option>
      </select>
    </div>

    <div class="form-group">
      <label for="amount">金額:</label>
      <input type="number" id="amount" name="amount" style="width:150px;text-align:right;" required>円
    </div>

    <div class="form-group">
      <label for="memo">備考:</label>
      <textarea id="memo" name="memo" th:maxlength="200"></textarea>
    </div>

    <button type="submit">記録</button>
  </form>
</div>

<div class="container">
  <h2>データ一覧</h2>
  <table th:if="${expensesList != null and expensesList.size() > 0}">
    <thead>
    <tr>
      <th style="width:100px">ID</th>
      <th style="width:120px">記録日付</th>
      <th style="width:150px">収支区分</th>
      <th style="width:150px">カテゴリ</th>
      <th style="width:100px;text-align:right;">金額</th>
      <th style="width:500px">備考</th>
      <th style="width:80px"></th>
    </tr>
    </thead>
    <tbody>
    <tr th:each="data : ${expensesList}">
      <td th:text="${data.id}"></td>
      <td th:text="${data.recordingDateTime}"></td>
      <td th:text="${data.inOrOut}"></td>
      <td th:text="${data.category}"></td>
      <td th:text="${data.amount}" style="text-align:right;"></td>
      <td th:text="${data.memo}"></td>
      <td>
        <form action="/delete">
            <button type="submit">削除</button>
            <input type="hidden" name="id" th:value="${data.id}">
        </form>
      </td>
    </tr>
    </tbody>
  </table>
</div>
<div class="container" th:if="${expensesList == null or expensesList.size() == 0}">
    データがありません。
</div>
</body>
</html>
body {
  font-family: sans-serif;
  margin: 0; /* 余白を0に設定 */
}

.container {
  width: 900px; /* 画面幅を900pxに設定 */
  margin: 0 auto; /* 中央配置 */
  padding: 20px; /* 余白を追加 */
}

h1 {
  text-align: center;
  margin-bottom: 20px;
}

.form-group {
  margin-bottom: 15px;
}

label {
  display: block;
  margin-bottom: 5px;
}

input,
select,
textarea {
  width: 100%;
  padding: 5px;
  border: 1px solid #ccc;
  box-sizing: border-box;
}

button {
  background-color: #4CAF50;
  color: white;
  padding: 10px 20px;
  border: none;
  cursor: pointer;
}

button:hover {
  background-color: #45a049;
}

/* セル */
th {
  text-align: left; /* セル内の文字を左揃え */
  border: 1px solid #CCCCCC; /* セル境界線を追加 */
  background-color: #C2EEFF;
}

/* セル */
td {
  text-align: left; /* セル内の文字を左揃え */
  border: 1px solid #CCCCCC; /* セル境界線を追加 */
  background-color: #E0FFFF;
}
htmlはsrc/main/resources/templates/に、
cssはsrc/main/resources/static/css/に配置しました。
通常のHTMLと異なる点は以下になります。
- 2行目の <html xmlns:th="http://www.thymeleaf.org"> の記述
- thタグ
これらはthymeleaf固有の記述です。thタグは、<th:if>で条件分岐、<th:each>で繰り返し処理が行えます。
また、<form action="/register">で指定したURLにより、コントローラー側が受けるメソッドを判断します。
Control
MVCにおけるControlのクラスを作成します。以下のようなJavaファイルを作成しました。
package com.example.houseHoldAccoutBook;

import org.springframework.beans.factory.annotation.Autowired;
import org.springframework.stereotype.Controller;
import org.springframework.ui.Model;
import org.springframework.web.bind.annotation.GetMapping;
import org.springframework.web.bind.annotation.RequestParam;

import java.util.Date;
import java.util.List;
import java.util.UUID;
@Controller
public class HomeController {
    private final TExpensesDao dao;

    @Autowired
    HomeController(TExpensesDao dao) {
        this.dao = dao;
    }

    @GetMapping(value="/home")
    String home()
    {
        return "houseHoldAccountBook";
    };

    /*
     *登録するメソッド
     */
    @GetMapping(value="/register")
    String register(@RequestParam("recordingDateTime") String recordingDateTimeStr,
                    @RequestParam("category") int category,
                    @RequestParam("amount") long amount,
                    @RequestParam("memo") String memo) {

        //idを変数で取得
        String id = UUID.randomUUID().toString().substring(0,8);

        //Date型は@RequestParamで受け取れないため、String→Dateに変換する
        Date recordingDateTime = DateTimeLib.convertStrToDate(recordingDateTimeStr, "yyyy-MM-dd");

        int inOrOut = Constants.INOROUT_OUT;
        if(category > 50) {
            inOrOut =Constants.INOROUT_IN;
        }

        //登録モデルを作成
        TExpensesModel model = new TExpensesModel(id, recordingDateTime, inOrOut, category, amount, memo);

        //登録処理
        dao.register(model);

        return "redirect:/search";
    }

    /*
     *検索するメソッド
     */
    @GetMapping("/search")
    String search(Model model) {
        List<DetailForm> list = dao.select();

        model.addAttribute("expensesList", list);
        return "houseHoldAccountBook";
    }

    /*
     *削除するメソッド
     */
    @GetMapping("/delete")
    String delete(@RequestParam("id") String id) {
        dao.delete(id);

        return "redirect:/search";
    }

}
-
Controllerアノテーション
クラス宣言の上部に@Controllerを記述することで、コントローラークラスとして認識されます。returnの後にHTMLのファイル名を記述することで、HTMLを返すことができます。また、@RestControllerと記述すれば、JSONやXML、文字列、オブジェクトなどを返すことができます。 -
GetMappingアノテーション
関数の上部に記述することで、アノテーション内の指定したパスからHTTP GETリクエストを受けた時に対象の関数が呼ばれます。 -
RequestParamアノテーション
関数の上部に記述することで、アノテーション内の指定したIDの変数をフォームから受け取ります。
RequestParamアノテーションで受ける引数の型をDateにすると遷移エラーが出たので、文字列で受け取りました。
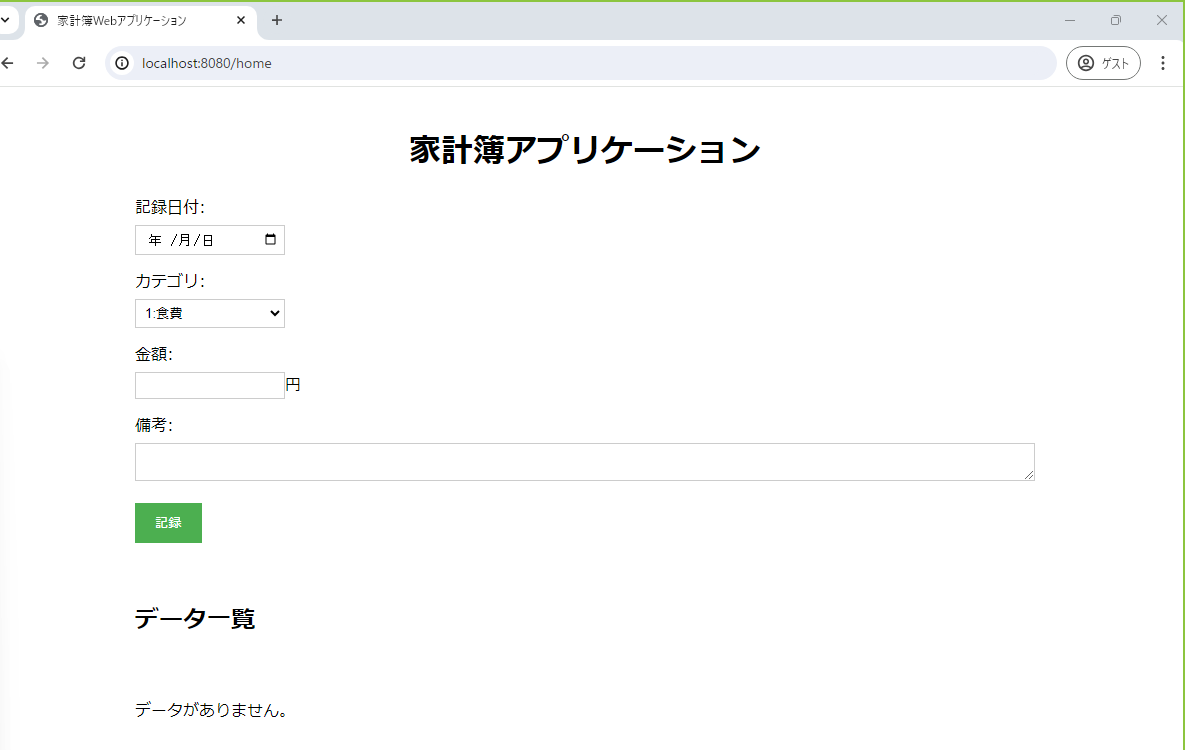
実行して、http://localhost:8080/home をブラウザで入力すると、前項で作成した登録画面が表示されました。これは、@GetMapping(value="/home")により呼び出されたhomeメソッドが、前項で作成したHTMLのファイル名を指定して返しているからです。
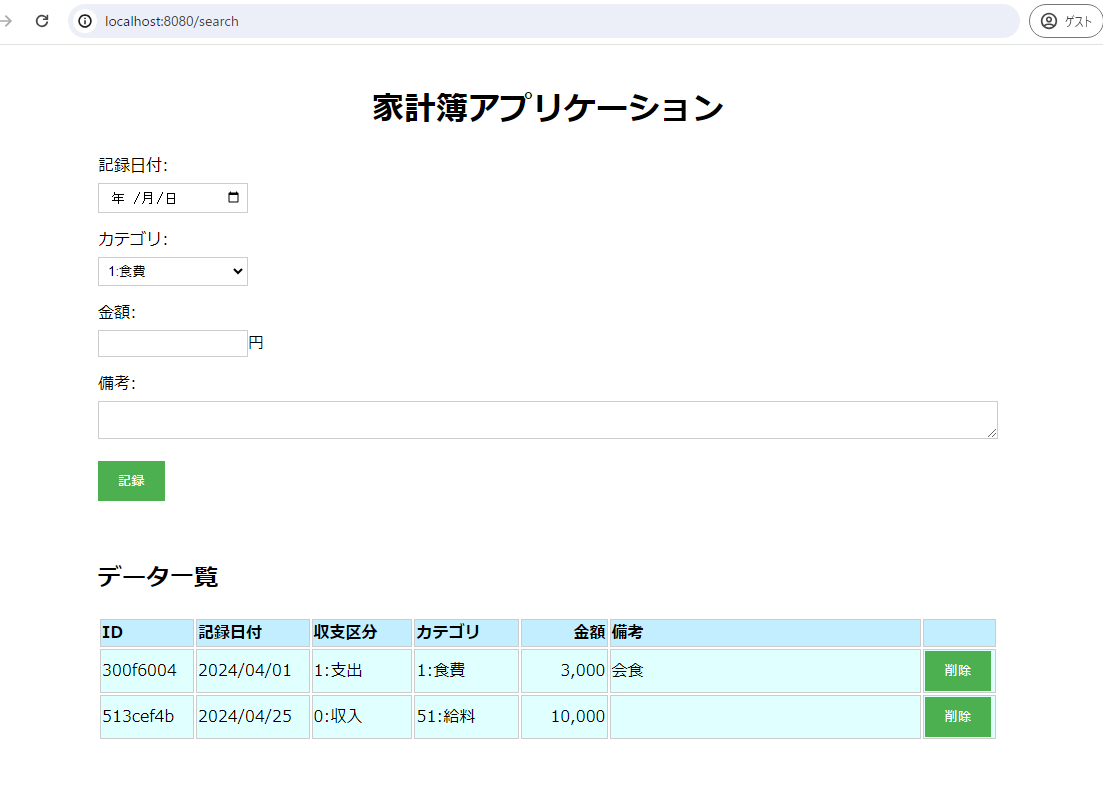
フォームの項目を入力して記録を押すと、データ一覧にデータが表示されました。
記録ボタンを押すとregisterメソッドが呼び出されDBに登録されますが、return "redirect:/search";とすることで、@GetMapping("/search")によりsearchメソッドが呼び出され、登録されたデータを呼び出します。このように、Spring Bootはメソッドの返り値によって画面の遷移を制御することができます。
Model
データベースにアクセスするDAOと、値を格納するクラスを添付します。jdbcの説明になってしまうので、解説は割愛します。
package com.example.houseHoldAccoutBook;

import org.springframework.beans.factory.annotation.Autowired;
import org.springframework.jdbc.core.JdbcTemplate;
import org.springframework.jdbc.core.namedparam.BeanPropertySqlParameterSource;
import org.springframework.jdbc.core.namedparam.SqlParameterSource;
import org.springframework.jdbc.core.simple.SimpleJdbcInsert;
import org.springframework.stereotype.Service;

import java.time.LocalDateTime;
import java.util.Date;
import java.util.List;
import java.util.Map;

@Service
public class TExpensesDao {
    private final JdbcTemplate jdbc;

    @Autowired
    TExpensesDao(JdbcTemplate jdbc) {
        this.jdbc = jdbc;
    }

    public void register(TExpensesModel model) {
        //SQLにマッピングする対象のインスタンスを指定
        SqlParameterSource sqlParam = new BeanPropertySqlParameterSource(model);

        SimpleJdbcInsert insert = new SimpleJdbcInsert(jdbc).withTableName("TExpenses");
        insert.execute(sqlParam);
    }

    public List<DetailForm> select() {
        StringBuilder sql = new StringBuilder();
        sql.append(" SELECT * ");
        sql.append(" FROM TExpenses ");

        //引数にSQLを指定し、データを取得
        List<Map<String, Object>> result = jdbc.queryForList(sql.toString());
        //取得したリストからstreamでMapを一つずつ取り出し、モデルのコンストラクタでインスタンス化する
        List<DetailForm> ret = result.stream()
                .map(model -> new DetailForm(
                        model.get("Id").toString(),
                        DateTimeLib.localDateTimetoDaetStr((LocalDateTime)model.get("RecordingDateTime"), "yyyy/MM/dd"),
                        model.get("InOrOut").toString()+":"+Constants.getInOrOutNm((int)model.get("InOrOut")),
                        model.get("Category").toString()+":"+Constants.getCategoryNm((int)model.get("Category")),
                        String.format("%,d", (int)model.get("Amount")),
                        model.get("Memo").toString())
                //終端処理でインスタンスをリスト化
                ).toList();
        return ret;
    }

    public void delete(String id) {
        StringBuilder sql = new StringBuilder();
        sql.append(" DELETE ");
        sql.append(" FROM TExpenses ");
        sql.append(" WHERE Id = ?");
        jdbc.update(sql.toString(), id);
    }
}
package com.example.houseHoldAccoutBook;
import java.util.Date;
/*
収支情報を保持するモデル
 */
public record  TExpensesModel (String id, Date recordingDateTime, int inOrOut, int category, long amount, String memo){}
最後にsrc/main以下のツリーを載せます。
main
├─java
│  └─com
│      └─example
│          └─houseHoldAccoutBook
│                  Constants.java
│                  DateTimeLib.java
│                  DetailForm.java
│                  HomeController.java
│                  HouseHoldAccoutBookApplication.java
│                  TExpensesDao.java
│                  TExpensesModel.java
│
└─resources
    │  application.properties
    │
    ├─static
    │  └─css
    │          style.css
    │
    └─templates
            houseHoldAccountBook.html
まとめ
以上でSpring BootによるWebアプリケーションの実装が完了しました。0から作成した割には非常に短時間で実装できました。特にアクションフォームの受け渡しなどに煩雑な設定ファイルを作成することなく、ほとんどJavaファイルで実装できたので、導入が非常に楽でした。また、Spring Iintializrによってプロジェクト構造の雛形とpop.xmlへの依存性の注入が自動で行われる点も魅力的でした。
次回は作成したアプリをLinuxベースのサーバーにデプロイしてみたいと思います。


