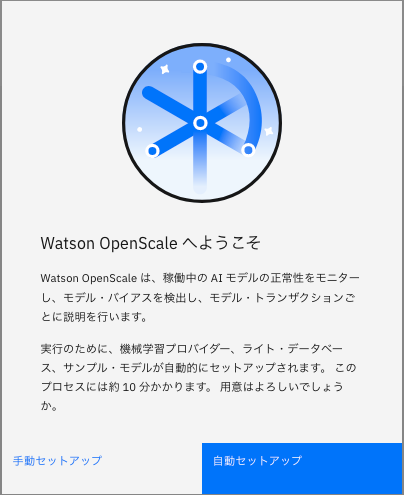
Watson OpenScaleでは初回起動時に以下のように「自動セットアップ」のメニューが表示され、データがロードされた状態でデモを行うことができます。
自動セットアップは環境を初期化しないと再度実施できないとか、特定のWatson Machine LearningやDb2のインスタンスを指定できない等の制約があります。本記事ではOpenScaleのCLIを使用して、もっと柔軟にデモ環境を作成する方法を紹介します。
CLIのインストール
CLIは以下リンク先で詳細を確認できます。
https://pypi.org/project/ibm-ai-openscale-cli/
pipコマンドでCLIをインストールします。
pip install -U ibm-ai-openscale-cli
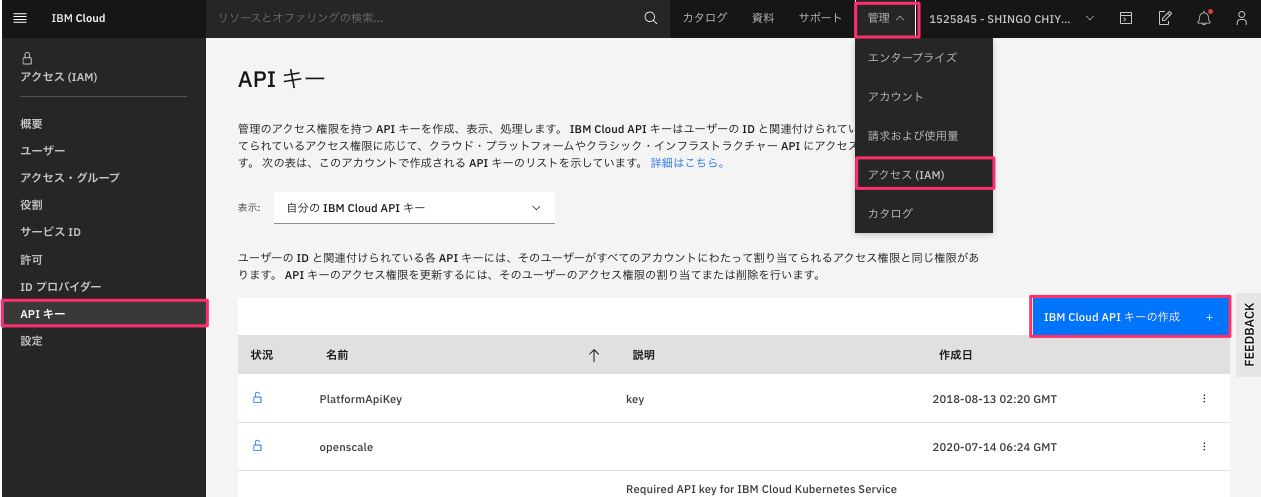
IBM Cloud API キーの作成
IBM Cloudのコンソールから、管理 ->アクセス(IAM) -> APIキー -> IBM Cloud APIキーの作成 でAPIキーを作成します。
CLIの実行
セットアップ例1
以下のコマンドでは自動セットアップと同様、内部DBによって構成が実行されます。
export APIKEY=<IBM_CLOUD_API_KEY>
ibm-ai-openscale-cli --apikey $APIKEY
セットアップ例2
任意のWMLのインスタンスを使用する場合は --wml オプションで WMLのcredentialが記載されたファイルを指定します。
export APIKEY=<IBM_CLOUD_API_KEY>
export WML=wml.json
ibm-ai-openscale-cli --apikey $APIKEY --wml $WML
wml.json
{
  "apikey": "xxxxxxxxxxxxxxxxxxxxxxxxxxxxxxxxx",
  "iam_apikey_description": "Auto generated apikey during resource-key operation for Instance - crn:v1:bluemix:public:pm-20:us-south:a/7f9dc5344476457f2c0f53244a37da3b:6d23b778-bb30-43b4-9e0e-2bfcfeefc75f::",
  "iam_apikey_name": "auto-generated-apikey-ea5c2063-19fd-4b54-a1ce-7e9d4de67622",
  "iam_role_crn": "crn:v1:bluemix:public:iam::::serviceRole:Writer",
  "iam_serviceid_crn": "crn:v1:bluemix:public:iam-identity::a/7f9dc5344476457f2c0f53244a37da3b::serviceid:ServiceId-307f14da-2e58-4d8f-abc6-c9dcda6632b9",
  "instance_id": "6d23b778-bb30-43b4-9e0e-2bfcfeefc75f",
  "password": "xxxxxxxxxxxxxxxxxxxxxxxxxxx",
  "url": "https://us-south.ml.cloud.ibm.com",
  "username": "ea5c2063-19fd-4b54-a1ce-7e9d4de67622"
}
セットアップ例3
さらに、Db2をデータマートとして使用する場合は --db2オプションで Db2のcredentialが記載されたファイルを指定します。
export APIKEY=<IBM_CLOUD_API_KEY>
export WML=wml.json
export DB2=db2.json
ibm-ai-openscale-cli --apikey $APIKEY --wml $WML --db2 $DB2
db2.json
{
  "db": "BLUDB",
  "dsn": "DATABASE=BLUDB;HOSTNAME=dashdb-txn-flex-yp-dal09-240.services.dal.bluemix.net;PORT=50000;PROTOCOL=TCPIP;UID=bluadmin;PWD=xxxxxxxxxxx",
  "host": "dashdb-txn-flex-yp-dal09-240.services.dal.bluemix.net",
  "hostname": "dashdb-txn-flex-yp-dal09-240.services.dal.bluemix.net",
  "https_url": "https://dashdb-txn-flex-yp-dal09-240.services.dal.bluemix.net:8443",
  "jdbcurl": "jdbc:db2://dashdb-txn-flex-yp-dal09-240.services.dal.bluemix.net:50000/BLUDB",
  "parameters": {},
  "password": "xxxxxxxxxxxx",
  "port": 50000,
  "ssldsn": "DATABASE=BLUDB;HOSTNAME=dashdb-txn-flex-yp-dal09-240.services.dal.bluemix.net;PORT=50001;PROTOCOL=TCPIP;UID=bluadmin;PWD=xxxxxxxxxxxx;Security=SSL;",
  "ssljdbcurl": "jdbc:db2://dashdb-txn-flex-yp-dal09-240.services.dal.bluemix.net:50001/BLUDB:sslConnection=true;",
  "uri": "db2://bluadmin:MTJlMGExNjBiMmZi@dashdb-txn-flex-yp-dal09-240.services.dal.bluemix.net:50000/BLUDB",
  "username": "bluadmin"
}
データの再ロード
--history-onlyオプションを使用すると、既存の構成に、デモ用のヒストリカルデータを7日再度ロードし直してくれます。
export APIKEY=<IBM_CLOUD_API_KEY>
export WML=wml.json
ibm-ai-openscale-cli --apikey $APIKEY --history-only --extend --deployment-name  GermanCreditRiskModel --wml $WML