概要
- Rails5.1 + webpacker + vue.jsを使用したアプリケーションを作成します。
- 本記事は環境構築には触れず、ajaxを使用した検索フォームに焦点を絞ります。
- 作成したコードはこちら
サンプルアプリ
- シンプルな社員管理アプリケーションを作成します。
- 使用するモデルは社員(staff)のみ。
- 社員モデルは名前(name)、年齢(age)、入社日(joined_on)の情報を持ちます。
$ rails g scaffold staff name:string age:integer joined_on:date
$ rake db:migrate
ルーティング
- ajax用のエンドポイント
api/staffs/searchを作成します。
routes.rb
  root 'staffs#index'
  scope :api, { format: 'json' } do
    resources :staffs do
      get :search , on: :collection
    end
  end
  resources :staffs
Ajaxでリクエストパラメータを送る
axiosとqsをインストールしておきます。
$ yarn add axios
$ yarn add qs
application.js
import Vue from 'vue/dist/vue.esm'
import axios from 'axios'
import Qs from 'qs'

document.addEventListener('DOMContentLoaded', () => {
  const app = new Vue({
    el: '#el-index',
    data: function(){
      return {
        staffs: [],
        query: {
          name_cont: null,
          age_gteq: 0,
          age_lteq: 100,
          joined_on_gteq: null,
          joined_on_lteq: null
        }
      }
    },
    created: function(){
      this.search()
    },
    methods:{
      search: function(){
        axios.get('/api/staffs/search',{
          params:{
            q: this.query
          },
          paramsSerializer: function(params) {
            return Qs.stringify(params, {arrayFormat: 'brackets'})
          }
        })
        .then((response) => {
          console.log(response);
          this.staffs = response.data.staffs;
        })
        .catch((error) => {
          console.log(error);
        })
      }
    }
  })
})
-
this.queryがそのままransackの検索クエリーになります。 -
Qs.stringifyでクエリーを連想配列に変換します。 -
返却されたresponseの配列をdataに格納することで、画面に自動反映されます。
-
サーバサイドでは特別なことはせず、そのままransackを使うだけです。
Gemfile
+ gem 'ransack'
staffs_controller.rb
  # GET /api/staffs/searchs
  def search
    @q = Staff.ransack(search_params)
    @staffs = @q.result(distinct: true)
  end
  private
  def search_params
      params.require(:q).permit(:name_cont , :age_gteq , :age_lteq , :joined_on_gteq, :joined_on_lteq)
  end
staffs/search.json.jbuilder
json.staffs @staffs, partial: 'staffs/staff', as: :staff
staffs/_staff.json.jbuilder
json.extract! staff,
              :id,
              :name,
              :age,
              :joined_on,
              :created_at,
              :updated_at
json.url staff_url(staff, format: :json)
フォームを作る
UIにはElement-uiをつかいます。
$ yarn add element-ui
application.js
import Vue from 'vue/dist/vue.esm'
import axios from 'axios'
import Qs from 'qs'
+import ElementUI from 'element-ui'
+import locale from 'element-ui/lib/locale/lang/ja'
+import 'element-ui/lib/theme-default/index.css'
+
+Vue.use(ElementUI, { locale })
+
document.addEventListener('DOMContentLoaded', () => {
  const app = new Vue({
    el: '#el-index',
    data: function(){
      return {
        staffs: [],
        query: {
          name_cont: null,
          age_gteq: 0,
          age_lteq: 100,
          joined_on_gteq: null,
          joined_on_lteq: null
        }
      }
    },
    created: function(){
      this.search()
    },
    methods:{
+      notify: function(msg){
+        this.$notify({
+          type: 'error',
+          title: 'Error',
+          message: msg
+        });
+      },
      search: function(){
        axios.get('/api/staffs/search',{
          params:{
            q: this.query
          },
          paramsSerializer: function(params) {
            return Qs.stringify(params, {arrayFormat: 'brackets'})
          }
        })
        .then((response) => {
          console.log(response);
          this.staffs = response.data.staffs;
        })
        .catch((error) => {
          console.log(error);
+          this.notify(error.message);
        })
      }
    }
  })
})
- 日本語を適用するには、
element-ui/lib/locale/lang/jaでimportしたlocaleをセットすれば良いようです。
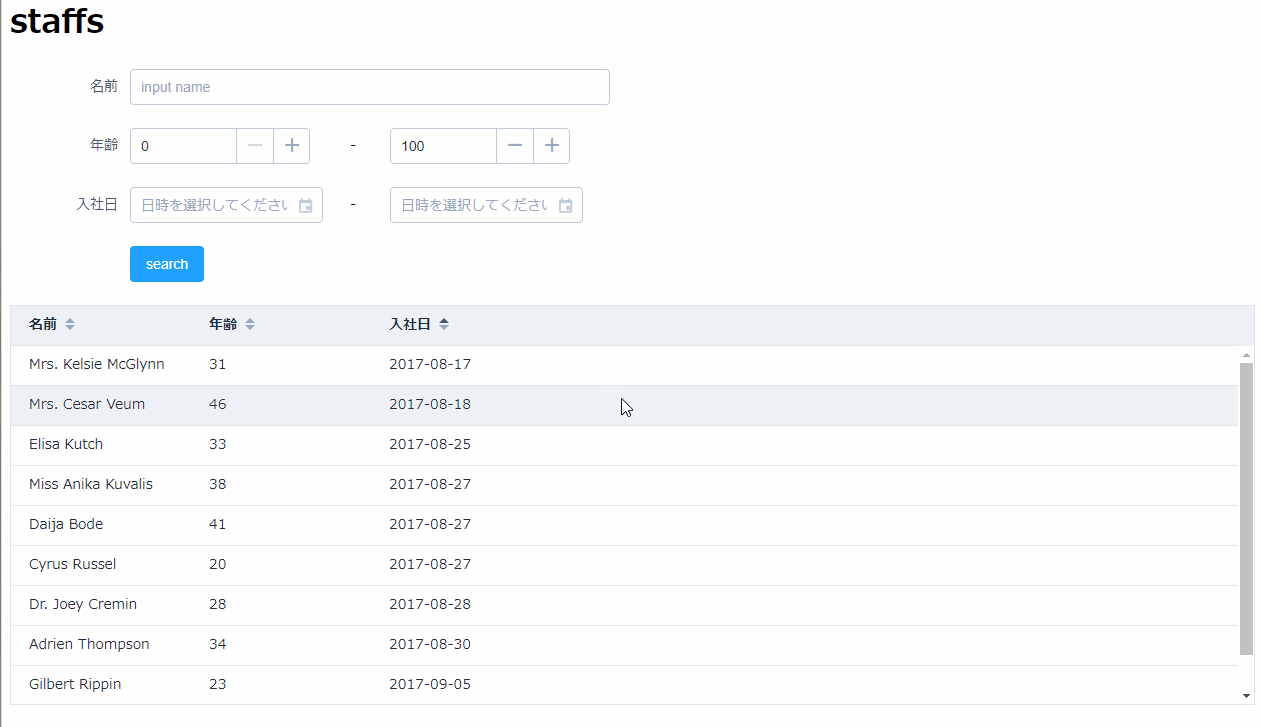
index.html.erb
<div id="el-index">
  <h1>staffs</h1>
  <div class="search-form-static">
  <el-form ref="form" :model="query" label-width="120px">
    <el-form-item label="名前">
      <el-input v-model="query.name_cont" placeholder="input name"></el-input>
    </el-form-item>
    <el-form-item label="年齢">
      <el-col :span="11">
        <el-input-number v-model="query.age_gteq" :min="0" :max="150"></el-input-number>
      </el-col>
      <el-col class="line" :span="2">-</el-col>
      <el-col :span="11">
        <el-input-number v-model="query.age_lteq" :min="0" :max="150"></el-input-number>
      </el-col>
    </el-form-item>
    <el-form-item label="入社日">
      <el-col :span="11">
        <el-date-picker
          v-model="query.joined_on_gteq"
          type="date"
          placeholder="日時を選択してください">
        </el-date-picker>
      </el-col>
      <el-col class="line" :span="2">-</el-col>
      <el-col :span="11">
        <el-date-picker
          v-model="query.joined_on_lteq"
          type="date"
          placeholder="日時を選択してください">
        </el-date-picker>
      </el-col>
    </el-form-item>
    <el-form-item>
      <el-button type="primary" @click="search">search</el-button>
    </el-form-item>
  </el-form>
  </div>
  <el-table
    :data="staffs"
    height="400"
    stripe
    style="width: 100%">
    <el-table-column
      prop="name"
      sortable
      label="名前"
      width="180">
    </el-table-column>
    <el-table-column
      prop="age"
      sortable
      label="年齢"
      width="180">
    </el-table-column>
    <el-table-column
      prop="joined_on"
      sortable
      label="入社日">
    </el-table-column>
  </el-table>
</div>
テストデータ
- fakerを使用してテストデータを作成します。
Gemfile
+ gem 'faker'
seeds.rb
10.times do
  Staff.create(
    name: Faker::Name.name,
    age: Faker::Number.between(18, 60),
    joined_on: Faker::Date.between(20.days.ago, Date.today)
  )
end
デモ
参考
How to make AJAX calls in Rails 5.1 with or without jQuery
Vue.jsのコンポーネント詰め合わせ「Element」がスゴかった