SENSY Advent Calendar14日目の記事です。
12月からSENSY株式会社のAIチームで働いています。今回はDeep Learningへの応用ができるTheanoという数値計算ライブラリを用いて、チュートリアルを参考に畳み込みニューラルネットワーク(CNN)の実装をしたので、実装内容と結果をまとめました。細かい説明は省いています。
データはMNISTを用いました。
インストール
$ pip install Theano
エラーなくversion'1.0.1'がインストールができました。
動作確認として、以下のコードを実行します。
from theano import function, config, shared, tensor
import numpy
import time

vlen = 10 * 30 * 768
iters = 1000

rng = numpy.random.RandomState(22)
x = shared(numpy.asarray(rng.rand(vlen), config.floatX))
f = function([], tensor.exp(x))
print(f.maker.fgraph.toposort())
t0 = time.time()
for i in range(iters):
    r = f()
t1 = time.time()
print("Looping %d times took %f seconds" % (iters, t1 - t0))
print("Result is %s" % (r,))
if numpy.any([isinstance(x.op, tensor.Elemwise) and
              ('Gpu' not in type(x.op).__name__)
              for x in f.maker.fgraph.toposort()]):
    print('Used the cpu')
else:
    print('Used the gpu')
実行結果
[Elemwise{exp,no_inplace}(<TensorType(float64, vector)>)]
Looping 1000 times took 2.734218 seconds
Result is [ 1.23178032  1.61879341  1.52278065 ...,  2.20771815  2.29967753 1.62323285]
Used the cpu
CPUでの動作確認ができました。
MNISTのデータダウンロード
今回はscikit-learnのmldataを用いてダウンロードしました。
from sklearn.datasets import fetch_mldata
mnist = fetch_mldata('MNIST original', data_home='.')
>>> mnint
{'COL_NAMES': ['label', 'data'],
 'DESCR': 'mldata.org dataset: mnist-original',
 'data': array([[0, 0, 0, ..., 0, 0, 0],
        [0, 0, 0, ..., 0, 0, 0],
        [0, 0, 0, ..., 0, 0, 0],
        ...,
        [0, 0, 0, ..., 0, 0, 0],
        [0, 0, 0, ..., 0, 0, 0],
        [0, 0, 0, ..., 0, 0, 0]], dtype=uint8),
 'target': array([ 0.,  0.,  0., ...,  9.,  9.,  9.])}
28×28ピクセルの0~9の手書き数字データがダウンロードできました。
実装
インポート
numpy,theanoなどのライブラリをインストールします。
import numpy as np
import os
import time
import theano
import theano.tensor as T
from theano.tensor.nnet import conv2d
from theano.tensor.signal.pool import pool_2d
from sklearn.model_selection import train_test_split
from sklearn.datasets import fetch_mldata
データロード
データを読み込み、、80%を学習用、20%を評価用と分割して、複数の関数から参照できる共有変数とします。
def data_load(dataset):

    mnist = fetch_mldata(dataset, data_home='.')
    train_set_x ,test_set_x, train_set_y,test_set_y = train_test_split(mnist.data,mnist.target, train_size=0.8)
    train_set = [train_set_x,train_set_y]
    test_set = [test_set_x, test_set_y]

    def shared_dataset(data, borrow=True):
        data_x, data_y = data

        shared_x = theano.shared(
            np.asarray(data_x, dtype=theano.config.floatX), borrow=borrow)
        shared_y = theano.shared(
            np.asarray(data_y, dtype=theano.config.floatX), borrow=borrow)

        return shared_x, T.cast(shared_y, 'int32')

    test_set_x, test_set_y = shared_dataset(test_set)
    train_set_x, train_set_y = shared_dataset(train_set)

    rval = [(train_set_x, train_set_y),
            (test_set_x, test_set_y)]

    return rval
畳み込み層
CNNの畳み込み層を実装します。
class ConvLayer(object):
    def __init__(self, rng, input, filter_shape, image_shape):
        assert image_shape[1] == filter_shape[1]
        self.input = input
        fan_in = np.prod(filter_shape[1:])
        fan_out = filter_shape[0] * np.prod(filter_shape[2:])

        W_bound = np.sqrt(6.0 / (fan_in + fan_out))
        self.W = theano.shared(
            np.asarray(
                rng.uniform(low=-W_bound, high=W_bound, size = filter_shape),
                dtype=theano.config.floatX
            ),
            borrow=True
        )

        b_values = np.zeros((filter_shape[0],),dtype=theano.config.floatX)
        self.b = theano.shared(value=b_values, borrow=True)

        conv_out = conv2d(
            input=input,
            filters=self.W,
            filter_shape=filter_shape,
            input_shape=image_shape
        )

        self.output = T.tanh(conv_out + self.b.dimshuffle('x', 0, 'x', 'x'))

        self.params = [self.W, self.b]
ブーリング層
CNNのプーリング層を実装します。
class PoolLayer(object):
    def __init__(self, rng, input, poolsize=(2, 2)):

        pooled_out = pool_2d(
            input = input ,
            ws=poolsize,
            ignore_border=True)

        self.output = pooled_out
隠れ層
畳み込み、プーリング後のニューラルネットワーク部分の隠れ層を実装します。
class HiddenLayer(object):
    def __init__(self, rng, input, n_in, n_out, W=None, b=None, activation=T.tanh):
        self.input = input

        if W is None:
            W_bound = np.sqrt(6.0 / (n_in + n_out))
            W_values = np.asarray(
                rng.uniform(
                    low=-W_bound, high=W_bound, size = (n_in, n_out)),
                dtype=theano.config.floatX
            )
            if activation == T.nnet.sigmoid:
                W_values += 4

            W = theano.shared(value=W_values, name='W', borrow=True)

        if b is None:
            b_values = np.zeros((n_out,),dtype=theano.config.floatX)
            b = theano.shared(value=b_values, name='b',borrow=True)

        self.W = W
        self.b = b

        lin_output = T.dot(input, self.W) + self.b
        self.output = (
            lin_output if activation is None
            else activation(lin_output)
        )

        self.params = [self.W, self.b]
ロジスティック回帰
class LogisticRegression(object):

    def __init__(self, input, n_in, n_out):
        self.W = theano.shared(
            value=np.zeros(
                (n_in, n_out),
                dtype=theano.config.floatX),
            name='W',
            borrow=True
        )

        self.b = theano.shared(
            value=np.zeros(
                (n_out,),
                dtype=theano.config.floatX),
            name='b',
            borrow=True
        )

        self.p_y_given_x = T.nnet.softmax(T.dot(input, self.W) + self.b)

        self.y_pred = T.argmax(self.p_y_given_x, axis=1)

        self.params = [self.W, self.b]

    def negative_log_likelihood(self, y):
        return -T.mean(T.log(self.p_y_given_x)[T.arange(y.shape[0]), y])

    def errors(self, y):
        if y.ndim != self.y_pred.ndim:
            raise TypeError('y should have the same shape as self.y_pred',
                            ('y', y.type, 'y_pred', self.y_pred.type))

        if y.dtype.startswith('int'):
            return T.mean(T.neq(self.y_pred, y))
        else:
            raise NotImplementedError()
学習
def lenet(lr=0.1, epoch=100, dataset='MNIST original', batch_size=500):
    rng = np.random.RandomState(23455)

    datasets = data_load(dataset)
    train_x, train_y = datasets[0]
    test_x, test_y = datasets[1]
    n_train_batches = int(train_x.get_value(borrow=True).shape[0] / batch_size)
    n_test_batches = int(test_x.get_value(borrow=True).shape[0] / batch_size)

    index = T.lscalar()
    x = T.matrix('x')
    y = T.ivector('y')

    layer0_input = x.reshape((batch_size, 1, 28, 28))

    layer0 = ConvLayer(rng,
                       input = layer0_input,
                       filter_shape = (10, 1, 5, 5),
                       image_shape = (batch_size, 1, 28, 28))

    layer1 = ConvLayer(rng,
                       input = layer0.output,
                       filter_shape = (20, 10, 5, 5),
                       image_shape = (batch_size, 10, 24, 24))

    layer2 = PoolLayer(rng,
                       input = layer1.output,
                      poolsize=(2, 2))


    layer3 = ConvLayer(rng,
                       input = layer2.output,
                       filter_shape = (50, 20, 5, 5),
                       image_shape = (batch_size, 20, 10, 10))

    layer4 = PoolLayer(rng,
                       input = layer3.output,
                      poolsize=(2,2))

    layer5_input = layer4.output.flatten(2)

    layer5 = HiddenLayer(rng,
                         input = layer5_input,
                         n_in = 50 * 3 * 3,
                         n_out = 100,
                         activation = T.tanh)

    layer6 = LogisticRegression(input = layer5.output,
                                n_in = 100,
                                n_out = 10)

    cost = layer6.negative_log_likelihood(y)

    test_model = theano.function(
        [index],
        layer6.errors(y),
        givens={
            x:test_x[index * batch_size: (index + 1) * batch_size],
            y:test_y[index * batch_size: (index + 1) * batch_size]
        })

    params = layer6.params + layer5.params + layer3.params + layer1.params + layer0.params
    grads = T.grad(cost, params)
    updates = [(param_i, param_i - lr * grad_i) for param_i,grad_i in zip(params, grads)]

    train_model = theano.function(
        [index],
        cost,
        updates=updates,
        givens={
            x:train_x[index * batch_size: (index + 1) * batch_size],
            y:train_y[index * batch_size: (index + 1) * batch_size]
        })

    start_time = time.clock()
    test_score = 0

    for epo in range(epoch):
        for minibatch_index in range(n_train_batches):
            cost_i = train_model(minibatch_index)

        test_loss = [test_model(i) for i in range(n_test_batches)]
        test_score = np.mean(test_loss)
        print ('epo : %d , test accuracy : %f' % (epo, 100.0 - test_score * 100))

    end_time = time.clock()
今回はConv→Conv→Pool→Conv→Pool→Hidden→Outputという形で実装しました。
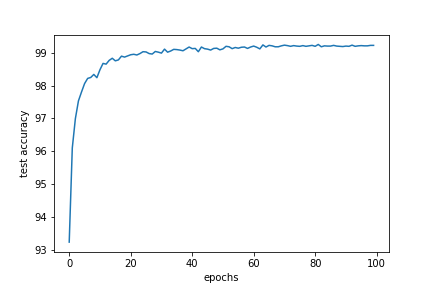
batch_sizeを500で100epoch学習しました。
実行結果
test accuracy : 99.22%
学習にかかった時間 : 310.67m
まとめ
今回はTheanoを用いてCNNを実装し、MNISTのデータを学習しました。
機会があれば、GPUでも動かしてみようと思います。
