はじめに
今更ながらReactを触ってみました。
以前Riot.jsを触っていたので、Reactはすごく書きやすいな〜という印象を持ちました。
簡単なTodoアプリケーションの作成をしながらReactを解説していきたいと思います。
React歴2日目ですので、間違いなどありましたら、コメント頂けますと幸いです。
環境
Nodeとcreate-react-appのインストール方法については記載しません。
- Mac OS X 10.14
- Nodejs 11.1.0
- create-react-app 2.1.1
1. アプリケーションを作成
$ create-react-app react-todo

$ cd react-todo
2. 不要ファイルの削除と初期ファイルの修正
create-react-appコマンドで生成されるディレクトリとファイル構造は以下
create-todo
┗node_modules/
┗public/
┗src/
  | App.css
  | App.js
  | App.test.js
  | index.css
  | index.js
  | logo.svg
  | serviceWorker.js
.gitignore
package.json
package-lock.json
README.md
上記のうちsrcディレクトリ内のApp.jsとindex.js、serviceWorker.js以外を削除します。
componentsディレクトリの作成
そして、srcディレクトリ内にcomponentsディレクトリを作成
// srcディレクトリ内にcomponentsディレクトリを作成
$ mkdir src/components

// App.jsをcomponentsディレクトリに移動
$ mv src/App.js src/components
ファイル名を変更
以下ファイルの拡張子をjsxにします。特に変更する必要もないのですが、なんとなく変更しておきます。
- index.js -> index.jsx
- App.js -> App.jsx
ファイルの修正
index.jsxを以下のように修正
src/index.jsx
import React from 'react';
import ReactDOM from 'react-dom';
import * as serviceWorker from './serviceWorker';

import App from './components/App';

ReactDOM.render(<App />, document.getElementById('root'));

// If you want your app to work offline and load faster, you can change
// unregister() to register() below. Note this comes with some pitfalls.
// Learn more about service workers: http://bit.ly/CRA-PWA
serviceWorker.unregister();
App.jsxを以下のように修正
src/components/App.jsx
import React, { Component } from 'react';

export default class App extends Component {
  render() {
    return (
      <div className="App">
      </div>
    );
  }
}
index.htmlにsiimpleを追加
デザインをSiimpleに丸投げするので、CDNで読み込み
<link rel="stylesheet" href="https://cdn.jsdelivr.net/npm/siimple@3.1.1/dist/siimple.min.css">を追記しています。
<!DOCTYPE html>
<html lang="en">
  <head>
    <meta charset="utf-8">
    <link rel="shortcut icon" href="%PUBLIC_URL%/favicon.ico">
    <meta name="viewport" content="width=device-width, initial-scale=1, shrink-to-fit=no">
    <meta name="theme-color" content="#000000">
    <!--
      manifest.json provides metadata used when your web app is added to the
      homescreen on Android. See https://developers.google.com/web/fundamentals/web-app-manifest/
    -->
    <link rel="manifest" href="%PUBLIC_URL%/manifest.json">
    <!-- 以下を追記 -->
    <link rel="stylesheet" href="https://cdn.jsdelivr.net/npm/siimple@3.1.1/dist/siimple.min.css">
    <!--
      Notice the use of %PUBLIC_URL% in the tags above.
      It will be replaced with the URL of the `public` folder during the build.
      Only files inside the `public` folder can be referenced from the HTML.

      Unlike "/favicon.ico" or "favicon.ico", "%PUBLIC_URL%/favicon.ico" will
      work correctly both with client-side routing and a non-root public URL.
      Learn how to configure a non-root public URL by running `npm run build`.
    -->
    <title>React App</title>
  </head>
  <body>
    <noscript>
      You need to enable JavaScript to run this app.
    </noscript>
    <div id="root"></div>
    <!--
      This HTML file is a template.
      If you open it directly in the browser, you will see an empty page.

      You can add webfonts, meta tags, or analytics to this file.
      The build step will place the bundled scripts into the <body> tag.

      To begin the development, run `npm start` or `yarn start`.
      To create a production bundle, use `npm run build` or `yarn build`.
    -->
  </body>
</html>
3. Todoアプリケーションの概要
作成するTodoアプリケーションは以下のコンポーネントで構成されます。
- Appコンポーネント(stateを管理)
- Formコンポーネント(stateless)
- Listコンポーネント(stateless)
親コンポーネントがデータ(state)を管理し、子コンポーネントはstatelessで組みたいと思います。
親子関係は以下
App(親)
┗Form(子)
┗List(子)
4. Formコンポーネントを作成する
functional componentで作成する。
class componentとfunctional componentについてはとてもわかりやすいこの記事を参照ください。
src/componentsディレクトリ内にForm.jsxを作成し、以下を入力。
まずは見た目だけを作っていきます。
import React, { Component } from 'react';

const Form = (props) => (
  <form className="siimple-form">
    <div className="siimple-form-field">
      <label className="siimple-label siimple--color-white">Your todo:</label>
      <input name="title" type="text" className="siimple-input"/> <input type="submit" value="Add" className="siimple-btn siimple-btn--teal"/>
    </div>
  </form>
);

export default Form;
作成しただけではまだ表示出来ないので、App.jsxにForm.jsxをimportさせます。
src/components/App.jsxを以下のように修正
import React, { Component } from 'react';
import Form from './Form';

export default class App extends Component {
  render() {
    return (
      <div className="siimple-box siimple--bg-dark">
        <h1 className="siimple-box-title siimple--color-white">React Todo App</h1>
        <Form/>
      </div>
    );
  }
}
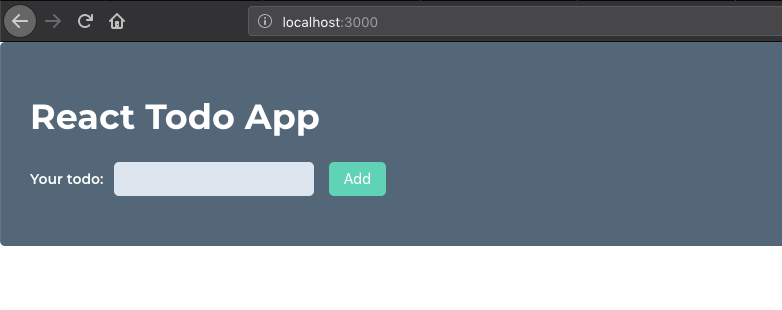
ここまで終わったら、
アプリケーションのルートディレクトリに移動して、npm startを実行http://localhost:3000にアクセスすると開発中のページが見えるかと思います。
今の所以下のように表示されるかと思います。
5. List.jsxを作成する
src/components内にList.jsxを作成し、以下を入力します。
import React, { Component } from 'react';

let style = {
  maxWidth: '700px',
};

let btn = {
  cursor: 'pointer'
};

const List = (props) => (
  <ul className="siimple-list">
    <li className="siimple-list-item siimple--bg-white" style={style}>Item 1 <span className="siimple-tag siimple-tag--error siimple-hover" style={btn}>Delete</span></li>
    <li className="siimple-list-item siimple--bg-white" style={style}>Item 2 <span className="siimple-tag siimple-tag--error siimple-hover" style={btn}>Delete</span></li>
    <li className="siimple-list-item siimple--bg-white" style={style}>Item 3 <span className="siimple-tag siimple-tag--error siimple-hover" style={btn}>Delete</span></li>
  </ul>
);

export default List;
上記入力後、再度App.jsxを以下のように修正します。
import React, { Component } from 'react';
import Form from './Form';
import List from  './List';

export default class App extends Component {
  render() {
    return (
      <div className="siimple-box siimple--bg-dark">
        <h1 className="siimple-box-title siimple--color-white">React Todo App</h1>
        <Form/>
        <div className="siimple-rule"></div>
        <List/>
      </div>
    );
  }
}
6. 投稿機能を作成していく
あらかた見た目が出来たところで、機能を追加していく。
投稿機能では、親コンポーネント(App)と子コンポーネント(Form)で以下のように役割を分担する
- App
- データ(state)を管理
- データ保存用関数の定義
- 子コンポーネントへデータ保存用関数を受け渡し
- Form
- 親コンポーネントの関数をpropsで受け取り実行
App.jsx
状態管理(state)は親コンポーネントに行わせるようにするので、src/components/App.jsxを修正。
import React, { Component } from 'react';
import Form from './Form';
import List from  './List';

export default class App extends Component {
  constructor(props){
    super(props);
    this.state = {
      todo: []
    };
    this.handleAdd = this.handleAdd.bind(this);
  }

  // データ保存
  handleAdd(e){
    console.log(e.target.title.value);
    e.preventDefault(); //これを書かないとリダイレクトされてしまう
  }
  render() {
    return (
      <div className="siimple-box siimple--bg-dark">
        <h1 className="siimple-box-title siimple--color-white">React Todo App</h1>
        <Form handleAdd={this.handleAdd}/>
        <div className="siimple-rule"></div>
        <List/>
      </div>
    );
  }
}
constructorとデータ保存を行う関数handleAddを定義。
this.handleAdd = this.handleAdd.bind(this);この部分ですが、定義したhandleAdd関数内でthisを使用出来るようにする為にconstructor 内に定義しています。
handleAdd(e)として定義されていれば、受け取ったeを使ってe.target.子コンポーネントで定義したフォーム要素のname属性.valueで値を取得出来る。
Form.jsx
inputに入力したデータをconsole.logに出力
src/components/Form.jsxを修正
formタグにイベントハンドラonSubmitを追記する。
import React, { Component } from 'react';

const Form = (props) => (
  <form className="siimple-form" onSubmit={props.handleAdd}>
    <div className="siimple-form-field">
      <label className="siimple-label siimple--color-white">Your todo:</label>
      <input name="title" type="text" className="siimple-input"/> <input type="submit" value="Add" className="siimple-btn siimple-btn--teal"/>
    </div>
  </form>
);

export default Form;
ここまでで、npm startをやり直して、Your todoに値を入れて、Addボタンを押し、コンソールログを見てみましょう。
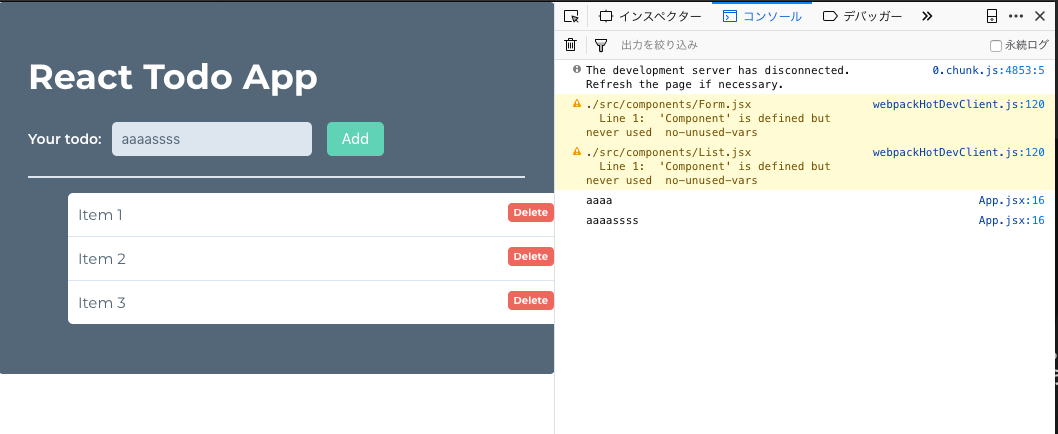
以上のようにデータが取得出来ているかと思います。
データ保存処理を書く
console.logでフォームからデータが渡ってきていることを確認したら、保存処理を書いていきます。
src/components/App.jsxのhandleAdd関数を以下のように書き換えます。
// データ保存
handleAdd(e){
  // リダイレクト防止
  e.preventDefault();
  // フォームから受け取ったデータをオブジェクトに挿入して、stateのtodo配列に追加
  this.state.todo.push({title: e.target.title.value}); // まだ保存されていない
  // setStateを使ってstateを上書き
  this.setState({todo: this.state.todo}); // 保存完了
  // inputのvalueを空に
  e.target.title.value = '';
}
投稿機能の完成です。
しかし、まだ投稿したデータが表示されていないので、Listを編集していきます。
7. 保存されたデータを表示する
保存されたデータ(state)を表示するにはまずsrc/components/App.jsxを編集していきます。
App.jsx
import React, { Component } from 'react';
import Form from './Form';
import List from  './List';

export default class App extends Component {
  constructor(props){
    super(props);
    this.state = {
      todo: []
    };
    this.handleAdd = this.handleAdd.bind(this);
  }

  // データ保存
  handleAdd(e){
    e.preventDefault();
    // フォームから受け取ったデータをオブジェクトに挿入して、stateのtodo配列に追加
    this.state.todo.push({title: e.target.title.value});
    // setStateを使ってstateを上書き
    this.setState({todo: this.state.todo});
    // inputのvalueを空に
    e.target.title.value = '';
  }
  render() {
    return (
      <div className="siimple-box siimple--bg-dark">
        <h1 className="siimple-box-title siimple--color-white">React Todo App</h1>
        <Form handleAdd={this.handleAdd}/>
        <div className="siimple-rule"></div>
        <List todos={this.state.todo}/>
      </div>
    );
  }
}
<List todos={this.state.todo}/>のように変更し、stateのtodoを子コンポーネントへtodosという変数名で受け渡します。
List.jsx
src/components/List.jsxを以下のように編集
import React, { Component } from 'react';

let style = { maxWidth: '700px' };
let btn = { cursor: 'pointer' };

const List = (props) => (
  <ul className="siimple-list">
    {props.todos.map((todo, i) => {
      return <li key={i} className="siimple-list-item siimple--bg-white" style={style}>{todo.title} <span className="siimple-tag siimple-tag--error siimple-hover" style={btn}>Delete</span></li>
    })};
  </ul>
);

export default List;
親コンポーネント(App.jsx)でtodosを渡したので、子コンポーネント(List.jsx)でpropsを使い受け取り、ループを回しています。
この際にReactのルールでループで処理した要素には一意なKeyを指定する必要があります。なので、key={i}としています。
8. 削除処理
投稿機能、表示機能まで作成したので、最後に削除機能を作成していきましょう。
App.jsx
src/components/App.jsxにhandleRemove関数を作成し、Listコンポーネントへ受け渡す。
import React, { Component } from 'react';
import Form from './Form';
import List from  './List';

export default class App extends Component {
  constructor(props){
    super(props);
    this.state = {
      todo: []
    };
    this.handleAdd = this.handleAdd.bind(this);
    this.handleRemove = this.handleRemove.bind(this);
  }

  // データ保存
  handleAdd(e){
    e.preventDefault();
    // フォームから受け取ったデータをオブジェクトに挿入して、stateのtodo配列に追加
    this.state.todo.push({title: e.target.title.value});
    // setStateを使ってstateを上書き
    this.setState({todo: this.state.todo});
    // inputのvalueを空に
    e.target.title.value = '';
  }

  // データ削除
  handleRemove(i){
    // todo配列からi番目から1つ目のデータを除外
    this.state.todo.splice(i,1);
    // setStateでtodo配列を上書き
    this.setState({todo: this.state.todo});
  }

  render() {
    return (
      <div className="siimple-box siimple--bg-dark">
        <h1 className="siimple-box-title siimple--color-white">React Todo App</h1>
        <Form handleAdd={this.handleAdd}/>
        <div className="siimple-rule"></div>
        <List todos={this.state.todo} handleRemove={this.handleRemove}/>
      </div>
    );
  }
}
List.jsx
import React from 'react';

let style = { maxWidth: '700px' };
let btn = { cursor: 'pointer' };

const List = (props) => (
  <ul className="siimple-list">
    {props.todos.map((todo, i) => {
      return <li key={i} className="siimple-list-item siimple--bg-white" style={style}>{todo.title} <span className="siimple-tag siimple-tag--error siimple-hover" style={btn} onClick={() => props.handleRemove(i)}>Delete</span></li>
    })};
  </ul>
);

export default List;
<span className="siimple-tag siimple-tag--error siimple-hover" style={btn} onClick={() => props.handleRemove(i)}>Delete</span>にonClickでpropsで親コンポーネントから受け取ったhandleRemove関数を実行させるようにしています。その際に、無名関数で実行し、iを引数に持たせています。
9. 完成形
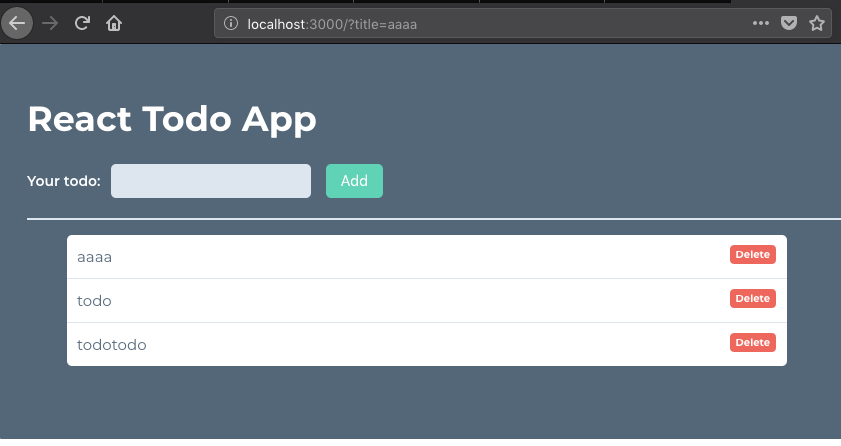
ソースコードも貼っておきます
以上で、簡単なReactのTodoアプリケーションが作成出来たかと思います。