この記事について
はじめてプログラミングにとりくむ人がなんとか「オセロ」ゲームを作れるようになるための解説記事です。
対象読者は中学1〜2年生の想定です。 4日間にわたって読むような構成で書かれています。
完成形イメージ
いったんの完成形のコードは以下にあります
https://github.com/sawamur/reversi-processing
とりあえず動いている様子: https://www.instagram.com/p/BXrRJpvFvwQ/
ご注意 (2017/8/12)
この記事はとりあえず全体の流れを把握するためのものであるので、細かい文法の説明ははしょっています。文法についてはそれぞれ検索するなり、本で確認するなりしてください。(そのうち書き足したいとは思ってます)
参考サイト:基本的な文法など
基本的な文法などは以下のサイトにも解説されています
day1: Processingのインストールから盤にとりあえず石を置くまで
Processingのインストール
以下のサイトからお使いのパソコンにあわせてダウンロードします。Macの場合は「Mac OS X」を選んでください
https://processing.org/download/
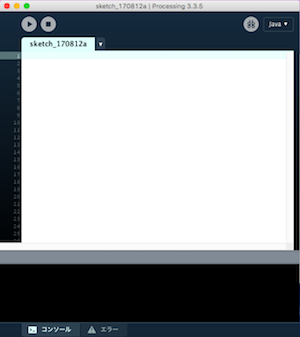
zipを解凍してダブルクリックすると以下のようなウィンドウが立ち上がります。
白いところがプログラムを書くところで、再生ボタンを押すと実行されます。
はじめてのプログラム〜盤面を描く
Processingの基本はsetup()とdraw()という二つの関数です。setupの中に書かれた処理は最初に一回だけ実行されます。drawの中の処理はずっと繰り返されます。プログラムが終了するまでえんえんとdraw()が実行され続けるイメージです。
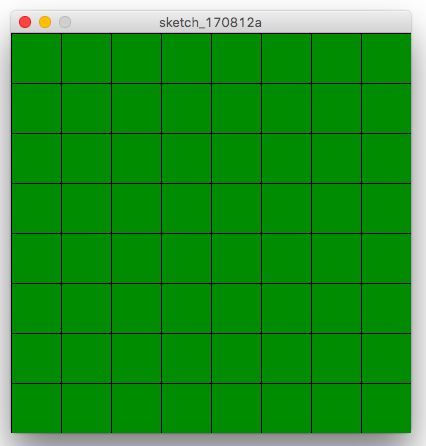
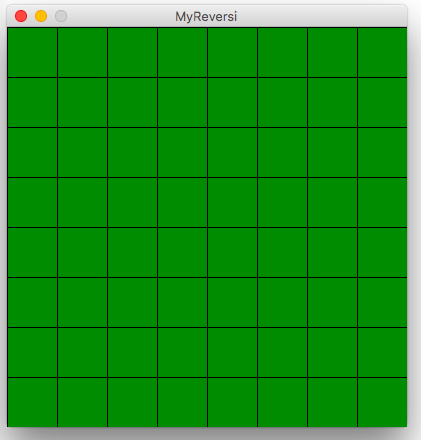
では、オセロの盤面を描いてみましょう。縦50ピクセル、横50ピクセルのマスが縦に8個、横に8個ならぶようにします。
void setup() {
  size(400,400);
}

void draw() {
  stroke(0);
  fill(0,140,0);

  // 縦に8回くりかえす
  for(int i = 0; i < 8; i++){
    // 横に8回くりかえす
    for(int j = 0; j < 8; j++){
      // 長方形を描く。x座標はj*50、y座標はi*50、縦横の長さは50。
      rect(j * 50, i * 50, 50, 50);
    }
  }
}
ある場所に石を置く
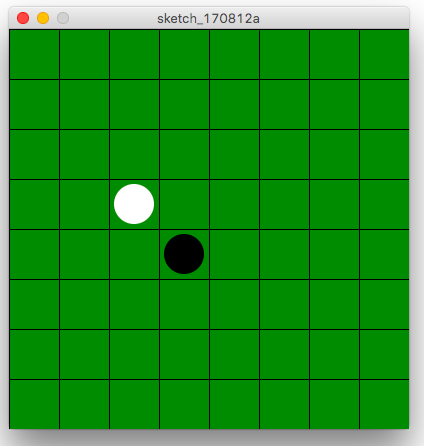
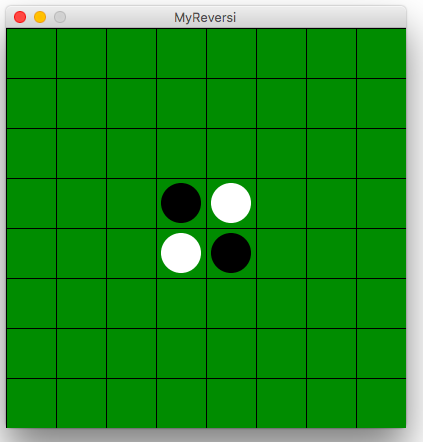
次に、横3縦2の位置に白い円、横4縦3の位置に黒い円を描いてみましょう。
void setup() {
  size(400,400);
}

void draw() {
  for(int i = 0; i < 8; i++){
    for(int j = 0; j < 8; j++){
      stroke(0);
      fill(0,140,0);
      rect(i * 50, j * 50, 50, 50);

      // 横3縦2
      if(j == 3 && i == 2){
         noStroke();
         fill(255,255,255);
         // 円の中心はi * 50にマスのサイズの半分を加えた点
         // 直径は縦横それぞれ40ピクセル
         ellipse(i * 50 + 25, j* 50 + 25, 40,40);
      }

      // 横4縦3
      if(j == 4 && i == 3){
         noStroke();
         fill(0,0,0);
         ellipse(i * 50 + 25, j* 50 + 25, 40,40);
      }
    }
  }
}
クリックした位置に石を置く
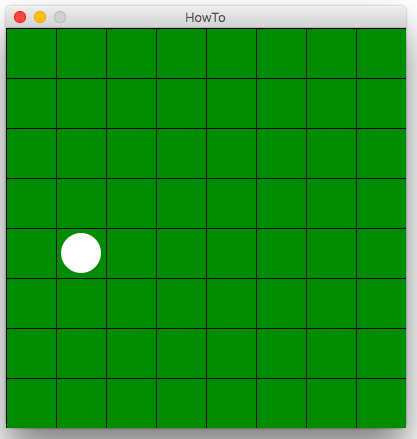
次にクリックした位置に白い石をおきます。ひとつしか置けないので、クリックするたびに石が移動します
int col; // 横方向に何マス目に円を描くか
int row; // 縦方向に何マス目に円を描くか

void setup() {
  size(400,400);

  // 最初は円が描かれないよう -1 を入れておく
  col = -1;
  row = -1;
}

void draw() {
  for(int i = 0; i < 8; i++){
    for(int j = 0; j < 8; j++){
      stroke(0);
      fill(0,140,0);
      rect(j * 50, i * 50, 50, 50);

      if(j == col && i == row){
         noStroke();
         fill(255,255,255);
         ellipse(j * 50 + 25, i* 50 + 25, 40,40);
      }
    }
  }
}

void mouseClicked() {
  // クリックした時のマウス座標をマスの長さで割って切り捨てると何マス目かがわかる
  col = floor(mouseX / 50);
  row = floor(mouseY / 50);
}
day2: はじめてのオブジェクト指向
オブジェクト指向とはなんでしょうか?
オブジェクト指向とは、あらゆるものを種類(クラス)とその種類がもつ機能(メソッド)で分類する考え方です。
例えば、ヘアドライヤーを考えてみましょう。ドライヤーという種類(クラス)のものは、「熱い風を送る」「冷風を送る」という機能をもちます。どんな色のドライヤーでも、機能はかわりません。

from https://www.flickr.com/photos/irsein/5226080656
それぞれのドライヤーひとつひとつを「オブジェクト」と考えます。オブジェクトのもつ機能はそのオブジェクトが属するクラスによって決まります。
このように機能を種類ごとに分類して作っていくことで、使いやすいプログラムができあがります。
例:ヘアドライヤーのクラスを定義するイメージ
クラスを定義するイメージは以下です。これはダミーのプログラムなので動くものではありません。あくまでイメージをつかんでもらう目的で置いておきます。
class Dryer {
  int color; // 例えば1番が白、2番が赤、3番が青 のように決めておく。オブジェクト固有のフィールドとなる。

  /**
  * このクラスからオブジェクトを作る時によばれる処理
  */
  Dryer(int clr) {
    color = clr
  }

  /**
  * 熱い風を出す
  */
  void blowHot() {
    //...
  }

  /**
  * 冷たい風を出す
  */
  void blowCool() {
    //...
  }
}
重要なのは、このクラスから作られるひとつひとつのオブジェクトに固有の情報(今回は色)と、共通する機能が定義されていることです。
使う時のイメージは以下です。繰り返しますがあくまでイメージです
Dryer redDryer = new Dryer( 2 );
redDryer.blowHot();
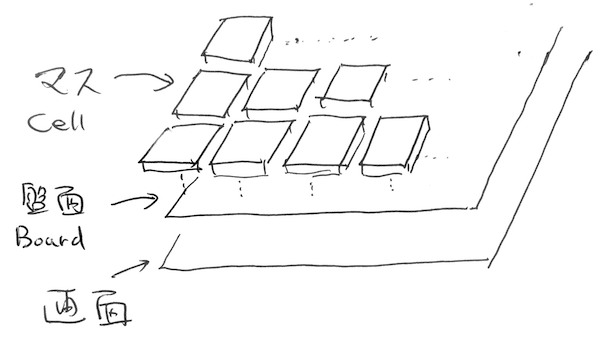
盤面とマスの考え方
今回のオセロでは以下のように考えます
- 画面の上に盤面が載っている
- 盤面は8x8のマスを持っている
それぞれ盤面をBoardクラス、マスをCellクラスとします。
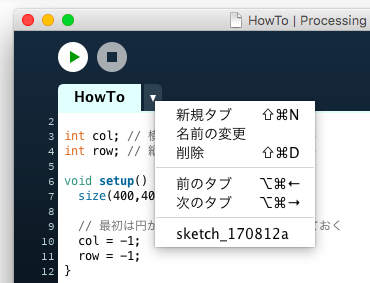
ファイルの追加
Processingのエディタのファイル名のあるタブの右にある「▼」マークをクリックし「新規タブ」を選択するとファイルを追加できます。
ここで「Board」と「Cell」を追加してください
クラスに分割した形で盤面を描く
盤面クラスBoardとマスのクラスCellに分割して、最初にやったように盤面のみを描いてみます。
ここで一度ファイルを保存しMyReversiという名前をつけてください。ファイル一式が入ったフォルダが作成され、メインのプログラムが同名のMyReversi.pdeという名前で保存されます。
Board board;

void setup() {
  size(400,400);
  board = new Board();
}

void draw() {
  // 盤面の「描く」という機能を実行する
  board.display();
}
class Board {
  ArrayList<ArrayList> cells; // マスの行を入れておく配列

  Board() {
    cells = new ArrayList<ArrayList>();

    for(int row = 0; row < 8; row++){
      // 行ごとの配列を作る
      ArrayList<Cell> rCells = new ArrayList<Cell>();

      for(int col = 0; col < 8; col++){
        // マスを作って行の配列に入れる
        Cell cell = new Cell(col, row);
        rCells.add(cell);
      }

      // 行の配列を全体の配列に入れる
      cells.add(rCells);
    }
  }

  /**
  * 盤面の「描く」機能
  * マスを一個一個とりだして描画させている
  */
  void display() {
    // マスを一個一個とりだしてマスの「描画する」機能を実行する
    for(ArrayList<Cell> row: cells){
      for(Cell c: row){
        c.display();
      }
    }
  }
}
class Cell {
  int col; // 横の位置
  int row; // 縦の位置

  Cell(int colNum, int rowNum) {
    col = colNum;
    row = rowNum;
  }

  /**
  * マスを描画する
  * 縦の位置、横の位置に応じて長方形を描く
  */
  void display() {
    stroke(0);
    fill(0,140,0);
    rect(col * 50, row * 50, 50, 50);
  }
}
ここまでだと、むしろややこしくなっただけに感じられるかもしれません。この後で、プログラムがどんどん複雑になっていくにしたがって、分割したありがたみが分かってきます。
クリックしたマスに黒と白の石を交互に置いていく
次はクリックしたマスに黒と白の石を交互に置いていくようにしましょう
まず盤面Boardにマウス座標のしたにあるマスCellを返す機能(メソッド)を作ります
  ...
  Cell getCellAtXY(int x,int y) {
    int colNum = floor( x / 50);
    int rowNum = floor( y / 50);
    return (Cell) cells.get(rowNum).get(colNum);
  }
  ...
次にマスに石が置いてあるかどうか、置いてあるとしたら何色かを保存できるようにします。
class Cell {
  int col; // 横の位置
  int row; // 縦の位置
  int stone = 0; // 石があるか。0:なし、1:黒、-1:白
  ...
マスを描画する時に「石がある」という状態だったら円を描くようにします
  ...
  void display() {
    stroke(0);
    fill(0,140,0);
    rect(col * 50, row * 50, 50, 50);

    // 石がある場合
    if(stone != 0){
      noStroke();
      if(stone == 1){ // 1は黒
        fill(0,0,0);
      } else { // それ以外は白
         fill(255,255,255);
      }
      // 円を描画する
      ellipse(col * 50 + 25, row* 50 + 25, 40,40);
    }
  }
  ...
石を置く機能も作ります
  ...
  void putStone(int stoneColor){
    stone = stoneColor;
  }
メインのプログラムでマウスがクリックされた時の処理を書きます
int stoneColor = 1; // 1:黒、-1:白とする。 最初は黒 ← プログラムの冒頭で定義
...
void mouseClicked() {
  Cell cell = board.getCellAtXY(mouseX, mouseY);
  cell.putStone( stoneColor );
  stoneColor *= -1; // 反転
}
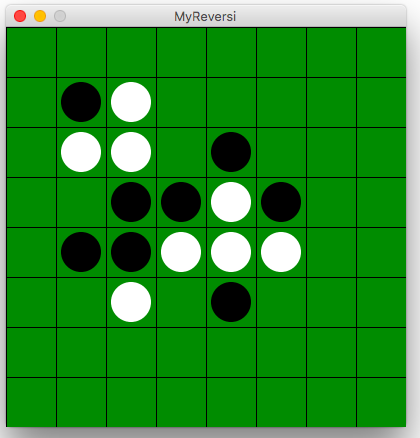
クリックすればするほど白黒の石が交互に置かれていくようになります
day2まとめ:プログラム全体
ここまでのプログラム全体は以下です
Board board;
int stoneColor = 1; // 1:黒、-1:白とする

void setup() {
  size(400,400);
  board = new Board();
}

void draw() {
  board.display();
}

void mouseClicked() {
  Cell cell = board.getCellAtXY(mouseX, mouseY);
  cell.putStone( stoneColor );

  stoneColor *= -1; // 反転
}
class Board {
  ArrayList<ArrayList> cells; // マスの行を入れておく配列

  Board() {
    cells = new ArrayList<ArrayList>();

    for(int row = 0; row < 8; row++){
      // 行ごとの配列を作る
      ArrayList<Cell> rCells = new ArrayList<Cell>();

      for(int col = 0; col < 8; col++){
        // マスを作って行の配列に入れる
        Cell cell = new Cell(col, row);
        rCells.add(cell);
      }

      // 行の配列を全体の配列に入れる
      cells.add(rCells);
    }
  }

  /**
  * 盤面の「描く」機能
  * マスを一個一個とりだして描画させている
  */
  void display() {
    // マスを一個一個とりだしてマスの「描画する」機能を実行する
    for(ArrayList<Cell> row: cells){
      for(Cell c: row){
        c.display();
      }
    }
  }

  /**
  * ある座標にあるマスを返す
  */
  Cell getCellAtXY(int x,int y) {
    int colNum = floor( x / 50);
    int rowNum = floor( y / 50);
    return (Cell) cells.get(rowNum).get(colNum);
  }
}
class Cell {
  int col; // 横の位置
  int row; // 縦の位置
  int stone = 0; // 石があるか。0:なし、1:黒、-1:白

  Cell(int colNum, int rowNum) {
    col = colNum;
    row = rowNum;
  }

  /**
  * マスを描画する
  */
  void display() {
    stroke(0);
    fill(0,140,0);
    rect(col * 50, row * 50, 50, 50);

    // 石がある場合
    if(stone != 0){
      noStroke();
      if(stone == 1){ // 1は黒
        fill(0,0,0);
      } else { // それ以外は白
         fill(255,255,255);
      }
      // 円を描画する
      ellipse(col * 50 + 25, row* 50 + 25, 40,40);
    }
  }

  /**
  * 石を置く
  * @param stoneColor 置く石の色。黒なら1、白なら-1
  */
  void putStone(int stoneColor){
    stone = stoneColor;
  }
}
day3: 石をひっくりかえす
今日は石を置いたらまわりの石がひっくりかえるようにしましょう。そもそもオセロのルールとしては、石が一個もひっくりかえらない場所には石が置けません。というこは、あるマスに石を置いた場合に、ひっくりかえす石が存在するかを確認し、ある場合はそれらを全てひっくりかえす。ない場合は、なにもしない、という考え方ができます。
メインの流れ
あるマスにある色の石を置いた際にひっくりかえすことが可能なマスを返す機能をcellsToFlipWithというメソッドで実装するとすると、メインのロジックは以下のようになります。
...
void mouseClicked() {
  Cell cell = board.getCellAtXY(mouseX, mouseY);
  // あるマスにある色の石を置くとするとひっくり返せるマスがあるかどうか。(中身はまだ作ってません)
  ArrayList<Cell> cellsToFlip = board.cellsToFlipWith(cell, stoneColor);

  //引っ繰り返せるマスがある場合は石が置ける
  if(cellsToFlip.size() > 0){
    //石を置く
    cell.putStone(stoneColor);

    // それぞれひっくりかえす
    for(Cell c: cellsToFlip){
      // ここにひっくり返すメソッドがくる
    }
  } else {
    // ひっくりかえせるマスがない場合は何もしない
  }
  stoneColor *= -1; // 反転
}
盤面からひっくりかえせるマスを得る
考え方としては、以下のような順序です
- 指定されたマスの縦横斜め8方向にならぶマスの配列を得る
- それぞれの配列について、ひっくりかえせるマスがあるか調べる
まず1をできるようにするために、あるマスを起点に指定された方向に並ぶマスの配列を返すメソッドをつくりましょう
  ...
  /**
  * あるマスを起点として指定された方向に並ぶセルを返す
  * cellAtStartは起点となるマス
  * directionColとdirectionRowはそれぞれ縦と横の方向
  * 例えば右上方向なら directionCol = 1, directionRow = -1 となる
  */
  ArrayList<Cell> getCellsInDirection(Cell cellAtStart,int directionCol, int directionRow ) {
    ArrayList<Cell> cellsToReturn  = new ArrayList<Cell>();
    if(directionCol == 0 && directionRow == 0){
      return cellsToReturn;
    }
    int col = cellAtStart.col + directionCol;
    int row = cellAtStart.row + directionRow;
    Cell nextCell = getCellAt(col,row);
    while(nextCell != null){
      cellsToReturn.add(nextCell);
      col += directionCol;
      row += directionRow;
      nextCell = getCellAt(col,row);
    }
    return cellsToReturn;
  }
このメソッドを使って、各方向に並ぶマスの配列をとりだし、それぞれにひっくりかえるかどうか調べます
  ...
  /**
  * あるマスに石を置いた場合にひっくりかえせるセルの配列を返す
  * cell 石を置こうとするマス
  * stone 置く石の色を意味する整数。1または-1
  */
  ArrayList<Cell> cellsToFlipWith(Cell cell, int stone) {
    ArrayList<Cell> cellsToFlip = new ArrayList<Cell>();
    if(cell.hasStone()){
      return cellsToFlip;
    }

    // 縦横斜めの8方向に対象となるマスをとってきて、引っ繰り返せるかどうか調べる
    for(int dCol = -1; dCol < 2; dCol ++){
      for(int dRow = -1; dRow < 2; dRow ++) {
        ArrayList<Cell> cellsInDir = this.getCellsInDirection(cell, dCol, dRow);
        ArrayList<Cell> checked = new ArrayList<Cell>();
        for(Cell c: cellsInDir) {
           if(c.stone == 0){
                 break;
            }
            // 色が違う場合はいったん配列に入れる
            if(c.stone != stone){
                 checked.add(c);
            }
            // 同じ色の石がみつかったら返却する配列にそこまでの石を入れてループを抜ける
            if(c.stone == stone){
               for(Object toFlip: checked){
                 cellsToFlip.add((Cell) toFlip);
               }
               break;
            }
          }
          // 同じ色の石が見つからなかったらcheckedは破棄される
       }
     }
     return cellsToFlip;
  }
その他、必要な機能
石をひっくかえす機能flip()と、そのマスが石を持っているかを確認する機能hasStone()をCellクラスに作ります。簡単な機能ですが、こうやってメソッドとして分かりやすい名前をつけておくことで、プログラム全体が読みやすくなります。
  ...
  void flip() {
    stone *= -1;
  }

  boolean hasStone() {
    return (stone != 0);
  }
縦の位置と横の位置を指定して盤面からマスをとりだす
  ...
  Cell getCellAt(int col, int row) {
    // 指定範囲にない場合はnullを返す
    if(col < 0 || col > 7 || row < 0 || row > 7){
      return null;
    }
    return (Cell) cells.get(row).get(col);
  }
ゲーム開始用に真ん中に2個ずつ白と黒の石を置く
  ...
  void initGame() {
    getCellAt(3,3).putStone( 1 );
    getCellAt(4,4).putStone( 1 );
    getCellAt(3,4).putStone( -1 );
    getCellAt(4,3).putStone( -1 );
  }
day3まとめ:プログラム全体
Board board;
int stoneColor = 1; // 1:黒、-1:白とする

void setup() {
  size(400,400);
  board = new Board();
  board.initGame();
}

void draw() {
  board.display();
}

void mouseClicked() {
  Cell cell = board.getCellAtXY(mouseX, mouseY);
  ArrayList<Cell> cellsToFlip = board.cellsToFlipWith(cell, stoneColor);

  //引っ繰り返せるマスがある場合は石が置ける
  if(cellsToFlip.size() > 0){
    //石を置く
    cell.putStone(stoneColor);

    // それぞれひっくりかえす
    for(Cell c: cellsToFlip){
      c.flip();
    }
  } else {
    // ひっくりかえせるマスがない場合は何もしない
  }

  stoneColor *= -1; // 反転
}
class Board {
  ArrayList<ArrayList> cells; // マスの行を入れておく配列

  Board() {
    cells = new ArrayList<ArrayList>();

    for(int row = 0; row < 8; row++){
      // 行ごとの配列を作る
      ArrayList<Cell> rCells = new ArrayList<Cell>();

      for(int col = 0; col < 8; col++){
        // マスを作って行の配列に入れる
        Cell cell = new Cell(col, row);
        rCells.add(cell);
      }

      // 行の配列を全体の配列に入れる
      cells.add(rCells);
    }
  }

  void initGame() {
    getCellAt(3,3).putStone( 1 );
    getCellAt(4,4).putStone( 1 );
    getCellAt(3,4).putStone( -1 );
    getCellAt(4,3).putStone( -1 );
  }

  /**
  * 盤面の「描く」機能
  * マスを一個一個とりだして描画させている
  */
  void display() {
    // マスを一個一個とりだしてマスの「描画する」機能を実行する
    for(ArrayList<Cell> row: cells){
      for(Cell c: row){
        c.display();
      }
    }
  }

  /**
  * ある座標にあるマスを返す
  */
  Cell getCellAtXY(int x,int y) {
    int colNum = floor( x / 50);
    int rowNum = floor( y / 50);
    return (Cell) cells.get(rowNum).get(colNum);
  }


  /**
  * あるマスに石を置いた場合にひっくりかえせるセルの配列を返す
  * @param cell 石を置こうとするマス
  * @param stone 置く石を意味する整数。Cell.BLACKまたはCell.WHITE
  */
  ArrayList<Cell> cellsToFlipWith(Cell cell, int stone) {
    ArrayList<Cell> cellsToFlip = new ArrayList<Cell>();
    if(cell.hasStone()){
      return cellsToFlip;
    }

    // 縦横斜めの8方向に対象となるマスをとってきて、引っ繰り返せるかどうか調べる
    for(int dCol = -1; dCol < 2; dCol ++){
      for(int dRow = -1; dRow < 2; dRow ++) {
        ArrayList<Cell> cellsInDir = this.getCellsInDirection(cell, dCol, dRow);
        ArrayList<Cell> checked = new ArrayList<Cell>();
        for(Cell c: cellsInDir) {
           if(c.stone == 0){
                 break;
            }
            // 色が違う場合はいったん配列に入れる
            if(c.stone != stone){
                 checked.add(c);
            }
            // 同じ色の石がみつかったら返却する配列にそこまでの石を入れてループを抜ける
            if(c.stone == stone){
               for(Object toFlip: checked){
                 cellsToFlip.add((Cell) toFlip);
               }
               break;
            }
          }
          // 同じ色の石が見つからなかったらcheckedは破棄される
       }
     }
     return cellsToFlip;
  }

  /**
  * あるマスを起点として指定された方向に並ぶセルを返す
  * 右上方向なら directionCol = 1, directionRow = -1 となる
  * @param cellAtStart 起点となるマス
  * @param directionCol 横方向 -1=左,0=そのまま,1=右
  * @param directionRow 縦方向 -1=上,0=そのまま,1=下
  */
  ArrayList<Cell> getCellsInDirection(Cell cellAtStart,int directionCol, int directionRow ) {
    ArrayList<Cell> cellsToReturn  = new ArrayList<Cell>();
    if(directionCol == 0 && directionRow == 0){
      return cellsToReturn;
    }
    int col = cellAtStart.col + directionCol;
    int row = cellAtStart.row + directionRow;
    Cell nextCell = getCellAt(col,row);
    while(nextCell != null){
      cellsToReturn.add(nextCell);
      col += directionCol;
      row += directionRow;
      nextCell = getCellAt(col,row);
    }
    return cellsToReturn;
  }

  Cell getCellAt(int col, int row) {
    if(col < 0 || col > 7 || row < 0 || row > 7){
      return null;
    }
    return (Cell) cells.get(row).get(col);
  }
}
class Cell {
  int col; // 横の位置
  int row; // 縦の位置
  int stone = 0; // 石があるか。0:なし、1:黒、-1:白

  Cell(int colNum, int rowNum) {
    col = colNum;
    row = rowNum;
  }

  /**
  * マスを描画する
  */
  void display() {
    stroke(0);
    fill(0,140,0);
    rect(col * 50, row * 50, 50, 50);

    // 石がある場合
    if(stone != 0){
      noStroke();
      if(stone == 1){ // 1は黒
        fill(0,0,0);
      } else { // それ以外は白
         fill(255,255,255);
      }
      // 円を描画する
      ellipse(col * 50 + 25, row* 50 + 25, 40,40);
    }
  }

  /**
  * 石を置く
  * @param stoneColor 置く石の色。黒なら1、白なら-1
  */
  void putStone(int stoneColor){
    stone = stoneColor;
  }

  void flip() {
    stone *= -1;
  }

  boolean hasStone() {
    return (stone != 0);
  }
}
day4: 敵のAIを作る
今日は敵のAI(人工知能)を作ります。AIと言っても、ごくごくシンプルなロジックしか作りません。ひとまずは勝負としてなりたつことを目標にします。
AIクラスに必要な機能
AIクラスに必要な機能を考えます。適切なマスを選択する think() というメソッドを作ることにしましょう。この機能(メソッド)は以下のような考え方でマスを選ぶことにします
- 盤オブジェクトから空のマスを全て取得する
- それらのマスをひとつひとつとりだし、もしそこに石を置いたら何個ひっくりかえせるか計算する
- もっとも多くひっくりかえせるマスを選ぶ
まず、「新規タブ」を追加からAiというファイルを追加します。
class Ai{
  Board board;
  int stoneColor;

  Ai(Board board) {
    this.board = board;
    this.stoneColor = -1; // 白
  }

  /**
  * どのマスに置くか考える
  * いまのところは愚直に一番ひっくりかえせる数が多いのを選んでる
  * そのうち2〜3手先を計算するようにするつもり
  * @return 置くマス
  */
  Cell think() {
    int max = 0;
    Cell bestCell = null;
    ArrayList<Cell> candidates = board.getEmptyCells(); // 空のマスの配列(※まだ作ってません)
    for(Cell cell: candidates) {
      ArrayList<Cell> cellsToFlip = board.cellsToFlipWith(cell,  stoneColor);
      if(max < cellsToFlip.size()){
        max = cellsToFlip.size();
        bestCell = cell;
      }
    }
    return bestCell;
  }
}
このメソッドで必要な空のマスを取り出す機能をBoardクラスに作ります
  ...
  ArrayList<Cell> getEmptyCells() {
    ArrayList<Cell> eCells = new ArrayList<Cell>();
    for(ArrayList<Cell> row: cells){
      for(Cell cell: row){
        if(!cell.hasStone()){
          eCells.add(cell);
        }
      }
    }
    return eCells;
  }
  ...
メインのプログラムに必要な流れ
ざっくりAIができたらメインのプログラムに組み込みます。
必要な機能は以下のような感じです
- プレイヤー(自分)が石を置いたらAIのターンにうつる
- AIのターンでは、さっき作った
think()メソッドをつかったマスを選ぶ - 選んだマスに石を置いてひっくりかえす
- プレイヤーのターンにうつる
Ai ai; // 全体でつかう変数としてaiを宣言

void setup() {
  ...
  ai = new Ai(board); // プログラム開始時にAiクラスのオブジェクトを作る
}
...
void mouseClicked() {
  ...
  stoneColor *= -1; // ターンエンド。石の色を反転させる
  // 白だったらAIのターン
  if( stoneColor == -1){
     turnForAi();
  }
}
...
void turnForAi() {
    // 置くマスを考えてかえす
  Cell cell = ai.think();
  // そこに置いた場合にひっくりかえすマス
  ArrayList<Cell> cellsToFlip = board.cellsToFlipWith(cell, stoneColor);

  // 石を置いて
  cell.putStone(stoneColor);
  // それぞれひっくり返す
  for(Cell c: cellsToFlip){
    c.flip();
  }

  stoneColor *= -1; // ターンエンド
}
day4まとめ:プログラム全体
ここまでくるといちおう勝負っぽく進むようになります。(もちろん足りないものはあります。後で説明します)
Board board;
Ai ai;
int stoneColor = 1; // 1:黒、-1:白とする

void setup() {
  size(400,400);
  board = new Board();
  board.initGame();
  ai = new Ai(board);
}

void draw() {
  board.display();
}

void mouseClicked() {
  Cell cell = board.getCellAtXY(mouseX, mouseY);
  ArrayList<Cell> cellsToFlip = board.cellsToFlipWith(cell, stoneColor);

  //引っ繰り返せるマスがある場合は石が置ける
  if(cellsToFlip.size() > 0){
    //石を置く
    cell.putStone(stoneColor);

    // それぞれひっくりかえす
    for(Cell c: cellsToFlip){
      c.flip();
    }
  } else {
    // ひっくりかえせるマスがない場合は何もしない
  }

  stoneColor *= -1; // ターンエンド。石の色を反転させる
  // 白だったらAIのターン
  if( stoneColor == -1){
     turnForAi();
  }
}

void turnForAi() {
    // 置くマスを考えてかえす
  Cell cell = ai.think();
  // そこに置いた場合にひっくりかえすマス
  ArrayList<Cell> cellsToFlip = board.cellsToFlipWith(cell, stoneColor);

  // 石を置いて
  cell.putStone(stoneColor);
  // それぞれひっくり返す
  for(Cell c: cellsToFlip){
    c.flip();
  }

  stoneColor *= -1; // ターンエンド
}
class Ai {
  Board board;
  int stoneColor;

  Ai(Board board) {
    this.board = board;
    this.stoneColor = -1; // 白
  }

  /**
  * どのマスに置くか考える
  * いまのところは愚直に一番ひっくりかえせる数が多いのを選んでる
  * そのうち2〜3手先を計算するようにするつもり
  * @return 置くマス
  */
  Cell think() {
    int max = 0;
    Cell bestCell = null;
    ArrayList<Cell> candidates = board.getEmptyCells();
    for(Cell cell: candidates) {
      ArrayList<Cell> cellsToFlip = board.cellsToFlipWith(cell,  stoneColor);
      if(max < cellsToFlip.size()){
        max = cellsToFlip.size();
        bestCell = cell;
      }
    }
    return bestCell;
  }
}
class Board {
  ArrayList<ArrayList> cells; // マスの行を入れておく配列

  Board() {
    cells = new ArrayList<ArrayList>();

    for(int row = 0; row < 8; row++){
      // 行ごとの配列を作る
      ArrayList<Cell> rCells = new ArrayList<Cell>();

      for(int col = 0; col < 8; col++){
        // マスを作って行の配列に入れる
        Cell cell = new Cell(col, row);
        rCells.add(cell);
      }

      // 行の配列を全体の配列に入れる
      cells.add(rCells);
    }
  }

  void initGame() {
    getCellAt(3,3).putStone( 1 );
    getCellAt(4,4).putStone( 1 );
    getCellAt(3,4).putStone( -1 );
    getCellAt(4,3).putStone( -1 );
  }

  /**
  * 盤面の「描く」機能
  * マスを一個一個とりだして描画させている
  */
  void display() {
    // マスを一個一個とりだしてマスの「描画する」機能を実行する
    for(ArrayList<Cell> row: cells){
      for(Cell c: row){
        c.display();
      }
    }
  }

  /**
  * ある座標にあるマスを返す
  */
  Cell getCellAtXY(int x,int y) {
    int colNum = floor( x / 50);
    int rowNum = floor( y / 50);
    return (Cell) cells.get(rowNum).get(colNum);
  }


  /**
  * あるマスに石を置いた場合にひっくりかえせるセルの配列を返す
  * @param cell 石を置こうとするマス
  * @param stone 置く石を意味する整数。Cell.BLACKまたはCell.WHITE
  */
  ArrayList<Cell> cellsToFlipWith(Cell cell, int stone) {
    ArrayList<Cell> cellsToFlip = new ArrayList<Cell>();
    if(cell.hasStone()){
      return cellsToFlip;
    }

    // 縦横斜めの8方向に対象となるマスをとってきて、引っ繰り返せるかどうか調べる
    for(int dCol = -1; dCol < 2; dCol ++){
      for(int dRow = -1; dRow < 2; dRow ++) {
        ArrayList<Cell> cellsInDir = this.getCellsInDirection(cell, dCol, dRow);
        ArrayList<Cell> checked = new ArrayList<Cell>();
        for(Cell c: cellsInDir) {
           if(c.stone == 0){
                 break;
            }
            // 色が違う場合はいったん配列に入れる
            if(c.stone != stone){
                 checked.add(c);
            }
            // 同じ色の石がみつかったら返却する配列にそこまでの石を入れてループを抜ける
            if(c.stone == stone){
               for(Object toFlip: checked){
                 cellsToFlip.add((Cell) toFlip);
               }
               break;
            }
          }
          // 同じ色の石が見つからなかったらcheckedは破棄される
       }
     }
     return cellsToFlip;
  }

  /**
  * あるマスを起点として指定された方向に並ぶセルを返す
  * 右上方向なら directionCol = 1, directionRow = -1 となる
  * @param cellAtStart 起点となるマス
  * @param directionCol 横方向 -1=左,0=そのまま,1=右
  * @param directionRow 縦方向 -1=上,0=そのまま,1=下
  */
  ArrayList<Cell> getCellsInDirection(Cell cellAtStart,int directionCol, int directionRow ) {
    ArrayList<Cell> cellsToReturn  = new ArrayList<Cell>();
    if(directionCol == 0 && directionRow == 0){
      return cellsToReturn;
    }
    int col = cellAtStart.col + directionCol;
    int row = cellAtStart.row + directionRow;
    Cell nextCell = getCellAt(col,row);
    while(nextCell != null){
      cellsToReturn.add(nextCell);
      col += directionCol;
      row += directionRow;
      nextCell = getCellAt(col,row);
    }
    return cellsToReturn;
  }

  Cell getCellAt(int col, int row) {
    if(col < 0 || col > 7 || row < 0 || row > 7){
      return null;
    }
    return (Cell) cells.get(row).get(col);
  }


  ArrayList<Cell> getEmptyCells() {
    ArrayList<Cell> eCells = new ArrayList<Cell>();
    for(ArrayList<Cell> row: cells){
      for(Cell cell: row){
        if(!cell.hasStone()){
          eCells.add(cell);
        }
      }
    }
    return eCells;
  }
}
class Cell {
  int col; // 横の位置
  int row; // 縦の位置
  int stone = 0; // 石があるか。0:なし、1:黒、-1:白

  Cell(int colNum, int rowNum) {
    col = colNum;
    row = rowNum;
  }

  /**
  * マスを描画する
  */
  void display() {
    stroke(0);
    fill(0,140,0);
    rect(col * 50, row * 50, 50, 50);

    // 石がある場合
    if(stone != 0){
      noStroke();
      if(stone == 1){ // 1は黒
        fill(0,0,0);
      } else { // それ以外は白
         fill(255,255,255);
      }
      // 円を描画する
      ellipse(col * 50 + 25, row* 50 + 25, 40,40);
    }
  }

  /**
  * 石を置く
  * @param stoneColor 置く石の色。黒なら1、白なら-1
  */
  void putStone(int stoneColor){
    stone = stoneColor;
  }

  void flip() {
    stone *= -1;
  }

  boolean hasStone() {
    return (stone != 0);
  }
}
おわりに
ここまでで一応ゲームっぽく動くようになったとは思いますが、いくつか足りないものがあります
ここまでのプログラムに足りないもの
ちゃんと楽しめるゲームになるためには以下のような機能が必要です。
- ゲームオーバー処理。マスが全ておわったゲームを止め、勝利者を決定すること
- AIのターン時にちょっと待つこと。いまのプログラムだと一瞬でAIが手を打つので楽しくありません
- スキップ処理。置けるマスがない時にスキップできること
それぞれを組み込んだサンプルが以下にあります。参考にしてください。
https://github.com/sawamur/reversi-processing
AIを強くする
以下のような考え方でAIを強くできます。
- オセロの形勢の評価は単に自分のコマがどれだけ多いかであるので、盤面のスコアを計算できるようにする
- 自分の手の後に相手の動きを計算し、相手が最高の打ち手をすると仮定して、次に石を置いたときにもっともスコアが高くなるマスをピックアップする
基本的な仕組みができれば何手先まで読むかで強さが変わるはずです
よいプログラムを書くために
この記事のサンプルはなるべく分かりやすくするため、ちょっと無駄な書き方やあまり良くない書き方をしているところがあります。
例えば、黒が1、白が-1というのがいくつかのファイルにあらわれます。こういう特殊な数字はあとから読んで意味がわからな書くなりがちなので、どこかにまとめておくとよいでしょう。
参考図書
Processingをまんべんなく学ぶために以下の本がおすすめです。(私も翻訳者のひとりです)。
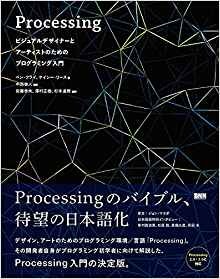
Processing:ビジュアルデザイナーとアーティストのためのプログラミング入門
楽しいプログラミングを!
