はじめに
Terraformの学習の一環でMacOSにTerraformを導入したので、導入手順について記事にしていきたいと思います。
コードを実行して、AWSにリソースを構築するところまで試験でやってみます。
環境
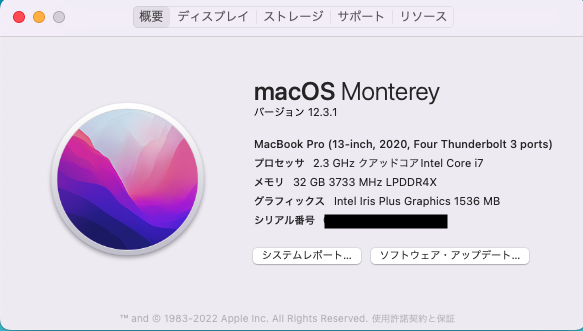
- MacBook Pro 2020年モデルを使用します。(macOS Monterey バージョン12.3.1)
- Homebrew 3.4.6
ma-sato@satsuton ~ % brew --version
Homebrew 3.4.6
Homebrew/homebrew-core (git revision c199393579c; last commit 2022-04-12)
Homebrew/homebrew-cask (git revision f49a71b320; last commit 2022-04-12)
ma-sato@satsuton ~ %
- AWSは
AdministratorAccessを付与したIAMユーザーを使用
導入手順
以下の順序でやっていきます。
1.tfenvインストール
2.git-secrets設定
3.動作確認(Gitコミットを防ぐことが可能かどうか)
4.AWSCLIのインストール
1.tfenvインストール
tfenvはTerraformのバージョンマネージャーになります。
- Homebrewでtfenvをインストールします。
brew install tfenv
ma-sato@satsuton ~ % brew install tfenv
Running `brew update --preinstall`...
==> Auto-updated Homebrew!
Updated 1 tap (homebrew/cask).
No changes to formulae.

==> Downloading https://ghcr.io/v2/homebrew/core/tfenv/manifests/2.2.3
######################################################################## 100.0%
==> Downloading https://ghcr.io/v2/homebrew/core/tfenv/blobs/sha256:d58555c2a79b2425a495e4bcdf48297067578c42c863493845030ed8f51e8d53
==> Downloading from https://pkg-containers.githubusercontent.com/ghcr1/blobs/sha256:d58555c2a79b2425a495e4bcdf48297067578c42c863493845030ed8f51e8d53?
######################################################################## 100.0%
==> Pouring tfenv--2.2.3.all.bottle.tar.gz
🍺  /usr/local/Cellar/tfenv/2.2.3: 24 files, 90.2KB
==> Running `brew cleanup tfenv`...
Disable this behaviour by setting HOMEBREW_NO_INSTALL_CLEANUP.
Hide these hints with HOMEBREW_NO_ENV_HINTS (see `man brew`).
ma-sato@satsuton ~ %
- tfenvがインストールされたことを確認
tfenv --version
ma-sato@satsuton ~ % tfenv --version
tfenv 2.2.3
ma-sato@satsuton ~ %
→tfenvのバージョンが2.2.3であることを確認
2.複数のTerraformバージョンインストール
- インストール可能なバージョン一覧を確認します。
tfenv list-remote
ma-sato@satsuton ~ % tfenv list-remote
1.2.0-alpha
1.1.8
1.1.7
1.1.6
1.1.5
1.1.4
1.1.3
1.1.2
〜長いので省略〜
0.2.1
0.2.0
0.1.1
0.1.0
ma-sato@satsuton ~ %
※以下のバージョンをインストール
tfenv install 1.1.7
tfenv install 1.1.8
- インストールしたTerraformのバージョンのリストを確認
tfenv list
ma-sato@satsuton ~ % tfenv list
  1.1.8
  1.1.7
No default set. Set with 'tfenv use <version>'
ma-sato@satsuton ~ %
→1.1.7と1.1.8がインストールできていることを確認。
-
1.1.8に切り替える。
tfenv use 1.1.8
ma-sato@satsuton ~ % tfenv use 1.1.8
Switching default version to v1.1.8
Switching completed
ma-sato@satsuton ~ %
※tfenv listを実行すると、1.1.8が選択されていることを確認。
ma-sato@satsuton ~ % tfenv list
* 1.1.8 (set by /usr/local/Cellar/tfenv/2.2.3/version)
  1.1.7
ma-sato@satsuton ~ %
2.git-secrets設定
- 全リポジトリにAWS認証情報のパターンを設定
git secrets --register-aws --global
ma-sato@satsuton ~ % git secrets --register-aws --global
OK
ma-sato@satsuton ~ %
※git secretsが使用できない場合は、以下コマンドにてインストールを実施
brew install git-secrets
- 設定ファイルの内容を確認
cat ~/.gitconfig
ma-sato@satsuton ~ % cat ~/.gitconfig
[user]
	name = satton-infra
	email = *************@gmail.com
[core]
	editor = atom --wait
[secrets]
	providers = git secrets --aws-provider
	patterns = (A3T[A-Z0-9]|AKIA|AGPA|AIDA|AROA|AIPA|ANPA|ANVA|ASIA)[A-Z0-9]{16}
	patterns = (\"|')?(AWS|aws|Aws)?_?(SECRET|secret|Secret)?_?(ACCESS|access|Access)?_?(KEY|key|Key)(\"|')?\\s*(:|=>|=)\\s*(\"|')?[A-Za-z0-9/\\+=]{40}(\"|')?
	patterns = (\"|')?(AWS|aws|Aws)?_?(ACCOUNT|account|Account)_?(ID|id|Id)?(\"|')?\\s*(:|=>|=)\\s*(\"|')?[0-9]{4}\\-?[0-9]{4}\\-?[0-9]{4}(\"|')?
	allowed = AKIAIOSFODNN7EXAMPLE
	allowed = wJalrXUtnFEMI/K7MDENG/bPxRfiCYEXAMPLEKEY
ma-sato@satsuton ~ %
- 新規リポジトリ作成時に、
git-secretsがインストールされるよう設定する。
git secrets --install ~/.git-templates/secrets
git config --global init.templatedir '~/.git-templates/secrets'
ma-sato@satsuton ~ % git secrets --install ~/.git-templates/secrets
✓ Installed commit-msg hook to /Users/ma-sato/.git-templates/secrets/hooks/commit-msg
✓ Installed pre-commit hook to /Users/ma-sato/.git-templates/secrets/hooks/pre-commit
✓ Installed prepare-commit-msg hook to /Users/ma-sato/.git-templates/secrets/hooks/prepare-commit-msg
ma-sato@satsuton ~ %
ma-sato@satsuton ~ % git config --global init.templatedir '~/.git-templates/secrets'
ma-sato@satsuton ~ %
3.動作確認(Gitコミットを防ぐことが可能かどうか)
- テスト用のディレクトリを作成
mkdir AWS
cd AWS
※ディレクトリ作成の細かい説明は、本記事では省きます。
- Gitの新規リポジトリを作成
git init
ma-sato@satsuton AWS % git init
Initialized empty Git repository in /Users/ma-sato/AWS/.git/
ma-sato@satsuton AWS %
-
main.tfの作成
テスト用のAWS認証情報は~/.gitconfigのallowedのサンプルキーを参考にします。
数字の部分を7から8に変更してmain.tfの作成を実施。
echo "aws_access_key_id = \"AKIAIOSFODNN8EXAMPLE\"\naws_secret_access_key = \"wJalrXUtnFEMI/K8MDENG/bPxRfiCYEXAMPLEKEY\"" > main.tf
ma-sato@satsuton AWS % cat main.tf
aws_access_key_id = "AKIAIOSFODNN8EXAMPLE"
aws_secret_access_key = "wJalrXUtnFEMI/K8MDENG/bPxRfiCYEXAMPLEKEY"
ma-sato@satsuton AWS %
-
main.tfをコミット対象にする
git add main.tf
ma-sato@satsuton AWS % git add main.tf
ma-sato@satsuton AWS % git status
On branch master

No commits yet

Changes to be committed:
  (use "git rm --cached <file>..." to unstage)
	new file:   main.tf

ma-sato@satsuton AWS %
- Gitにコミットしてエラーになることを確認
git commit -m "secrets test"
ma-sato@satsuton AWS % git commit -m "secrets test"
main.tf:1:aws_access_key_id = "AKIAIOSFODNN8EXAMPLE"
main.tf:2:aws_secret_access_key = "wJalrXUtnFEMI/K8MDENG/bPxRfiCYEXAMPLEKEY"

[ERROR] Matched one or more prohibited patterns

Possible mitigations:
- Mark false positives as allowed using: git config --add secrets.allowed ...
- Mark false positives as allowed by adding regular expressions to .gitallowed at repository's root directory
- List your configured patterns: git config --get-all secrets.patterns
- List your configured allowed patterns: git config --get-all secrets.allowed
- List your configured allowed patterns in .gitallowed at repository's root directory
- Use --no-verify if this is a one-time false positive
ma-sato@satsuton AWS %
4.AWSCLIのインストール
※GUIでのインストール方法を例としてご紹介します。
-
ブラウザでmacOS用のパッケージファイルをダウンロードする。
ダウンロードリンク -
ダウンロード後、画面に従ってインストールを実施
-
インストール後に以下のコマンドが実行できることを確認
which aws
aws --version
ma-sato@satsuton ~ % which aws
/usr/local/bin/aws
ma-sato@satsuton ~ % aws --version
aws-cli/2.2.46 Python/3.8.8 Darwin/21.4.0 exe/x86_64 prompt/off
ma-sato@satsuton ~ %
詳しくは以下の公式リンクをご確認下さい。
AWS CLI の最新バージョンをインストールまたは更新します。
※コマンドラインでのAWSCLIの導入方法についても記載されております。
コード実行試験
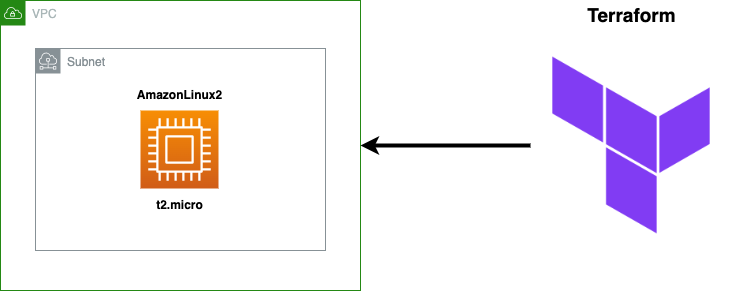
AWS上にTerraformを用いて、以下のリソースを作成します。
今回は、リソース作成可能であることを確認するところまでがゴールになります。
EC2へのSSH接続に関しては、また別の機会に記事を書きます。
1.AWSCLIにて認証情報の設定
$ aws configure --profile IAMユーザー
AWS Access Key ID [None]: アクセスキー
AWS Secret Access Key [None]: シークレットキー
Default region name [None]: ap-northeast-1
Default output format [None]: json
2.コード準備
任意のフォルダを作成し、以下のコードをセットする。
/Users/ma-sato/Desktop/terraform
ファイル名は、main.tfになります。
provider "aws" {
  profile = "terraform"
  region  = "ap-northeast-1"
}

# ----------------------------------
# VPC
# ----------------------------------
resource "aws_vpc" "sample_vpc" {
  cidr_block                       = "192.168.0.0/20"
  instance_tenancy                 = "default"
  enable_dns_support               = true
  enable_dns_hostnames             = true
  assign_generated_ipv6_cidr_block = false

  tags = {
    Name = "sample-vpc"
  }
}

# ----------------------------------
# Subnet
# ----------------------------------
resource "aws_subnet" "sample_subnet" {
  vpc_id                          = aws_vpc.sample_vpc.id
  cidr_block                      = "192.168.1.0/24"
  assign_ipv6_address_on_creation = "false"
  map_public_ip_on_launch         = "true"
  availability_zone               = "ap-northeast-1a"

  tags = {
    Name = "sample_subnet"
  }
}

# ----------------------------------
# InternetGateway
# ----------------------------------
resource "aws_internet_gateway" "sample_igw" {
  vpc_id = aws_vpc.sample_vpc.id
  tags = {
    Name = "sample_igw"
  }
}

# ----------------------------------
# RouteTable
# ----------------------------------
resource "aws_route_table" "sample_rt" {
  vpc_id = aws_vpc.sample_vpc.id

  route {
    cidr_block = "0.0.0.0/0"
    gateway_id = aws_internet_gateway.sample_igw.id
  }

  tags = {
    Name = "sample_rt"
  }
}

# ----------------------------------
# RouteTableをVPCとSubnetに紐付け
# ----------------------------------
resource "aws_main_route_table_association" "sample_rt_vpc" {
  vpc_id         = aws_vpc.sample_vpc.id
  route_table_id = aws_route_table.sample_rt.id
}

resource "aws_route_table_association" "sample_rt_subet_a" {
  subnet_id      = aws_subnet.sample_subnet.id
  route_table_id = aws_route_table.sample_rt.id
}

# ----------------------------------
# EC2
# ----------------------------------
resource "aws_instance" "sample_ec2" {
  ami                     = "ami-0a3d21ec6281df8cb"
  instance_type           = "t2.micro"
  subnet_id               = aws_subnet.sample_subnet.id
  disable_api_termination = false

  tags = {
    Name = "sample-ec2"
  }
}
3.コード実行
ターミナルにて各コマンドを実施する。
- コードを設置しているディレクトリへ移動。
cd /Users/ma-sato/Desktop/terraform
- 実行環境の初期化
terraform init
satsuton:terraform ma-sato$ terraform init

Initializing the backend...

Initializing provider plugins...
- Finding latest version of hashicorp/aws...
- Installing hashicorp/aws v4.9.0...
- Installed hashicorp/aws v4.9.0 (signed by HashiCorp)

Terraform has created a lock file .terraform.lock.hcl to record the provider
selections it made above. Include this file in your version control repository
so that Terraform can guarantee to make the same selections by default when
you run "terraform init" in the future.

Terraform has been successfully initialized!

You may now begin working with Terraform. Try running "terraform plan" to see
any changes that are required for your infrastructure. All Terraform commands
should now work.

If you ever set or change modules or backend configuration for Terraform,
rerun this command to reinitialize your working directory. If you forget, other
commands will detect it and remind you to do so if necessary.
satsuton:terraform ma-sato$
→Terraform has been successfully initialized!と表示されることを確認。
- コードのフォーマットを整える
terraform fmt
satsuton:terraform ma-sato$ terraform fmt
satsuton:terraform ma-sato$
- コード実行前確認
terraform plan
satsuton:terraform ma-sato$ terraform plan

Terraform used the selected providers to generate the following execution plan. Resource actions are indicated with the following symbols:
  + create

Terraform will perform the following actions:

  # aws_instance.sample_ec2 will be created
  + resource "aws_instance" "sample_ec2" {
      + ami                                  = "ami-0a3d21ec6281df8cb"
      + arn                                  = (known after apply)
      + associate_public_ip_address          = (known after apply)
      + availability_zone                    = (known after apply)
      + cpu_core_count                       = (known after apply)
〜長いので省略〜
      + tags                                 = {
          + "Name" = "sample-vpc"
        }
      + tags_all                             = {
          + "Name" = "sample-vpc"
        }
    }

Plan: 7 to add, 0 to change, 0 to destroy.

────────────────────────────────────────────────────────────────────────────────────────────────────────────────────────────────────────────────────────────────────────────────────────────────────────────────────────────────

Note: You didn't use the -out option to save this plan, so Terraform can't guarantee to take exactly these actions if you run "terraform apply" now.
satsuton:terraform ma-sato$
→設定に問題がなく、エラーが表示されていないことを確認。
- コード実行
terraform apply
→コード実行すると途中でDo you want to perform these actions?と聞かれるため、yesと入力し実行。
aws_vpc.sample_vpc: Creating...
aws_vpc.sample_vpc: Still creating... [10s elapsed]
aws_vpc.sample_vpc: Creation complete after 12s [id=vpc-0e481648eb66d31a7]
aws_internet_gateway.sample_igw: Creating...
aws_subnet.sample_subnet: Creating...
aws_internet_gateway.sample_igw: Creation complete after 0s [id=igw-01082b2229df4125a]
aws_route_table.sample_rt: Creating...
aws_route_table.sample_rt: Creation complete after 1s [id=rtb-0b387320b03621acd]
aws_main_route_table_association.sample_rt_vpc: Creating...
aws_main_route_table_association.sample_rt_vpc: Creation complete after 0s [id=rtbassoc-036c21a1cacd08e10]
aws_subnet.sample_subnet: Still creating... [10s elapsed]
aws_subnet.sample_subnet: Creation complete after 11s [id=subnet-0c0cef87ca222d1fe]
aws_route_table_association.sample_rt_subet_a: Creating...
aws_instance.sample_ec2: Creating...
aws_route_table_association.sample_rt_subet_a: Creation complete after 1s [id=rtbassoc-00692bf4e44a9d70a]
aws_instance.sample_ec2: Still creating... [10s elapsed]
aws_instance.sample_ec2: Still creating... [20s elapsed]
aws_instance.sample_ec2: Still creating... [30s elapsed]
aws_instance.sample_ec2: Creation complete after 32s [id=i-0ff699e67c91d3fd0]

Apply complete! Resources: 7 added, 0 changed, 0 destroyed.
satsuton:terraform ma-sato$
→Apply complete! Resources: 7 added, 0 changed, 0 destroyed.と表示されることを確認。
4.リソース作成確認
AWSのコンソール画面よりリソースが作成されていることを確認。
5.リソース削除
- 以下コマンドを実行
terraform destroy
→Do you really want to destroy all resources?と聞かれるため、yesと入力し実行。
ws_main_route_table_association.sample_rt_vpc: Destroying... [id=rtbassoc-036c21a1cacd08e10]
aws_route_table_association.sample_rt_subet_a: Destroying... [id=rtbassoc-00692bf4e44a9d70a]
aws_instance.sample_ec2: Destroying... [id=i-0ff699e67c91d3fd0]
aws_main_route_table_association.sample_rt_vpc: Destruction complete after 1s
aws_route_table_association.sample_rt_subet_a: Destruction complete after 1s
aws_route_table.sample_rt: Destroying... [id=rtb-0b387320b03621acd]
aws_route_table.sample_rt: Destruction complete after 0s
aws_internet_gateway.sample_igw: Destroying... [id=igw-01082b2229df4125a]
aws_instance.sample_ec2: Still destroying... [id=i-0ff699e67c91d3fd0, 10s elapsed]
aws_internet_gateway.sample_igw: Still destroying... [id=igw-01082b2229df4125a, 10s elapsed]
aws_instance.sample_ec2: Still destroying... [id=i-0ff699e67c91d3fd0, 20s elapsed]
aws_internet_gateway.sample_igw: Still destroying... [id=igw-01082b2229df4125a, 20s elapsed]
aws_internet_gateway.sample_igw: Destruction complete after 27s
aws_instance.sample_ec2: Destruction complete after 30s
aws_subnet.sample_subnet: Destroying... [id=subnet-0c0cef87ca222d1fe]
aws_subnet.sample_subnet: Destruction complete after 1s
aws_vpc.sample_vpc: Destroying... [id=vpc-0e481648eb66d31a7]
aws_vpc.sample_vpc: Destruction complete after 0s

Destroy complete! Resources: 7 destroyed.
satsuton:terraform ma-sato$
- AWSのコンソール画面よりリソースが削除されたことを確認。
参考記事
【初心者向け】MacにTerraform環境を導入してみた
Terraform入門 AWSにEC2を作成してみよう


