目次
- 第1回 The Twelve-Factor App on AWS & Django(The Twelve-Factor Appとは)
- 第2回 The Twelve-Factor App on AWS & Django(バックエンドAPIを作ろう) ← 今回
はじめに
前回(第1回)はThe Twelve-Factor Appで開発することの目的や意義について書きました。
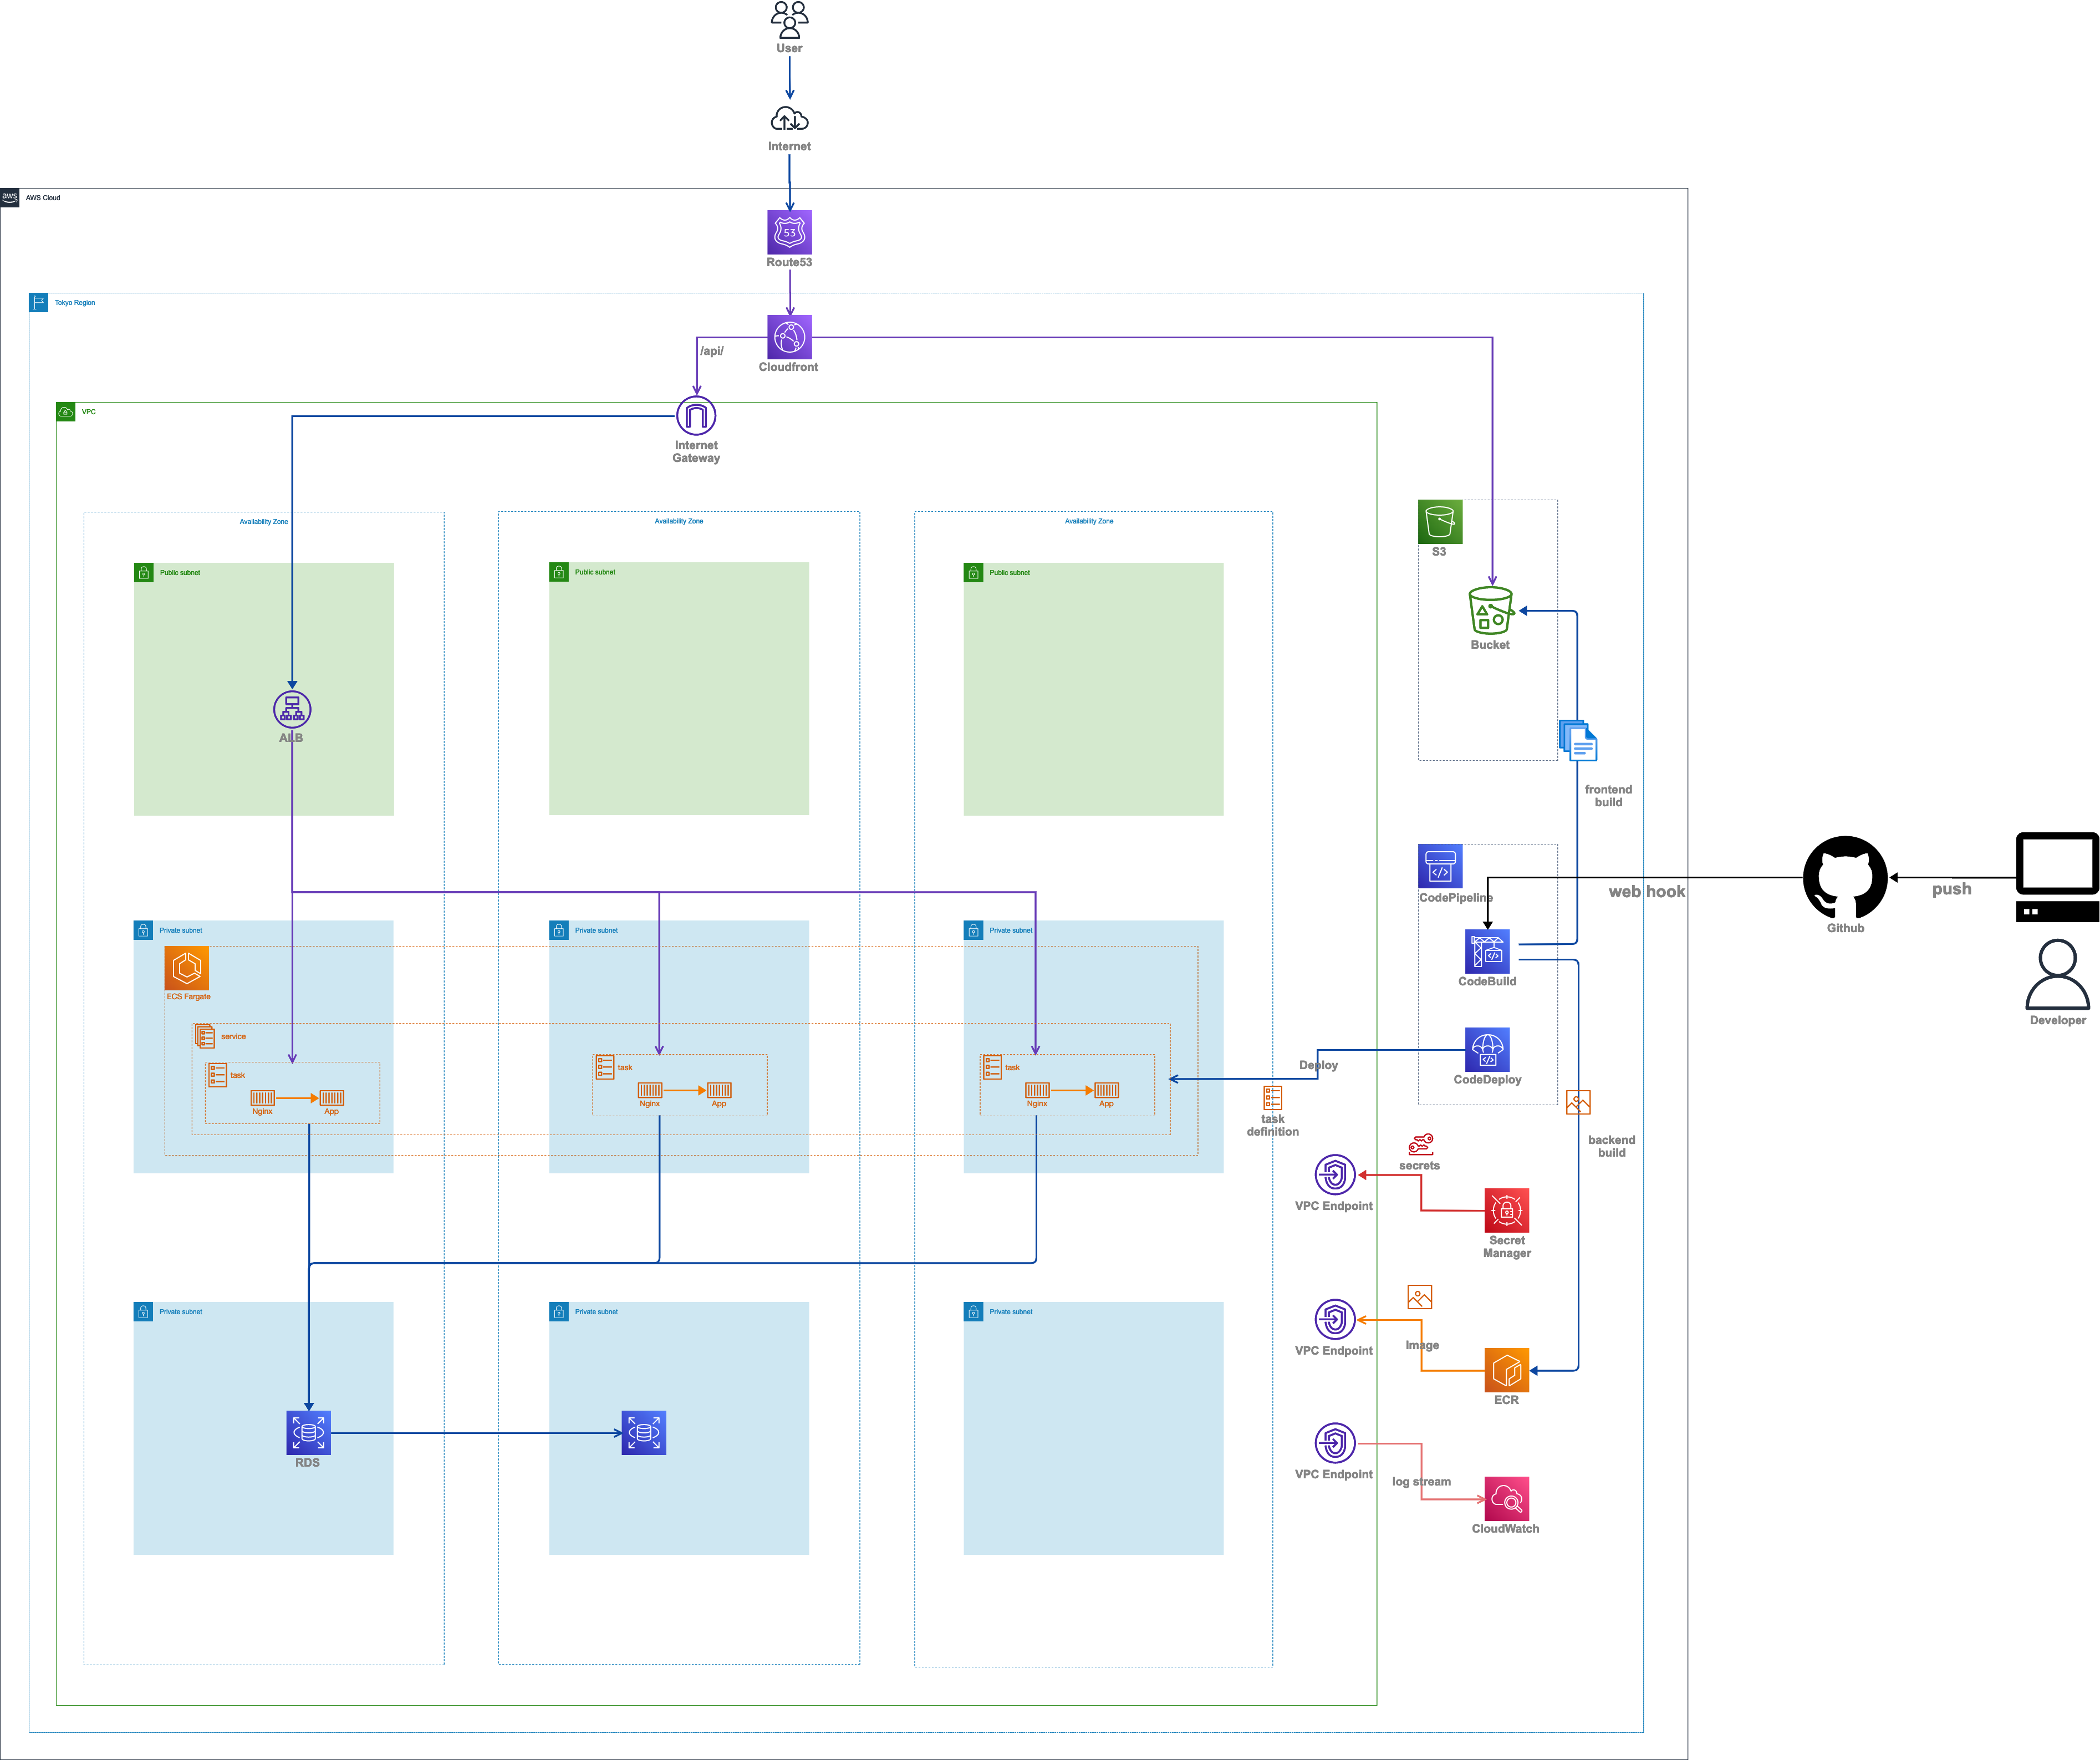
今回から実際に下図の通り、実装して開発を進めたいと思います。インフラを構築すると費用がかかり始めるので、まずはアプリの実装から始めたいと思います。
作成するアプリ
誰もが1回は使ったことのあるタスクを管理するTODOアプリを作成したいと思います。
TODOアプリのバックエンドはDjangoでRESTful APIとし、フロントエンドはNuxtでSPAとして作成したいと思います。
今回はバックエンドのAPIを作成したいと思います。使用するライブラリとバージョンは以下になります。
| 言語/FW/ライブラリ | バージョン |
|---|---|
| macOS | 12.3.1 |
| Python | 3.10.6 |
| pyenv | 2.3.0-49-gae22c695 |
| pip | 22.2.2 |
| pipenv | 2022.8.5 |
| Django | 4.1 |
| djangorestframework | 3.13.1 |
| pytest | 7.1.2 |
| pytest-django | 4.5.2 |
| pytest-factoryboy | 2.5.0 |
| pytest-freezegun | 0.4.2 |
| pytest-cov | 3.0.0 |
まずはPythonの環境構築を行います。Pythonは後程バージョンの切り替えもできるように、pyenvを利用してインストールします。お使いの環境に応じてインストールを行って下さい。下記はMacでインストールを実施しました。
% brew update

% brew install pyenv

% echo 'export PYENV_ROOT="$HOME/.pyenv"' >> ~/.zshrc

% echo 'command -v pyenv >/dev/null || export PATH="$PYENV_ROOT/bin:$PATH"' >> ~/.zshrc

% echo 'eval "$(pyenv init -)"' >> ~/.zshrc

% exec "$SHELL"
pyenvがインストールできたら、アプリを作成します。
// アプリを格納するディレクトリを作成
% mkdir sample-ecs-todo-app
// 作成したディレクトリに移動
% cd sample-ecs-todo-app
// Python3.10.6をインストール
% pyenv install 3.10.6
// 使用するPythonのバージョンを3.10.6に設定
% pyenv global 3.10.6
// 作成したPython環境のpipを最新のバージョンにアップデート
% pip install --upgrade pip
// 作成したPython環境にpipenvをインストール
% pip install pipenv
// Djangoプロジェクトを作成するため、作成したPython環境にインストール
% pip install django
// バックエンドのアプリを格納するディレクトリを作成
% mkdir backend
// 作成したディレクトリ配下に移動
% cd backend
// django-adminコマンドでプロジェクトを作成
% django-admin startproject config .
// pipenvの仮想環境を
% export PIPENV_VENV_IN_PROJECT=true
// Python3.10.6で仮想環境を作成
% pipenv --python 3.10.6
// Djangoをインストール
% pipenv install django
// 環境変数をDjangoで扱いやすくするライブラリをインストール
% pipenv install django-environ
// PostgreSQLへアクセスするためのライブラリをインストール
% pipenv install psycopg2-binary
// Gunicorn(Python HTTP サーバー)ライブラリをインストール
% pipenv install gunicorn
// マイグレーションを実行
% python manage.py migrate
// マイグレーションを確認
% python manage.py showmigrations
// スーパーユーザーを作成
% python manage.py createsuperuser
Username (leave blank to use 'admin'): admin
Email address: admin@example.com
Password:
Password (again):
Superuser created successfully.
// 開発サーバーを起動
% python manage.py runserver
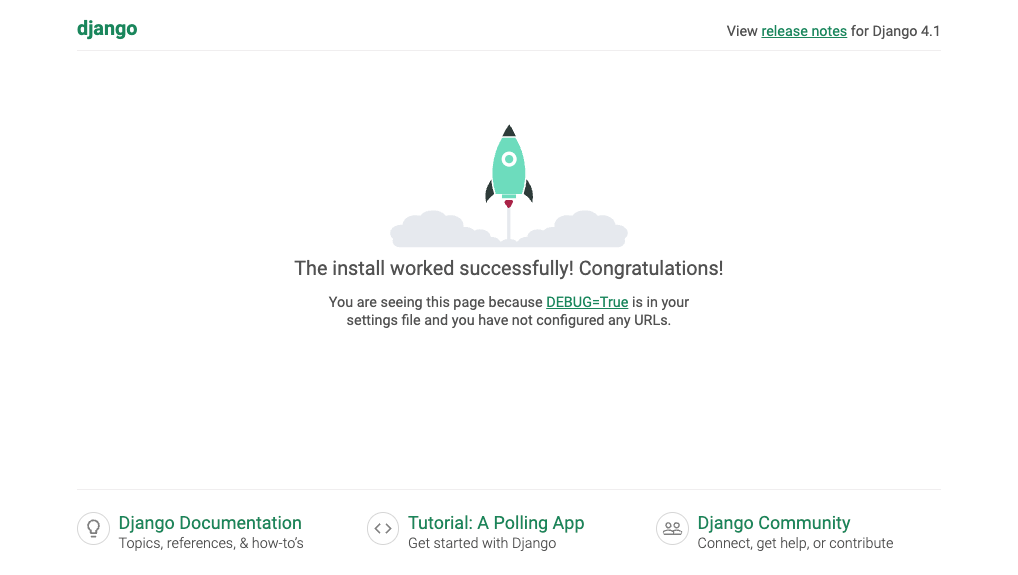
http://127.0.0.1:8000/にアクセスし、下図の画面が表示できたら、Djangoのセットアップが完了になります。
// DjangoでRESTful APIを作成するため、djangorestframeworkをインストール
% pipenv install djangorestframework

// TODOアプリを作成
% python manage.py startapp todo
TODOアプリの雛形が作成できたら以下のファイルを作成・編集します。
from pathlib import Path

import environ

# Build paths inside the project like this: BASE_DIR / 'subdir'.
BASE_DIR = Path(__file__).resolve().parent.parent


# Quick-start development settings - unsuitable for production
# See https://docs.djangoproject.com/en/4.1/howto/deployment/checklist/

+ env = environ.Env()
+ dot_env_path = BASE_DIR / '.env'
+ if dot_env_path.exists():
+     env.read_env(str(dot_env_path))


# SECURITY WARNING: keep the secret key used in production secret!
- SECRET_KEY = 'django-insecure-5&cyjjqq=+l^mye=6ton2m%f6=)3vs)q%7^4^66sl_y+y_+tdw'
+ SECRET_KEY = env.str('SECRET_KEY', 'django-insecure-5&cyjjqq=+l^mye=6ton2m%f6=)3vs)q%7^4^66sl_y+y_+tdw')

# SECURITY WARNING: don't run with debug turned on in production!
- DEBUG = True
+ DEBUG = env.bool('DEBUG', False)

- ALLOWED_HOSTS = []
+ ALLOWED_HOSTS = env.list('ALLOWED_HOSTS', default=['127.0.0.1', 'localhost'])

+ LOCAL_DEV = env.bool('LOCAL_DEV', default=False)


# Application definition

INSTALLED_APPS = [
    'django.contrib.admin',
    'django.contrib.auth',
    'django.contrib.contenttypes',
    'django.contrib.sessions',
    'django.contrib.messages',
    'django.contrib.staticfiles',
+     'rest_framework',
+     'todo',
]

MIDDLEWARE = [
    'django.middleware.security.SecurityMiddleware',
    'django.contrib.sessions.middleware.SessionMiddleware',
    'django.middleware.common.CommonMiddleware',
    'django.middleware.csrf.CsrfViewMiddleware',
    'django.contrib.auth.middleware.AuthenticationMiddleware',
    'django.contrib.messages.middleware.MessageMiddleware',
    'django.middleware.clickjacking.XFrameOptionsMiddleware',
    'middlewares.RequestLogMiddleware',
]

ROOT_URLCONF = 'config.urls'

TEMPLATES = [
    {
        'BACKEND': 'django.template.backends.django.DjangoTemplates',
        'DIRS': [],
        'APP_DIRS': True,
        'OPTIONS': {
            'context_processors': [
                'django.template.context_processors.debug',
                'django.template.context_processors.request',
                'django.contrib.auth.context_processors.auth',
                'django.contrib.messages.context_processors.messages',
            ],
        },
    },
]

WSGI_APPLICATION = 'config.wsgi.application'


# Database
# https://docs.djangoproject.com/en/4.1/ref/settings/#databases

+ if LOCAL_DEV:
+     DATABASES = {
+         'default': {
+             'ENGINE': 'django.db.backends.sqlite3',
+             'NAME': BASE_DIR / 'db.sqlite3',
+             'TEST': {
+                 'CHARSET': 'UTF8',
+                 'NAME': ':memory:',
+             },
+         }
+     }
+ else:
+     DATABASES = {
+         'default': env.db(),
+     }

# Password validation
# https://docs.djangoproject.com/en/4.1/ref/settings/#auth-password-validators

AUTH_PASSWORD_VALIDATORS = [
    {
        'NAME': 'django.contrib.auth.password_validation.UserAttributeSimilarityValidator',
    },
    {
        'NAME': 'django.contrib.auth.password_validation.MinimumLengthValidator',
    },
    {
        'NAME': 'django.contrib.auth.password_validation.CommonPasswordValidator',
    },
    {
        'NAME': 'django.contrib.auth.password_validation.NumericPasswordValidator',
    },
]


# Internationalization
# https://docs.djangoproject.com/en/4.1/topics/i18n/

- LANGUAGE_CODE = 'en-us'
+ LANGUAGE_CODE = 'ja'

- TIME_ZONE = 'UTC'
+ TIME_ZONE = 'Asia/Tokyo'

USE_I18N = True

USE_TZ = True


# Static files (CSS, JavaScript, Images)
# https://docs.djangoproject.com/en/4.1/howto/static-files/

STATIC_URL = 'static/'

# Default primary key field type
# https://docs.djangoproject.com/en/4.1/ref/settings/#default-auto-field

DEFAULT_AUTO_FIELD = 'django.db.models.BigAutoField'

+ # logging
+ LOGGING = {
+     'version': 1,
+     'disable_existing_loggers': True,
+     'formatters': {
+         'backend': {
+             '()': 'formatter.JsonFormatter',
+             'format': '[%(levelname)s]\t%(asctime)s.%(msecs)dZ\t%(levelno)s\t%(message)s\n'
+         }
+     },
+     'handlers': {
+         'console': {
+             'level': 'INFO',
+             'class': 'logging.StreamHandler',
+             'formatter': 'backend',
+         },
+     },
+     'loggers': {
+         'django.request': {
+             'handlers': ['console'],
+             'level': 'INFO',
+         },
+         'django.db.backends': {
+             'handlers': ['console'],
+             'level': 'DEBUG',
+         },
+         'backend': {
+             'handlers': ['console'],
+             'level': 'DEBUG',
+             'propagate': False,
+         },
+     },
+ }
ローカル環境で開発するための環境変数を.envファイルに定義します。
+ SECRET_KEY=django-insecure-5&cyjjqq=+l^mye=6ton2m%f6=)3vs)q%7^4^66sl_y+y_+tdw
+ DEBUG=True
+ LOCAL_DEV=True
ログをAWS CloudWatch logsで確認しやすくするために、JSON形式に構造化するためにフォーマッターを作成します。
+ import json
+ import logging
+ import traceback
+
+
+ class JsonFormatter(logging.Formatter):
+     def format(self, record):
+         if self.usesTime():
+             record.asctime = self.formatTime(record, self.datefmt)
+
+         json_log = {
+             'aws_request_id': getattr(record, 'aws_request_id', '00000000-0000-0000-0000-000000000000'),
+             'log_level': str(getattr(record, 'levelname', '')),
+             'timestamp': '%(asctime)s.%(msecs)dZ' % dict(asctime=record.asctime, msecs=record.msecs),
+             'aws_request_id': getattr(record, 'aws_request_id', '00000000-0000-0000-0000-000000000000'),
+             'message': record.getMessage(),
+             'status_code': str(getattr(record, 'status_code', '')),
+             'execution_time': str(getattr(record, 'execution_time', '')),
+             'stack_trace': {},
+         }
+
+         request = getattr(record, 'request', None)
+
+         if request:
+             json_log = {
+                 'aws_cf_id': request.META.get('HTTP_X_AMZ_CF_ID', ''),
+                 'aws_trace_id': request.META.get('HTTP_X_AMZN_TRACE_ID', ''),
+                 'x_real_ip': request.META.get('HTTP_X_REAL_IP', ''),
+                 'x_forwarded_for': request.META.get('HTTP_X_FORWARDED_FOR', ''),
+                 'request_method': request.method,
+                 'request_path': request.get_full_path(),
+                 'request_body': request.request_body,
+                 'user_agent': request.META.get('HTTP_USER_AGENT', ''),
+                 'user': str(getattr(request, 'user', '')),
+                 'stack_trace': {},
+             }
+
+         if record.exc_info:
+             json_log['stack_trace'] = traceback.format_exc().splitlines()
+
+         return json.dumps(json_log, ensure_ascii=False)
HTTPリクエストのログをJSON形式で出力できるようフォーマッターを使ったミドルウェアを作成します。
+ import copy
+ import json
+ import logging
+ import re
+ import time
+
+ from django.utils.deprecation import MiddlewareMixin
+
+ request_logger = logging.getLogger('backend')
+
+
+ class RequestLogMiddleware(MiddlewareMixin):
+     """Request Logging Middleware."""
+
+     def __init__(self, *args, **kwargs):
+         """Constructor method."""
+         super().__init__(*args, **kwargs)
+
+     def is_json_format(self, request_body):
+         try:
+             json.loads(request_body)
+         except json.JSONDecodeError:
+             return False
+
+         return True
+
+     def process_request(self, request):
+         """Set Request Start Time to measure time taken to service request."""
+         request.start_time = time.time()
+         request.request_body = ''
+         if request.method in ['PUT', 'POST', 'PATCH']:
+             try:
+                 request_body = request.body.decode('utf-8')
+
+                 if request_body and self.is_json_format(request_body):
+                     request.request_body = json.loads(request_body)
+                 else:
+                     request.request_body = request_body
+             except UnicodeDecodeError:
+                 # request.request_body = str(base64.b64encode(request.body))
+                 request_body = copy.deepcopy(request.body)
+                 first_file_name = ''
+                 file_names = re.findall('filename=\".*\"\\\\r\\\\nContent-Type', str(request_body))
+                 if len(file_names) > 0:
+                     first_file_name = file_names[0]
+                     first_file_name = first_file_name.replace('\\r\\nContent-Type', '')
+                     first_file_name = first_file_name.replace('\\\\', '\\')
+                 request.request_body = first_file_name
+
+     def process_response(self, request, response):
+         status_code = getattr(response, 'status_code', '')
+         log_info = {
+             'request': request,
+             'status_code': status_code,
+             'execution_time': time.time() - request.start_time,
+         }
+         if status_code == 200:
+             request_logger.info(msg='OK', extra=log_info)
+         return response
TodoをDBに保存するためモデルを作成します。
+ from django.db import models
+
+
+ class Todo(models.Model):
+     ACTIVE = 0
+     DONE = 1
+     STATUS = ((ACTIVE, 'active'), (DONE, 'done'))
+
+     title = models.CharField(max_length=30)
+     description = models.TextField(blank=True, null=True)
+     status = models.SmallIntegerField(choices=STATUS, default=ACTIVE)
+     created_at = models.DateTimeField(auto_now_add=True)
Djangoの管理画面からTodoテーブルのデータを変更できるようにします。
+ from django.contrib import admin
+
+ from todo import models
+
+
+ @admin.register(models.Todo)
+ class TodoAdmin(admin.ModelAdmin):
+     list_display = ['id', 'title', 'description', 'status', 'created_at']
+     search_fields = ['title']
DBから取得したTodoのデータの入出力を定義します。
+ from rest_framework import serializers
+
+ from todo.models import Todo
+
+
+ class TodoSerializer(serializers.ModelSerializer):
+     class Meta:
+         model = Todo
+         fields = ['id', 'title', 'description', 'created_at']
+
+     def create(self, validated_data):
+         return Todo.objects.create(**validated_data)
+
+     def update(self, instance, validated_data):
+         instance.status = validated_data.get('status', instance.status)
+         instance.save()
+         return instance
Todoを取得・送信するAPIを定義します。
+ from rest_framework import viewsets
+
+ from todo.models import Todo
+ from todo.serializers import TodoSerializer
+
+
+ class TodoViewSet(viewsets.ModelViewSet):
+     queryset = Todo.objects.all().order_by('-id')
+     serializer_class = TodoSerializer
作成したTodoのAPIをURLに紐づけます。
+ from rest_framework import routers
+
+ from todo.views import TodoViewSet
+
+ router = routers.DefaultRouter()
+ router.register(r'todos', TodoViewSet)
定義したURLを外部に公開します。
+ from todo.urls import router

urlpatterns = [
      path('admin/', admin.site.urls),
+     path('api/', include(router.urls)),
]
上記コードの追加・編集が完了したら、下記を実行してDBのマイグレーションを行います。
// マイグレーションファイルを作成
% python manage.py makemigrations

// マイグレーションを確認
% python manage.py showmigrations

// マイグレーションを実行
% python manage.py migrate
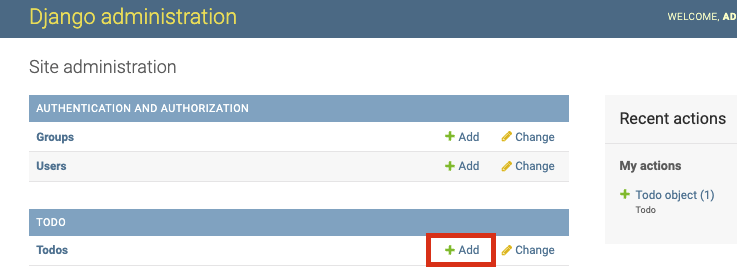
http://127.0.0.1:8000/admin/にアクセスしてDjangoの管理画面にアクセスして、上記で作成したスーパーユーザーのアカウントでログインして下さい。
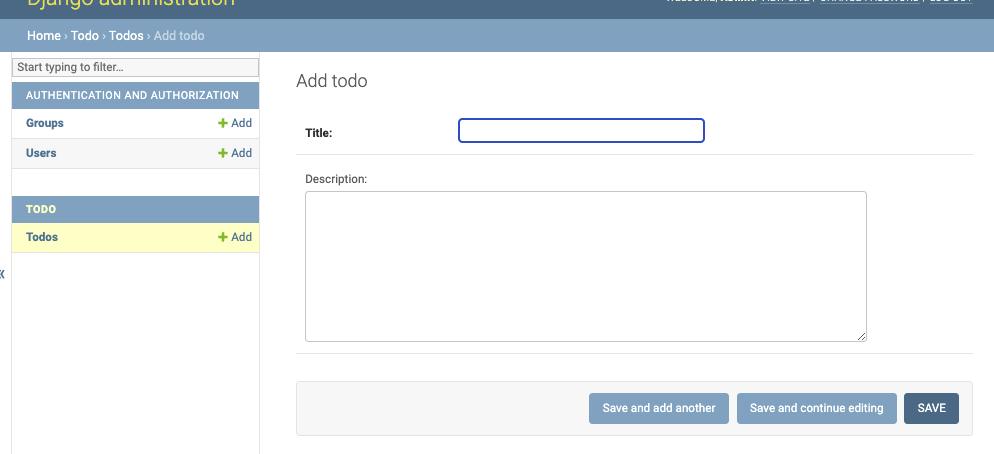
ログインできたら、「Add」ボタンから追加画面に移動して、入力・「SAVE」ボタンを押下してtodoを作成して下さい。
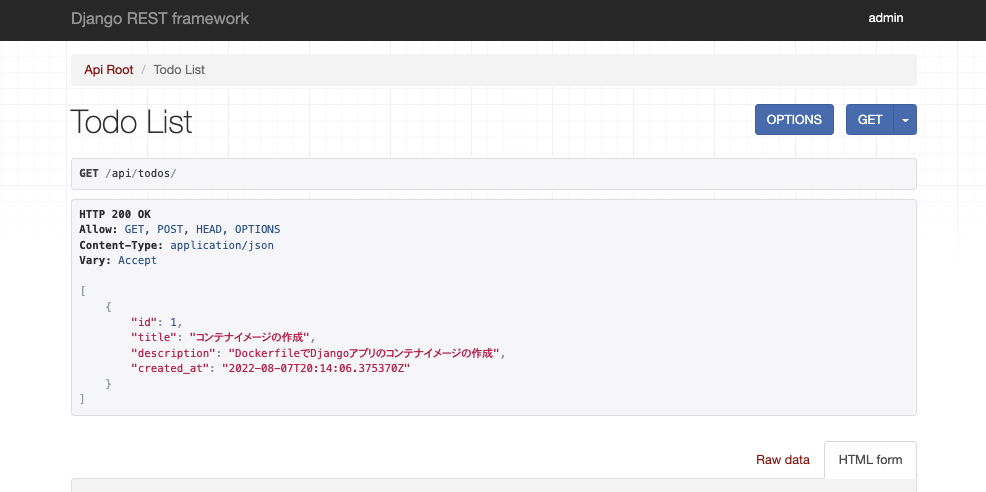
作成できたら、http://127.0.0.1:8000/api/todos/にアクセスすると、下図のようにJSON形式で作成したTODOが取得できます。
簡単ですが、バックエンドのAPIを作成することができました。
後続でCIとしてGithubにプッシュすると、自動テストを実行するようにしたいと思うので、予め作成したAPIに自動テストを実装しカバレッジも出力できるようにしたいと思います。
まず自動テストを実装するために必要なライブラリをインストールします。
// pytest(Pythonでテストを実装するための使い勝手が良いライブラリ)をインストール
% pipenv install --dev pytest

// pytest-django(Djangoでpytestを扱いやすくするライブラリ)をインストール
% pipenv install --dev pytest-django

// pytest-factoryboy(テストデータを作成しやすくするライブラリ)をインストール
% pipenv install --dev pytest-factoryboy

// pytest-freezegun(時刻を固定してテストしやすくするライブラリ)をインストール
% pipenv install --dev pytest-freezegun

// pytest-cov(カバレッジを取得するライブラリ)をインストール
% pipenv install --dev pytest-cov
ライブラリをインストールできたら、以下のファイルを作成します。
+
テストデータを作成しやすくするクラスを定義します。
+ import factory
+
+ from todo.models import Todo
+
+
+ class TodoFactory(factory.django.DjangoModelFactory):
+     class Meta:
+         model = Todo
+
+     id = 1
+     title = 'Implement API'
+     description = 'Implement an API to retrieve Todo'
+     status = 0
APIの自動テストを実装します。Todoを2個登録して、登録した順序(降順)にAPIを介してTodoが取得できることを確認します。
+ import datetime
+ import json
+ import zoneinfo
+
+ import pytest
+ from rest_framework.test import APIRequestFactory
+
+ from todo.tests.factories import TodoFactory
+ from todo.views import TodoViewSet
+
+
+ @pytest.mark.freeze_time(datetime.datetime(2022, 8, 11, 9, 0, 0, tzinfo=zoneinfo.ZoneInfo('Asia/Tokyo')))
+ @pytest.mark.django_db
+ def tests_should_get_two_todos():
+     TodoFactory()
+     TodoFactory(id=2, title='Code Review', description='Review Pull Request #1')
+
+     client = APIRequestFactory()
+     todo_list = TodoViewSet.as_view({'get': 'list'})
+
+     request = client.get('/api/todos/')
+     response = todo_list(request)
+     response.render()
+
+     assert response.status_code == 200
+     assert json.loads(response.content) == [
+         {
+             'id': 2,
+             'title': 'Code Review',
+             'description': 'Review Pull Request #1',
+             'status': 0,
+             'created_at': '2022-08-11T09:00:00+09:00'
+         },
+         {
+             'id': 1,
+             'title': 'Implement API',
+             'description': 'Implement an API to retrieve Todo',
+             'status': 1,
+             'created_at': '2022-08-11T09:00:00+09:00'
+         }
+     ]
pytestの設定を定義します。
+ [pytest]
+ DJANGO_SETTINGS_MODULE = config.settings
+ python_files = tests_*.py
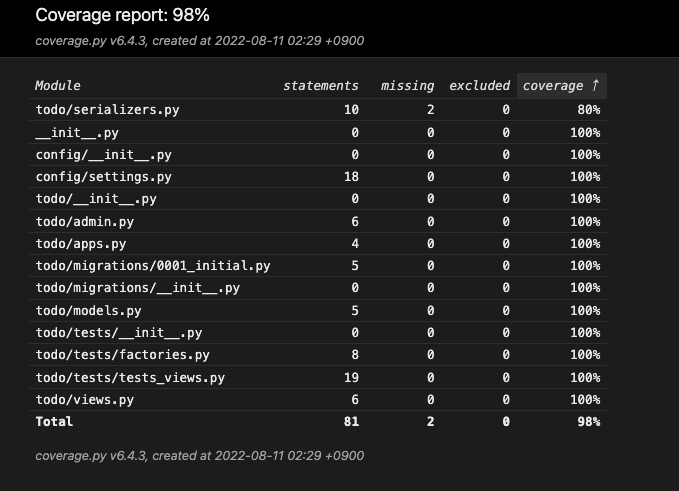
上記ファイルが作成できたら、pytest --cov --cov-report=html -vを実行して下さい。実行できると、↓のテスト結果を出力できると思います。
% pytest --cov --cov-report=html -v
======================================================================================= test session starts ========================================================================================
platform darwin -- Python 3.10.6, pytest-7.1.2, pluggy-1.0.0 -- /Users/staff/Dev/sample-ecs-todo-app/backend/.venv/bin/python
cachedir: .pytest_cache
django: settings: config.settings (from ini)
rootdir: /Users/staff/Dev/sample-ecs-todo-app/backend, configfile: pytest.ini
plugins: freezegun-0.4.2, factoryboy-2.5.0, Faker-13.15.1, django-4.5.2, cov-3.0.0
collected 1 item

todo/tests/tests_views.py::tests_should_get_two_todos PASSED
無事自動テストもpassして想定通りAPIが動作していることを確認できました。
カバレッジもbackend/htmlcovディレクトリに出力していて、index.htmlを開くと、ファイルごとのカバレッジを確認できます。ファイルをクリックすると、ファイルごとに網羅できているコード、網羅できていないコードを確認できます。
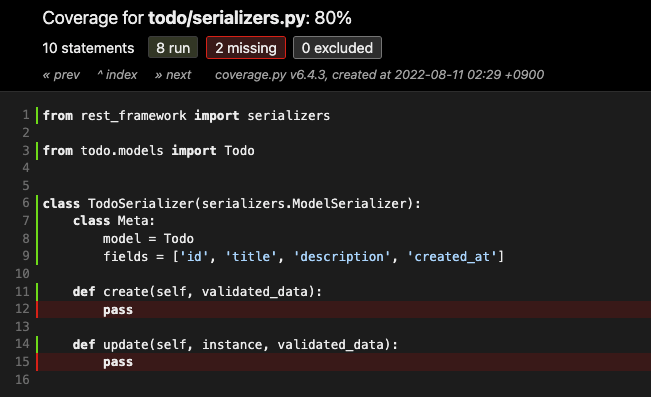
試しにbackend/todo/serializers.pyを開くと、網羅できたコードを緑色、できなかったコードを赤色でハイライトしてくれます。
以上でバックエンドの実装は完了になります。最終的なディレクトリ構成は以下になりました。
sample-ecs-todo-app
└── backend
    ├── Pipfile
    ├── Pipfile.lock
    ├── README.md
    ├── __init__.py
    ├── config
    │   ├── __init__.py
    │   ├── asgi.py
    │   ├── settings.py
    │   ├── urls.py
    │   └── wsgi.py
    ├── db.sqlite3
    ├── manage.py
    ├── pytest.ini
    └── todo
        ├── __init__.py
        ├── admin.py
        ├── apps.py
        ├── migrations
        │   ├── 0001_initial.py
        │   └── __init__.py
        ├── models.py
        ├── serializers.py
        ├── tests
        │   ├── __init__.py
        │   ├── factories.py
        │   └── tests_views.py
        ├── tests.py
        ├── urls.py
        └── views.py
上記ソースコードはGithubにプッシュしましたのでクローンしてみて下さい。
次回はフロントエンドのSPAをNuxtで作成したいと思います。