はじめに
私はこれまで次のようにAndroidアプリ設計に関わる記事を書きました。
これら2つ記事の内容を組み合わせた、「Architecture Components + FluxによるAndroidアプリ設計」について考えたので本記事にその設計をまとめました。
結論から言うとFluxアーキテクチャとArchitecture Componentsの相性はとても良いと思います。
Sample
実装のサンプルは以下にあります。
このリポジトリにはFluxアーキテクチャのDispatcherやStoreからViewへのデータの反映を様々な実装で実現したサンプルがあるので、合わせて参考にしていただければ幸いです(Android アプリ設計パターン入門執筆時のサンプルの一部として作ったので、そのサンプルリポジトリにも同様の実装があります)。
実装について
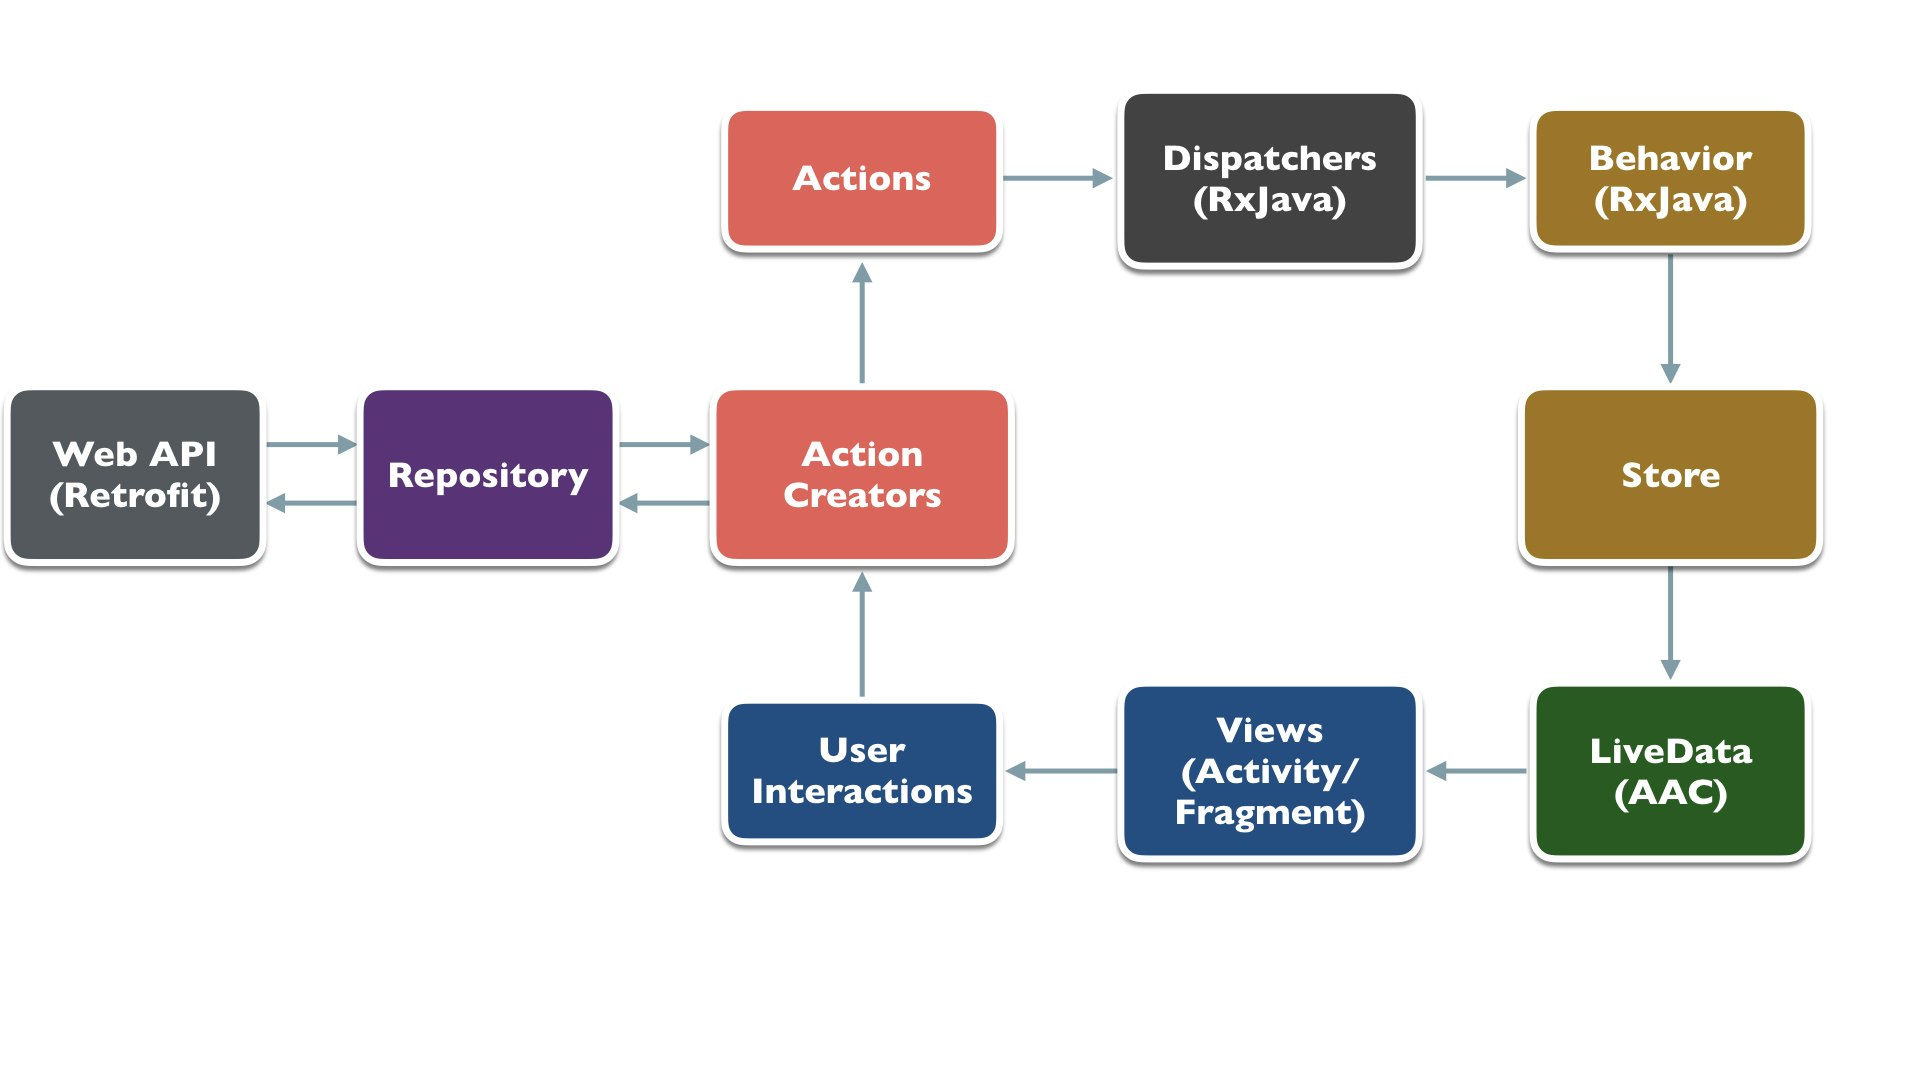
全体の設計は次のようになります。
Android Architecture Components
Android Architecture Components(AAC)の導入などについては次の記事に書いてあるので、そちらをご覧ください。
Flux
Fluxは前出の図のようにデータフローを単一方向にするアーキテクチャです。
Action、Dispatcher、Store、Viewという4つのコンポーネントがあり、それぞれ次のような役割を担っています。
- Action (Action Creator) : 特定の要求(Viewからのユーザ入力など)を処理し、その結果となるデータをStoreへと伝達する
- Dispatcher : ActionをStoreへと伝達する
- Store : Dispatcherから送られたActionおよびそれが含むデータに応じて自身の状態を変更し、保持する
- View : Storeの状態に応じて結果などを画面に表示する
Store/Dispatcherの実装
今回の実装の肝はArchitecture ComponentsのViewModelをFluxアーキテクチャのStoreとみなすところです。
それをより明確にするため、次のようなクラスを用意しました。
abstract class Store : ViewModel()
これを継承して画面ごとにStoreを用意します。
以下はメインとなる画面のMainStoreというクラスです。
class MainStore @Inject constructor(private val dispatcher: MainDispatcher) : Store() {

  val repos: LiveData<List<Repo>> = dispatcher.onRefreshRepo
      .map { it.data }
      .observeOn(AndroidSchedulers.mainThread())
      .toLiveData()

  val repoReadmeUrl: LiveData<String> = dispatcher.onShowRepoReadme
      .map { it.data }
      .observeOn(AndroidSchedulers.mainThread())
      .toLiveData()
}
MainDispatcherは次のようになっており、流すデータごとにDispatcherが存在します。
class MainDispatcher : Dispatcher() {

  private val dispatcherRefreshRepo: FlowableProcessor<MainAction.RefreshRepo>
      = BehaviorProcessor.create<MainAction.RefreshRepo>().toSerialized()
  val onRefreshRepo: Flowable<MainAction.RefreshRepo> = dispatcherRefreshRepo
  private val dispatcherShowRepoReadme: FlowableProcessor<MainAction.ShowRepoReadme>
      = BehaviorProcessor.create<MainAction.ShowRepoReadme>().toSerialized()
  val onShowRepoReadme: Flowable<MainAction.ShowRepoReadme> = dispatcherShowRepoReadme

  fun dispatch(action: MainAction.RefreshRepo) {
    dispatcherRefreshRepo.onNext(action)
  }

  fun dispatch(action: MainAction.ShowRepoReadme) {
    dispatcherShowRepoReadme.onNext(action)
  }

}
ここではBehaviorProcessorを用いていますが、「RxJava + Flux (+ Kotlin)によるAndroidアプリ設計」の記事内で書いたような様々なRxJava2のクラスをDispatcherとして使うことが出来るかと思います(以前の記事ではRxJava1のクラスを用いているのでその点は注意してください)。
また、Architecture ComponentsのRoomを使ってデータベースからRxjava2のクラスでデータを流せば、これもDispatcherとして用いることができそうとも考えています。
MainStoreクラス内のtoLiveData()は拡張関数で、次のように定義されています。
android.arch.lifecycle:reactivestreamsライブラリ内の関数LiveDataReactiveStreams.fromPublisher()を呼び出しています。
fun <T> Publisher<T>.toLiveData() = LiveDataReactiveStreams.fromPublisher(this)
Action/ActionCreatorの実装
次にActionは以下のようなインタフェースを用意しました。
interface Action<out T> {
  val data: T
}
このインタフェースを実装したseald classを以下のように定義します。
sealed class MainAction<out T> : Action<T> {
  class RefreshRepo(override val data: List<Repo>) : MainAction<List<Repo>>()
  class ShowRepoReadme(override val data: String) : MainAction<String>()
}
特定の画面(ここではMainActivity)でのActionの種類の一覧性を高めるためにseald classを用いていますが、data classでも良いかもしれません。
そしてActionCreatorの実装は次のようになります。
@PerActivityScope
class MainActionCreator @Inject constructor(
    private val dispatcher: MainDispatcher,
    private val repository: GitHubRepository
) {

  fun fetchRepo(repoOwner: String)
      = repository.fetchUserRepos(repoOwner)
      .subscribeOn(Schedulers.io())
      .subscribeBy(
          onSuccess = {
            dispatcher.dispatch(MainAction.RefreshRepo(it))
          },
          onError = {
            Timber.e(it)
          })

  fun fetchReadme(repoOwner: String, repoName: String)
      = repository.fetchReadme(repoOwner, repoName)
      .subscribeOn(Schedulers.io())
      .subscribeBy(
          onSuccess = {
            dispatcher.dispatch(MainAction.ShowRepoReadme(it.html_url))
          },
          onError = {
            Timber.e(it)
          }
      )

  fun showRepoDetailDialog(activity: FragmentActivity, repoOwner: String, repoName: String) {
    RepoDetailDialogFragment.newInstance(repoOwner, repoName)
        .show(activity.supportFragmentManager, "MainAction.RepoDetailDialog")
  }
}
GitHubRepositoryの関数を呼び出し、その結果をMainDispatcherへと流しています。
MainActivityの実装
以上のようにMainStore、MainDispatcher、MainAction、MainActionCreatorを用意すると、ViewコンポーネントであるMainActivityの実装は次のようになります。
class MainActivity : AppCompatActivity(), HasSupportFragmentInjector {

  @Inject lateinit var androidInjector: DispatchingAndroidInjector<Fragment>
  @Inject lateinit var storeProvider: StoreProvider
  @Inject lateinit var actionCreator: MainActionCreator
  private val store by lazy { storeProvider.get(this, MainStore::class) }
  private val binding by lazy { DataBindingUtil.setContentView<MainActivityBinding>(this, R.layout.main_activity) }
  private val adapter = MainAdapter()
  private val ownerName = "satorufujiwara"

  override fun supportFragmentInjector() = androidInjector

  override fun onCreate(savedInstanceState: Bundle?) {
    super.onCreate(savedInstanceState)
    binding.recyclerView.adapter = adapter
    binding.recyclerView.layoutManager = LinearLayoutManager(this)
    adapter.onItemClicked = {
      actionCreator.showRepoDetailDialog(this, ownerName, it.name)
    }

    store.repos.observe(this) {
      it ?: return@observe
      adapter.run {
        items.clear()
        items.addAll(it)
        notifyDataSetChanged()
      }
    }
    actionCreator.fetchRepo(ownerName)
  }
}
画面が表示されると actionCreator.fetchRepo(ownerName)が呼び出され、その結果LiveDataであるstore.reposが更新され、observeしているラムダが読み出され、adapterを使ってRecyclerViewの表示が更新されます。
StoreProviderについては次節にて説明します。
Dagger2
Dagger2を使った依存性注入についても下記の記事から大きくは変わっていません。
今回もdagger.androidを使っています。その導入方法や@ContributesAndroidInjectorアノテーションの利用方法については上記の記事をご覧ください。
StoreProviderの実装
Architecture ComponentsのViewModelをFluxアーキテクチャのStoreとみなしているので、Architecture ComponentsのViewModelProvider.Factoryを継承したインタフェースStoreProviderを次のように定義します。
interface StoreProvider : ViewModelProvider.Factory {

  fun <T : ViewModel> get(activity: FragmentActivity, storeClass: KClass<T>): T

  fun <T : ViewModel> get(fragment: Fragment, storeClass: KClass<T>): T

}
このインタフェースを実装したクラスを次のように定義します。
class ViewModelFactory @Inject
constructor(private val creators: Map<Class<out ViewModel>, @JvmSuppressWildcards Provider<ViewModel>>)
  : StoreProvider {

  @Suppress("UNCHECKED_CAST")
  override fun <T : ViewModel> create(modelClass: Class<T>): T {
    var creator: Provider<ViewModel>? = creators[modelClass]
    if (creator == null) {
      for ((key, value) in creators) {
        if (modelClass.isAssignableFrom(key)) {
          creator = value
          break
        }
      }
    }
    if (creator == null) throw IllegalArgumentException("unknown model class " + modelClass)
    try {
      return creator.get() as T
    } catch (e: Exception) {
      throw RuntimeException(e)
    }
  }

  override fun <T : ViewModel> get(activity: FragmentActivity, storeClass: KClass<T>) =
      ViewModelProviders.of(activity, this).get(storeClass.java)

  override fun <T : ViewModel> get(fragment: Fragment, storeClass: KClass<T>) =
      ViewModelProviders.of(fragment, this).get(storeClass.java)
}
StoreProviderインタフェースを継承しているのでget関数が増えていますが、このクラスも
「Kotlin + Architecture Component + Dagger2によるAndroidアプリ設計」のViewModelFactoryクラスとほぼ同一です。
MainModule
@ContributesAndroidInjectorアノテーションを利用して、Injectに必要な定義を書きます。
@Module
internal abstract class UiModule {

  @Binds
  abstract fun bindViewModelFactory(factory: ViewModelFactory): StoreProvider

  @PerActivityScope
  @ContributesAndroidInjector(modules = [MainModule::class, MainDispatcherModule::class])
  internal abstract fun contributeMainActivity(): MainActivity

}
DaggerのMutliBindingによる定義(@Bindsや@ContributesAndroidInjector)と@Providesによる定義が同クラスに共存出来ないので、以下のように分けてあります。
@Module
internal abstract class MainModule {

  @Binds
  @IntoMap
  @ViewModelKey(MainStore::class)
  abstract fun bindMainStore(viewModel: MainStore): ViewModel

  @ContributesAndroidInjector
  abstract fun contributeRepoDetailDialogFragment(): RepoDetailDialogFragment
}

@Module
internal class MainDispatcherModule {

  @PerActivityScope
  @Provides
  fun provideMainDispatcher() = MainDispatcher()

}
以上のように定義することでMainActivity内で、StoreProviderおよびMainStoreのインスタンスを次のように取得することができます。
class MainActivity : AppCompatActivity(), HasSupportFragmentInjector {

  @Inject lateinit var storeProvider: StoreProvider
  private val store by lazy { storeProvider.get(this, MainStore::class) }

  //略
}
その他のライブラリ
Architecture Component、Dagger2以外に以下のようなライブラリを用いています。
- DataBinding - https://developer.android.com/topic/libraries/data-binding/index.html
- OkHttp - http://square.github.io/okhttp
- Retrofit - http://square.github.io/retrofit
- Moshi - https://medium.com/square-corner-blog/kotlins-a-great-language-for-json-fcd6ef99256b
- Glide - https://github.com/bumptech/glide
- RxJava - https://github.com/ReactiveX/RxJava
- RxAndroid - https://github.com/ReactiveX/RxAndroid
- RxKotlin - https://github.com/ReactiveX/RxKotlin
- Timber - http://github.com/JakeWharton/timber
まとめ
- Architecture Componentsの
ViewModelをFluxアーキテクチャのStoreとしてつかう - DispatcherにはRxJava2の
Flowableを用い、Store内でLiveDataへと変換 - Viewから先は
LiveDataを用いる - FluxアーキテクチャとArchitecture Componentsの相性はとても良い
