Swift4.2とSwift5 で動作確認済
https://itunes.apple.com/sg/app/pripara/id1039257927?mt=8
(香港のAppStoreじゃないとダウンロードできません)
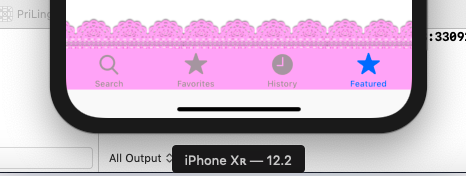
実現できたUITabBar(アイコンは今回の記事と関係ないです)

方法
⑴UIBezierPathを使って、どんなグラフィックを描きたいかを定義します。今回は、スタート地点のY座標をマイナスとし、縦に少し拡張しているだけです。
    func createLengthExpandShape() -> CGPath {
        let path = UIBezierPath()

        //Starting point (left top) then draw lines until the it returns to the starting point with close().
        let startX: CGFloat = 0
        let startY: CGFloat = -37

        path.move(to: CGPoint.init(x: startX, y: startY))
        path.addLine(to: CGPoint.init(x: self.tabBar.frame.width, y: startY))
        path.addLine(to: CGPoint.init(x: self.tabBar.frame.width, y: self.tabBar.frame.height))
        path.addLine(to: CGPoint.init(x: startX, y: self.tabBar.frame.height))
        path.close()

        return path.cgPath
    }
参考 https://medium.com/@philipp307/draw-a-custom-ios-tabbar-shape-27d298a7f4fa
(2)CAShapeLayerに(1)のパスを追加し、レイヤーの形を変えます。
   override func viewDidLoad() {
        super.viewDidLoad()
        // Do any additional setup after loading the view.
        //中略 ここでUITabBarControllerの他の設定を色々することになると思います

        //Change tabbar shape
        self.changeTabBarShape()

    }

    func changeTabBarShape() {
        let shapeLayer = CAShapeLayer()

        //Get CGPath
        shapeLayer.path = self.createLengthExpandShape()

        //Set image
        shapeLayer.fillColor = UIColor.init(patternImage: UIImage.init(named: "MyImage.png")!).cgColor

        //Set layer
        self.tabBar.layer.insertSublayer(shapeLayer, at: 0)
    }
(3)UIColor.init(patternImage:) でセットしたい画像を用意し、Xcodeにドラッグ&ドロップで追加してください。その際Copy Items If Neededにチェックを入れることをお勧めします。
画像の準備が一番わかりにくい点です。
画像はランタイム時上下逆にして使われるので、画像編集ソフトなどで画像の内容をあらかじめ上下逆にしておいてください。また画像が貼られ始めるのは「拡張前の」レイヤーの左上角からという点に注意してください。
今回、画像下のピンク色で雑に塗りつぶしただけの部分がUITabBarの本来の左上から貼られます。
その上のCAShapeLayerで拡張した部分には、画像上のレースのひらひら部分が貼られます。
ひらひら部分と、塗りつぶしただけの部分の間をpngで透過しておくと、UITabBarが画像に合わせて複雑に形を変える(ように見える)ため、デザイン性が増します。
CAShapeLayerの拡張法をもっと複雑に変えたい場合は、画像の中身も調整する必要があると思います。今回は縦長にしただけなので、簡単に済んでいます。
全プロジェクト
https://github.com/Satoru-PriChan/ChangeUITabBarAppearance
気に入ったら、GitHubの方に星もらえると助かります。
もっとエクセレントなやり方があると思うので、誰か教えてください・・・
以上

