はじめに
だいたい1年くらい前にChainerで書いたアニメ顔を分類するプログラムですが,今回はKerasで書きました.プログラムはGitHubにあげました.
データセット
データセットはanimeface-character-datasetから入手することができます.
参考:DenoisingAutoEncoderでアニメ顔の特徴を抽出してみた
データセット前処理
前より少しだけ改良しました.32×32のRGBのデータ(shape=(3, 32, 32))にリサイズします.前回と違うのは,データの入っていない空のフォルダを削除しなくても多分ちゃんと動くところです.
Requirementsは
- six
- numpy
- opencv
- progressbar2
となっています.
# ! -*- coding: utf-8 -*-

import os
import six.moves.cPickle as pickle
import numpy as np
try:
	import cv2 as cv
except:
	pass
from progressbar import ProgressBar

class AnimeFaceDataset:
	def __init__(self):
		self.data_dir_path = u"./animeface-character-dataset/thumb/"
		self.data = None
		self.target = None
		self.n_types_target = -1
		self.dump_name = u'animedata'
		self.image_size = 32

	def get_dir_list(self):
		tmp = os.listdir(self.data_dir_path)
		if tmp is None:
			return None
		ret = []
		for x in tmp:
			if os.path.isdir(self.data_dir_path+x):
				if len(os.listdir(self.data_dir_path+x)) >= 2:
					ret.append(x)
		return sorted(ret)

	def get_class_id(self, fname):
		dir_list = self.get_dir_list()
		dir_name = filter(lambda x: x in fname, dir_list)
		return dir_list.index(dir_name[0])

	def get_class_name(self, id):
		dir_list = self.get_dir_list()
		return dir_list[id]

	def load_data_target(self):
		if os.path.exists(self.dump_name+".pkl"):
			print "load from pickle"
			self.load_dataset()
			print "done"
		else:
			dir_list = self.get_dir_list()
			ret = {}
			self.target = []
			self.data = []
			print("now loading...")
			pb = ProgressBar(min_value=0, max_value=len(dir_list)).start()
			for i, dir_name in enumerate(dir_list):
				pb.update(i)
				file_list = os.listdir(self.data_dir_path+dir_name)
				for file_name in file_list:
					root, ext = os.path.splitext(file_name)
					if ext == u'.png':
						abs_name = self.data_dir_path+dir_name+'/'+file_name
						# read class id i.e., target
						class_id = self.get_class_id(abs_name)
						self.target.append(class_id)
						# read image i.e., data
						image = cv.imread(abs_name)
						image = cv.resize(image, (self.image_size, self.image_size))
						image = image.transpose(2,0,1)
						image = image/255.
						self.data.append(image)
			pb.finish()
			print("done.")
			self.data = np.array(self.data, np.float32)
			self.target = np.array(self.target, np.int32)

			self.dump_dataset()

	def dump_dataset(self):
		pickle.dump((self.data,self.target), open(self.dump_name+".pkl", 'wb'), -1)

	def load_dataset(self):
		self.data, self.target = pickle.load(open(self.dump_name+".pkl", 'rb'))


if __name__ == '__main__':
	dataset = AnimeFaceDataset()
	dataset.load_data_target()
実際に読み込んでみると
In [1]: from animeface import AnimeFaceDataset

In [2]: dataset = AnimeFaceDataset()

In [3]: dataset.load_data_target()
load from pickle
done

In [4]: x = dataset.data

In [5]: y = dataset.target

In [6]: print x.shape, y.shape
(14490, 3, 32, 32) (14490,)
となり,データ数14490,クラス数(キャラクター数)176の分類問題となります.(ここまではほとんど前回と同じです.)
KerasによるConvolutional Neural Networksの実装
モデルの構築
from keras.layers.convolutional import Convolution2D
from keras.layers.convolutional import MaxPooling2D
from keras.layers.core import Activation
from keras.layers.core import Dense
from keras.layers.core import Dropout
from keras.layers.core import Flatten
from keras.models import Sequential

def build_deep_cnn(num_classes=3):
	model = Sequential()

	model.add(Convolution2D(96, 3, 3, border_mode='same', input_shape=(3, 32, 32)))
	model.add(Activation('relu'))

	model.add(Convolution2D(128, 3, 3))
	model.add(Activation('relu'))
	model.add(MaxPooling2D(pool_size=(2, 2)))
	model.add(Dropout(0.5))

	model.add(Convolution2D(256, 3, 3, border_mode='same'))
	model.add(Activation('relu'))

	model.add(Convolution2D(256, 3, 3))
	model.add(Activation('relu'))
	model.add(MaxPooling2D(pool_size=(2, 2)))
	model.add(Dropout(0.5))

	model.add(Flatten())
	model.add(Dense(1024))
	model.add(Activation('relu'))
	model.add(Dropout(0.5))

	model.add(Dense(num_classes))
	model.add(Activation('softmax'))

	return model
最初にmodel = Sequential()でシーケンシャルモデルを生成して,それにConvolutional2DやDenseを追加していくだけでネットワークを構築できます.
Convolutional2Dが畳み込み層,Denseが全結合層に相当する感じです.
一番最初の,
Convolution2D(96, 3, 3, border_mode='same', input_shape=(3, 32, 32))
だけはinput_shapeを指定する必要があります.
Convolutional2Dについて簡単に説明すると,最初の引数が,畳み込みカーネルの枚数,第2,3引数が畳み込みカーネル大きさを指定するものです.border_modeにはsameとvalidの2種類がありますが,sameはpaddingがカーネルの大きさの半分,つまり出力の縦横の大きさは入力の縦横の大きさは変わりません.validはpaddingがない状態,つまり出力の縦横の大きさは入力の縦横の大きさよりも小さくなります.paddingについはこちらがわかりやすいです.今回はsameで畳み込みカーネルのshapeが(96, 3, 3),入力のshapeが(3, 32, 32)のためこの層の出力のshapeは(96, 32, 32)となります.validの場合の出力のshapeは(96, 32-(3-1), 32-(3-1))=(96, 30, 30)となります.その他にstrideなども設定することができます.
モデルの学習
from keras.callbacks import EarlyStopping
from keras.callbacks import LearningRateScheduler
from keras.optimizers import Adam
from keras.optimizers import SGD
from animeface import AnimeFaceDataset

class Schedule(object):
	def __init__(self, init=0.01):
		self.init = init
	def __call__(self, epoch):
		lr = self.init
		for i in xrange(1, epoch+1):
			if i%5==0:
				lr *= 0.5
		return lr

def get_schedule_func(init):
	return Schedule(init)

dataset = AnimeFaceDataset()
dataset.load_data_target()
x = dataset.data
y = dataset.target
n_class = len(set(y))
perm = np.random.permutation(len(y))
x = x[perm]
y = y[perm]

model = build_deep_cnn(n_class)
model.summary()
init_learning_rate = 1e-2
opt = SGD(lr=init_learning_rate, decay=0.0, momentum=0.9, nesterov=False)
model.compile(loss='sparse_categorical_crossentropy', optimizer=opt, metrics=["acc"])
early_stopping = EarlyStopping(monitor='val_loss', patience=3, verbose=0, mode='auto')
lrs = LearningRateScheduler(get_schedule_func(init_learning_rate))

hist = model.fit(x, y,
				batch_size=128,
				nb_epoch=50,
				validation_split=0.1,
				verbose=1,
				callbacks=[early_stopping, lrs])
学習するfit関数の引数のcallbacksには,収束判定したら自動的に学習を終了するEarlyStoppingや,epoch毎に学習率を調整することができるLearningRateSchedulerなどを指定することができ,便利です.
簡単にLearningRateSchedulerについて説明すると,「引数に現在のepoch数を(0はじまり)を与えた時に学習率を返してくれる関数」を引数に取ります.例えば,
class Schedule(object):
    def __init__(self, init=0.01):
        self.init = init
    def __call__(self, epoch):
        lr = self.init
        for i in xrange(1, epoch+1):
            if i%5==0:
                lr *= 0.5
        return lr

def get_schedule_func(init):
    return Schedule(init)

lrs = LearningRateScheduler(get_schedule_fun(0.01))
のようにやると,初期学習率0.01で5epoch毎に学習率が半減する,といった感じになります.
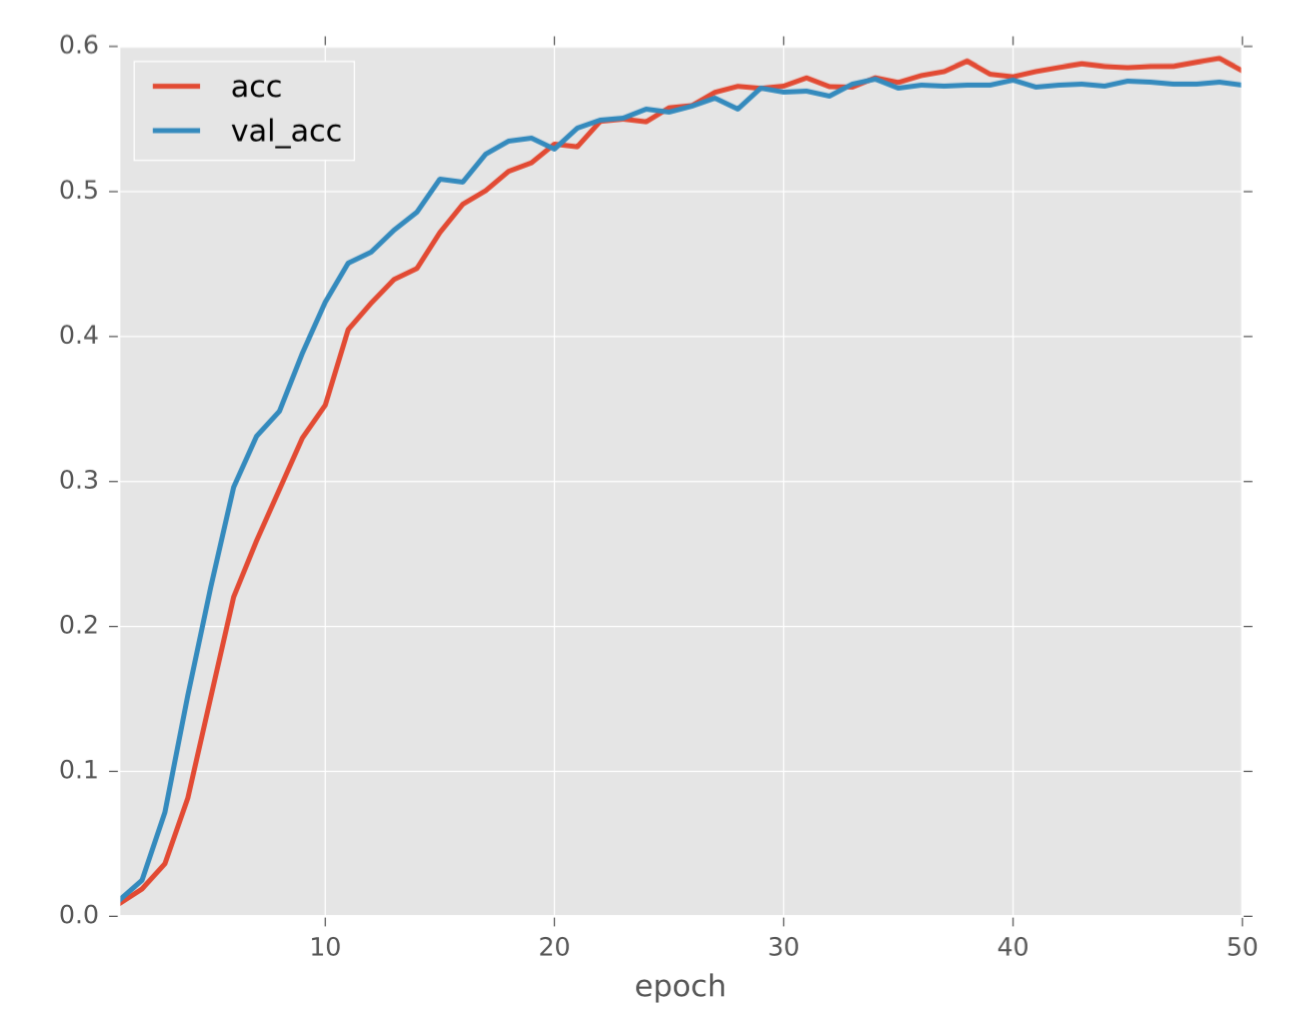
また,fitの返り値のオブジェクトの.historyには辞書型で各epoch毎の誤差関数等を保存してくれます.PandasとMatplotlibを使うと便利に可視化することができます.
import pandas as pd
import matplotlib.pyplot as plt
plt.style.use("ggplot")

df = pd.DataFrame(hist.history)
df.index += 1
df.index.name = "epoch"
df[["acc", "val_acc"]].plot(linewidth=2)
plt.savefig("acc_history.pdf")
df[["loss", "val_loss"]].plot(linewidth=2)
plt.savefig("loss_history.pdf")
実験結果
結果は以下の通りとなり,検証用の正解率は約6割弱となりました.
実は最適化手法にAdamを使うと検証用の正解率は7割を超えるのでやってみてください.
誤差関数の推移

正解率の推移
