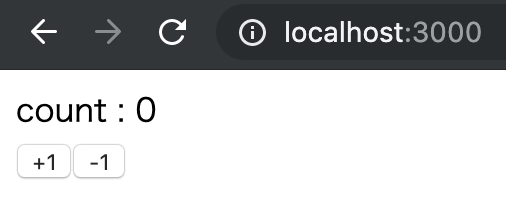
カウントアプリの概要
 増えたり減ったりします。
Reactのみでこのアプリを実装。
Reactのみでカウントアプリを作成して、後からReduxを導入します。
create-react-appでReactアプリを作成してある程で話が進みます
# ディレクトリ構造

react-app/
        ├  node_modules
        ├  public
        ├  src
        │   ├ components
        │   │      ├ App.js
        │   │
        │   ├ index.js
        ├  package.json
        ├  README.md
        ├  yarn.lock
表示部分の実装
import React , { Component } from 'react'; // Componentをimportする
class App extends Component{
  render(){
    return(
      <React.Fragment>
        <div>count : 0</div>
        <button>+1</button>
        <button>-1</button>
      </React.Fragment>
    )
  }
}

export default App;
class componentを使って実装していくので、importしておく。
App.jsをcomponents配下に移動させたので、src/index.jsも変更する。
import React from 'react';
import ReactDOM from 'react-dom';
import App from './components/App'; //ここを変更

ReactDOM.render(<App />, document.getElementById('root'));
これで、動かないが画面への表示される。
次にボタンを押すと、stateが更新され、countの数字が変わるようにしていく。
import React , { Component } from 'react';

class App extends Component{

  constructor(props){
    super(props)
    this.state = { count: 0 } //countの初期値を設定
  }

  // プラスボタンが押された時の処理
  handlePlusButton = () => {
    this.setState({ count: this.state.count + 1})
  }

  // マイナスボタンが押された時の処理
  handleMinusButton = () => {
    this.setState({ count: this.state.count - 1})
  }

  render(){
    return(
      <React.Fragment>
        <div>count : { this.state.count }</div>
        <button onClick={this.handlePlusButton}>+1</button>
        <button onClick={this.handleMinusButton}>-1</button>
      </React.Fragment>
    )
  }
}

export default App;
Reactのみのカウントアプリはこれで完成。
Reduxの導入
Reduxを利用するためにパッケージをinstallする。
yarn add react react-redux
ディレクトリ構造を変更する。
react-app/
        ├  node_modules
        ├  public
        ├  src
        │   ├ components
        │   │      ├ App.js
        │   │
        │   ├ actions
        │   │      ├ index.js
        │   │
        │   ├ reducers
        │   │      ├ index.js
        │   │      ├ count.js
        │   │
        │   ├ utils
        │   │      ├ index.js
        │   │
        │   ├ index.js
        ├  package.json
        ├  README.md
        ├  yarn.lock
アクション(actions)の作成
アクションには、アプリケーション内部で起こる出来事を記載する。jsのオブジェクトで処理は書かない。
オブジェクト内部には、ユニークな名前を持つ'type'キーと、typeに対応する値を持つ。
export const INCREMENT = 'INCREMENT'  //再利用することが多いので定義。あとでutils/indexに移動します。
export const DECREMENT = 'DECREMENT'  //再利用することが多いので定義。あとでutils/indexに移動します。

//プラスする処理の名前
export const increment = () =>({
    type: INCREMENT
  })

//マイナスする処理の名前
export const decrement = () =>({
    type: DECREMENT
  })
ここで、utils/index.jsを作成して、上記のINCREMENTとDECREMENTを定義して、src/actions/index.jsからimportする仕組みにする。
export const INCREMENT = 'INCREMENT'
export const DECREMENT = 'DECREMENT'
import { INCREMENT, DECREMENT } from './utils' //ここを追加

//プラスする処理の名前
export const increment = () =>({
    type: INCREMENT
  })

//マイナスする処理の名前
export const decrement = () =>({
    type: DECREMENT
  })
reducerの作成
actionが発生した時に、そのactionのtypeに応じて、stateをどう変化させるのか定義する。
// 全てのreducerをまとめるためのファイル
import { combineReducers } from 'redux' //applicationの全reducerをまとめるために必要
import count from './count'

export default combineReducers({ count })
// export default combineReducers({ count, hoge, huga }) のように書く。これで、count,hoge,hugaが使えるようになる。
import { INCREMENT, DECREMENT } from '../utils'

const initialState = { value: 0 } //状態の初期値を定義。

const count = (state = initialState, action) => {
  switch(action.type){
    case INCREMENT:
      return {value: state.value + 1} //変更したい状態を返す。※ここではまだ状態は変わっていない。
    case DECREMENT:
      return {value: state.value - 1}
    default:
      return state
  }
}

export default count;
Storeの作成
アプリケーションの状態(state)を保持する。
import React from 'react';
import ReactDOM from 'react-dom';
import { createStore } from 'redux' //storeを作成するために必要
import { Provider } from 'react-redux' //作成したstoreを全componentに渡すために必要

import App from './components/App';
import reducer from './reducers' //作成したreducerをimportしておく

const store = createStore(reducer) //storeの作成

ReactDOM.render(
  <Provider store={store}>
    <App />
  </Provider>, document.getElementById('root'));
これで、redux部分はほとんど完成。
ReactとReduxのつなぎこみ
import React, { Component } from 'react';
import { connect } from 'react-redux'
import { increment, decrement } from '../actions' //actionsのimport


class App extends Component{
  render(){
    const props = this.props //状態やアクションを渡す。mapStateToPropsで定義されている。関数はmapDipatchTopropsで渡されている。
    return(
        <React.Fragment>
        <div>count : { props.value }</div>
        <button onClick={props.increment}>+1</button>
        <button onClick={props.decrement}>-1</button>
        </React.Fragment>

    )
  }
}

// stateの情報からこのcomponentで必要なものを取り出してcomponent内のpropsとしてマッピング機能
// 引数には、状態のトップレベルを示すstateを書いて、どういったオブジェクトをpropsとして対応させるのか、関数の戻り値として定義。
const mapStateToProps = (state) =>{
  return {value: state.count.value}
}

//あるアクションが発生した時に、reducerにタイプに応じた状態遷移を実行させるための関数がdipatche。
//このdispatch関数を引数に置くことで、このcomponentで必要になるdipatche関数を宣言する。
const mapDispatchToProps = (dispatch) =>(
  {
    increment: () => dispatch(increment()),
    decrement: () => dispatch(decrement())
  }
)


export default connect(mapStateToProps, mapDispatchToProps)(App);
ここでつまづいたのが、
const props = this.props
これは、mapStateToPropsとmapDispatchToPropsでそれぞれから状態を受け取っていた。
なので、今回だと、valueとincrement関数、decrement関数が渡されている。
まとめ
ソースコード
https://github.com/satokiyoshino/react-count-app
compileエラーが起きないで、バグが起きるとデバッグがめちゃくちゃ難しい。
Chromeの拡張で、Redux Devtoolがあるので、これを使えば少し助かるかもしれない。
https://github.com/zalmoxisus/redux-devtools-extension