はじめに
BERTが何なのかという説明はありません(できません(T_T))。
とりあえずbert使って出力をだすとこまでやってみた!という記事です。
やったことまとめ
- pytorch から BERT日本語Pretrainedモデル を扱える環境構築
-
pytorch-pretrained-BERTのexampleにある
extract_features.pyを使って各トークンのベクトルを出す - Embedding Projectorを使って可視化
環境
- macOS High Sierra 10.13.6
- python 3.6.5
環境構築!
PyTorchでBERT日本語Pretrainedモデルを使えるようにしていく。
とりあえずpytorch のインストール
公式サイト通りを参考に。
- https://pytorch.org/get-started/locally/
次はpythonからJuman++を使えるように
形態素解析器JUMAN++をインストールします。 インストールできたか確認。 JUMAN++をpythonから利用するには、PyKNPが必要になります。 インストールできたかの確認。 KNPって何? 形態素解析器JUMAN++(JUMAN)と構文解析器KNPのPythonバインディング (Python2系と3系の両方に対応) 公式サイトの方法でインストールしていきます。 公式サイトのpyknpを用いたプログラムです。クリックで展開します。
JUMAN++のインストール
$ brew install jumanpp
$ jumanpp -v
JUMAN++ 1.02
KNP のインストール
PyKNPの導入には構文解析器KNPが必要なため、先にKNPをインストールします。$ brew tap uetchy/nlp
$ brew install knp
% echo "jumanppとknpをいれました" | jumanpp | knp                    [10:42:51]
# S-ID:1 KNP:4.19-CF1.1 DATE:2019/06/05 SCORE:-27.38333
jumanppと<P>──┐     <体言>
        knpを<P>─PARA─────┐ <体言>
                      いれました<用言:動><格解析結果:ガ/-;ヲ/jumanpp;ヲ/knp;ニ/-;ノ/->
EOS
愛するKNPの使い方を紹介する
PyKNP のインストール
https://github.com/ku-nlp/pyknp$ pip install pyknp
# coding: utf-8
from __future__ import unicode_literals  # It is not necessary when you use >python3.
from pyknp import Juman

jumanpp = Juman()  # default is JUMAN++: Juman(jumanpp=True). if you use JUMAN, >use Juman(jumanpp=False)
result = jumanpp.analysis("下鴨神社の参道は暗かった。")
for mrph in result.mrph_list():  # 各形態素にアクセス
   print("見出し:%s, 読み:%s, 原形:%s, 品詞:%s, 品詞細分類:%s, 活用型:%s, 活用形:%s, 意>味情報:%s, 代表表記:%s" \
         % (mrph.midasi, mrph.yomi, mrph.genkei, mrph.hinsi, mrph.bunrui, >mrph.katuyou1, mrph.katuyou2, mrph.imis,
            mrph.repname))
BERT日本語Pretrainedモデル
公式サイトよりダウンロードしてきます。
- http://nlp.ist.i.kyoto-u.ac.jp/index.php?BERT%E6%97%A5%E6%9C%AC%E8%AA%9EPretrained%E3%83%A2%E3%83%87%E3%83%AB
pytorch-pretrained-BERT
PyTorchベースのBERTライブラリになります。
tokenization.pyの修正が必要になります。
注意: --do_lower_case False オプションをつけてください。これをつけないと、濁点が落ちてしまいます。また、tokenization.pyの以下の行をコメントアウトしてください。これを行わないと漢字が全て一文字単位になってしまいます。
黒橋・河原研究室
# text = self._tokenize_chinese_chars(text)
修正しましょう。
$ pip list | grep bert
pytorch-pretrained-bert 0.6.2
% pip show pytorch-pretrained-bert | grep Location
Location: /path/to/your/site-packages
$ vim /path/to/your/site-packages/pytorch_pretrained_bert/tokenization.py
文章ベクトルだしてみる
pytorch-pretrained-BERTのexampleにあるextract_features.pyを使って
文ベクトルを抽出していこうと思います。
準備
extract_features.pyのダウンロード
extract_features.pyを持ってくる。
curl https://raw.githubusercontent.com/huggingface/transformers/v0.6.2/examples/extract_features.py -O
少しプログラムを変更します。
tokenizerにJuman++で分かち書きしたものを渡します。
プログラムの一部のみ掲載しています。
def convert_examples_to_features(examples, seq_length, tokenizer):
    """Loads a data file into a list of `InputFeature`s."""

    from pyknp import Juman
    jm = Juman()

    features = []
    for (ex_index, example) in enumerate(examples):
        jm_result_a = jm.analysis(example.text_a)
        tokens_a = tokenizer.tokenize(" ".join([m.midasi for m in jm_result_a.mrph_list()]))
        # tokens_a = tokenizer.tokenize(example.text_a)

        tokens_b = None
        if example.text_b:
            jm_result_b = jm.analysis(example.text_b)
            tokens_b = tokenizer.tokenize(" ".join([m.midasi for m in jm_result_b.mrph_list()]))
            # tokens_b = tokenizer.tokenize(example.text_b)
入力するテキストの準備
改行区切りのテキストファイルを準備します。
サッカーがしたいな
シュート上手ですね
オムライスが好き
いちご美味しい
今日は良い天気だ!
昨日は雨だった
実行してみる
extract_features.py の引数
今回使用するものだけ
| 引数名 | 説明 |
|---|---|
| input_file | 改行区切りのtxtファイル |
| output_file | 出力ファイル名(json) |
| bert_model |
pytorch_model.bin, bert_config.json, vocab.txtへのpath |
| layers | 何層目の隠れ層から抽出するか(defaule: -1,-2,-3,-4) |
| do_lawer_case | tokenを小文字化する |
google-research/bertのextract_features.pyから少しだけ変わっている
実行
python extract_features.py \
--input_file=input.txt \
--output_file=output.json \
--bert_model=/path/to/your/Japanese_L-12_H-768_A-12_E-30_BPE/ \
--layers -2
--do_lawer_case のオプションはつけることでTrueとなります。Falseにしたいので書いていません。
隠れ層は最後から2つ目を指定しています。(12 or 24中の)
なんで2つ目なんだろう...↓
Why not the last hidden layer? Why second-to-last?
The last layer is too closed to the target functions (i.e. masked language model and next sentence prediction) during pre-training, therefore may be biased to those targets. If you question about this argument and want to use the last hidden layer anyway, please feel free to set pooling_layer=-1.
bert-as-serviseのよくある質問より
出力されるjsonファイル
output.json{ "linex_index": 入力された文章が何行目のものか(0ベース), "features": [ { "token": 対応するトークン, "layers": [ { "index": レイヤーの番号, "values": 対応する表現ベクトル } ] } ] }
出力結果の可視化
768次元あるベクトルを人がみて理解するのは難しいと思うので、
次元削減を行い、なんとなく見える形にしていきます。
今回はEmbedding Projectorというサイトを使い、
PCA(主成分分析)を行って、データを2次元で表示してみます。
tsvファイルへ書き出し
tsvファイルでのロードを要求されるため、
jsonファイルから必要なトークンのベクトルのみをtsvファイルに書き出していきます。
import json
import csv

TARGET_LAYER = -2
TARGET_TOKEN = '[CLS]'

input_file = open('./output.json', 'r')
output_tsv = open('./output.tsv', 'w')
tsv_writer = csv.writer(output_tsv, delimiter="\t")

for line in input_file:
    json_dict = json.loads(line)
    for feature in json_dict['features']:
        if feature['token'] != TARGET_TOKEN:
            continue
        for layer in feature['layers']:
            if layer['index'] == TARGET_LAYER:
                tsv_writer.writerow(layer['values'])


input_file.close()
output_tsv.close()
読み込み!
ベクトルのファイル: output.tsv
metadata: input_txt(文章を改行区切りしたもの)
でロードさせると結果が表示されると思います。
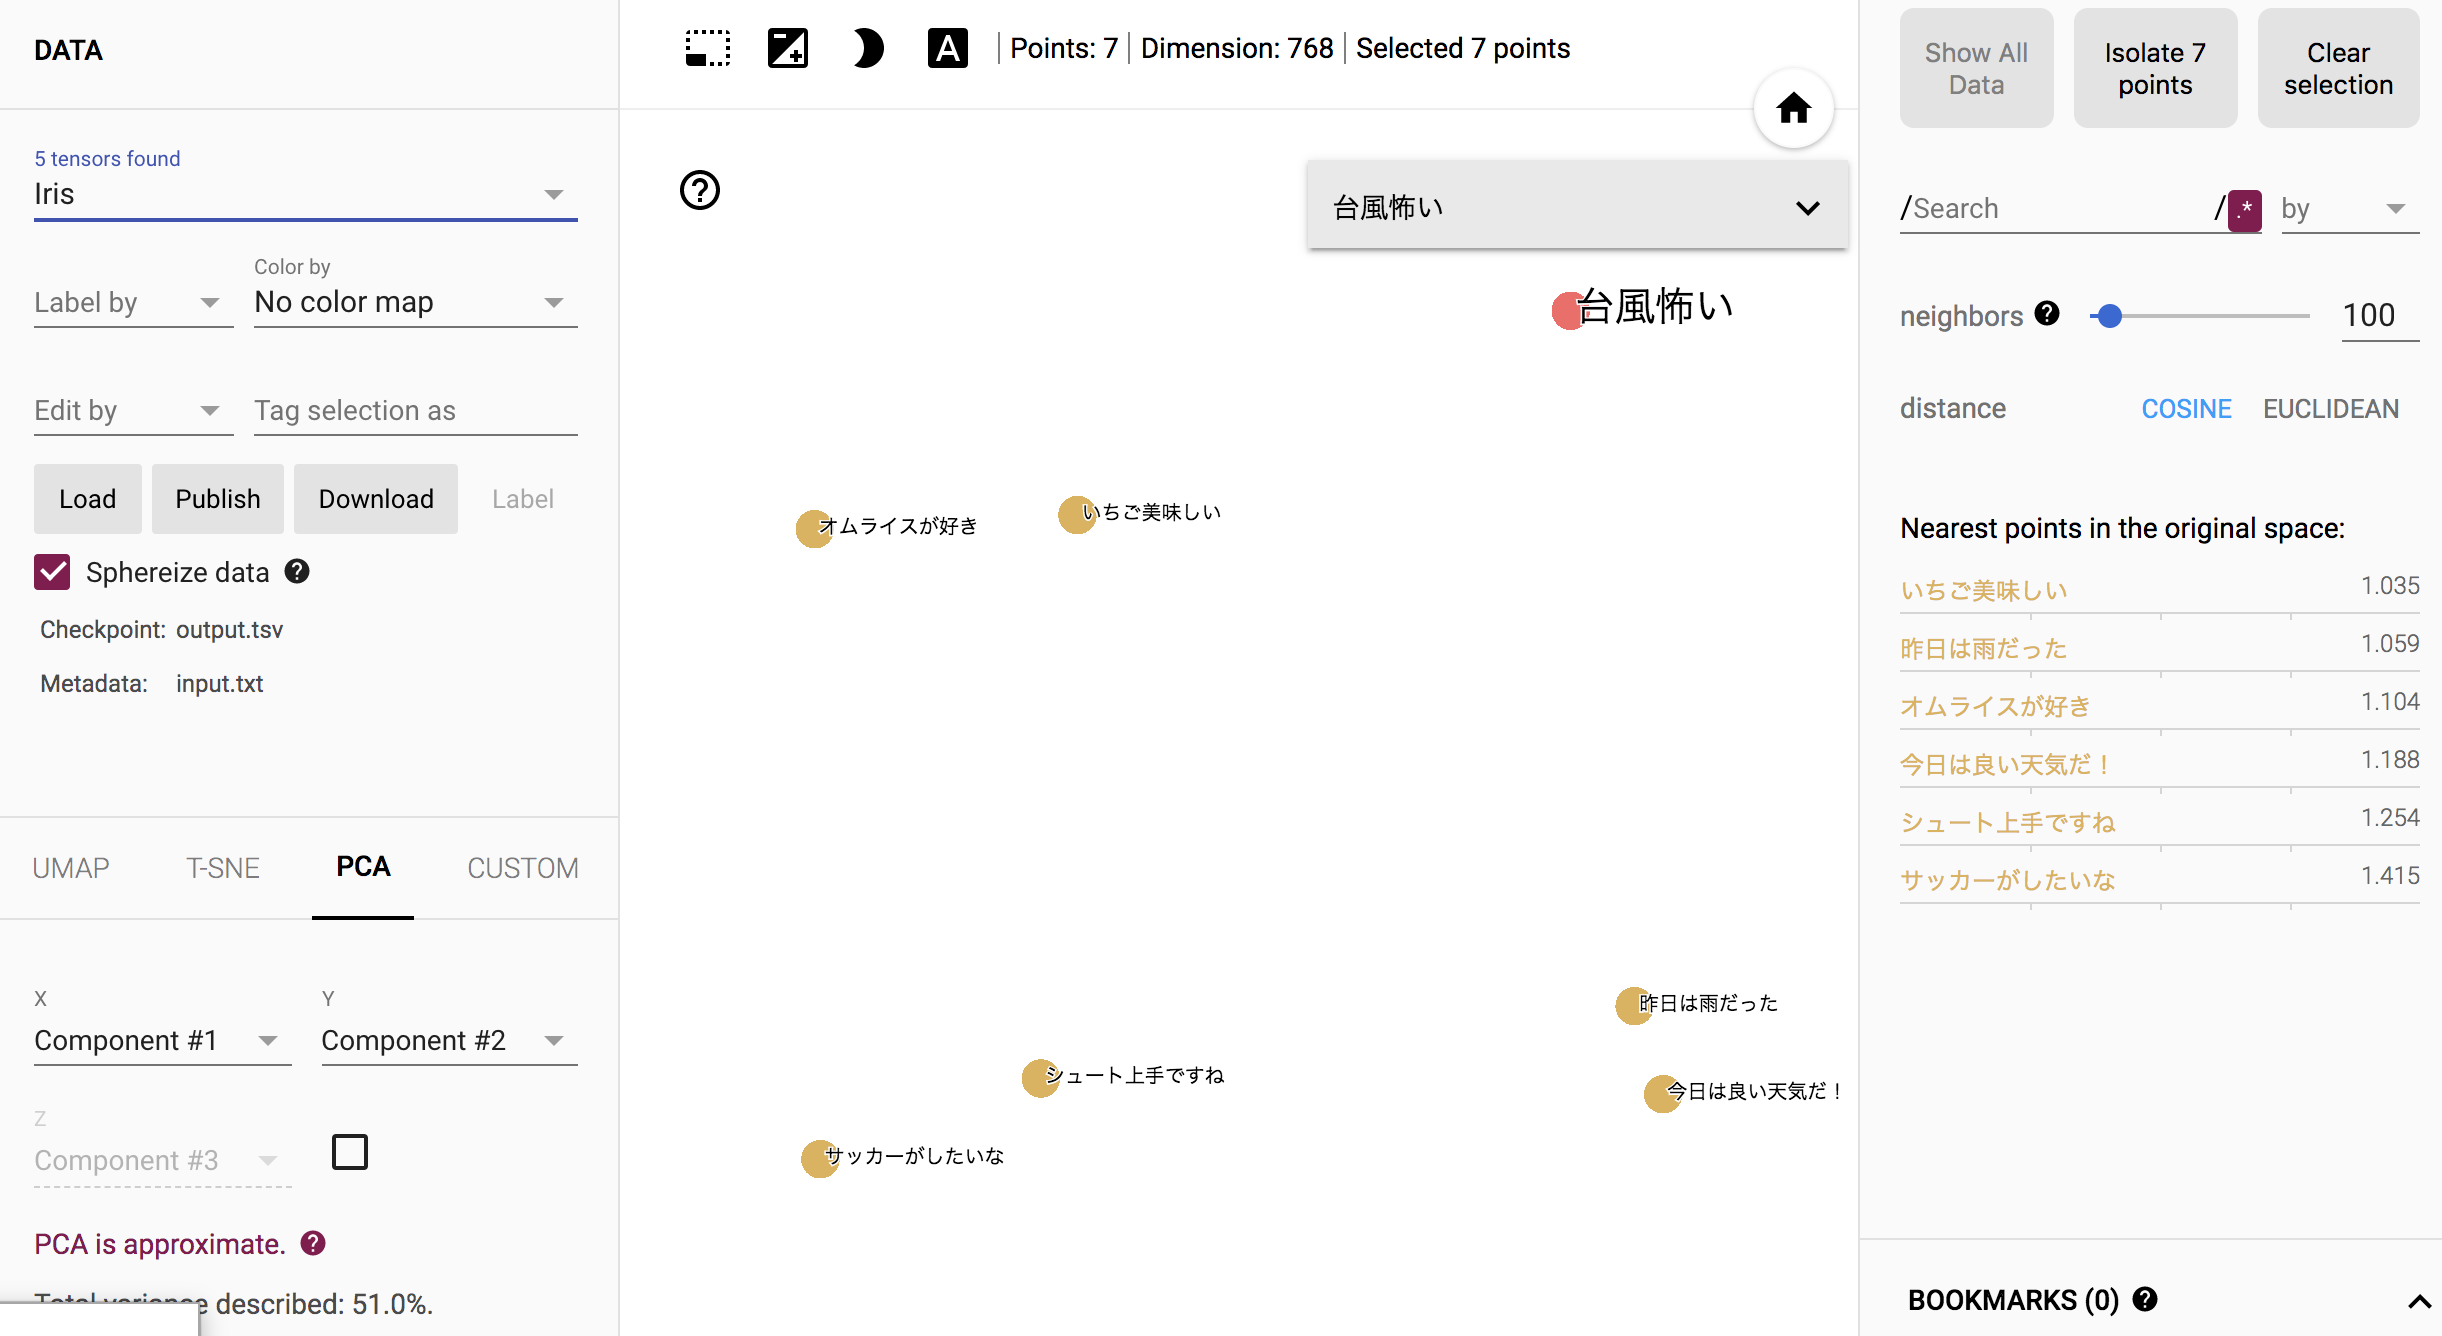
人だったらこうやって分類するな、という感じになっている気がします。
最後に
BERTが何なのか深く理解はできていませんが、
とりあえず環境構築から出力をだすところまで出来ました(T_T)!
間違っているところや、もっとこうしたほうが良いよ!みたいなことがあれば
ご指摘いただけると幸いです。