Elastic Beanstalk の監視に関する以下2点について解説します。
- デフォルトのメトリクス以外の監視指標の追加方法
- しきい値設定し、超えた場合にSNSにアラートを飛ばす方法
前提条件
- プラットフォーム:Node.js 12 running on 64bit Amazon Linux 2
※Amazon Linux2ですが、古いAmazon Linuxでも設定方法は同じです。
Beanstalkにおける監視
Elastic Beanstalkではアプリケーションをデプロイするだけでコンソールなどからデフォルトでいくつかの情報を得られます。
- インスタンス数
- CPU使用率
- ネットワークトラフィック量 など
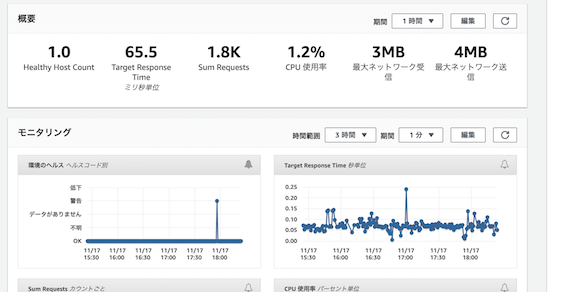
ただし、メモリ使用率やディスク使用量のデータはデフォルト状態では取得できません。。。
これらを取得するには、.ebextensionsを利用した設定が必要になります。
デフォルト以外の指標を監視する
メモリ使用率の取得
- 公式ドキュメントに設定方法が記載されています。またはAWSの公式サンプルとしてgithubでも公開されています。
- ドキュメントにある設定をそのままコピーして.ebextensions/cloudwatch.configとして作成(名前はxxx.configならOK)
.ebextensions/cloudwatch.config
packages:
  yum:
    perl-DateTime: []
    perl-Sys-Syslog: []
    perl-LWP-Protocol-https: []
    perl-Switch: []
    perl-URI: []
    perl-Bundle-LWP: []

sources:
  /opt/cloudwatch: https://aws-cloudwatch.s3.amazonaws.com/downloads/CloudWatchMonitoringScripts-1.2.1.zip

container_commands:
  01-setupcron:
    command: |
      echo '*/5 * * * * root perl /opt/cloudwatch/aws-scripts-mon/mon-put-instance-data.pl `{"Fn::GetOptionSetting" : { "OptionName" : "CloudWatchMetrics", "DefaultValue" : "--mem-util --disk-space-util --disk-path=/" }}` >> /var/log/cwpump.log 2>&1' > /etc/cron.d/cwpump
  02-changeperm:
    command: chmod 644 /etc/cron.d/cwpump
  03-changeperm:
    command: chmod u+x /opt/cloudwatch/aws-scripts-mon/mon-put-instance-data.pl

option_settings:
  "aws:autoscaling:launchconfiguration" :
    IamInstanceProfile : "aws-elasticbeanstalk-ec2-role"
  "aws:elasticbeanstalk:customoption" :
    CloudWatchMetrics : "--mem-util --mem-used --mem-avail --disk-space-util --disk-space-used --disk-space-avail --disk-path=/ --auto-scaling"
- この設定を追加した状態でデプロイすると、モニタリングのコンソールで以下のような項目が新たに選べるようになります。
- Memory Utilization(メモリ使用率)
- Memory Available(メモリ残量)
- Memory Used(メモリ使用量)

※2021年6月14日追記
そのままコピーすると現在perl-Digest-SHAのインストールでエラーが出ます。解決策としてはこちらのイシューの通り、perl-Digest-SHA.x86_64を指定することです。
SNSにアラートを飛ばす
- しきい値を設定し、超えた場合にSNSにアラートを飛ばすには、こちらも.ebextensionsに設定ファイルを追加します。
- 書式はyamlで、実態としてはCloudFormationの設定ファイルです。そのため、各設定項目の詳細はCloudformationのドキュメントで参照できます。
- 以下はCPU使用率が50%以上になった場合にSNSにアラートを飛ばす設定例です。
.ebextensions/create_alarm.config
Resources:
  CPUAlarm:
    Type: AWS::CloudWatch::Alarm
    Properties:
      AlarmActions:
      - arn:aws:sns:ap-northeast-1:xxxxxxxxx:xxxxxxxxxxx
      MetricName: CPUUtilization
      ComparisonOperator: GreaterThanOrEqualToThreshold
      AlarmDescription: { "Fn::Join" : ["", [{ "Ref" : "AWSEBEnvironmentName" }, "-CPU-utilization-alarm." ]]}
      Statistic: Average
      Period: 60
      Dimensions:
      - Value:
          Ref: AWSEBAutoScalingGroup
        Name: AutoScalingGroupName
      EvaluationPeriods: 1
      InsufficientDataActions: []
      Namespace: AWS/EC2
      OKActions:
      - arn:aws:sns:ap-northeast-1:xxxxxxxxx:xxxxxxxxxxxxx
      Threshold: 50
アラームの設定ファイルを簡単に作成する方法
-
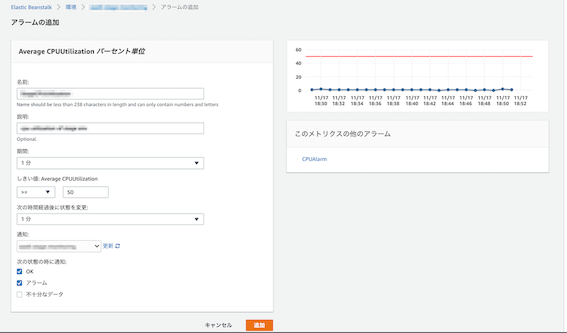
CloudFormationの設定ファイルを一から作成するのは大変ですが、一度テスト環境などでBeanstalkの画面からアラームを設定し、EB CLIのconfig saveオプションを使うと現在の環境の設定をファイル出力できます。
-
アラームをコンソールから設定
-
設定をコマンドで出力
eb config save
出力されたファイルのアラーム設定の部分をコピーし、.ebextensions/xxx.configとして追加すればOKです。