はじめに
ハンズオンをしていた際に「毎回作成するのがめんどくさいリソースをterraformでコード化して、要らなくなったらすぐ壊せるようにしよう」と思ったのでコードを作成しました。その際、方々から情報を集めて整理したので、terraformでAWSリソースを構成する際の情報になればと思って記事を書きました。
この記事で最終的には、簡単なALB-EC2環境を構築したいと思ったときに、手早く構築して、手早くサヨナラすることが出来るようになります。
対象者
- terraform初学者
- IaCで環境を構築したいと考えている方
- ハンズオンで楽したいと思っている方
作成するシステム構成
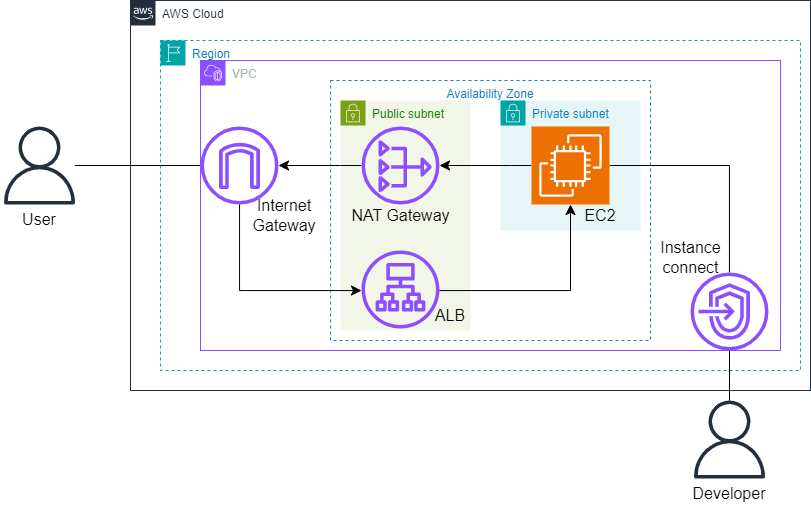
システムの構成はこのようになっています。
EC2への接続はEC2-Instance-Connectを経由しています。

VPC
VPCを構成するコードはこちらになります。長いので区切って記載しています。
VPCのリージョンは東京リージョンを選択したものとしています。
1. VPC, Subnet
最初にVPC, サブネット情報を記述していきます。
ALBを構成する際サブネットは必ず複数必要となります。しかし、今回の構成では楽するために1AZ-1subnetとしているため、ダミーのパブリックサブネットを1つデプロイして回避します。
# -------------------------------------------------------
# vpc
resource "aws_vpc" "test_vpc" {
  cidr_block           = "10.0.0.0/20"
  enable_dns_hostnames = true
  tags = {
    Name = "${var.product_name}-vpc"
  }
}

# -------------------------------------------------------
# subnet
resource "aws_subnet" "test_public_subnet1a" {
  vpc_id            = aws_vpc.test_vpc.id
  cidr_block        = "10.0.1.0/24"
  availability_zone = "ap-northeast-1a"
  tags = {
    Name = "${var.product_name}-public_subnet1a"
  }
}


resource "aws_subnet" "test_private_subnet1a" {
  vpc_id            = aws_vpc.test_vpc.id
  cidr_block        = "10.0.3.0/24"
  availability_zone = "ap-northeast-1a"
  tags = {
    Name = "${var.product_name}-private_subnet1a"
  }
}

# dummy-subnet
resource "aws_subnet" "dummy_public_subnet1c" {
  vpc_id            = aws_vpc.test_vpc.id
  cidr_block        = "10.0.2.0/24"
  availability_zone = "ap-northeast-1c"
  tags = {
    Name = "${var.product_name}-public_subnet1c"
  }
}
2. Gateway
次にインターネットゲートウェイとNATゲートウェイのコードです。ダミーサブネットはNATゲートウェイをデプロイする必要はありません。
# -------------------------------------------------------
# Inernet_Gateway
resource "aws_internet_gateway" "test_igw" {
  vpc_id = aws_vpc.test_vpc.id
  tags = {
    Name = "${var.product_name}-igw"
  }
}

# -------------------------------------------------------
# Nat_Gateway
resource "aws_eip" "test_eip_1a" {
  domain = "vpc"
  tags = {
    Name = "${var.product_name}-eip-nat1a"
  }
}

resource "aws_nat_gateway" "test_nat_1a" {
  subnet_id     = aws_subnet.test_public_subnet1a.id
  allocation_id = aws_eip.test_eip_1a.id

  tags = {
    Name = "${var.product_name}-nat-1a"
  }
}
3. その他コンポーネント
以下はVPC内の残りのコンポーネントであるルートテーブル(パブリック・プライベート), EC2インスタンスコネクトのコードです。ダミーのサブネットに対してもルートテーブルを紐づけることを忘れないようにする必要があります。AWSアカウント当たりのインスタンスコネクトの数には限りがあるので注意しましょう。
# -------------------------------------------------------
# Route_Table(public)
resource "aws_route_table" "test_public_rtb" {
  vpc_id = aws_vpc.test_vpc.id
  tags = {
    Name = "${var.product_name}-public-rt"
  }
}

resource "aws_route" "test_public_rtb" {
  route_table_id         = aws_route_table.test_public_rtb.id
  gateway_id             = aws_internet_gateway.test_igw.id
  destination_cidr_block = "0.0.0.0/0"
}

resource "aws_route_table_association" "test_public_rtb_1a" {
  route_table_id = aws_route_table.test_public_rtb.id
  subnet_id      = aws_subnet.test_public_subnet1a.id
}

# dummy-subnet
resource "aws_route_table_association" "dummy_public_rtb_1c" {
  route_table_id = aws_route_table.test_public_rtb.id
  subnet_id      = aws_subnet.dummy_public_subnet1c.id
}

# -------------------------------------------------------
# Route_Table(private)
resource "aws_route_table" "test_private_rtb_1a" {
  vpc_id = aws_vpc.test_vpc.id
  tags = {
    Name = "${var.product_name}-private-1a_rt"
  }
}

resource "aws_route" "test_private_rtb_1a" {
  route_table_id         = aws_route_table.test_private_rtb_1a.id
  nat_gateway_id         = aws_nat_gateway.test_nat_1a.id
  destination_cidr_block = "0.0.0.0/0"
}

resource "aws_route_table_association" "test_private_rtb_1a" {
  route_table_id = aws_route_table.test_private_rtb_1a.id
  subnet_id      = aws_subnet.test_private_subnet1a.id
}

# -------------------------------------------------------
# ec2_instance_connect_endpoint
resource "aws_ec2_instance_connect_endpoint" "test_eic" {
  subnet_id          = aws_subnet.test_private_subnet1a.id
  security_group_ids = [aws_security_group.test_sg_eic.id]
  preserve_client_ip = true
  tags = {
    Name = "${var.product_name}-eic"
  }
}
Security Group
セキュリティグループを宣言するコードはこちらになります。
EC2はエンドポイントとALBの各セキュリティグループからのインバウンド通信を許可しています。
インスタンスコネクトは東京リージョンからのSSHインバウンド通信と全てのSSHアウトバウンド通信を許可しています。3.112.23.0/29は東京リージョンのipv4アドレスです。各リージョンのipアドレスは公式ドキュメントにまとめられているのでそちらを参照してください。
ALBはインバウンドのHTTP通信とすべてのアウトバウンド通信を許可しています。
各リージョンのIPアドレス:https://docs.aws.amazon.com/ja_jp/vpc/latest/userguide/aws-ip-ranges.html
# -------------------------------------------------------
# security_group(ec2)
resource "aws_security_group" "test_sg_ec2" {
  name        = "${var.product_name}-sg-ec2"
  description = "Security group for ec2 sevcer"
  vpc_id      = aws_vpc.test_vpc.id


  # inbound
  ingress {
    description     = "SSH"
    from_port       = 22
    to_port         = 22
    protocol        = "tcp"
    security_groups = [aws_security_group.test_sg_eic.id]
  }

  ingress {
    description     = "HTTP"
    from_port       = 80
    to_port         = 80
    protocol        = "tcp"
    security_groups = [aws_security_group.test_sg_alb.id]
  }

  # outbound
  egress {
    from_port   = 0
    to_port     = 0
    protocol    = "-1"
    cidr_blocks = ["0.0.0.0/0"]
  }

  tags = {
    Name = "${var.product_name}-sg-ec2"
  }
}

# -------------------------------------------------------
# security_group(ec2_instance_connect endpoint)
resource "aws_security_group" "test_sg_eic" {
  name        = "${var.product_name}-sg-eic"
  description = "Security group for eic"
  vpc_id      = aws_vpc.test_vpc.id

  # inbound
  ingress {
    description = "SSH"
    from_port   = 22
    to_port     = 22
    protocol    = "tcp"
    cidr_blocks = ["3.112.23.0/29"] # ip-address:ap-northeast-1
  }

  # outbound
  egress {
    description = "SSH"
    from_port   = 22
    to_port     = 22
    protocol    = "tcp"
    cidr_blocks = ["0.0.0.0/0"]
  }

  tags = {
    Name = "${var.product_name}-sg-eic"
  }
}

# -------------------------------------------------------
# security_group(application_load_balancer)
resource "aws_security_group" "test_sg_alb" {
  name        = "${var.product_name}-sg-alb"
  description = "Security group for alb"
  vpc_id      = aws_vpc.test_vpc.id

  # inbound
  ingress {
    description = "HTTP"
    from_port   = 80
    to_port     = 80
    protocol    = "tcp"
    cidr_blocks = ["0.0.0.0/0"]
  }

  # outbound
  egress {
    from_port   = 0
    to_port     = 0
    protocol    = "-1"
    cidr_blocks = ["0.0.0.0/0"]
  }

  tags = {
    Name = "${var.product_name}-sg-alb"
  }
}
EC2
EC2を作成するコードはこちらになります。
AMIは最新のAmazonLinux2023を自動で読み込むようにしています。
今回は接続確認において不精するためにscript.shを組み込んでいますが、設定項目が増えるためあまり推奨されていません。
# -------------------------------------------------------
# ami(latest amazon linux 2023)
data "aws_ssm_parameter" "amzn2_latest_ami" {
  name = "/aws/service/ami-amazon-linux-latest/al2023-ami-kernel-default-x86_64"
}

# -------------------------------------------------------
# ec2
resource "aws_instance" "test_ec2" {
  ami                    = data.aws_ssm_parameter.amzn2_latest_ami.value
  instance_type          = "t2.micro"
  subnet_id              = aws_subnet.test_private_subnet1a.id
  vpc_security_group_ids = [aws_security_group.test_sg_ec2.id]
  user_data              = file("./script.sh")
  tags = {
    Name     = "${var.product_name}-ec2"
    UserName = "${var.name}"
    Deadline = "${local.datetime}"
    Project  = "terraform-handson"
  }
}
user_dataとして読み込むscript.shのコマンド群は以下の内容になっています。スクリプトによってEC2起動時にサーバが起動するようにしています。
#!/bin/bash
dnf -y update
dnf -y install httpd

echo "Hello World" > index.html

mv index.html /var/www/html/

chown apache:apache -R /var/www/html
chown apache:apache -R /var/www/html/index.html

systemctl start httpd
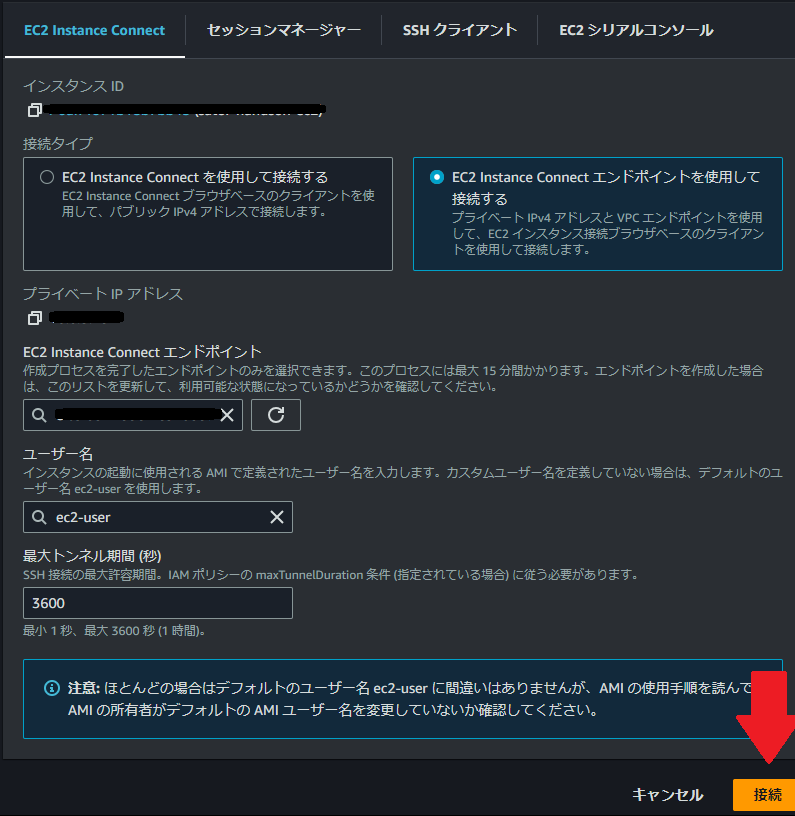
terraformで構築した後の話にはなりますが、EC2-Instance-Connectを経由したアクセス方法について説明します。
最初に、構築されたEC2のコンソールにアクセスして、接続と書かれたボタンを押します。

次に接続画面が表示されるの上のタブから「EC2 Instance Connect」を選択します。選ぶとたくさんの注意書きが表示されると思いますが「EC2 Instance Connect エンドポイントを使用して接続する」を選択すると消えるので気にしないで大丈夫です。選択した後でそのまま接続を押すとコンソール画面が表示されます。

最終的にこちらのコンソール画面が使用中のブラウザで表示されれば、EC2へのアクセスが完了しています。
後は権限とセキュリティの範囲で好きにテストしてみましょう。

Application Load Balancer
最後にALBを構成するコードです。
サブネットは2つ以上必要なので、subnetsの対象にダミーを含む2つのパブリックサブネットを含んでいます。
ヘルスチェックのパスは既にドキュメントルートを含むものであるため、index.htmlのみ指定します。
# -------------------------------------------------------
# alb
resource "aws_lb" "test_alb" {
  name               = "${var.product_name}-alb"
  internal           = false
  load_balancer_type = "application"
  security_groups    = [aws_security_group.test_sg_alb.id]

  # need two az
  subnets = [
    aws_subnet.test_public_subnet1a.id,
    aws_subnet.dummy_public_subnet1c.id
  ]

  ip_address_type = "ipv4"

  tags = {
    Name = "${var.product_name}-alb"
  }
}

resource "aws_lb_target_group" "test_target_group" {
  name             = "${var.product_name}-tg"
  target_type      = "instance"
  protocol_version = "HTTP1"
  port             = 80
  protocol         = "HTTP"
  ip_address_type  = "ipv4"

  vpc_id = aws_vpc.test_vpc.id

  tags = {
    Name = "${var.product_name}-tg"
  }

  health_check {
    interval            = 30
    path                = "/index.html" #/var/www
    port                = "traffic-port"
    protocol            = "HTTP" #"HTTPS"
    timeout             = 5
    healthy_threshold   = 5
    unhealthy_threshold = 2
    matcher             = "200"
  }
}

resource "aws_alb_listener" "test_alb_listener" {
  load_balancer_arn = aws_lb.test_alb.arn
  port              = "80"
  protocol          = "HTTP"
  default_action {
    type             = "forward"
    target_group_arn = aws_lb_target_group.test_target_group.arn
  }
}

# -------------------------------------------------------
# alb - ec2(1a)
resource "aws_alb_target_group_attachment" "test_target_group_attachement_1a" {
  port             = 80
  target_group_arn = aws_lb_target_group.test_target_group.arn
  target_id        = aws_instance.test_ec2.id
}
実行後
terraform applyで上記コードを実行し、ロードバランサーからDNSを参照し、「Hello World」と書かれたページが表示されれば成功です。
最後に
基礎的でシンプルな構成となっていますが、これをベースに様々なサーバ環境が作成できると思います。
最後に、拙い文章をここまで読んでいただき、ありがとうございました。