Vue.jsで外部APIを叩くチュートリアル
Vue.js勉強中の若輩データエンジニアです.
外部APIを実行して表示する方法の備忘録です.
この記事の真似事なので.本家の方にいいね等でのフィードバックをお願いします.
開発環境の準備
参考 ↓↓↓
第一回 Vue.jsでWebアプリをつくろう! | MONSTER DIVE
$ npm install -g vue-cli
$ vue init webpack

Generate project in current directory? → Y
Project name → Enter
Project description → Enter
Author → Enter
Vue build → Runtime-only: about 6KB lighter min+gzip...
Install vue-router? → n
Use ESLint to lint your code? → n
Set up unit tests → n
Setup e2e tests with Nightwatch? → n
Should we run `npm install` for you after the project has been created? → Yes, use npm
axios ----- HTTP通信を実装
今回のアプリのメイン です.
HTTP通信を axios というライブラリで簡単に実装することができます.
ライブラリ インストール
npm i -S axios
システムの概観
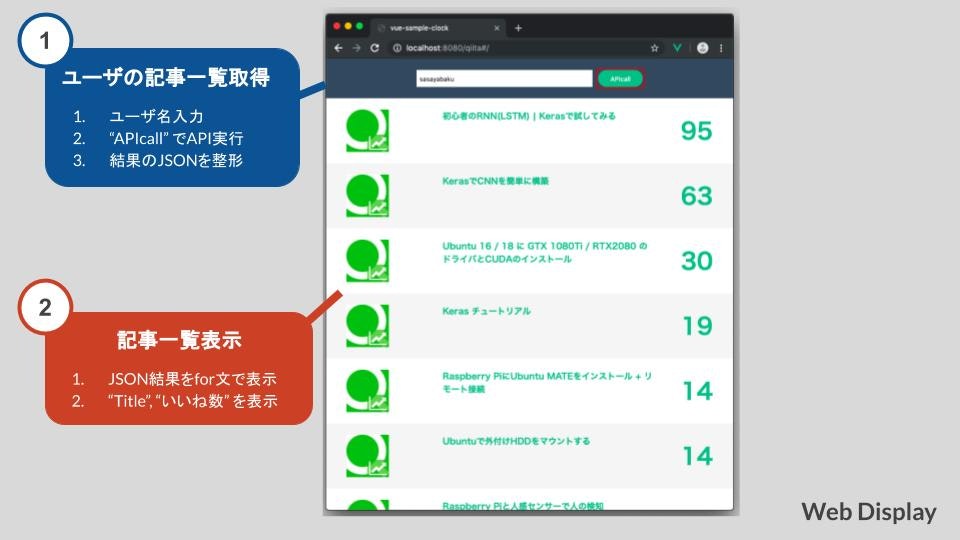
- ユーザの記事一覧取得
- まず,form入力でQiitaユーザを入力する.
- Qiita API で,入力したQiitaユーザの記事一覧APIをaxiosでGETクエストする.
- APIが取得されるまで,Loading画面を表示する
- 親コンポーネントの変数(list型)に,取得したAPI結果を入れる.この時,Loading画面を終了する.
- 記事一覧表示
- 先程,4.で格納したAPIの結果を引用して,v-forを使って,各記事の要素をループで取り出して,記事一覧部分を作成していく.
っとこんな構成で作成します.
ディレクトリ構成
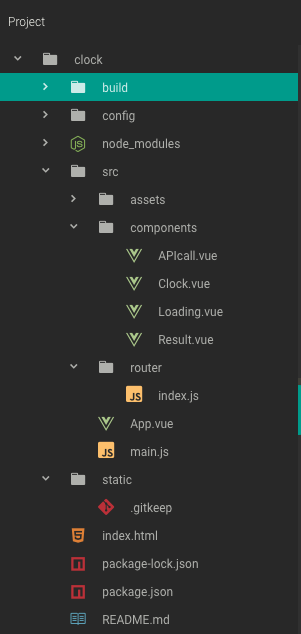
App.vue --- アプリの全体構成をコンポーネント
-
APIcall: APIを呼ぶコンポーネント -
Result: APIの結果を表示するコンポーネント
この2つを定義します.
Template
2つの子コンポーネントを呼び出すことだけ記述.
APIcall
-
@loadStart: APIを実行したときにLoading画面を表示するmethod -
@loadComplete: APIの実行が終了した時にLoading画面を非表示にするmethod
Result
-
:items: APIの結果が格納されたList変数を渡す -
:loadProgress: Loading画面の状態を渡す
<template>
  <div class="root">
    <APIcall class="APIcall" @loadStart="onLoadStart" @loadComplete="onLoadComplete"/>
    <Result :items="items" :loadProgress="loadProgress" /></Result>
  </div>
</template>
Script
アプリに使用する.変数・関数・コンポーネントを定義します.
- Import Part : 各コンポーネントを読み込む宣言
- Data Part : アプリで保持しておくデータを格納する変数を定義
- Method Part : アプリで実行する処理を関数定義
- Component Part : アプリがどのコンポーネントで構成されているかを定義
<script>
// Import Part
import APIcall from '@/components/APIcall';
import Result from '@/components/Result';


export default{

// Data Part
  data() {
    return {
      items: [],
      loadProgress: false,
    };
  },

// Method Part
  methods:{
    onLoadStart(){
      this.loadProgress = true;
    },
    onLoadComplete({ results }) {
      this.items = results;
      this.loadProgress = false;
    },


  },

// Component Part
  components:{
    APIcall,
    Result
  },
}
</script>
Style
<style>
html {
  font-size: 62.5%;
}

body{
  margin: 0;
}

a{
  text-decoration: none;
}

p{
  margin: 0;
}

ul{
  padding: 0;
  margin: 0;
}
</style>
Form作成 ~ API実行
では,早速作ります.
- Qiitaユーザを指定するFormを作成
- それを基に,記事取得APIを実行
APIcall.vue
Template
-
v-model: 親コンポーネント(今回だとApp.vue)と双方向でデータ通信を行う.(inputと,dataの値が同期される)(scriptでquを定義) -
@keyup.enter: Enterキーを押した時のイベントハンドラ -
@click: クリックした時のイベントハンドラ
<template>
  <div class="APIcall_container">
    <input class="text" type="text" v-model="qu" @keyup.enter="exe" />
    <input class="submit" type="submit" value="APIcall" @click="exe" />
  </div>
</template>
Script
今回のキモである.axiosを使ってAPIを実行.
-
async: 非同期処理を簡単に定義するJavaScriptモジュール -
$emit: 任意のタイミングでイベントを発生(今回は,任意のタイミングでloadStartとloadCompleteをイベント実行) -
await: 同期処理を簡単に定義するJavaScriptモジュール(これが処理終了するまで,次の処理に行かない)
axios.getはただ単にGETリクエストの結果を取得してるだけです.ただurl中の${this.qu}で,Formに入力したQiitaユーザ名を取得しています.
<script>
import axios from "axios"

export default {
  data() {
    return {
      qu: "",
    }
  },

  methods:{
    async exe() {
      // $emit >> 任意のタイミングでイベントを発生させる
      this.$emit("loadStart")
      const { data } = await axios.get(`https://qiita.com/api/v2/users/${this.qu}/items?per_page=100`);
      this.$emit("loadComplete", { results: data})
    },
  },
};
</script>
Style
<style scope>
  .APIcall_container{
    display: flex;
    justify-content: center;
    height: 70px;
    padding: 20px;
    background-color: #35495e;
    box-sizing: border-box;
  }

  .text{
    width: 50%;
    max-width: 300px;
    padding: .5em;
    border: none;
  }

  .submit{
    padding: .5em 2em;
    margin-left: 10px;
    color: #fff;
    background-color: #42b883;
    border: none;
    border-radius: 20px;
  }
</style>
Loading画面
API実行部分で記述した.loadStartとloadCompleteに使うLoading画面が実装されていませんので,次はこれを実装します.
Loading.vue
とはいえ,HTMLとCSSで表示画面を作成するだけです.
Template
<template>
  <div>
    <div class="item"></div>
  </div>
</template>
Style
<style scoped>
  .item{
    width: 50px;
    height: 50px;
    position: absolute;
    top: 0;
    right: 0;
    bottom: 0;
    left: 0;
    margin: auto;
    border: 3px solid #42b883;
    border-top-color: transparent;
    border-radius: 50%;
    animation: spin 0.75s infinite linear;
  }

  .item::after{
    content: "";
    position: absolute;
    top: -3px;
    left: -3px;
    width: inherit;
    height: inherit;
    border: inherit;
    border-radius: inherit;
    transform: rotate(60deg);
  }

  @keyframes spin{
    from{
      transform: rotate(0deg);
    }

    to{
      transform: rotate(360deg);
    }
  }
</style>
記事一覧表示
APIで取得した,投稿記事情報をリスト形式で表示します.
-
APIcallで格納した.result(itemsに格納)をv-for構文で,ループして表示処理を記述する. - v-show構文を用いて,Loading画面の表示/非表示を真偽値で制御するように定義
Template
-
HTMLのタグ要素(今回: [ aタグ → href ]) に,Vueのdataの値(
itemsのurl要素)を代入したい場合は,v-bind:<要素名>構文を使う必要があります.
<template>
  <div>
    <ul class="list">
      <li class="item" v-for="item of sortedItemsByLikes" :key="item.title">
        <a v-bind:href="item.url">
          <div class="item-inner">
            <div class="photo">
              <img class="photo-img" src="https://pbs.twimg.com/profile_images/748042935124492288/knHIR7XC.jpg" alt="item.title" />
            </div>
            <div class="content">
              <p><a class="title" target="_blank">{{ item.title }}</a></p>
            </div>
            <span class="good">{{ item.likes_count }}</span>
          </div>
        </a>
      </li>
    </ul>
    <Loading class="loading" v-show="loadProgress"></Loading>
  </div>
</template>
Script
Result コンポーネントの部分で,読み込み時にLoading画面が表示できるようにしたいので,子コンポーネントとしてLoadingを読み込みます.
今回はAPIの結果をソートするので,computedで,いいね数でソートするsortedItemByLikesを実装しています.
-
props: 親コンポーネントからdataとmethodを取得 -
componentでLoadingを読み込み -
sortedItemByLikes: JavaScriptのsort()にlikes_count(いいね数)でソートするような比較関数を実装 → sortと比較関数の解説
<script>
import Loading from '@/components/Loading';

export default{
  props: ["items", "loadProgress"],
  components: {
    Loading
  },

  computed:{
    sortedItemsByLikes(){
      return this.items.sort((a, b) => {
        return (a.likes_count < b.likes_count) ? 1 : (a.likes_count > b.likes_count) ? -1 : 0;
      })
    }
  }
}
</script>
完成
今回はVue.jsで,
- Formデータの扱い方
- 外部APIの扱い方(GETのみでしたが...)
- Component間のデータの受け渡し方
を使って,Qiitaから指定ユーザの記事一覧を取得してきました.
GitHub
vueJS_training/02_axiosQiita/app at master · sasayabaku/vueJS_training