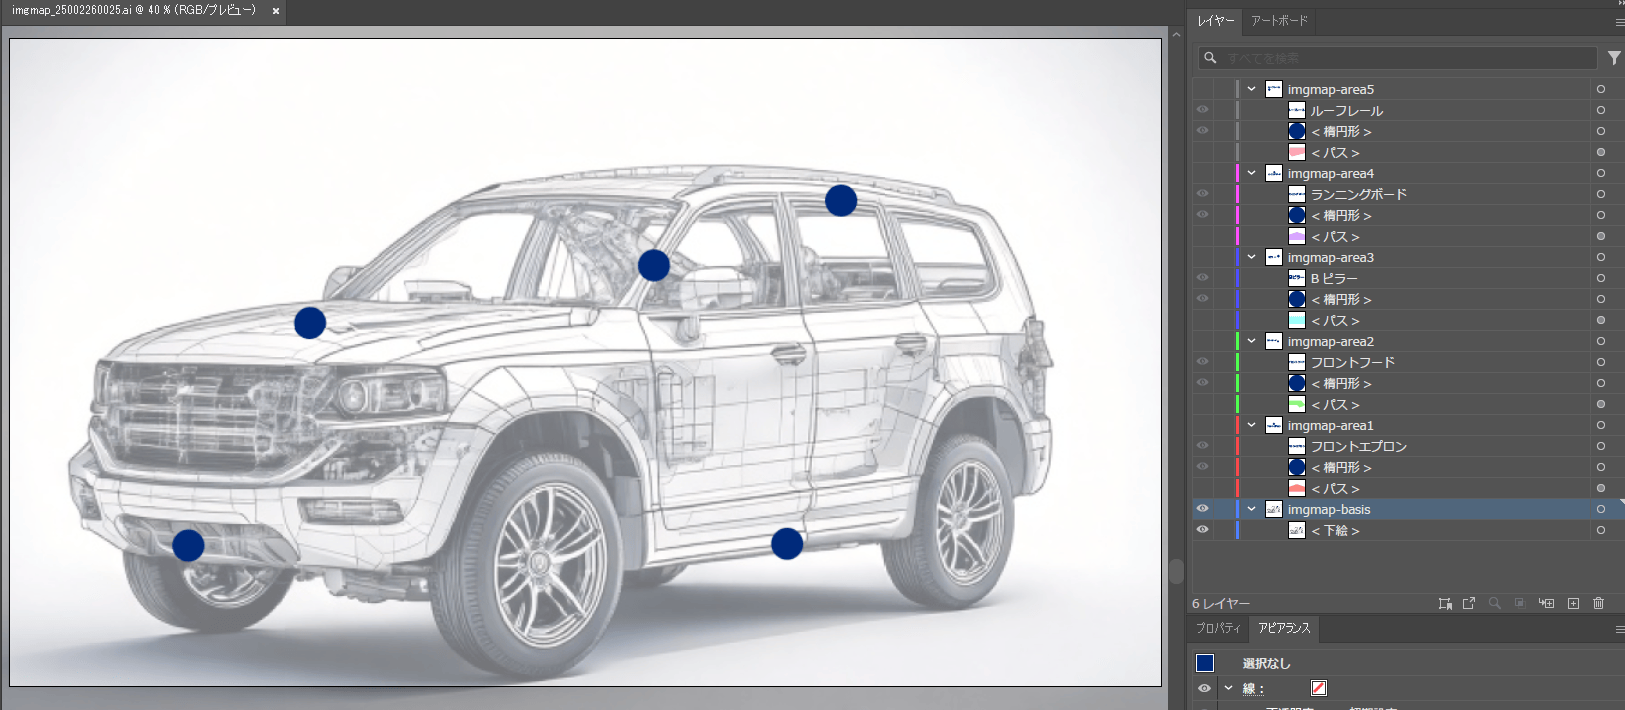
今回はIllustratorを使ってクリッカブルマップを作成する方法をご紹介します。
実際の制作過程で発生しやすい問題とその解決策もあわせて解説します。
以前も記事にしましたが、もう少しわかりやすくまとめ直してみました。
ImageMapとは?
ImageMap(イメージマップ)とは、1枚の画像上に複数のクリック可能な領域(ホットスポット)を設定できるHTML機能です。画像の特定部分をクリックすると、それぞれ異なるリンク先に移動したり、JavaScript機能を実行させたりできます。
Illustratorで作成するメリット
「HTML Imagemap Generator」などのツールと比較すると、Illustratorを使うメリットは次の通りです:
- デザインと一体化した作業が可能
- 修正・調整が容易(やり直しができる)
- レイヤー管理で複雑な構造も整理しやすい
- 位置合わせが正確にできる
- ホバーエフェクト用の画像も同時に作成可能
実際の作業手順
1. アートボードの設定
重要: アートボードのサイズは最終表示サイズに合わせて設定しましょう。800px×600pxのような標準的なサイズがおすすめです。あまりに大きいサイズ(1920px×1080pxなど)で作成すると、生成されるImageMapの座標と表示される画像のサイズが合わなくなる問題が発生します。
2. 下絵の準備
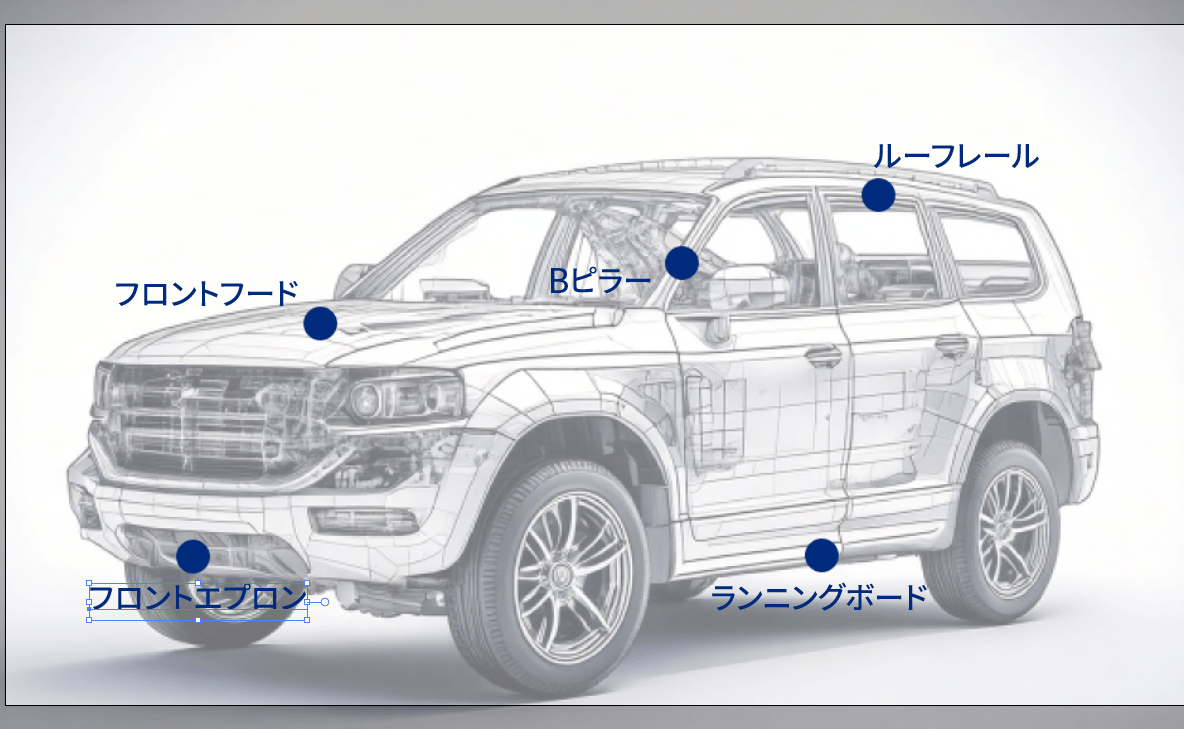
クリッカブルマップのベースとなる画像を配置します。今回は自動車の図面を使用します。
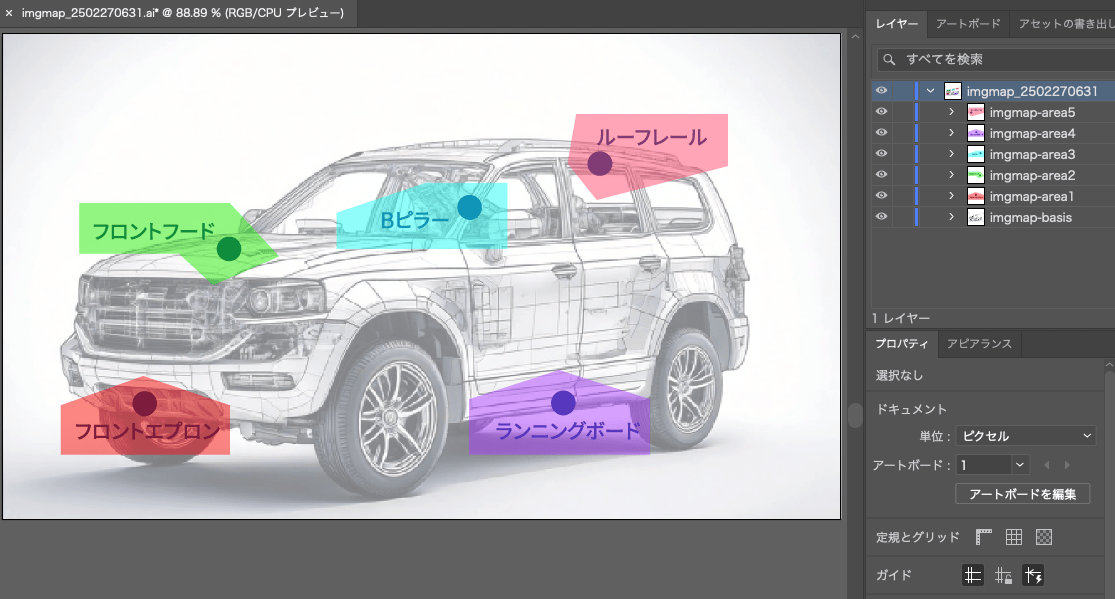
重要なポイントとして、下絵のレイヤー名を「imgmap-basis」に変更しておきます。この名前は後の変換処理で重要になります。
3. クリック領域の作成
各クリック可能にしたい部分に新しいレイヤーを作成します。
重要なポイント:
- 各領域のレイヤー名は「imgmap-area1」「imgmap-area2」のように連番で命名
- 形状はポリゴン(多角形)で作成する - 矩形(長方形)ツールで作成すると変換時に問題が発生することがあります
- 長方形が必要な場合は、ペンツールで4点以上の閉じたパスとして描画しましょう
- 視認性のために半透明カラーで塗りを設定
今回の例では、フロントフード、Bピラー、ルーフレール、フロントエプロン、ランニングボードの5つの領域を作成しました。
4. SVGファイルの書き出し
作成したIllustratorデータをSVG形式で書き出します。
- ファイル > 書き出し > 書き出し形式を選択
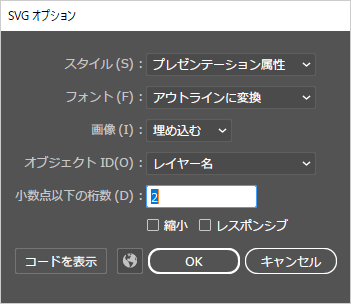
- SVG形式を選び、以下の設定に注意します:
- スタイル:プレゼンテーション属性
- フォント:アウトラインに変換
- 画像:埋め込む
- オブジェクトID:レイヤー名
- レスポンシブのチェックは外す
これらの設定はSVGの構造を適切に保つために重要です。
5. SVGをImageMapコードに変換
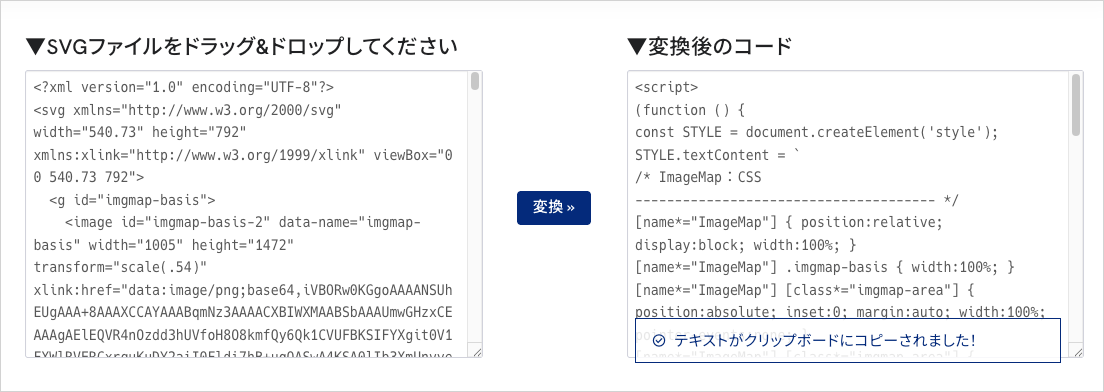
書き出したSVGファイルを専用の変換ツールで変換します。
SVGからImageMap(イメージマップ)に変換ツール
https://code-plus.jp/gp/tools/imagemap-converter/
ソースコード(Gist):
https://gist.github.com/sarap422/e9a1503728dd8fd66ce3a830920a9db7
SVGファイルをドラッグ&ドロップするだけで、自動的にHTMLコードが生成されます。このコードには必要なCSS定義も含まれています。
変換時の問題と対処法:
- 長方形(rect)要素が正しく変換されない問題:すべての形状をポリゴン(5点以上の閉じたパス)として作成する
- 特定の領域が出力されない:レイヤー名が正しく「imgmap-area」で始まっているか確認する
- 座標値がNaNになる:SVG内の座標が正しく認識されているか確認(ポリゴンとして再描画する)
6. ホバーエフェクト用の画像を書き出す
変換されたHTMLコードでは、各領域ごとに画像ファイルが必要です。これらをIllustratorから書き出します。
- ベース画像:「imgmap-basis.png」として保存
- 各領域の画像:「imgmap-area1.png」~「imgmap-area5.png」として保存
7. Webページへの実装
生成されたコードは以下のような構造になっています:
<map name="ImageMap" class="imgmap-container mx-auto" style="width:min(100%,92.5vw);">
  <dl class="imgmap-wrapper">
    <dt class="imgmap-basis">
      <img src="img/imgmap-basis.png" usemap="#ImageMap" alt="" />
    </dt>
    <dd class="imgmap-area1">
      <area shape="poly" coords="..." href="#" alt="" />
      <img src="img/imgmap-area1.png" alt="" />
    </dd>
    <!-- 他の領域も同様 -->
  </dl>
</map><!-- ///#ImageMap -->
これをWebページに配置し、書き出した画像ファイルを適切なフォルダに配置します。
CSSも以下のように自動生成されます:
[name*="ImageMap"] { position:relative; display:block; width:100%; }
[name*="ImageMap"] .imgmap-basis { width:100%; }
[name*="ImageMap"] [class*="imgmap-area"] { position:absolute; inset:0; margin:auto; width:100%; pointer-events:none; }
[name*="ImageMap"] [class*="imgmap-area"] { transition:all 0.5s ease; filter:opacity(100%) contrast(100%) contrast(100%); }
[name*="ImageMap"] [class*="imgmap-area"]:hover { filter:opacity(75%) contrast(108%) contrast(108%); }
このCSSにより、ホバー時にエフェクトが適用されます。
8. CSSのカスタマイズでホバーエフェクトを強化
基本的なCSSは自動生成されますが、より目立つエフェクトを追加することができます:
/* ホバー時に色相を反転させるCSS */
[name*="ImageMapBVJ"] [class*="imgmap-area"] {
	transition: all 0.5s ease;
	filter: hue-rotate(0deg) saturate(100%) saturate(100%) contrast(100%) contrast(100%);
}

[name*="ImageMapBVJ"] [class*="imgmap-area"]:hover {
	filter: hue-rotate(180deg) saturate(200%) saturate(200%) contrast(300%) contrast(300%);
}
トラブルシューティング
問題1: 座標がNaNになる
原因: SVGの座標形式が正しく認識されていない
解決策: すべての形状をポリゴンとして再作成し、5点以上の閉じたパスを使用する
問題2: rect要素が出力されない
原因: 変換ツールが矩形要素を正しく処理できない
解決策: ペンツールを使って4点以上の閉じたパスとして描画する
問題3: 座標とホバー位置がずれる
原因: アートボードが大きすぎる(1920px×1080pxなど)
解決策: 840px×486pxのような中程度のサイズでアートボードを設定し直す
問題4: 画像が表示されない
原因: 画像ファイル名とパスが一致していない
解決策: レイヤー名とファイル名が一致していることを確認(imgmap-area1→imgmap-area1.png)
まとめ
Illustratorを使ったクリッカブルマップの作成は、次のような流れになります:
- 適切なサイズ(800px前後)でアートボードを設定
- 下絵の準備(レイヤー名:imgmap-basis)
- クリック領域をポリゴン(多角形)で作成(レイヤー名:imgmap-area1、imgmap-area2...)
- SVGファイルの書き出し
- 専用ツールでImageMapコードに変換
- ホバーエフェクト用の画像書き出し
- Webページへの実装
- CSSのカスタマイズでエフェクトを強化
この方法ならデザインの変更があっても、Illustratorファイルを修正して再度書き出すだけで対応できます。また、最初からポリゴンとして作成し、適切なサイズのアートボードを使用することで、よくある問題を避けることができます。
