IPFactory Advent Calender 2023 20日目の記事です。
全ての記事はこちら▼
はじめに
この記事に来ていただき、ありがとうございます。
Unityで、よくある挙動の3人称カメラを作りました。
簡単な技の組み合わせですが、必要な時パッと作れるような備忘録みたいな感じで使えればと思います。
..スクリプトが散乱していますが、最終的にまとめたものも載せております。
完成品・目標
動いてる動画リンク貼らなきゃ
- カメラが回転・ズームする
- プレイヤーに追従
- 床や障害物へのめり込みを回避
- プレイヤーがカメラ方向を基準に操作
準備
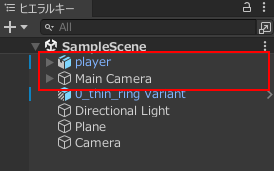
オブジェクトの配置
プレイヤーはRigidbody,CapsuleColliderを適用しています。
入力
入力周りの準備をします
//outside
private float rotation_hor;
private float rotation_ver;
private float distance_base;

//void Start()
    rotation_hor = 0f;
    rotation_ver = 0f;
    distance_base = 5.0f;

//void Update()
    //zoom-scrolling  FixedUpdateだめかも
    distance_base -= Input.mouseScrollDelta.y * 0.5f;
    if (distance_base < 1.0f) distance_base = 1.0f;

//void FixedUpdate()
    //camera rotation
    rotation_hor += Input.GetAxis("Mouse X") * 3;
    rotation_ver -= Input.GetAxis("Mouse Y") * 1.5f;

    //restrict vertical angle to -90 ~ +90
    if ( Mathf.Abs(rotation_ver) > 90 ) rotation_ver = Mathf.Sign(rotation_ver) * 90;
カメラ回転
Quaternion.Euler
Quaternion.Eulerの便利な特徴として、軸を回転する順番があります。
y→x→z ( yaw→pitch→roll )
これをそのままマウス入力と合わせ、カメラの回転に転用します。
//void FixedUpdate()
    //base vector to rotate
    var rotation = Vector3.Normalize( new Vector3(0, 0.2f, -5) ); //base(normalized)
    rotation = rotation * Quaternion.Euler (pitch, yaw, 0) //rotate vector

    //turn self
    transform.rotation= Quaternion.Euler (pitch, yaw, 0); //Quaternion IN!!

    //turn around + zoom
    transform.position= rotation * distance;

    //rotation center to neck-level
    var necklevel = Vector3.up*1.7f;
    transform.positon += necklevel;
カメラ自身の回転は、Quaternionを直接代入しました。
プレイヤの周回では、ベクトルの回転を利用します。
回転用のベースベクトルにQuaternionを掛け、回転させます。
カーソルロック
マウスカーソルの固定も追加しておきます。
Escキーで固定解除可能
//void Start()
    //cursor lock : Esc to exit
    Cursor.visible = false;
    Cursor.lockState = CursorLockMode.Locked;
プレイヤー追従
今回は滑らかな追従にしてみます。
追従させる前に、まずはplayerを設定しましょう。
Playerゲームオブジェクト取得
//outside
public GameObject player;

//void Start()
    player = GameObject.FindWithTag("Player");
Vector3.Lerp
カメラ回転の中心のみ、多少のスムーズさを加えます。
(カメラ自体はこの中心点のみを向くため、プレイヤーがあまり早く動きすぎると追いつかず画面外に飛んでいきます。場合によって変えた方がよさげ)
//void FixedUpdate()
    playertrack = Vector3.Lerp(
        playertrack, player.transform.position, Time.deltaTime * 10);
    transform.position += playertrack;
めり込み回避
Physics.SphereCast
RayCastの球体版。半径を持った太い光線を放つようです。
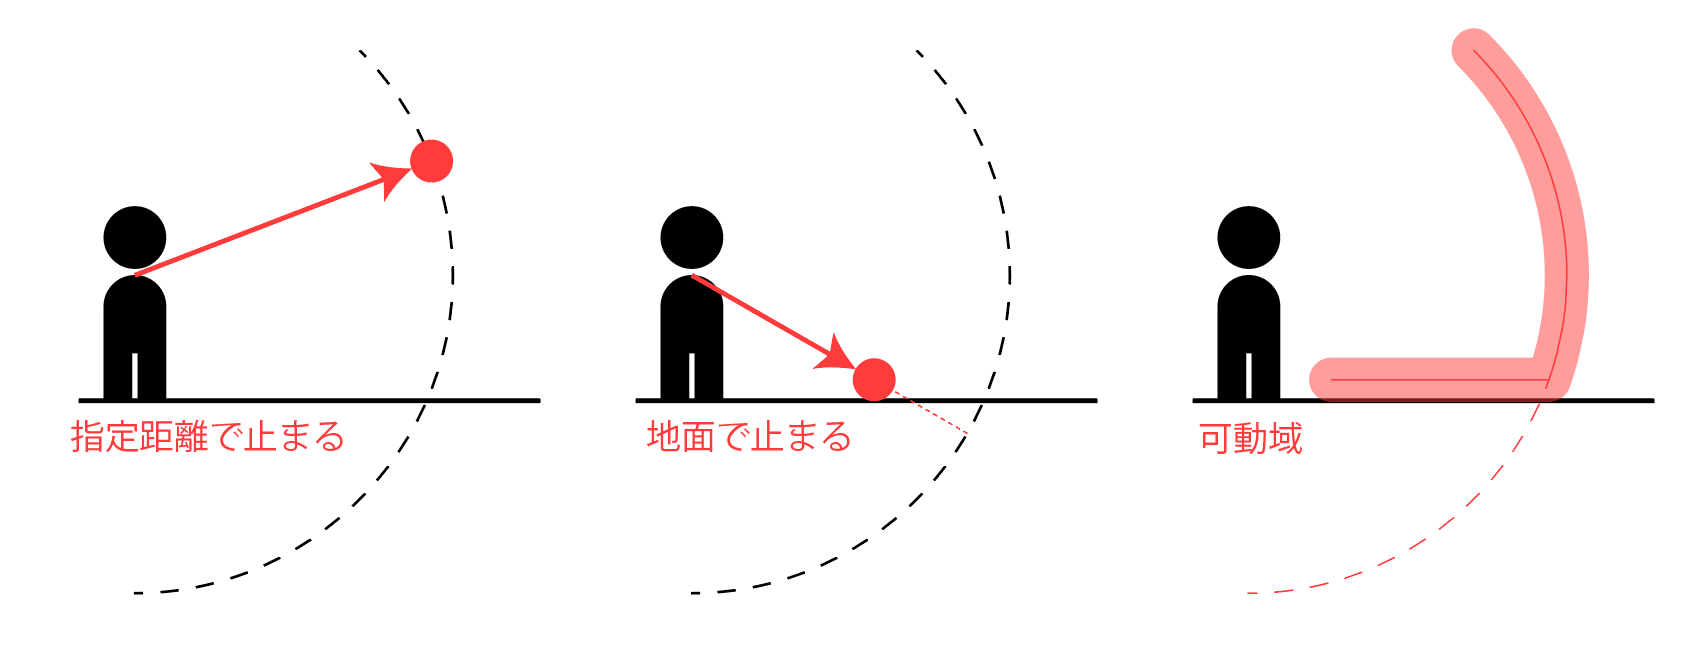
今回は着地点が壁から安全に離すため、こちらを使用します。
(壁ギリギリでカメラを向けると貫通するため)
layermask
そのために、まずはlayermaskの準備をします。
障害物レイヤーを追加し、SphereCastを障害物だけに反応させる設定です。
今回は6層目にFloor_obstacleという名前で設定しました。
床オブジェクトにこのレイヤーを適用します。

レイヤーマスクの設定はこちらのサイトを参考にしました。
スクリプト
layermaskを準備したところで、スクリプトを書いていきます。
//void FixedUpdate()
    RaycastHit hit;
    int layermask = 1 << 6; //1のビットを6レイヤー分(Floor_obstacleがある場所)だけ左シフト
    float distance = distance_base; //copy default(mouseScroll zoom)

    if (Physics.SphereCast(playertrack + Vector3.up * 1.7f, 0.5f,
        rotation, out hit,  distance, layermask))
    {
        distance = hit.distance; //overwrite copy
    }
発射地点はカメラ回転の中心と同じ位置、半径は0.5...と設定していきます。
このコードを、rotationベクトルを定義したところに挿入しました。
カメラの動きを客観的にみると、こんな感じになっているかと思います。
カメラ優先プレイヤー操作
次はプレイヤー側の作成です。
mainCameraゲームオブジェクト
カメラのy軸回転を使うため、GameObjectごと持ってきます。
ついでに都合上Rigidbodyも持ってきています
//outside
public GameObject mainCamera;
private Rigidbody rb;

//void Start()
    mainCamera = GameObject.FindWithTag("MainCamera");
    rb = GetComponent<Rigidbody>();
入力方向を回転させる
//void FixedUpdate()
    //input
    float in_x = Input.GetAxis("Horizontal");
    float in_z = Input.GetAxis("Vertical");
    Vector3 in_dir = new Vector3(in_x,0,in_z); //input_direction

    //斜め入力をしたとき、プレイヤー速度が√2になるのを防ぐ
    if (in_dir.magnitude > 1)in_dir.Normalize();

    //rotate input to camera direction
    in_dir = Quaternion.Euler(0, mainCamera.transform.rotation.eulerAngles.y, 0) * in_dir;

    //移動
    rb.AddForce(in_dir * 50, ForceMode.Force);
移動はRigidbodyに力を加える感じです。
√2の件は、イメージをScratchで作ってみました
プレイヤーの向きを合わせる
プレイヤの向きは私の場合、入力があったときのみ更新するようにしました。
常にカメラと同じ方向を向かれたら、後ろ姿しか見えませんから。
Quaternion.LookRotationを使用しています。
//void FixedUpdate()
        if ( in_dir.magnitude > 0 ) {
            transform.rotation = Quaternion.LookRotation( in_dir );
        }
完成品
最後にこれまでのを組み合わせて...
出来上がったものがこちらになります。
using System.Collections;
using System.Collections.Generic;
using Unity.VisualScripting;
using UnityEngine;

public class TPSCamera : MonoBehaviour
{

    public GameObject player;

    private float rotation_hor;
    private float rotation_ver;
    private float distance_base;
    private Vector3 playertrack;

    // Start is called before the first frame update
    void Start()
    {
        player = GameObject.FindWithTag("Player");

        rotation_hor = 0f;
        rotation_ver = 0f;
        distance_base = 5.0f;
        playertrack = Vector3.zero;

        //cursor lock : Esc to exit
        Cursor.visible = false;
        Cursor.lockState = CursorLockMode.Locked;

    }

    // Update is called once per frame
    void Update()
    {
        //zoom-scrolling  FixedUpdateだめかも
        distance_base -= Input.mouseScrollDelta.y * 0.5f;
        if (distance_base < 1.0f) distance_base = 1.0f;

    }

    void FixedUpdate()
    {
        //camera rotation
        rotation_hor += Input.GetAxis("Mouse X") * 3;
        rotation_ver -= Input.GetAxis("Mouse Y") * 1.5f;

        //restrict vertical angle to -90 ~ +90
        if (Mathf.Abs(rotation_ver) > 90) rotation_ver = Mathf.Sign(rotation_ver) * 90;

        //base vector to rotate
        var rotation = Vector3.Normalize(new Vector3(0, 0.2f, -5)); //base(normalized)
        rotation = Quaternion.Euler(rotation_ver, rotation_hor, 0) * rotation; //rotate vector

        //stop at floor-obstacle layer
        RaycastHit hit;
        int layermask = 1 << 6; //1のビットを6レイヤー分(Floor_obstacleがある場所)だけ左シフト
        float distance = distance_base; //copy default(mouseScroll zoom)

        if (Physics.SphereCast(playertrack + Vector3.up * 1.7f, 0.5f,
        rotation, out hit, distance, layermask))
        {
            distance = hit.distance; //overwrite copy
        }

        //turn self
        transform.rotation = Quaternion.Euler(rotation_ver, rotation_hor, 0); //Quaternion IN!!

        //turn around + zoom
        transform.position = rotation * distance;

        //rotation center to neck-level
        var necklevel = Vector3.up * 1.7f;
        transform.position += necklevel;

        //track
        playertrack = Vector3.Lerp(
            playertrack, player.transform.position, Time.deltaTime * 10);
        transform.position += playertrack;
    }
}
using System.Collections;
using System.Collections.Generic;
using UnityEngine;

public class PlayerCtrl : MonoBehaviour
{

    public GameObject mainCamera;
    private Rigidbody rb;

    // Start is called before the first frame update
    void Start()
    {
        rb = GetComponent<Rigidbody>();
        mainCamera = GameObject.FindWithTag("MainCamera");
    }

    // Update is called once per frame
    void FixedUpdate()
    {
        //input
        float in_x = Input.GetAxis("Horizontal");
        float in_z = Input.GetAxis("Vertical");
        Vector3 in_dir = new Vector3(in_x, 0, in_z); //input_direction

        //斜め入力をしたとき、プレイヤー速度が√2になるのを防ぐ
        if (in_dir.magnitude > 1) in_dir.Normalize();

        //カメラ方向に合わせる
        in_dir = Quaternion.Euler(0, mainCamera.transform.rotation.eulerAngles.y, 0) * in_dir;

        if (in_dir.magnitude > 0)
        {
            transform.rotation = Quaternion.LookRotation(in_dir);
        }

        //移動
        rb.AddForce(in_dir * 50, ForceMode.Force);
    }
}
おわりに・余談
記録は以上になります。
いかがでしたでしょうか。
自分はこの手の記事を書くような経験が皆無だったため、読みづらかったかもしれません。精進します。
今回は比較的簡単な技の組み合わせで、標準的な?カメラを実装することができました。
昔はsinやcosの計算ずくで実装していたのですが、ベクトルを回転させるだけで解決するという発想が衝撃でした。
最後に
記事を読んでいただき、ありがとうございます。

