SSHのTCP転送Channelを使って、
Websocketでクライアントから受信したデータを転送先にTCPで送信し、
転送先から受信したTCPデータをクライアントにWebsocketで送信します。
これにより、Websocket/TCP通信の変換と、SSHによるTunnelingができます。
要するに、以下のようなWebsocketサーバを作ります。
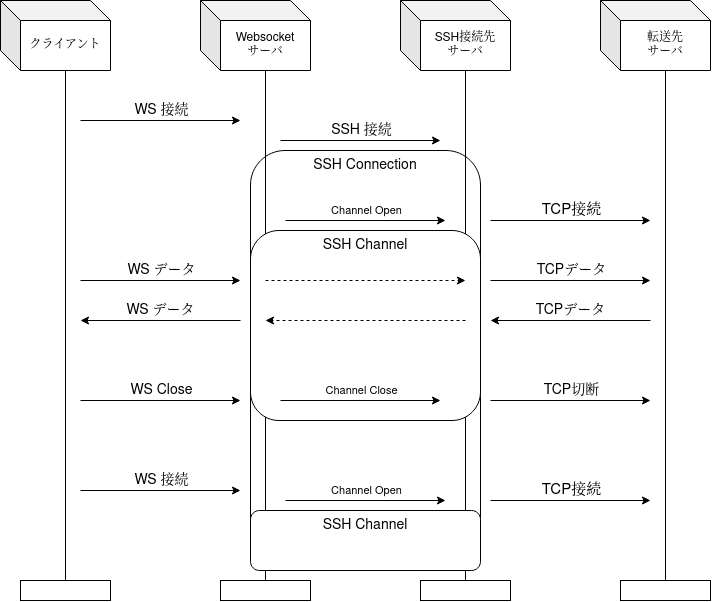
初めにWebsocket接続が開始されると、SSHでサーバへ接続し、さらにTCP転送用ChannelをOpenします。
以降、Websocket通信は転送用Channelを通して、SSH接続先サーバから転送先サーバへのTCP通信に転送されます。
Websocketが切断されたら転送用ChannelをCloseします。(これにより接続先のSSHサーバが転送先へのTCP通信を終了します。)
バージョン
Cowboyは公式通りにerlang.mkを使う方法で導入します。
- Ubuntu 20.04
- Erlang/OTP 22.2
- Cowboy 2.6.3
LOCAL_DEPS = ssh
DEPS = cowboy
dep_cowboy_commit = 2.6.3
DEP_PLUGINS = cowboy
実装
Routing
今回は /<SSH接続先ホスト>/<SSH接続先ポート>/<転送先ホスト>/<転送先ポート>のようなパスに接続することで、SSH接続先と転送先を指定できるようにしています。
        Dispatch = cowboy_router:compile([
            {'_', [{"/:host/:port/:rhost/:rport", ws_handler, []}]}
        ]),
本体
cowboy_websocketModuleでCallbackを実装します。
-module(ws_handler).
-behavior(cowboy_websocket).

-export([init/2]).
-export([websocket_init/1]).
-export([websocket_handle/2]).
-export([websocket_info/2]).
-export([terminate/3]).

-export([recv_loop/2]).

-record(state,{
          channel
}).

%% Reqからbindingを取得する。(/:host/:port/:rhost/:rport)
%% host:port は SSH接続先。
%% rhost:rport は 転送先。
init(Req, _) ->
        Host = binary_to_list(cowboy_req:binding(host, Req)),
        Port = binary_to_integer(cowboy_req:binding(port, Req)),
        RHost = binary_to_list(cowboy_req:binding(rhost, Req)),
        RPort = binary_to_integer(cowboy_req:binding(rport, Req)),
        {ok,Con} = connection_server:connect(connection_server, Host, Port),
        {ok,ChanRef} = direct_tcpip_channel:start(Con, {RHost,RPort}, {"127.0.0.1", 50000}),
        {cowboy_websocket, Req, #state{channel=ChanRef}}.

websocket_init(#state{channel=Chan}=State) ->
        spawn(?MODULE, recv_loop, [Chan,self()]),
        {ok, State}.

%% binaryデータをChannelに転送。
websocket_handle({text, Data}, State) ->
        {ok, State};
websocket_handle({binary, Data}, #state{channel=Chan}=State) ->
        direct_tcpip_channel:send(Chan, Data),
        {ok, State};
websocket_handle(_Frame, State) ->
        {ok, State}.

%% recv_loopから受信したデータをWebsocketで転送。
websocket_info({data, Data}, State) ->
        {reply, {binary, Data}, State};
websocket_info(close, State) ->
        {stop, State};
websocket_info(_Info, State) ->
        {ok, State}.

terminate(_, _, #state{channel=Chan}) ->
        direct_tcpip_channel:close(Chan),
        ok.

%% Channelから受信したデータをwebsocket handlerに送信。
recv_loop(Chan, Pid) ->
        case direct_tcpip_channel:recv(Chan) of
                {ok, Data} ->
                        Pid ! {data, Data},
                        recv_loop(Chan, Pid);
                {error, _} ->
                        Pid ! close
        end.
詳しく記載します。
init/2 - HTTP接続の開始
%% Reqからbindingを取得する。(/:host/:port/:rhost/:rport)
%% host:port は SSH接続先。
%% rhost:rport は 転送先。
init(Req, _) ->
        Host = binary_to_list(cowboy_req:binding(host, Req)),
        Port = binary_to_integer(cowboy_req:binding(port, Req)),
        RHost = binary_to_list(cowboy_req:binding(rhost, Req)),
        RPort = binary_to_integer(cowboy_req:binding(rport, Req)),
        {ok,Con} = connection_server:connect(connection_server, Host, Port),
        {ok,ChanRef} = direct_tcpip_channel:start(Con, {RHost,RPort}, {"127.0.0.1", 50000}),
        {cowboy_websocket, Req, #state{channel=ChanRef}}.
初めに呼び出されるCallback、init/2です。
websocket_から始まるCallbackではReqを扱えないため、ここでBindingからパラメータを取り出します。
その後、以前作ったdirect-tcpip-channelの改版を使い、TCP転送用ChannelをOpenします。
SSHのConnectionをconnection_server:connectで取得していますが、connection_serverはgen_serverで書いたConnectionのキャッシュです。
ついでに認証情報もハードコードしています。
(connection_server実装はページ末尾に添付しました。)
websocket_init/1 - Websocketの開始
websocket_init(#state{channel=Chan}=State) ->
        spawn(?MODULE, recv_loop, [Chan,self()]),
        {ok, State}.

%% Channelから受信したデータをwebsocket handlerに送信。
recv_loop(Chan, Pid) ->
        case direct_tcpip_channel:recv(Chan) of
                {ok, Data} ->
                        Pid ! {data, Data},
                        recv_loop(Chan, Pid);
                {error, _} ->
                        Pid ! close
        end.
Websocket開始時に呼び出されます。
ここでself()により取得したPidにSSH Channelからのデータを送信して、websocket_infoCallbackで処理させます。
データ送受信
%% binaryデータをChannelに転送。
websocket_handle({text, Data}, State) ->
        {ok, State};
websocket_handle({binary, Data}, #state{channel=Chan}=State) ->
        direct_tcpip_channel:send(Chan, Data),
        {ok, State};
websocket_handle(_Frame, State) ->
        {ok, State}.

%% recv_loopから受信したデータをWebsocketで転送。
websocket_info({data, Data}, State) ->
        {reply, {binary, Data}, State};
websocket_info(close, State) ->
        {stop, State};
websocket_info(_Info, State) ->
        {ok, State}.
websocket_handleは{binary, Data}を受信したら、DataをChannelに送ります。
websocket_infoは{binary, Data}を受信したら、DataをbinaryでWebsocketに送ります。
(ちなみに_Frameで全マッチするCallbackはテンプレートから生成したままですが、消すと死活監視メッセージを処理できずクラッシュするようです。)
terminate/3 - Websocket終了
terminate(_, _, #state{channel=Chan}) ->
        direct_tcpip_channel:close(Chan),
        ok.
公式に記載のあるとおり、このCallbackは実装が必須ではありません。
今回はSSH ChannelをCloseする必要があるため実装しています。
使う
noVNCはHTMLベースのVNCクライアントです。
有名なのはwebsockifyと組み合わせる方法で、これはWebsocket通信をTCP通信に変換するものです。
今回はwebsockifyの代わりに、作ったものを組み合わせてみます。
以下の環境を用意します。
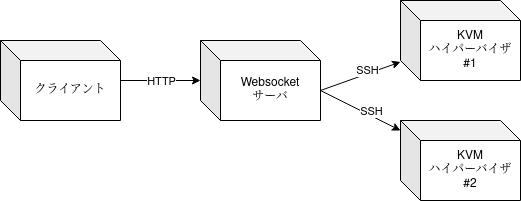
KVMベースのハイパーバイザは、仮想マシンのディスプレイをVNCで利用することができます。
ただこの時、ローカルホストからの接続のみ受け付けていることがあります。
こんな感じです。
testing@kvm-1:~$ sudo lsof -i | grep qemu
qemu-syst 1446    libvirt-qemu   23u  IPv4 171178      0t0  TCP localhost:5900 (LISTEN)
qemu-syst 1587    libvirt-qemu   22u  IPv4 172488      0t0  TCP localhost:5901 (LISTEN)

testing@kvm-1:~$ virsh domdisplay C8-2
vnc://127.0.0.1:0
testing@kvm-1:~$ virsh domdisplay C8
vnc://127.0.0.1:1
こんな時におなじみの接続方法といえばSSHポート転送です。
作業用の端末からハイパーバイザにSSHで接続し、ポート転送設定を行います。
# 例
ssh -L 15901:127.0.0.1:5901 kvm-1
転送された通信はSSH接続先からの通信に見えるため、VNCに接続が可能です。
今回作ったものも同様の仕組みでVNCの接続が可能です。
準備
作るのは図内Websocketサーバです。
Cowboy
まず、今回作ったCowboyサーバをTCPポート8080で動作させます。
        {ok, _} = cowboy:start_clear(my_http_listener,
            [{port, 8080}],
            #{env => #{dispatch => Dispatch}}
        ),
Nginx
次にNginxでnoVNCを提供します。
設定はこれです。
server {
    listen 80;
    server_name 192.168.122.111;

    location /ws/ {
        proxy_http_version 1.1;
        proxy_pass http://127.0.0.1:8080/;
        proxy_set_header Upgrade $http_upgrade;
        proxy_set_header Connection "upgrade";

        proxy_buffering off;
    }

    location /novnc {
        index vnc.html;
        alias /usr/share/novnc/;
    }
}
SSH接続準備
一度ハイパーバイザにSSH接続をしておきます。
(New host ... accept [y/n]?を済ませておく必要があります。)
2> ssh:start().
ok
3> ssh:connect("192.168.122.150", 22, []).
New host 192.168.122.150 accept [y/n]?y
ssh password:
これで準備ができました。
接続
クライアントからhttp://<Websocketサーバ>/novncに接続します。
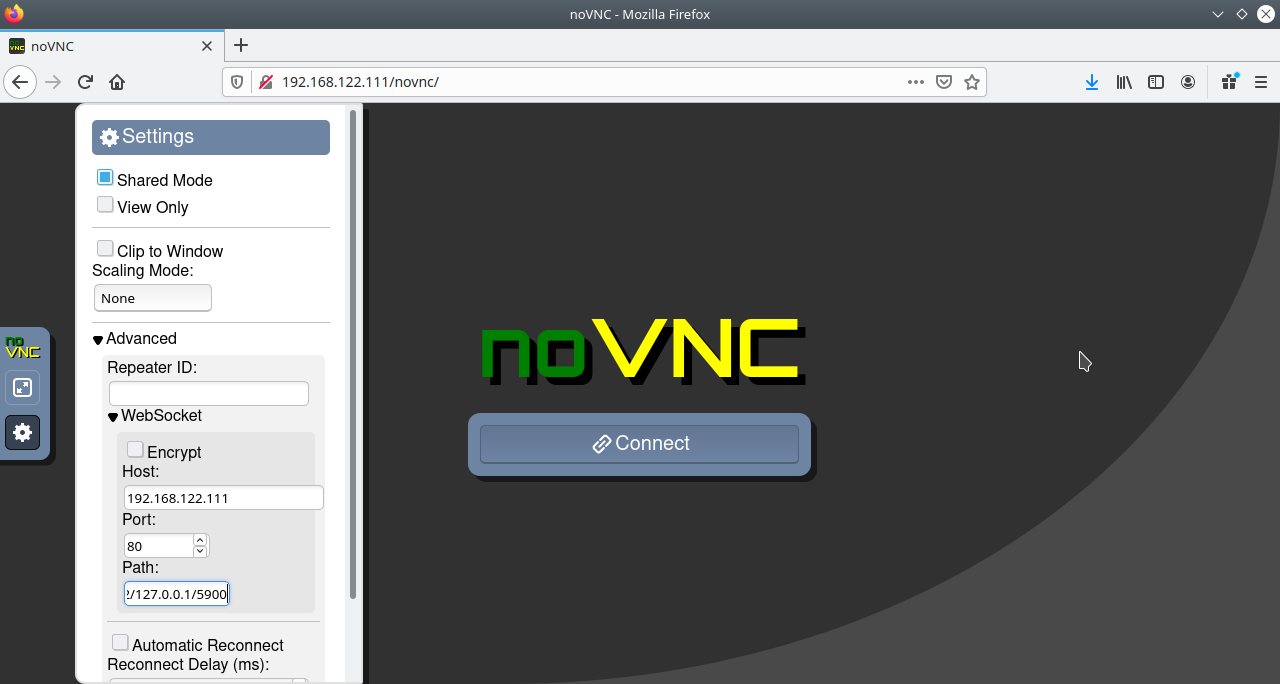
Settings、Advanced、WebSocketで、
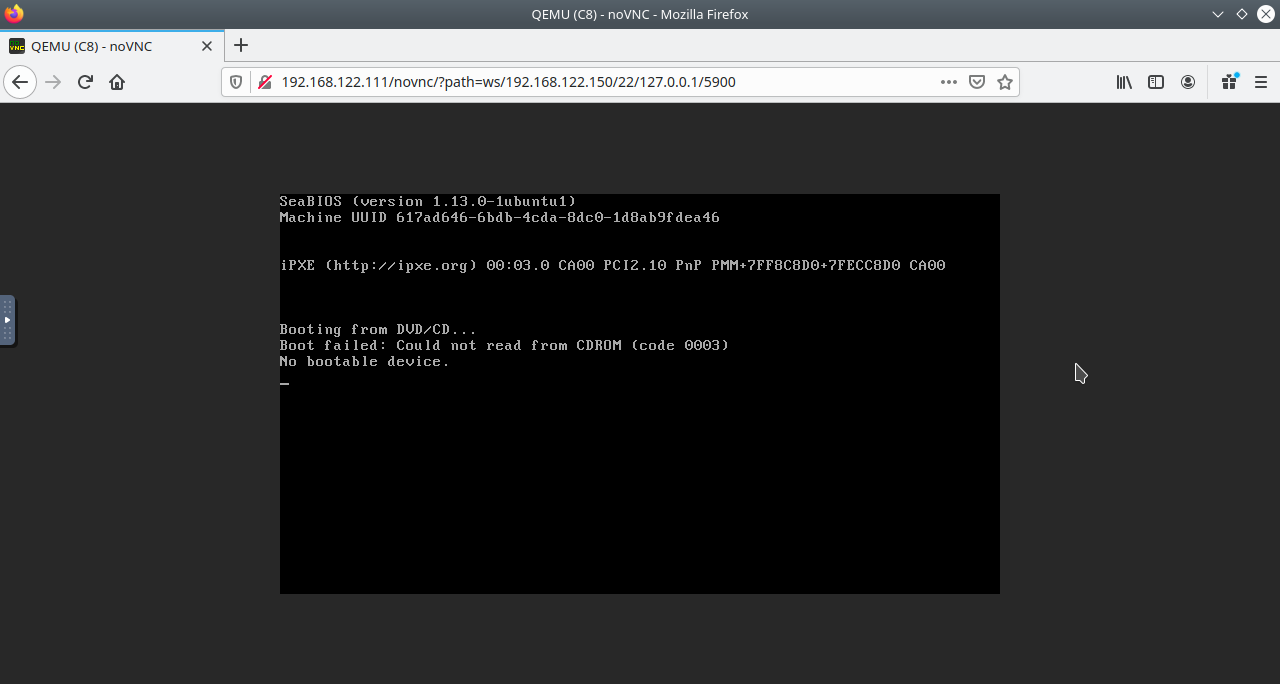
Pathをws/<ハイパーバイザIP>/22/127.0.0.1/<VNCポート>とします。
(例として、ws/192.168.122.150/22/127.0.0.1/5900)
Connectを押します。
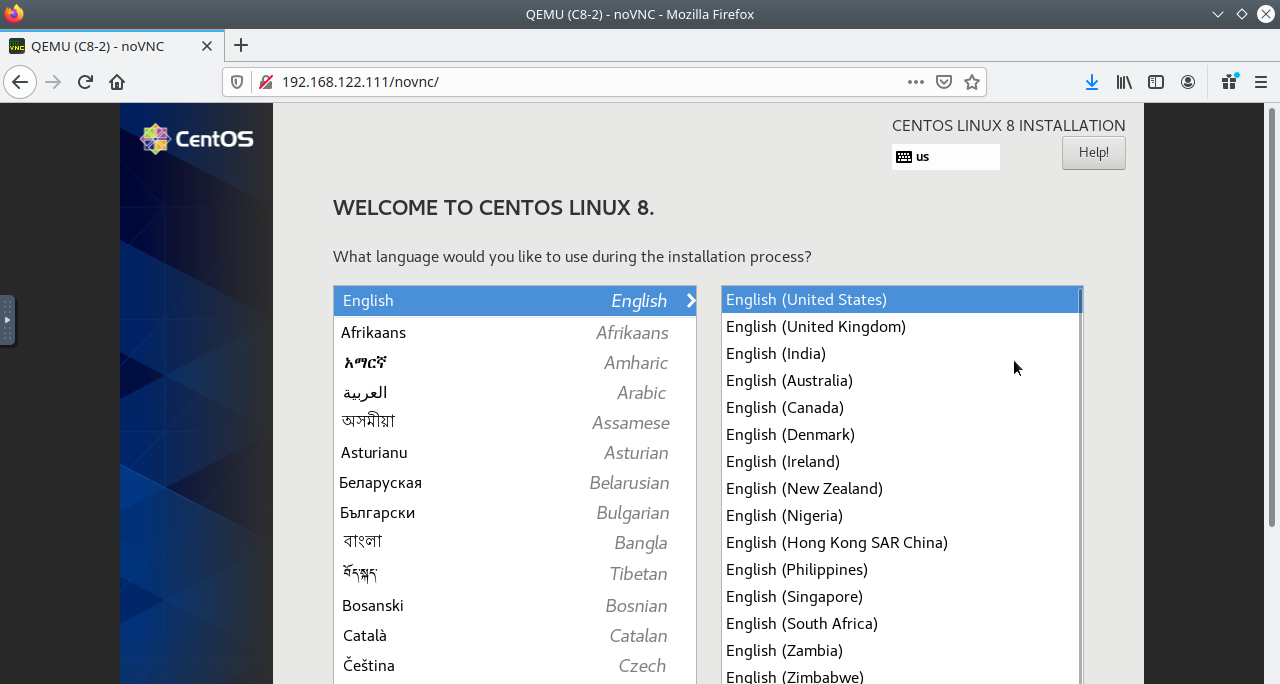
接続できました。
WebSocketのPathを変えると別のハイパーバイザ、別の仮想マシンディスプレイに接続できます。
URLでPathを指定することもできます。
終わりに
頑張って作った割にはnoVNC以外の使い道が思いつかないですね。
コード
`src/hello_erlang_app.erl` Application
-module(hello_erlang_app).
-behaviour(application).

-export([start/2]).
-export([stop/1]).

start(_Type, _Args) ->
        Dispatch = cowboy_router:compile([
            {'_', [{"/:host/:port/:rhost/:rport", ws_handler, []}]}
        ]),
        {ok, _} = cowboy:start_clear(my_http_listener,
            [{port, 8080}],
            #{env => #{dispatch => Dispatch}}
        ),
        hello_erlang_sup:start_link().

stop(_State) ->
        ok.
`src/direct_tcpip_channel.erl` 改良した`direct_tcpip_channel`
-module(direct_tcpip_channel).

-export([start/3, recv/1, send/2, close/1]).
-export([start_direct_tcpip/4]).
-export([init/1, handle_ssh_msg/2, handle_msg/2, handle_call/3]).

-behavior(ssh_client_channel).

-record(state, {
        parent, %% spawnを実行したプロセス
        chanid, %% Channel ID
        conref, %% Connection
        msg_queue, %% SSH受信データキュー
        req_queue %% Recv要求キュー
    }).

%% 起動用関数。
start(ConRef, Remote, Local) ->
    Pid = proc_lib:spawn(?MODULE, start_direct_tcpip,
                         [ConRef, Remote, Local, self()]),
    receive
        {up, Pid} -> {ok, Pid};
        {error, Reason} -> {error, Reason}
    end.

%% Channel管理用プロセスを開始する。spawnされる。
start_direct_tcpip(ConRef, Remote, Local, Parent) ->
    case open_direct_tcpip(ConRef, Remote, Local) of
        {open, ChanID} ->
             {ok, State} = ssh_client_channel:init([[
                               {channel_cb, ?MODULE},
                               {init_args, #state{
                                              chanid=ChanID,conref=ConRef,
                                              msg_queue=queue:new(),req_queue=queue:new(),
                                              parent=Parent}},
                               {cm, ConRef},
                               {channel_id, ChanID}]]),
             ssh_client_channel:enter_loop(State);
        _ ->
             Parent ! {error, error}
    end.

%% ChannelをOpenする。
open_direct_tcpip(ConRef, {RHost, RPort}, {LHost, LPort}) ->
    RHostAddr = list_to_binary(RHost),
    LHostAddr = list_to_binary(LHost),
    Data = << (size(RHostAddr)):32/unsigned-integer, RHostAddr/binary,
              RPort:32/unsigned-integer,
              (size(LHostAddr)):32/unsigned-integer, LHostAddr/binary,
              LPort:32/unsigned-integer >>,
    ssh_connection_handler:open_channel(ConRef, "direct-tcpip", Data, 65536, 655360, infinity).


%% 以下Callback。
init(State) ->
    {ok, State}.

%% 受信データを要求。
handle_call(recv, From, #state{msg_queue=Q,req_queue=W}=S) ->
    case queue:out(Q) of
        {empty, _} ->
            {noreply, S#state{req_queue=queue:in(From,W)}};
        {{value, Msg}, Rest} ->
            {reply, {ok, Msg}, S#state{msg_queue=Rest}}
    end;

%% Channelにデータ送信。
handle_call({send, Data}, _, #state{conref=ConRef,chanid=ChanID}=S) ->
    {reply, ssh_connection:send(ConRef, ChanID, Data), S};

handle_call(close, _, #state{conref=ConRef,chanid=ChanID}=S) ->
    {reply, ssh_connection:send_eof(ConRef,ChanID), S}.

%% Channelにデータ受信。
handle_ssh_msg({ssh_cm, _, {data, _, _, Data}}, #state{req_queue=W,msg_queue=Q}=S) ->
    case queue:out(W) of
        {empty, _} ->
            {ok, S#state{msg_queue=queue:in(Data,Q)}};
        {{value, Pid}, Rest} ->
            ssh_client_channel:reply(Pid, {ok, Data}),
            {ok, S#state{req_queue=Rest}}
    end;

handle_ssh_msg({ssh_cm, _, {eof, _}}, #state{conref=ConRef,chanid=ChanID}=S) ->
    ssh_connection:send_eof(ConRef, ChanID),
    {ok, S}.

handle_msg({ssh_channel_up, _, _}, S) ->
    S#state.parent ! {up, self()},
    {ok, S}.

recv(ChanRef) ->
    ssh_client_channel:call(ChanRef, recv).

send(ChanRef, Data) ->
    ssh_client_channel:call(ChanRef, {send, Data}).

close(ChanRef) ->
    ssh_client_channel:call(ChanRef, close).
`src/connection_server.erl` Connectionキャッシュ
-module(connection_server).
-behaviour(gen_server).

%% API.
-export([start_link/0]).
-export([connect/3]).

%% gen_server.
-export([init/1]).
-export([handle_call/3]).
-export([terminate/2]).
-export([code_change/3]).

-record(state, {
    cache,
    sshopts
}).

-record(connection, {
    remote,
    conid
}).

%% API.

-spec start_link() -> {ok, pid()}.
start_link() ->
        gen_server:start_link({local, connection_server}, ?MODULE,
                              [{sshopts,[{user,"user"},{password,"password"}]}], []).

connect(Ref, Host, Port) ->
        gen_server:call(Ref, {connect, {Host, Port}}).

%% gen_server.

init(Args) ->
        ssh:start(),
        Cache = ets:new(cache, [{keypos,#connection.remote}]),
        {ok, #state{cache=Cache,sshopts=proplists:get_value(sshopts, Args)}}.

handle_call({connect, {Host, Port}}, _From, #state{cache=C,sshopts=O}=S) ->
        case ets:lookup(C, {Host, Port}) of
                [] ->
                        {ok, Con} = ssh:connect(Host, Port, O),
                        ets:insert(C, #connection{remote={Host, Port},conid=Con}),
                        {reply, {ok, Con}, S};
                [#connection{conid=Con}] ->
                        case ssh:connection_info(Con) of
                                [_|_] ->
                                        {reply, {ok, Con}, S};
                                {error, _} ->
                                        {ok, Con2} = ssh:connect(Host, Port, O),
                                        ets:insert(C, #connection{remote={Host, Port},conid=Con2}),
                                        {reply, {ok, Con2}, S}
                        end
        end.


terminate(_Reason, _State) ->
        ssh:stop(),
        ok.

code_change(_OldVsn, State, _Extra) ->
        {ok, State}.
実はSSH接続用ユーザとパスワードはここにハードコードされている…!
`src/hello_erlang_sup.erl` Supervisor
-module(hello_erlang_sup).
-behaviour(supervisor).

-export([start_link/0]).
-export([init/1]).

start_link() ->
        supervisor:start_link({local, ?MODULE}, ?MODULE, []).

init([]) ->
        Procs = [{con, {connection_server, start_link, []},
                  permanent, brutal_kill, worker, [connection_server]}],
        {ok, {{one_for_one, 1, 5}, Procs}}.