Elm Bootstrapを試してみたのでその報告です。以下githubサイトの紹介を少し引用させていただきます。
ドキュメントサイト
rundis/elm-bootstrap - github
Elm Bootstrap APIドキュメント
Elm Bootstrap は Twitter Bootstrap 4 CSS Framework をElm applicationsで使うためのパッケージです。Twitter Bootstrap は最も人気のある CSS (with some JS) フレームワークでresponsiveや mobile first web sites を実現しています。Version 4 は完全にflexboxに対応しており、より良いコントロールと柔軟性を提供してくれます。
(1)Bootstrapを使うための型安全(Type Safe)なAPI
(2)いくつかのboilerplateの自動処理
(3)インタラクティブエレメント:Navbar, Dropdowns, Accordion, Modal, Popups, Dismissable Alerts, Tabs and Carousel
(4)簡単に利用できる水平・垂直のcenter stuff(?)
Elm Bootstrapはelm-mdlにインスパイヤされて開発したとあります。どちらを使うかはケースバイケースですかね。いずれにしても画面デザインのためのライブラリの選択肢が複数あるのはありがたいことです。
Elmでマテリアルデザインをためしてみた! Qiita
1.サンプルプログラムについて
ドキュメントサイトのGetting startedにあるexampleです。これはSPAを使っていますので、最後にSPAについても少し説明を加えたいと思います。
1-1.Elmプログラムの全コード
以下がElmプログラムの全コードになります。説明用にコメントに番号をつけています。
module Main exposing (main)

import Html exposing (..)
import Html.Attributes exposing (..)
import Html.Events exposing (onClick)

-- [3]SPA
import Navigation exposing (Location)
import UrlParser exposing ((</>))

-- [2]Elm Bootstrap
import Bootstrap.Navbar as Navbar      -- [2-1] Navbar(1)
import Bootstrap.Grid as Grid          -- [2-2] Grid(1)
import Bootstrap.Grid.Col as Col       -- [2-2] Grid(2)
import Bootstrap.Card as Card          -- [2-3] Card(1)
import Bootstrap.Card.Block as Block   -- [2-3] Card(2)
import Bootstrap.Button as Button
import Bootstrap.ListGroup as Listgroup
import Bootstrap.Modal as Modal


main : Program Never Model Msg
main =
    Navigation.program UrlChange    -- [3] UrlChange(1)
        { view = view
        , update = update
        , subscriptions = subscriptions
        , init = init
        }


type alias Model =
    { page : Page
    , navState : Navbar.State   -- [2-1] Navbar(2)
    , modalVisibility : Modal.Visibility
    }


type Page
    = Home
    | GettingStarted
    | Modules
    | NotFound


init : Location -> ( Model, Cmd Msg )
init location =
    let
        ( navState, navCmd ) =   -- [2-1] Navbar(3)
            Navbar.initialState NavMsg

        ( model, urlCmd ) =
            urlUpdate location { navState = navState, page = Home, modalVisibility= Modal.hidden }
    in
        ( model, Cmd.batch [ urlCmd, navCmd ] )


type Msg
    = UrlChange Location
    | NavMsg Navbar.State   -- [2-1] Navbar(4)
    | CloseModal
    | ShowModal


subscriptions : Model -> Sub Msg   -- [2-1] Navbar(5)
subscriptions model =
    Navbar.subscriptions model.navState NavMsg


update : Msg -> Model -> ( Model, Cmd Msg )
update msg model =
    case msg of
        UrlChange location ->   -- [3] UrlChange(2)
            urlUpdate location model

        NavMsg state ->   -- [2-1] Navbar(6)
            ( { model | navState = state }
            , Cmd.none
            )

        CloseModal ->
            ( { model | modalVisibility = Modal.hidden }
            , Cmd.none
            )

        ShowModal ->
            ( { model | modalVisibility = Modal.shown }
            , Cmd.none
            )


urlUpdate : Navigation.Location -> Model -> ( Model, Cmd Msg )
urlUpdate location model =
    case decode location of
        Nothing ->
            ( { model | page = NotFound }, Cmd.none )

        Just route ->
            ( { model | page = route }, Cmd.none )


decode : Location -> Maybe Page
decode location =
    UrlParser.parseHash routeParser location


routeParser : UrlParser.Parser (Page -> a) a
routeParser =
    UrlParser.oneOf
        [ UrlParser.map Home UrlParser.top
        , UrlParser.map GettingStarted (UrlParser.s "getting-started")
        , UrlParser.map Modules (UrlParser.s "modules")
        ]


view : Model -> Html Msg
view model =
    div []
        [ menu model
        , mainContent model
        , modal model
        ]


menu : Model -> Html Msg
menu model =
    Navbar.config NavMsg    -- [2-1] Navbar(7)  [3] UrlChange(3)
        |> Navbar.withAnimation
        |> Navbar.container
        |> Navbar.brand [ href "#" ] [ text "Elm Bootstrap" ]
        |> Navbar.items
            [ Navbar.itemLink [ href "#getting-started" ] [ text "Getting started" ]
            , Navbar.itemLink [ href "#modules" ] [ text "Modules" ]
            ]
        |> Navbar.view model.navState


mainContent : Model -> Html Msg
mainContent model =
    Grid.container [] <|    -- [2-2] Grid(3)
        case model.page of
            Home ->
                pageHome model

            GettingStarted ->
                pageGettingStarted model

            Modules ->
                pageModules model

            NotFound ->
                pageNotFound


pageHome : Model -> List (Html Msg)
pageHome model =
    [ h1 [] [ text "Home" ]
    , Grid.row []        -- [2-2] Grid(4)
        [ Grid.col []    -- [2-2] Grid(5)
            [ Card.config [ Card.outlinePrimary ]  -- [2-3] Card(3)
                |> Card.headerH4 [] [ text "Getting started" ]
                |> Card.block []
                    [ Block.text [] [ text "Getting started is real easy. Just click the start button." ]
                    , Block.custom <|
                        Button.linkButton
                            [ Button.primary, Button.attrs [ href "#getting-started" ] ]
                            [ text "Start" ]
                    ]
                |> Card.view
            ]
        , Grid.col []    -- [2-2] Grid(6)
            [ Card.config [ Card.outlineDanger ]
                |> Card.headerH4 [] [ text "Modules" ]
                |> Card.block []
                    [ Block.text [] [ text "Check out the modules overview" ]
                    , Block.custom <|
                        Button.linkButton
                            [ Button.primary, Button.attrs [ href "#modules" ] ]
                            [ text "Module" ]
                    ]
                |> Card.view
            ]
        ]
    ]


pageGettingStarted : Model -> List (Html Msg)
pageGettingStarted model =
    [ h2 [] [ text "Getting started" ]
    , Button.button
        [ Button.success
        , Button.large
        , Button.block
        , Button.attrs [ onClick ShowModal ]
        ]
        [ text "Click me" ]
    ]


pageModules : Model -> List (Html Msg)
pageModules model =
    [ h1 [] [ text "Modules" ]
    , Listgroup.ul
        [ Listgroup.li [] [ text "Alert" ]
        , Listgroup.li [] [ text "Badge" ]
        , Listgroup.li [] [ text "Card" ]
        ]
    ]


pageNotFound : List (Html Msg)
pageNotFound =
    [ h1 [] [ text "Not found" ]
    , text "SOrry couldn't find that page"
    ]


modal : Model -> Html Msg
modal model =
    Modal.config CloseModal
        |> Modal.small
        |> Modal.h4 [] [ text "Getting started ?" ]
        |> Modal.body []
            [ Grid.containerFluid []
                [ Grid.row []
                    [ Grid.col
                        [ Col.xs6 ]
                        [ text "Col 1" ]
                    , Grid.col
                        [ Col.xs6 ]
                        [ text "Col 2" ]
                    ]
                ]
            ]
        |> Modal.view model.modalVisibility
1-2.プログラム環境作成
必要なパッケージをインストールします。
elm-package install --yes rundis/elm-bootstrap
elm-package install elm-lang/navigation
elm-package install evancz/url-parser
コンパイルします。
elm-make Main.elm --output elm.js
サーバを起動します。
elm-reactor -a=www.mypress.jp -p=3030
またはAWS S3にアップロードする。
aws s3 sync build/ s3://elm-svg
サンプルプログラムがAWS S3で動作しています。==> サンプルプログラム ライブ!!!
1-3.プログラムキャプチャ画像
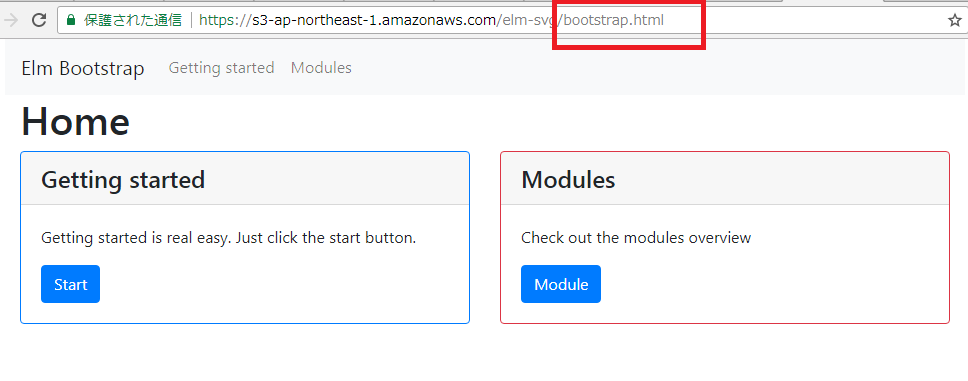
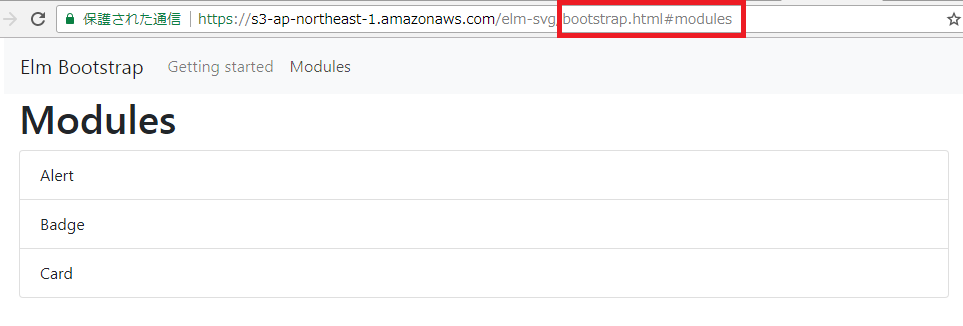
このプログラムは全部で3枚の画面を持っています。加えてmodalもありますが、ここでは省略しています。
2.elm-bootstrap
elm-bootstrapを使うということは、使いたいcomponentを選んで使うことになります。ここではNavbarとGrid、Cardの3つのcomponentを見ていきたいと思います。それぞれの使い方がまったく異なるので、実際のコーディングのときはドキュメントの参照が必須ですね。Navbar以外は割りとシンプルです。
2-1.Navbar
Navbarはヘッダーのナビゲーションメニューを表示させるために使われます。Bootstrapの代表的なコンポーネントですが、生で使うとコードは結構複雑です。それがElm Bootstrapでは割とスッキリと書けることをみます。ただしview stateを更新しつけることが必要で、少し面倒です。
ライブラリのimportです。把握しやすいように、関連箇所にコメントで番号を振ってあります。
import Bootstrap.Navbar as Navbar -- [2-1] Navbar(1)
さてmodelの中でnavbarのview state (navState ) をkeepし続ける必要があります。以下のコーディングは、ほとんどこれを実現するためのものとなります。最後にviewのコードを書きますが、これは大変シンプルでメンテナンスしやすいものとなっています。
type alias Model =
    { page : Page
    , navState : Navbar.State   -- [2-1] Navbar(2)
    , modalVisibility : Modal.Visibility
    }
まずnavStateの初期値ですが、navbar はinitial window size を知る必要があります。そのためcommand を発行してElm runtimeで実行させます。その結果、NavMsgメッセージが発生し、update関数にて初期値が設定されます。
init : Location -> ( Model, Cmd Msg )
init location =
    let
        ( navState, navCmd ) =   -- [2-1] Navbar(3)
            Navbar.initialState NavMsg
#
    in
        ( model, Cmd.batch [ urlCmd, navCmd ] )
その後は、navState はsubscriptionsでイベントをリッスンし、NavMsgメッセージを発生させることで、update関数でkeepされることになります。
type Msg
    = UrlChange Location
    | NavMsg Navbar.State   -- [2-1] Navbar(4)
    | CloseModal
    | ShowModal

subscriptions : Model -> Sub Msg   -- [2-1] Navbar(5)
subscriptions model =
    Navbar.subscriptions model.navState NavMsg
update関数では以下のようにして navState を更新します。
update : Msg -> Model -> ( Model, Cmd Msg )
update msg model =
    case msg of
#
        NavMsg state ->   -- [2-1] Navbar(6)
            ( { model | navState = state }
            , Cmd.none
            )
#
以下がNavbarのコードになります。生でbootstrapで書いたときに比べてかなりスッキリすると思います。わかりやすくメンテナンスしやすいものです。クリックしたときの動作については「3.Elm SPA」で説明します。
menu : Model -> Html Msg
menu model =
    Navbar.config NavMsg    -- [2-1] Navbar(7)
        |> Navbar.withAnimation
        |> Navbar.container
        |> Navbar.brand [ href "#" ] [ text "Elm Bootstrap" ]
        |> Navbar.items
            [ Navbar.itemLink [ href "#getting-started" ] [ text "Getting started" ]
            , Navbar.itemLink [ href "#modules" ] [ text "Modules" ]
            ]
        |> Navbar.view model.navState
2-2.Grid
Bootstrap の grid system は containers と rows, columns の組み合わせを使い、コンテンツのレイアウトと整列を行います。flexbox を利用しておりフルresponsiveです。ざっくり見ていきます。
importします。
import Bootstrap.Grid as Grid      -- [2-2] Grid(1)
import Bootstrap.Grid.Col as Col   -- [2-2] Grid(2)
メインのcontainerを設定し、pageで画面を切り分け、それぞれの場合でそれぞれのページの rows と columnsを読みこみます。パイプ(<|)っていいですね。
mainContent : Model -> Html Msg
mainContent model =
    Grid.container [] <|    -- [2-2] Grid(3)
        case model.page of
            Home ->
                pageHome model

            GettingStarted ->
                pageGettingStarted model

            Modules ->
                pageModules model

            NotFound ->
                pageNotFound
ページHomeの場合を見てみます。
pageHome : Model -> List (Html Msg)
pageHome model =
    [ h1 [] [ text "Home" ]
    , Grid.row []        -- [2-2] Grid(4)
        [ Grid.col []    -- [2-2] Grid(5)
            [ Card.config [ Card.outlinePrimary ]
#
            ]
        , Grid.col []    -- [2-2] Grid(6)
            [ Card.config [ Card.outlineDanger ]
#
            ]
        ]
    ]
2-3.Card
Cardは柔軟で拡張可能なコンテンツ コンテナです。ヘッダーやフッター、さまざまなコンテンツや背景を表示できます。
import Bootstrap.Card as Card          -- [2-3] Card(1)
import Bootstrap.Card.Block as Block   -- [2-3] Card(2)
pageHomeの中でGrid.colのコンテンツを表示するためにCardが使われています。Card.headerH4でヘッダーを表示して、Card.block で内容を記述し、最後にCard.viewで表示しています。
#
        [ Grid.col []    -- [2-2] Grid(5)
            [ Card.config [ Card.outlinePrimary ]  -- [2-3] Card(3)
                |> Card.headerH4 [] [ text "Getting started" ]
                |> Card.block []
                    [ Block.text [] [ text "Getting started is real easy. Just click the start button." ]
                    , Block.custom <|
                        Button.linkButton
                            [ Button.primary, Button.attrs [ href "#getting-started" ] ]
                            [ text "Start" ]
                    ]
                |> Card.view
            ]
#
3.Elm SPA (Single Page Application)
このサンプルプログラムはSPAで3枚の画面を切り替える構成になっています。ElmでSPAを実現する方法は以下の過去記事に示してありますが、今回のサンプルも同じ方法で実装されています。ここでは簡単に説明を加えていきたいと思います。
ElmのSPAとRouting - Qiita
ElmのSPAへの第一歩のNavigation - Qiita
まずElmでSPAを実現するためには、NavigationとUrlParserの2つのライブラリが必要となります。
-- [3]SPA
import Navigation exposing (Location)
import UrlParser exposing ((</>))
次に以下のprogram行によって、ブラウザのアドレスバー変更によって画面の遷移は起こらなくなります。代わりに、Elmプログラム内でUrlChangeメッセージが発生してupdate関数が呼ばれるようになります。
main : Program Never Model Msg
main =
    Navigation.program UrlChange    -- [3] UrlChange(1)
#
update関数がUrlChangeメッセージを受け取ると、Urlパスをパースして、page情報をmodelに設定(上書き)します。model画変更されるので、viewは新しいpage情報に基づいて、新ページを表示します。
update : Msg -> Model -> ( Model, Cmd Msg )
update msg model =
    case msg of
        UrlChange location ->   -- [3] UrlChange(2)
            urlUpdate location model
#
以下のようにNavbarのヘッダーにハッシュ(#)のリンクが置かれています。前述したようにaリンクのクリックはページ遷移を起こしません。ここではハッシュ(#)リンクですので、特に404等のエラーにもならず、ブラウザのアドレスバーが更新されます。これがUrlChangeメッセージを引き起こします。
menu : Model -> Html Msg
menu model =
    Navbar.config NavMsg    -- [2-1] Navbar(7)  [3] UrlChange(3)
#
        |> Navbar.brand [ href "#" ] [ text "Elm Bootstrap" ]
        |> Navbar.items
            [ Navbar.itemLink [ href "#getting-started" ] [ text "Getting started" ]
            , Navbar.itemLink [ href "#modules" ] [ text "Modules" ]
#
今回は以上で終わります。


