はじめに
KubernetesでNodeのオートスケールを行うためにはCluster Autoscaler(CA)をデプロイする必要があります。
StatefulSetやDeploymentで外部ストレージとしてEBSを使用するとき、EBSの特性としてアタッチ先が同じAZに属していないといけません。
今回はEKSでPersistentVolume(PV)としてEBSを使用するときにAZごとにAutoscaling Group(ASG)を作成する方法を説明します。
Cluster Autoscalerのパターン
まずはCAのパターンについて説明していきます。
CAはクラスタにPodとしてデプロイされる必要があり、指定されたASGに属するNodeを監視します。
公式ページではNode数を増加させるタイミングは次の2点を満たすときと定義されています。
- リソース不足により現存するNodeへPodをスケジューリングするのに失敗してしまうとき
- 現存するNodeと同一のNodeが増えたらスケジューリング問題が解決するとき
重要なのはCAが監視する対象の単位がASGだということです。
パターンごとに挙動を見ていきましょう。
①1ASG 3AZ PV未使用の場合
1つのASGに別々のAZに属する計3個のNodeがあり、PVを用いないPodの場合を考えます。
Node1がスケジューリング不可の場合、PodはNode2かNode3にスケジューリングされます。

この場合、全Nodeがスケジューリング不可のときのみオートスケールが起きます。
行き場のないPodのPending状態が続くとCAがNode4をいずれかのAZに立てることになり、そこにPodがスケジューリングされます。

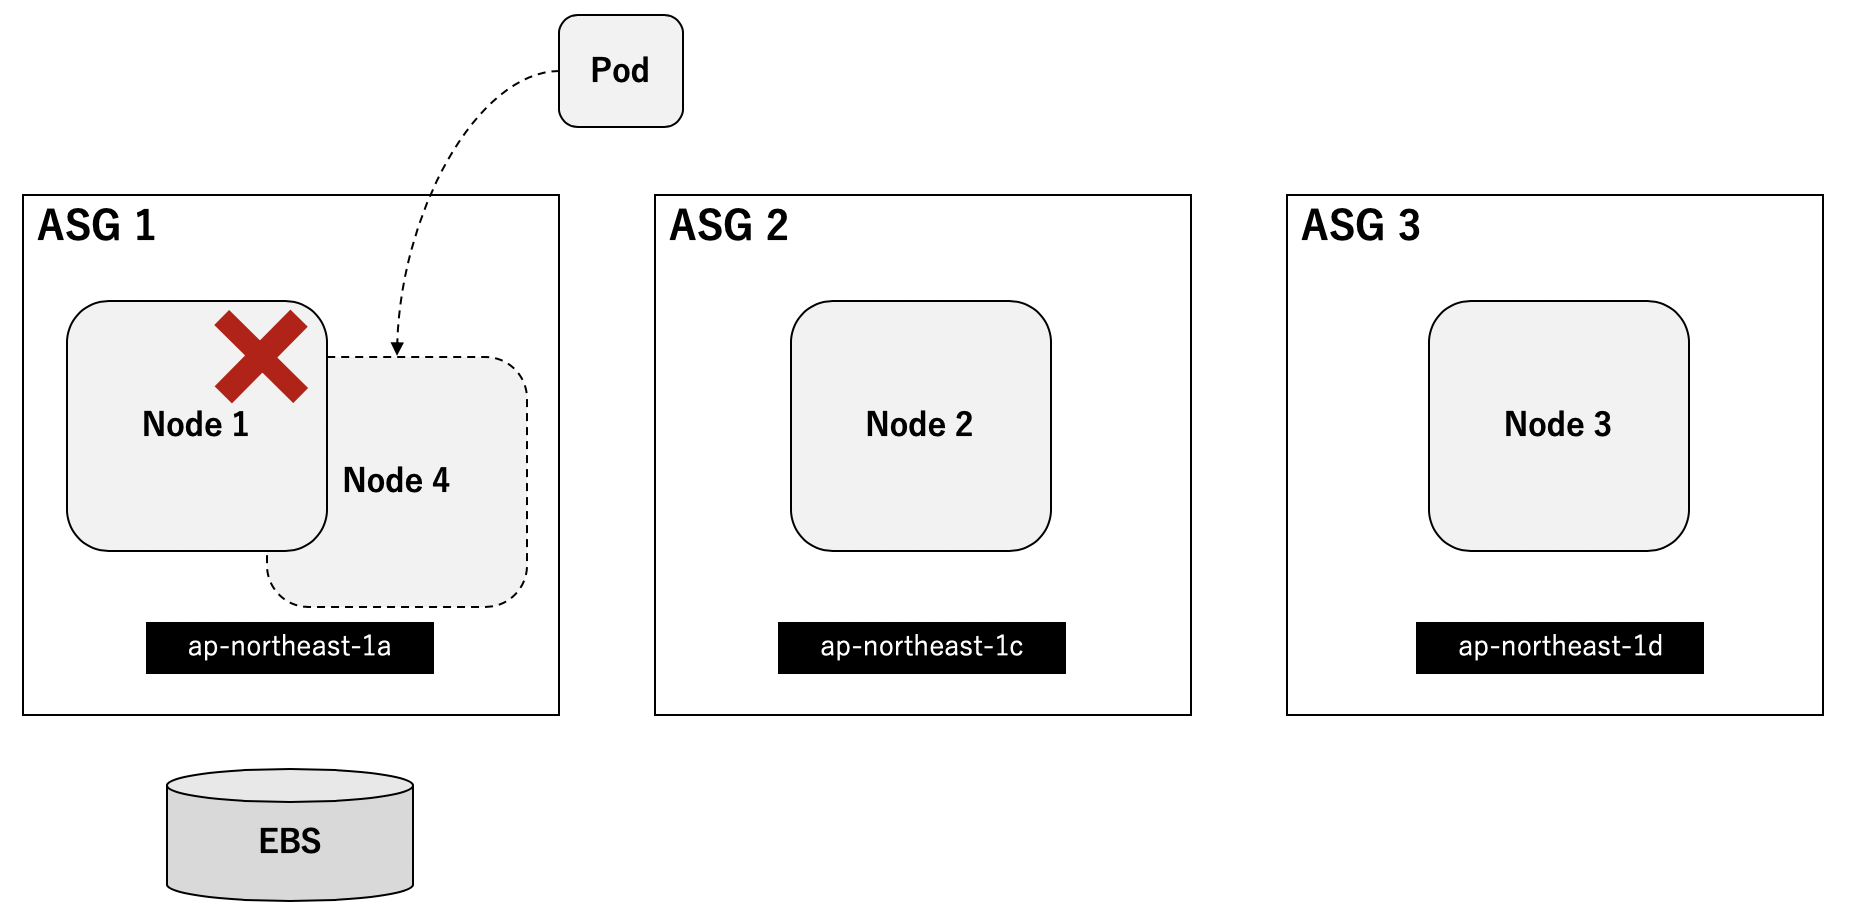
②1ASG 3AZ PV使用の場合
1つのASGに別々のAZに属する計3個のNodeがあり、PVを用いるPodの場合を考えます。
シナリオ例として、Dynamic Provisioningで1つのEBSを作成したStatefulSetが立っているNodeに障害が起きたために別Nodeで立てたいときが考えられます。
EBSとPodがのるNodeは同一AZでないと起動しません。下図の場合Podはap-northeast-1a以外のNodeでは起動しません。また、CAはASG単位で監視するのでNode2とNode3はスケジューリング可能と判断し、結果的にPodは起動しないまま終わります。

③3ASG 3AZ PV未使用の場合
3つのASGにそれぞれのAZを対応させた計3個のNodeがあり、PVを用いないPodの場合を考えます。
スケジューリングはパターン①と同じ挙動となります。

全Nodeがスケジューリング不可のときもパターン①同様にCAが作成した新たなNodeにスケジューリングされます。AZは例としてap-northeast-1cとしていますが、どこになるかは分かりません。

④3ASG 3AZ PV使用の場合
3つのASGにそれぞれのAZを対応させた計3個のNodeがあり、PVを用いるPodの場合を考えます。
パターン②ではCAが3つのNodeを1つのASGで見ていたためにオートスケールを行いませんでした。今回はASG1にスケジューリングするためのリソースがない且つNodeを増やしたらそこにPodを配置することができることが分かります。
結果的にはCAがASG1にNode4を作成しPodはそこでRunning状態になります。
以上のようにPVとしてEBSを使用する場合にはAZごとにAutoscaling Groupを作成する必要があります。
実装
前章のパターン④をTerraformとHelmで実装します。
環境情報
macOS Mojave 10.14.1
terraform: v0.12.16
helm: v2.14.3
helmfile: v0.87.0
kubectl: v1.13.11-eks-5876d6
ディレクトリ構造
├── terraform
│   ├── providers.tf
│   ├── vpc.tf
│   ├── eks.tf
│   └── iam.tf
└── kubernetes
    ├── helmfile.yaml
    └── nginx.yaml
AWSリソース
AWSリソースはTerraformで作成します。
providers.tfではリージョンを定義します。
provider "aws" {
  version = ">= 1.24.0"
  region  = "ap-northeast-1"
}
vpc.tfではクラスタのVPC情報を定義します。
data "aws_availability_zones" "available" {}

module "vpc" {
  source             = "terraform-aws-modules/vpc/aws"
  version            = "2.15.0"
  name               = "test-vpc"
  cidr               = "10.0.0.0/16"
  azs                = "${data.aws_availability_zones.available.names}"
  public_subnets     = ["10.0.1.0/24", "10.0.2.0/24", "10.0.3.0/24"]
  enable_nat_gateway = true
  single_nat_gateway = false
  one_nat_gateway_per_az = false
  tags               = "${merge(local.tags, map("kubernetes.io/cluster/${local.cluster_name}", "shared"))}"
}
eks.tfではEKSクラスタを定義します。ワーカーノードは3AZそれぞれに1つずつASGを作成します。
また、autoscaling_enabled = trueと設定することでCAがオートスケール対象として認識するためのタグをASGに自動で付加してくれます。
locals {
  cluster_name = "test-cluster"

  worker_groups = [
    {
      name = "test-worker0"
      instance_type = "t3.small"
      subnets = ["${element(module.vpc.public_subnets, 0)}"]
      autoscaling_enabled = true
      asg_desired_capacity = "1"
      asg_max_size = "2"
      asg_min_size = "1"
      root_volume_size = "10"
      key_name = "ec2-key"
    },
    {
      name = "test-worker1"
      instance_type = "t3.small"
      subnets = ["${element(module.vpc.public_subnets, 1)}"]
      autoscaling_enabled = true
      asg_desired_capacity = "1"
      asg_max_size = "2"
      asg_min_size = "1"
      root_volume_size = "10"
      key_name = "ec2-key"
    },
    {
      name = "test-worker2"
      instance_type = "t3.small"
      subnets = ["${element(module.vpc.public_subnets, 2)}"]
      autoscaling_enabled = true
      asg_desired_capacity = "1"
      asg_max_size = "2"
      asg_min_size = "1"
      root_volume_size = "10"
      key_name = "ec2-key"
    }
  ]
  tags = {
    Environment = "test"
  }
}

module "eks" {
  source  = "terraform-aws-modules/eks/aws"
  version = "6.0.2"
  cluster_name = "${local.cluster_name}"
  cluster_version = "1.13"
  subnets = "${module.vpc.public_subnets}"
  tags = "${local.tags}"
  vpc_id = "${module.vpc.vpc_id}"
  worker_groups = "${local.worker_groups}"
  cluster_create_timeout = "30m"
  cluster_delete_timeout = "30m"
}
iam.tfではCAのPodに付与しないといけないIAM Roleを作成します。
また、IAM Role for Service Accountを使用するための設定も加えます。今回はCAをHelmでデプロイしているのでService AccountのNamespaceと名前はそれに合わせた形にしないといけません。
resource "aws_iam_openid_connect_provider" "oidc_provider" {
  url = "${module.eks.cluster_oidc_issuer_url}"
  thumbprint_list = ["9e99a48a9960b14926bb7f3b02e22da2b0ab7280"]
  client_id_list = [
    "sts.amazonaws.com"
  ]
}

data "aws_iam_policy_document" "cluster_autoscaler" {
  statement {
    effect = "Allow"
    actions = [
      "sts:AssumeRoleWithWebIdentity"
    ]
    principals {
      type        = "Federated"
      identifiers = ["${aws_iam_openid_connect_provider.oidc_provider.arn}"]
    }
    condition {
      test     = "StringEquals"
      variable = "${replace(aws_iam_openid_connect_provider.oidc_provider.url, "https://", "")}:sub"
      values = [
        "system:serviceaccount:kube-system:cluster-autoscaler-aws-cluster-autoscaler"
      ]
    }
  }
}

resource "aws_iam_role" "cluster_autoscaler" {
  name               = "cluster-autoscaler"
  assume_role_policy = "${data.aws_iam_policy_document.cluster_autoscaler.json}"
}

resource "aws_iam_role_policy_attachment" "cluster_autoscaler" {
  role       = "${aws_iam_role.cluster_autoscaler.id}"
  policy_arn = "${aws_iam_policy.cluster_autoscaler.arn}"
}

resource "aws_iam_policy" "cluster_autoscaler" {
  name = "cluster-autoscaler"
  policy = <<EOF
{
  "Version": "2012-10-17",
  "Statement": [
    {
      "Effect": "Allow",
      "Action": [
        "autoscaling:DescribeAutoScalingGroups",
        "autoscaling:DescribeAutoScalingInstances",
        "autoscaling:DescribeLaunchConfigurations",
        "autoscaling:DescribeTags",
        "autoscaling:SetDesiredCapacity",
        "autoscaling:TerminateInstanceInAutoScalingGroup"
      ],
      "Resource": "*"
    }
  ]
}
EOF
}
下記コマンドを実行してAWSリソースを作成します。
$ terraform init
$ terraform apply
Kubernetesリソース
Helm Tillerがデプロイ済みであることを前提とします。
CAはhelmfileでデプロイします。serviceAccountAnnotationsにはCA用に作成したIAM Roleを記述します。XXXXXXXXXXXXは自分のAWSアカウントに置き換えてください。
repositories:
  - name: stable
    url: https://kubernetes-charts.storage.googleapis.com

releases:
  # https://github.com/helm/charts/tree/master/stable/cluster-autoscaler
  - name: cluster-autoscaler
    namespace: kube-system
    chart: stable/cluster-autoscaler
    version: 6.2.0
    wait: true
    values:
      - autoDiscovery:
          clusterName: test-cluster
        awsRegion: ap-northeast-1
        extraArgs:
          balance-similar-node-groups: true
          scale-down-delay-after-add: 1m
          scale-down-unneeded-time: 1m
        rbac:
          create: true
          serviceAccountAnnotations:
            eks.amazonaws.com/role-arn: arn:aws:iam::XXXXXXXXXXXX:role/cluster-autoscaler
下記コマンドでデプロイします。
$ helmfile apply
サンプルアプリとしてnginxをStatefulSetとしてデプロイします。
Dynamic ProvisioningでEBSをPersistentVolumeとして作成します。
---
apiVersion: apps/v1
kind: StatefulSet
metadata:
  name: nginx
spec:
  selector:
    matchLabels:
      app: nginx
  serviceName: "nginx"
  replicas: 1
  template:
    metadata:
      labels:
        app: nginx
    spec:
      containers:
      - name: nginx
        image: nginx
        ports:
        - containerPort: 80
          name: http
        volumeMounts:
        - name: volume
          mountPath: /data
  volumeClaimTemplates:
  - metadata:
      name: volume
    spec:
      accessModes: [ "ReadWriteOnce" ]
      resources:
        requests:
          storage: 1Gi
---
apiVersion: v1
kind: Service
metadata:
  name: nginx
  labels:
    app: nginx
spec:
  ports:
  - port: 80
    name: http
  selector:
    app: nginx
$ kubectl apply -f nginx.yaml
検証
デプロイしたStatefulSetのnginxがのっているNodeをcordonでスケジュール不可にした上でPodを削除してみます。
$ kubectl get node
NAME                                            STATUS                     ROLES    AGE    VERSION
ip-10-0-1-28.ap-northeast-1.compute.internal    Ready                      <none>   179m   v1.13.11-eks-5876d6
ip-10-0-2-247.ap-northeast-1.compute.internal   Ready                      <none>   179m   v1.13.11-eks-5876d6
ip-10-0-3-119.ap-northeast-1.compute.internal   Ready                      <none>   179m   v1.13.11-eks-5876d6

$ kubectl cordon ip-10-0-1-28.ap-northeast-1.compute.internal
node/ip-10-0-1-28.ap-northeast-1.compute.internal cordoned

$ kubectl get pod
NAME      READY   STATUS    RESTARTS   AGE
nginx-0   1/1     Running   0          47m

$ kubectl delete pod nginx-0
pod "nginx-0" deleted
新たにNodeが作成されることを確認します。PodもRunningとなっていることからEBSがきちんとマウントされていることが分かります。
$ kubectl get node
NAME                                            STATUS                     ROLES    AGE    VERSION
ip-10-0-1-25.ap-northeast-1.compute.internal    Ready                      <none>   89s    v1.13.11-eks-5876d6
ip-10-0-1-28.ap-northeast-1.compute.internal    Ready,SchedulingDisabled   <none>   3h1m   v1.13.11-eks-5876d6
ip-10-0-2-247.ap-northeast-1.compute.internal   Ready                      <none>   3h1m   v1.13.11-eks-5876d6
ip-10-0-3-119.ap-northeast-1.compute.internal   Ready                      <none>   3h1m   v1.13.11-eks-5876d6

$ kubectl get pod
NAME      READY   STATUS    RESTARTS   AGE
nginx-0   1/1     Running   0          2m29s
おわりに
PVとしてEBSを用いたPodをクラスタにデプロイする際に気をつけるべきことを説明しました。
EBSはマルチAZに対応していないこととCAがASG単位で監視をするということからASGはAZごとに作成すべきです。
Terraformなどでコード化しておけばリソース作成も楽にできます。