メイン参考:
@sakuran https://qiita.com/sakuran/items/3c2c9f22cbcbf4aff731
@BMJr https://qiita.com/BMJr/items/653e8843bf33abd02b9c
@rinov https://qiita.com/rinov/items/bff12e9ea1251e895306
Stanford PaulHegarty https://github.com/JqyModi/cs193p-Winter-2017-Stanford-IOS11-PaulHegarty.git
最近iOSの開発を勉強しているから、いろんな疑問があって、やっとわかた内容を共有したいです。
考え方
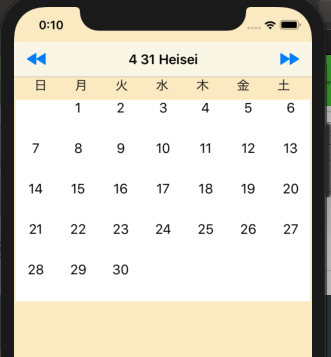
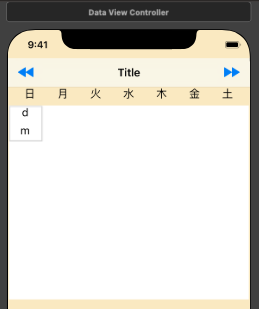
1.アプリ初期化の時、現在の時間の年月の日を表示する、そしてタイトルに和暦年と月を表示する
2.ページを前後に開いてから、前後月の日を表示する、もちろん必要なら年も変える、例えば1月の先月、12月の来月
3.⏪⏩を押したら、前後の年に変える。
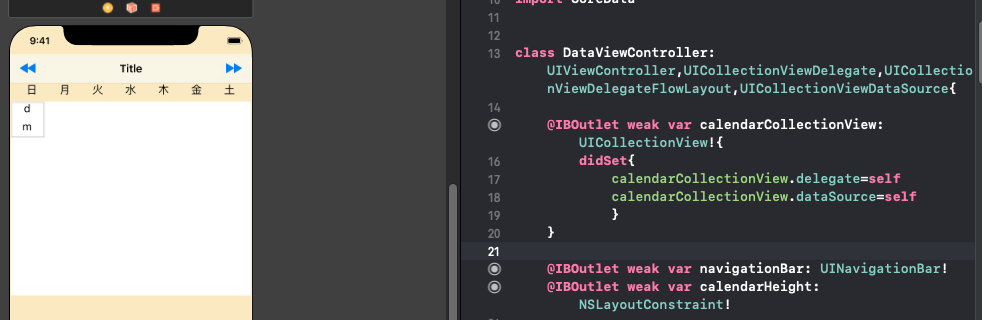
「Step1基本画面元素設定」
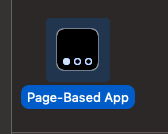
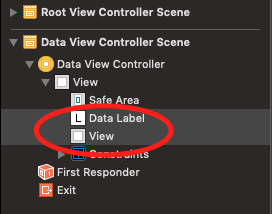
1.Page-Based Appで新しいプロジェクト作成し、Main.storyboardのData View(2番目のBoard)のLabelと白いViewを削除、ModelController.swiftとDataViewController.swiftに関する変数コードも削除
2.Data ViewにNavigation Barを配置して、NavigationItemをNavigation Barに入れ
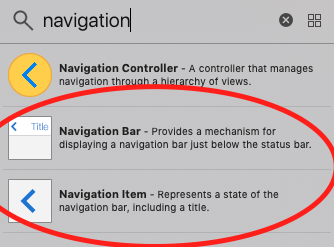
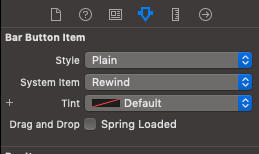
3.NavigationItemのStyleを設定(見た目)
4.日、月、火、水、木、金、土のLabelを配置
※一番良いやり方は1個のsectionでDateFormatter.monthSymbolsに代入と思ったんけど、@sakuranさんのコードを参考して、2つのsectionを作ると、section[0]の内容しか出てこない。〜失敗した。原因不明。
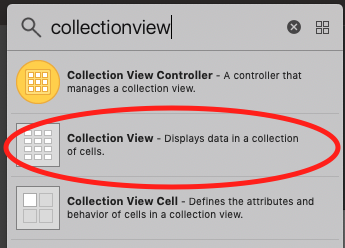
5.Data ViewにCollection Viewを配置して、CellにLabel(d)を配置
※カレンダーを作るためには、Cellに1個のLabelが十分、mは別の目的で作ったもので、無視
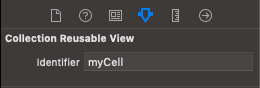
6.CellのidentifierをmyCellに設定
ここまで、画面は準備完了。
「Step2」必要なObjectを作成
1.Ctrl +マウスドラグでDataViewで関連なObjectをリンク(宣言)
このやり方は説明難いから、わからなければ、Stanfordのvideoを見て勉強してください
2.CellのクラスdayCell.swiftを作成して、Labelをリンク
import UIKit

class dayCell: UICollectionViewCell {
    @IBOutlet weak var dayLabel: UILabel!

    //背景色を白にする
    required init?(coder aDecoder: NSCoder) {
        super.init(coder: aDecoder)!
        self.backgroundColor = UIColor.white
    }
}
「Step3」DataViewController.swiftで1ヶ月分のカレンダーを計算函数を作成
    var monthSymbol:String = ""
    var year:Int = 2018
    var month:Int = 1
    var days:[String] = []
    var moneys:[Int16:String] = [:]
  //画面に表示するデータを呼び出しメソッド
    func reloadData(){
     //year年month月1日でdateComponentsを作る
        let dateComponents = DateComponents(calendar: Calendar.current, timeZone: TimeZone.current, year: year, month: month, day: 1)
     //その月の1日の絶対値を取得(僕の簡単の理解。正しいことをGoogleでCalendar関する知識を探してください)
        let firstDay = dateComponents.date! //その月の1日の絶対値
        days = getDays(theFirstDay: firstDay)

        let formatter = DateFormatter()
        formatter.dateFormat = DateFormatter.dateFormat(fromTemplate: "GyM", options: 0, locale: .current) //和暦のStyleに設定
        let dateLocale = formatter.string(from: firstDay) //平成31年3月
        navigationBar.topItem?.title = dateLocale
    }
    //何年何月の1ヶ月分のカレンダーの配列を作成函数
    func getDays(theFirstDay:Date) -> [String]{
        var _days = [String]()
        let weeksCount = Calendar.current.range(of: .weekOfMonth, in: .month, for: theFirstDay)!.count  //該日付の月には何週間があること
        let firstWeekday = Calendar.current.component(.weekday, from: theFirstDay)  //該日付の一日は何曜日のこと。日:1,火:2,水:3,木:4,金:5,土:6
        let daysCount = Calendar.current.range(of: .day, in: .month, for: theFirstDay)!.count //該日付の月に何日があること
     //毎週7日間で、カレンダーを作成、無い日は空白する
        for i in 1...weeksCount*7
        {
            if i < firstWeekday || i > daysCount + firstWeekday - 1
            {
                _days.append("")
            }else
            {
                _days.append(String(describing: i - firstWeekday + 1))
            }
        }
        return _days
    }
「Step4」CollectionView関する函数を設定
    override func viewWillAppear(_ animated: Bool) {
        super.viewWillAppear(animated)
        reloadData()
        calendarHeight.constant = calendarCollectionView.collectionViewLayout.collectionViewContentSize.height
    }

    @IBAction func NextYear(_ sender: UIBarButtonItem) {
        self.year += 1
        reloadData()
        calendarCollectionView.reloadData()
       calendarHeight.constant = calendarCollectionView.collectionViewLayout.collectionViewContentSize.height
    }

    @IBAction func LastYear(_ sender: UIBarButtonItem) {
        self.year -= 1
        reloadData()
        calendarCollectionView.reloadData()
       calendarHeight.constant = calendarCollectionView.collectionViewLayout.collectionViewContentSize.height
    }

    // MARK: UICollectionViewDelegate
    //set the section number
    func numberOfSectionsInCollectionView(collectionView: UICollectionView) -> Int {
        return 1
    }

    //cell numbers
    func collectionView(_ collectionView: UICollectionView, numberOfItemsInSection section: Int) -> Int {
        return days.count
    }

    //Add cells to collectionView
    func collectionView(_ collectionView: UICollectionView, cellForItemAt indexPath: IndexPath) -> UICollectionViewCell {
        let viewCell = collectionView.dequeueReusableCell(withReuseIdentifier: "myCell",for: indexPath) as! dayCell
        let day = days[indexPath.row]
            viewCell.dayLabel.text = day
        return viewCell
    }

    //CellSizeの自動調整。Reference to @BMJr
    func  collectionView(_ collectionView: UICollectionView, layout collectionViewLayout: UICollectionViewLayout, sizeForItemAt indexPath: IndexPath ) -> CGSize {
        let myBoundWidth: CGFloat = UIScreen.main.bounds.size.width
        let cellSize:CGFloat = myBoundWidth/7.5
        return CGSize(width: cellSize, height: cellSize)
    }

    //Section Minimum Space Reference to @BMJr
    func collectionView(_ collectionView: UICollectionView,layout collectionViewLayout:UICollectionViewLayout,minimumLineSpacingForSectionAt section:Int) -> CGFloat{ return 1}
「Step5」ページング函数の設定
class ModelController: NSObject, UIPageViewControllerDataSource {
    var year:Int = 2019
  //DataViewのIndex(何番目)を設定する函数
    func viewControllerAtIndex(_ index: Int, storyboard: UIStoryboard) -> DataViewController? {
        // Create a new view controller and pass suitable data.
        let dataViewController = storyboard.instantiateViewController(withIdentifier: "DataViewController") as! DataViewController
        dataViewController.year = self.year
        dataViewController.month = index
        return dataViewController
    }
  //現在DataViewが所在Index(何番目)を取得する
    func indexOfViewController(_ viewController: DataViewController) -> Int {
        // Return the index of the given data view controller.
        self.year = viewController.year
        return viewController.month
    }

    // MARK: - Page View Controller Data Source
  //前のページにする函数
    func pageViewController(_ pageViewController: UIPageViewController, viewControllerBefore viewController: UIViewController) -> UIViewController? {
        var index = self.indexOfViewController(viewController as! DataViewController)
        index -= 1
        if (index == 0) || (index == NSNotFound) {
            self.year -= 1
            index = 12
        }
        return self.viewControllerAtIndex(index, storyboard: viewController.storyboard!)
    }
    //後ろのページする函数
    func pageViewController(_ pageViewController: UIPageViewController, viewControllerAfter viewController: UIViewController) -> UIViewController? {
        var index = self.indexOfViewController(viewController as! DataViewController)
        index += 1
        if index > 12 {
            self.year += 1
            index = 1
        }
        return self.viewControllerAtIndex(index, storyboard: viewController.storyboard!)
    }
}
「Step6」初期化のページを設定する
        let dateComponents = Calendar.current.dateComponents(in: TimeZone.current, from: Date()) //現在の日付を取得
        let initalPageIndex = dateComponents.month ?? 1 //現在の月(数字)をページ順にする
        modelController.year = dateComponents.year ?? 2020  //現在の年に設定する、nilなら2020にする
        let startingViewController: DataViewController = self.modelController.viewControllerAtIndex(initalPageIndex, storyboard: self.storyboard!)!
以上!