はじめに
前回は企画、要件定義・設計までを記事にしていきました。
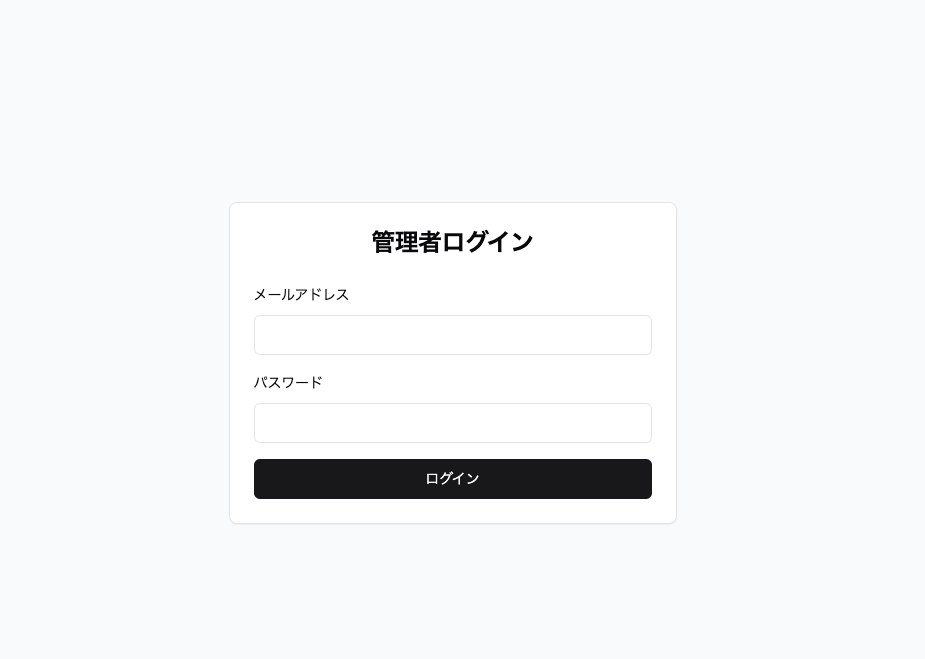
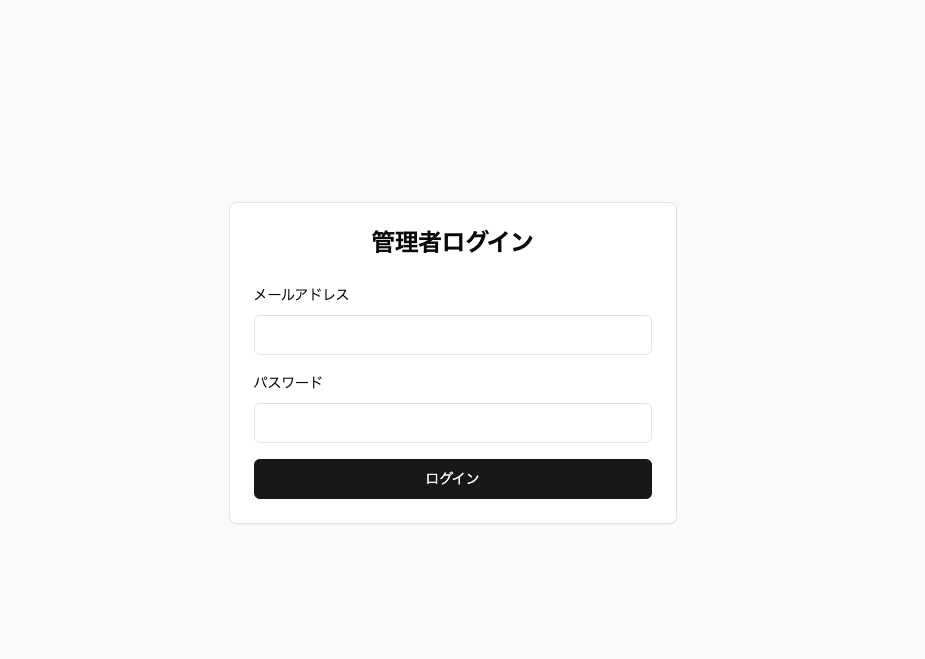
今回の記事では管理者の認証機能のUI作成をやっていきたいと思います。
プロジェクトの作成
ドキュメントを見ながら進めていきましょう。
How to set up a Next.js project
①npx create-next-app@latest

プロジェクト名はplatformとして作成していきます。
今回は全てYesで進めていきます。
platformディレクトリに移動したら以下のコマンドを実行していきます。
②npm install next@latest react@latest react-dom@latest
以下のコマンドを実行して開発環境を立ち上げてみましょう。
③npx next dev

ここまででプロジェクトの作成は完了です。
ファイルの整理
①publicフォルダの中身を削除
②layout.tsxファイルの言語を英語から日本語に変更
  return (
    <html lang="ja">
      <body
        className={`${geistSans.variable} ${geistMono.variable} antialiased`}
      >
        {children}
      </body>
    </html>
  );
③フォントの削除
layout.tsxを以下のように変更し、fontsファイルを丸ごと削除
import type { Metadata } from "next";

export const metadata: Metadata = {
  title: "Create Next App",
  description: "Generated by create next app",
};

export default function RootLayout({
  children,
}: Readonly<{
  children: React.ReactNode;
}>) {
  return (
    <html lang="ja">
      <body>
        {children}
      </body>
    </html>
  );
}
④ファイルを削除
page.tsx
⑤faviconを移動
faviconをpublicディレクトリに移動させる
⑥ルーティングの作成
app
┗blog
  ┗page.tsx
┗dashboard
  ┗login
    ┗page.tsx
  ┗page.tsx
layout.tsx
import React from 'react'

 const Blog = () => {
  return (
    <div>blog</div>
  )
}

export default Blog;
import React from 'react'

const Dashboard = () => {
  return (
    <div>dashboard</div>
  )
}

export default Dashboard;
import React from 'react'

const Login = () => {
  return (
    <div>login</div>
  )
}

export default Login;
ここまででページ遷移するためのルーティングの設定が完了しました。
管理者ログインページの認証フォームUI作成
shadcnのインストール
npx shadcn@latest init -dを実行
あれ、エラーが出た。
No Tailwind CSS configuration found at /Users/sakuya/app/platform.
It is likely you do not have Tailwind CSS installed or have an invalid configuration.
Install Tailwind CSS then try again.
どうやらTailwind CSSの設定がうまくいっていないようです。
まずはインストールがうまくいっているかの確認を行いましょう
npm install -D tailwindcss postcss autoprefixerを実行
私は上記のコマンドで対応できました。
再度shadcnをインストールするコマンドを実行して無事に完了しました。
shadcnを使ってみる
npx shadcn@latest add card
npx shadcn@latest add button
npx shadcn@latest add input
npx shadcn@latest add label
npx shadcn@latest add select
この5つのコマンドを実行したら以下をサイトからコピペするだけ
    <Card className="w-[350px]">
      <CardHeader>
        <CardTitle>Create project</CardTitle>
        <CardDescription>Deploy your new project in one-click.</CardDescription>
      </CardHeader>
      <CardContent>
        <form>
          <div className="grid w-full items-center gap-4">
            <div className="flex flex-col space-y-1.5">
              <Label htmlFor="name">Name</Label>
              <Input id="name" placeholder="Name of your project" />
            </div>
            <div className="flex flex-col space-y-1.5">
              <Label htmlFor="framework">Framework</Label>
              <Select>
                <SelectTrigger id="framework">
                  <SelectValue placeholder="Select" />
                </SelectTrigger>
                <SelectContent position="popper">
                  <SelectItem value="next">Next.js</SelectItem>
                  <SelectItem value="sveltekit">SvelteKit</SelectItem>
                  <SelectItem value="astro">Astro</SelectItem>
                  <SelectItem value="nuxt">Nuxt.js</SelectItem>
                </SelectContent>
              </Select>
            </div>
          </div>
        </form>
      </CardContent>
      <CardFooter className="flex justify-between">
        <Button variant="outline">Cancel</Button>
        <Button>Deploy</Button>
      </CardFooter>
    </Card>
簡単にフォームっぽいものができてしまいました!
shadcnをカスタマイズする
以下のように修正していきます。
import React from 'react'
import { Button } from "@/components/ui/button"
import {
  Card,
  CardContent,
  CardFooter,
  CardHeader,
  CardTitle,
} from "@/components/ui/card"
import { Input } from "@/components/ui/input"
import { Label } from "@/components/ui/label"


const Login = () => {
  return (
    <div className="min-h-screen flex items-center justify-center bg-gray-50">
      <Card className="w-full max-w-md">
        <CardHeader>
          <CardTitle className="text-2xl text-center">管理者ログイン</CardTitle>
        </CardHeader>
        <CardContent>
          <form>
            <div className="grid w-full items-center gap-4">
              <div className="flex flex-col space-y-1.5">
                <Label htmlFor="name">メールアドレス</Label>
                <Input id="name" />
              </div>
            </div>
          </form>
        </CardContent>
        <CardContent>
          <form>
            <div className="grid w-full items-center gap-4">
              <div className="flex flex-col space-y-1.5">
                <Label htmlFor="name">パスワード</Label>
                <Input id="name" />
              </div>
            </div>
          </form>
        </CardContent>
        <CardFooter className="flex justify-between">
          <Button type="submit" className="w-full">ログイン</Button>
        </CardFooter>
      </Card>
    </div>
  )
}

export default Login;
いい感じに修正できたと思います。
DBの作成
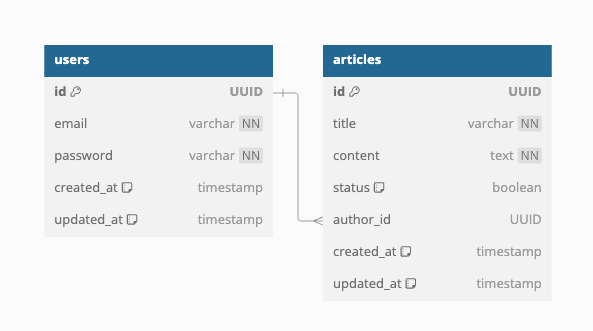
次は認証を行うためにdbを作っていきましょう。
DBは以下のようになっています。
supabase
プロジェクトの作成
new projectからプロジェクトを作成する。
リージョンは日本を選択してください。
apiディレクトリと.envファイルの作成
appディレクトリと同階層にapiディレクトリを作成。
その後.envファイルを作成して環境変数を記述していきます。
自分自身のProject URLとAPI Keyを入力してください。
NEXT_PUBLIC_SUPABASE_URL=Project URL
NEXT_PUBLIC_API_ANON_KEY=API Key
これでsupabaseと接続・操作ができるようになりました。
Prisma
Prismaの初期設定
-
api/libフォルダーを作成しprismaClient.tsファイルを作成しましょう。
-
npm install -D prismaを実行してprismaを入れていきます。 -
apiディレクトリに移動して
npx prisma initを実行します。
そうするとapiディレクトリにprismaフォルダーが作成され、.envファイルに新たに環境変数が追加されていると思います。 -
supabaseの設定からdatabaseを選択してdatabaseURLの環境変数をコピーして、先ほど.envファイルに作成された環境変数にコピペします。
ここまででprismaの初期設定が終わったのでdbを作っていきます。
データベースのモデル作成
公式ドキュメントにmodelがあるのでこれを編集して作成していきます。
model User {
  id    Int     @id @default(autoincrement())
  email String  @unique
  name  String
  password String
  articles article[]
  createAt DateTime @default(now())
  updateAt DateTime @updatedAt
}

model article {
  id        Int     @id @default(autoincrement())
  title     String
  content   String
  status Boolean @default(true)
  author User @relation(fields: [authorId], references: [id])
  authorId  Int
  createAt DateTime @default(now())
  updateAt DateTime @updatedAt
}
当初想定していた設計を少し変更しました。
ちょっとした余談なのですが、設計を作り切るのは難しいですね。
マイグレーション
-
apiディレクトリで以下のコマンドを実行
npx prisma migrate dev --name init -
prisma配下にmigrationsが作成されていることを確認,supabaseの方も確認するとdbが作成されていると思います。
-
supabaseから直接管理者アカウントのデータを追加
ここまででprismaの全体の設定が完了!
Hono
次はバックエンドの処理を追加していきます。
具体的には、
メールアドレス、パスワードが一致していた場合、ログインができて/applications/dashboardに遷移できる
また、ログインできていないのにapplications/dashboardに遷移できないようにする。
この二つの処理を実装していきましょう。
*今回ではセキュリティーの実装はしません。今後追加します。
Honoと必要なものを追加
npm add hono
npm install @hono/node-server
npm install --save bcrypt
npm install --save-dev ts-node
ディレクトリの追加
以下のように作成してください。
src/
├── api/
│   ├── lib/
│   │   └── prismaClient.ts
│   ├── middleware/
│   │   ├── auth/
│   │   │   ├── index.ts
│   │   │   └── types.ts
│   │   └── index.ts
│   ├── prisma/
│   │   ├── migrations/
│   │   │   └── 20241124063915_init/
│   │   │       └── migration.sql
│   │   └── schema.prisma
│   ├── routes/
│   │   └── dashboard.ts
│   ├── utils/
│   │   └── jwt.ts
│   ├── index.ts
│   └── tsconfig.json
│
└── app/
    ├── applications/
    │   ├── blog/
    │   │   └── page.tsx
    │   └── dashboard/
    │       ├── login/
    │       │   └── page.tsx
    │       └── page.tsx
    ├── components/
    │   └── ui/
    │       ├── card.tsx
    │       └── select.tsx
    ├── middleware/
    │   ├── auth/
    │   │   ├── hooks.ts
    │   │   ├── index.tsx
    │   │   └── types.ts
    │   └── index.ts
    ├── styles/
    │   └── globals.css
    └── layout.tsx
認証のイベント追加
'use client'
import React, { useState } from 'react'
import { useRouter } from 'next/navigation'
import { Button } from "@/app/components/ui/button"
import {
  Card,
  CardContent,
  CardFooter,
  CardHeader,
  CardTitle,
} from "@/app/components/ui/card"
import { Input } from "@/app/components/ui/input"
import { Label } from "@/app/components/ui/label"

const Login = () => {
  const router = useRouter()
  const [email, setEmail] = useState('')
  const [password, setPassword] = useState('')
  const [error, setError] = useState('')

  const handleSubmit = async (e: React.FormEvent) => {
    e.preventDefault()
    setError('')

    try {
      const res = await fetch('http://localhost:4000/dashboard/login', {
        method: 'POST',
        headers: {
          'Content-Type': 'application/json',
        },
        body: JSON.stringify({ email, password }),
      })

      const data = await res.json()

      if (!res.ok) {
        throw new Error(data.message || 'ログインに失敗しました')
      }

      if (data.success && data.token) {
        localStorage.setItem('token', data.token)
        router.push('/applications/dashboard')
      } else {
        throw new Error('認証に失敗しました')
      }

    } catch (err) {
      if (err instanceof Error) {
        setError(err.message)
      } else {
        setError('ログインに失敗しました')
      }
      console.error('Login error:', err)
    }
  }

  return (
    <div className="min-h-screen flex items-center justify-center bg-gray-50">
      <Card className="w-full max-w-md">
        <CardHeader>
          <CardTitle className="text-2xl text-center">管理者ログイン</CardTitle>
        </CardHeader>
        {error && (
          <div className="px-6 py-2 text-red-500 text-center">{error}</div>
        )}
        <form onSubmit={handleSubmit}>
          <CardContent>
            <div className="grid w-full items-center gap-4">
              <div className="flex flex-col space-y-1.5">
                <Label htmlFor="email">メールアドレス</Label>
                <Input
                  id="email"
                  type="email"
                  value={email}
                  onChange={(e) => setEmail(e.target.value)}
                  required
                />
              </div>
            </div>
          </CardContent>
          <CardContent>
            <div className="grid w-full items-center gap-4">
              <div className="flex flex-col space-y-1.5">
                <Label htmlFor="password">パスワード</Label>
                <Input
                  id="password"
                  type="password"
                  value={password}
                  onChange={(e) => setPassword(e.target.value)}
                  required
                />
              </div>
            </div>
          </CardContent>
          <CardFooter className="flex justify-between">
            <Button type="submit" className="w-full">ログイン</Button>
          </CardFooter>
        </form>
      </Card>
    </div>
  )
}

export default Login
honoでapiサーバー構築
import { serve } from '@hono/node-server'
import { Hono } from 'hono'
import { cors } from 'hono/cors'
import { dashboard } from './routes/dashboard'

const app = new Hono()

// CORSの設定
app.use('/*', cors({
  origin: ['http://localhost:3000'],
  allowMethods: ['GET', 'POST', 'PUT', 'DELETE'],
  allowHeaders: ['Content-Type', 'Authorization'],
  exposeHeaders: ['Content-Length', 'X-Kuma-Revision'],
  maxAge: 600,
  credentials: true,
}))

// ルートの設定
app.route('/dashboard', dashboard)

// サーバーの起動
const port = 4000
console.log(`Server is running on port ${port}`)

serve({
  fetch: app.fetch,
  port
})
次にルート先を設定します。
import { Hono } from 'hono'
// import bcrypt from 'bcrypt'
import { generateToken } from '../utils/jwt'
import { authMiddleware } from '../middleware/auth'
import { prisma } from '../lib/prismaClient'

type Variables = {
  userId: number;
};

const dashboard = new Hono<{ Variables: Variables }>()

dashboard.post('/login', async (c) => {
  try {
    const { email, password } = await c.req.json()

    const user = await prisma.user.findUnique({
      where: { email },
      select: {
        id: true,
        email: true,
        password: true
      }
    })


    if (!user) {
      return c.json({
        success: false,
        message: 'メールアドレスまたはパスワードが間違っています'
      }, 401)
    }

    // const isValid = await bcrypt.compare(password, user.password)
    const isValid = password === user.password

    if (!isValid) {
      return c.json({
        success: false,
        message: 'メールアドレスまたはパスワードが間違っています'
      }, 401)
    }

    const token = generateToken(user.id)
    return c.json({
      success: true,
      token,
      userId: user.id
    })

  } catch (error) {
    console.error('Login error:', error)
    return c.json({
      success: false,
      message: 'ログイン処理中にエラーが発生しました'
    }, 500)
  }
})

dashboard.use('/protected/*', authMiddleware)

dashboard.get('/protected/user', async (c) => {
  const userId = c.get('userId')

  const user = await prisma.user.findUnique({
    where: { id: userId },
    select: {
      id: true,
      email: true,
      name: true,
      createAt: true
    }
  })

  if (!user) {
    return c.json({ message: 'ユーザーが見つかりません' }, 404)
  }

  return c.json(user)
})

export { dashboard }
次に認証が成功した後のトークン作成する処理を実装しましょう。
import jwt from 'jsonwebtoken'

const JWT_SECRET = process.env.JWT_SECRET || 'your-secret-key'

interface JWTPayload {
  userId: number
}

export const generateToken = (userId: number): string => {
  return jwt.sign({ userId }, JWT_SECRET, { expiresIn: '24h' })
}

export const verifyToken = (token: string): JWTPayload | null => {
  try {
    const decoded = jwt.verify(token, JWT_SECRET) as JWTPayload
    return decoded
  } catch {
    return null
  }
}
次にapiとjwtの認証チェックの処理を記述していきましょう。
import { Context, Next } from 'hono'
import { verifyToken } from '../../utils/jwt'
import type { AuthMiddlewareContext } from './types'

export const authMiddleware = async (c: Context<{ Variables: AuthMiddlewareContext }>, next: Next) => {
  const token = c.req.header('Authorization')?.split(' ')[1]

  if (!token) {
    return c.json({ message: '認証が必要です' }, 401)
  }

  const decoded = verifyToken(token)
  if (!decoded) {
    return c.json({ message: 'トークンが無効です' }, 401)
  }

  c.set('userId', decoded.userId)
  await next()
}
次は型定義です。
export interface JWTPayload {
  userId: number;
}

export interface AuthMiddlewareContext {
  userId: number;
}
処理を外で使えるようにしましょう。
export { authMiddleware } from './auth'
export type { AuthMiddlewareContext, JWTPayload } from './auth/types'
次はアプリ側のmiddlewareの処理を記述していきましょう。
まずは、HOCの実装です。
HOCは「コンポーネントを受け取って、新しいコンポーネントを返す関数」です。簡単に言うと、コンポーネントを包装(ラップ)して機能を追加するパターンです。
'use client'
import React, { useEffect } from 'react'
import { useAuth } from './hooks'

export function withAuth<P extends object>(
  WrappedComponent: React.ComponentType<P>
) {
  return function WithAuthComponent(props: P) {
    const { isAuthenticated, isLoading, checkAuth } = useAuth()

    useEffect(() => {
      checkAuth()
    }, [checkAuth])

    if (isLoading) return <div>Loading...</div>
    if (!isAuthenticated) return null

    return <WrappedComponent {...props} />
  }
}
次に認証ロジックとAPI通信の追加です。
'use client'
import { useState } from 'react'
import { useRouter } from 'next/navigation'

export const useAuth = () => {
  const router = useRouter()
  const [isAuthenticated, setIsAuthenticated] = useState(false)
  const [isLoading, setIsLoading] = useState(true)

  const verifyAuth = async (token: string): Promise<boolean> => {
    try {
      const res = await fetch('http://localhost:4000/dashboard/protected/user', {
        headers: {
          'Authorization': `Bearer ${token}`
        }
      })
      return res.ok
    } catch {
      return false
    }
  }

  const checkAuth = async () => {
    const token = localStorage.getItem('token')
    if (!token) {
      setIsAuthenticated(false)
      setIsLoading(false)
      router.push('/applications/dashboard/login')
      return false
    }

    const isValid = await verifyAuth(token)
    if (!isValid) {
      setIsAuthenticated(false)
      setIsLoading(false)
      localStorage.removeItem('token')
      router.push('/applications/dashboard/login')
      return false
    }

    setIsAuthenticated(true)
    setIsLoading(false)
    return true
  }

  return { isAuthenticated, isLoading, checkAuth }
}
型定義の集約を行いましょう
export interface AuthState {
  isAuthenticated: boolean;
  isLoading: boolean;
}

export interface AuthResponse {
  success: boolean;
  token?: string;
  userId?: number;
  message?: string;
}

export interface AuthHook {
  isAuthenticated: boolean;
  isLoading: boolean;
  checkAuth: () => Promise<boolean>;
}
最後に外で使えるようにしましょう。
export { withAuth } from './auth'
export { useAuth } from './auth/hooks'
export type { AuthState, AuthResponse, AuthHook } from './auth/types'
こんな感じの認証になりました。
管理者認証の動画
終わりに
認証機能を今回は簡単に実装しました。今後はセキュリティー面を修正する必要がありますね。
また、今回認証機能を作るにあたり認証と認可の違いだったり、さまざまな認証方法があったりととても奥深いものだと思いました。
今後いろんな認証方法を実装していき学んでいきたいと思いました。


