Dockerを利用した Rails7 + MySQL8.0の環境構築についてまとめました。
Wiodows環境を想定して書いているので、Macの方は読み変えていただければと思います。
前提条件
Docker Desktop for Windows
フォルダ構成
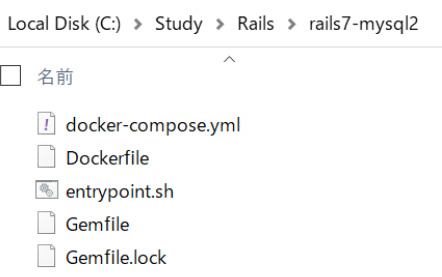
プロジェクトフォルダを作成して、ベースとなる設定ファイルを配置する。
以下のような感じ。
※ 改行コードがCRLFになっていたらLFに変更。ビルド時にエラーになることがある。

docker-compose.yml
Dockerコンテナを管理するための設定ファイルです。複数のDockerコンテナを定義し、それらの設定や依存関係を指定します。またネットワーク設定やボリュームのマウントなど、コンテナ間の接続やデータの共有に関する情報も含まれます。
version: '3'
services:
  web:
    # .で同一フォルダにDockerfileがあることを示す
    build: .
    # プロセスIDが残っているとエラーになるので、毎回削除する
    command: /bin/sh -c "rm -f tmp/pids/server.pid && bundle exec rails s -p 3001 -b '0.0.0.0'"
    volumes:
      - .:/app
    ports:
      - 3001:3001
    depends_on:
      - db
    # コンテナを起動させ続ける
    # 指定しないと起動直後にコンテナが終了してしまう
    tty: true
    # 標準入出力とエラー出力をコンテナに関連付け
    stdin_open: true
  db:
    image: mysql:8.0
    platform: linux/amd64
    command: mysqld --character-set-server=utf8 --collation-server=utf8_unicode_ci
    volumes:
      - db-volume:/var/lib/mysql
    # 環境変数
    environment:
      MYSQL_ROOT_PASSWORD: password
      # この設定がないと、webコンテナ(3001)にアクセスした際に(Host'172.23.0.3' is not allowed to connect to MySQL sever)エラー発生
      # →外部からのアクセス許可が必要
      MYSQL_ROOT_HOST: '%'
      TZ: "Asia/Tokyo"
    ports:
      - "3306:3306"
# PC上にdb-volumeという名前でボリューム(データ領域)が作成される
# コンテナを作り直したとしてもPC上に残るようにするために設定
volumes:
  db-volume:
Dockerfile
Dockerイメージのビルド手順を定義したもので、ベースイメージの指定、パッケージのインストール、ファイルのコピー、環境変数の設定など、イメージの構築に必要な手順が含まれます。
# FROM:使用するイメージ、バージョン
FROM ruby:3.1
# 公式→https://hub.docker.com/_/ruby
# ruby:3.1イメージはDebian11ベース

# Rails 7ではWebpackerが標準では組み込まれなくなったので、yarnやnodejsのインストールが不要

# gemバージョン
ARG RUBYGEMS_VERSION=3.3.20

# WORKDIR:作業ディレクトリ
RUN mkdir /app
WORKDIR /app

# COPY:コピー元とコピー先を指定
# ローカルのGemfileをコンテナ内の/app/Gemfileに
COPY Gemfile /app/Gemfile

COPY Gemfile.lock /app/Gemfile.lock

# RubyGemsをアップデート
RUN gem update --system ${RUBYGEMS_VERSION} && \
    bundle install

COPY . /app

# コンテナ起動時に実行させるスクリプト
COPY entrypoint.sh /usr/bin/
RUN chmod +x /usr/bin/entrypoint.sh
ENTRYPOINT ["entrypoint.sh"]
EXPOSE 3001

# コンテナ実行時にデフォルトで実行するコマンド
# Rails サーバ起動
CMD ["rails", "server", "-b", "0.0.0.0"]
entrypoint.sh
コンテナの起動時に実行される初期化や設定処理を記述します。
#!/bin/bash
set -e

# プロセスIDの残骸を削除
rm -f /app/tmp/pids/server.pid

# exec CMDで渡されたコマンドを実行(→rails s)
# コンテナのプロセスを実行する。(Dockerfile 内の CMD に設定されているもの。)
exec "$@"
Gemfile
Rubyプロジェクトで使用されるGem(ライブラリやパッケージ)の依存関係を管理するためのファイルです。(npmみたいな感じ)Bundlerと呼ばれるツールを使用して、Gemfileに記述された依存関係を解決し、必要なGemをインストールできます。
source "https://rubygems.org"
git_source(:github) { |repo| "https://github.com/#{repo}.git" }

ruby "3.1.4"

# Bundle edge Rails instead: gem "rails", github: "rails/rails", branch: "main"
gem "rails", "~> 7.0.4", ">= 7.0.4.3"

# The original asset pipeline for Rails [https://github.com/rails/sprockets-rails]
gem "sprockets-rails"

# Use mysql as the database for Active Record
gem "mysql2", "~> 0.5"

# Use the Puma web server [https://github.com/puma/puma]
gem "puma", "~> 5.0"

# Use JavaScript with ESM import maps [https://github.com/rails/importmap-rails]
gem "importmap-rails"

# Hotwire's SPA-like page accelerator [https://turbo.hotwired.dev]
gem "turbo-rails"

# Hotwire's modest JavaScript framework [https://stimulus.hotwired.dev]
gem "stimulus-rails"

# Build JSON APIs with ease [https://github.com/rails/jbuilder]
gem "jbuilder"

# Use Redis adapter to run Action Cable in production
# gem "redis", "~> 4.0"

# Use Kredis to get higher-level data types in Redis [https://github.com/rails/kredis]
# gem "kredis"

# Use Active Model has_secure_password [https://guides.rubyonrails.org/active_model_basics.html#securepassword]
# gem "bcrypt", "~> 3.1.7"

# Windows does not include zoneinfo files, so bundle the tzinfo-data gem
gem "tzinfo-data", platforms: %i[ mingw mswin x64_mingw jruby ]

# Reduces boot times through caching; required in config/boot.rb
gem "bootsnap", require: false

# UserAuthentication
gem 'devise'

# Use Sass to process CSS
gem "sassc-rails"

# Use jquery
gem 'jquery-rails'

# Use Bootstrap
gem 'bootstrap', '~> 5.1.3'

# JavaScript runtime
gem 'mini_racer'

# Code Helper
gem 'solargraph'

# Use Active Storage variants [https://guides.rubyonrails.org/active_storage_overview.html#transforming-images]
# gem "image_processing", "~> 1.2"

group :development, :test do
  # See https://guides.rubyonrails.org/debugging_rails_applications.html#debugging-with-the-debug-gem
  gem "debug", platforms: %i[ mri mingw x64_mingw ]
end

group :development do
  # Use console on exceptions pages [https://github.com/rails/web-console]
  gem "web-console"

  # Add speed badges [https://github.com/MiniProfiler/rack-mini-profiler]
  # gem "rack-mini-profiler"

  # Speed up commands on slow machines / big apps [https://github.com/rails/spring]
  # gem "spring"
end

group :test do
  # Use system testing [https://guides.rubyonrails.org/testing.html#system-testing]
  gem "capybara"
  gem "selenium-webdriver"
  gem "webdrivers"
end
jqueryやBootStrapなど、色々インストールしていますが、不要な方は削除してください。
Railsプロジェクト作成
$ docker-compose run web rails new . --force --no-deps --database=mysql
Dockerfileの記述をもとにrailsプロジェクトが作られる。
※Rails7はデフォルトでは webpack といったJSビルダーが使われず、Importmapという新しい方式を採用しています。npm/yarnも不要。オプションで指定することで従来どおりに webpackも使用可能ですが、せっかくraisl7を使用するのでImportmapにします。
DB設定
Dockerfileで設定したpasswordとhostを修正
development:
  <<: *default
  database: myapp_development
  host: db
  username: root
  password: password

# Warning: The database defined as "test" will be erased and
# re-generated from your development database when you run "rake".
# Do not set this db to the same as development or production.
test:
  <<: *default
  database: myapp_test
  host: db
  username: root
  password: password
DB作成
$ docker-compose run web rails db:create
Host 'xxx.xxx.xxx.xxx' is not allowed to connect to this MySQL server 等、エラーが発生する場合
docker-composeのネットワーク定義などがキャッシュで残っている可能性があるので、DB設定をすべて削除してみる
# すべてにサヨナラしたいとき
$ docker-compose down --rmi all --volumes --remove-orphans
コンテナ起動
$ docker-compose up -d
