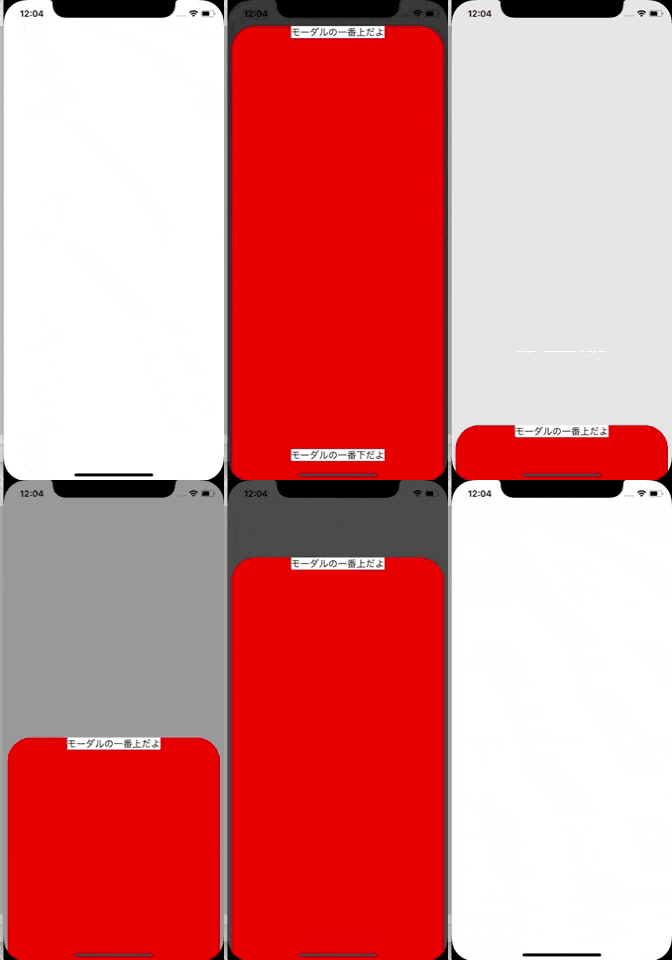
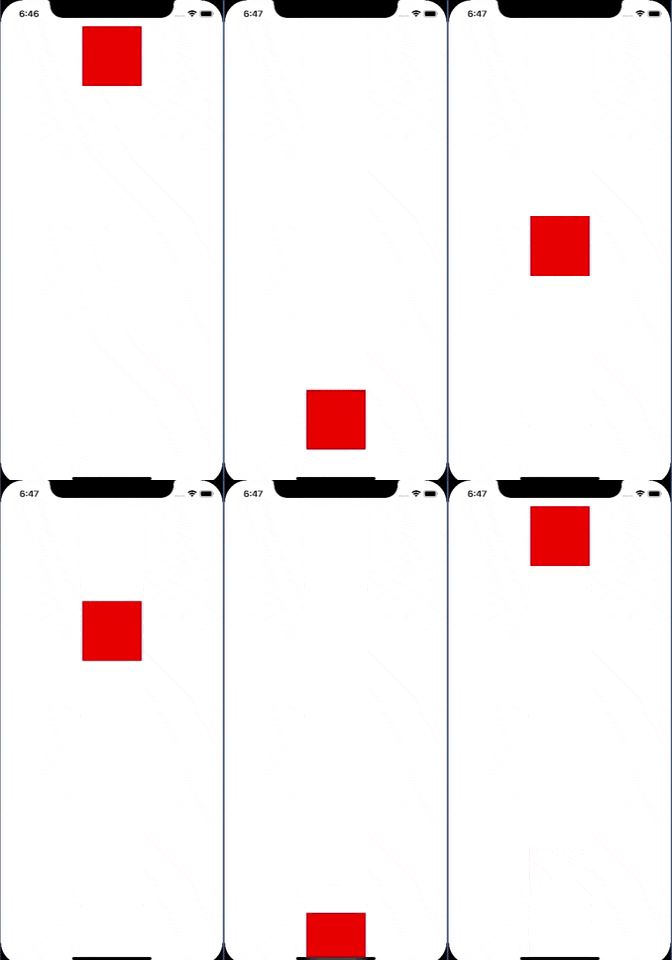
コードでAutolayoutしながらモーダルビューです
今回はアニメーションのやり方を説明してモーダルビューを表示するとこまでやります
コードでAutolayouts入門はこちらです
アニメーション
考え方としては表示状態の制約と非表示状態の制約のふたつの制約を用意して一方のみactiveにするというものです
サンプルコードは赤色の矩形を、表示状態ではsafeArea内のトップに現れるように、非表示状態では下に隠れるようにしてます
ソースコード
import UIKit
import TinyConstraints

class TinyConstraintsViewController:UIViewController{

  private weak var moveView:UIView?
  private var showConstraint:Constraint?
  private var dismissConstraint:Constraint?


  override func viewDidLoad() {
    super.viewDidLoad()
    //制約をつける
    self.setup()
  }

  override func touchesBegan(_ touches: Set<UITouch>, with event: UIEvent?) {
    //状態遷移する
    self.transitState()
  }
}

extension TinyConstraintsViewController{

  func setup(){
    let moveView = UIView()
    self.view.addSubview(moveView)
    self.moveView = moveView
    moveView.width(100)
    moveView.height(to:moveView, moveView.widthAnchor)
    moveView.backgroundColor = .red

    moveView.centerXToSuperview()

    //非表示の制約 最初はisActiveをfalseに
    self.dismissConstraint = moveView.topToBottom(of: self.view, isActive:false)
    //表示の制約 safeArea内
    self.showConstraint = moveView.topToSuperview(usingSafeArea:true)
  }

  func transitState(){
    /*
     表示・非表示の状態遷移
     /////////注意点/////////
     制約は先にtrue状態のものをfalseにする
     そうしないと一瞬両方がtrueになり制約がバッティングする
     */
    if self.showConstraint!.isActive {
      self.showConstraint!.isActive = false
      self.dismissConstraint?.isActive = true
    }
    else{
      self.dismissConstraint?.isActive = false
      self.showConstraint!.isActive = true
    }

    //1秒かけて制約の状態をviewに反映させる
    UIView.animate(withDuration: 1) {
      self.view.layoutIfNeeded()
    }
  }
}
解説
実はTinyConstraintsでは制約をつけたメソッドを呼ぶと戻り値としてConstraintもしくは[Constraint]の型を返してます
それをクラス変数に代入しておき状態遷移時にtrueとfalseを切り替えます
またふたつの制約が同時に実行されると矛盾するので一方のisActiveパラメータをfalseにして制約が効かないようにします
アニメーション自体の切り替えは
・どういう制約からどういう制約に変えるのか指定する
・アニメーションメソッドでlayoutIfNeededを呼ぶ
という流れになります
注意点
ソースのコメントにも書いてますが、表示状態の制約と非表示状態の制約が両方trueになるタイミングがあるとxcodeが警告を吐きまくります
両方の制約のisActiveをfalseにしてから、必要な制約のisActiveをtrueにしましょう
モーダルビュー
アニメーションを応用して下から出てくるモーダルビューを自作します
ソースコードはモーダルビューとそれを表示させるコントローラーのふたつです

ソースコード
import UIKit
import TinyConstraints

class ModalView: UIView {

  var isShowing:Bool = false

  private weak var backgroundView:UIView?
  private weak var slideView:UIView?
  private weak var safeAreaView:UIView?

  private var showConstraint:Constraint?
  private var dismissConstraint:Constraint?

  convenience init() {self.init(frame: UIScreen.main.bounds)}
  override init(frame:CGRect) {
    super.init(frame: frame)
    self.setup()
  }

  override func didMoveToWindow() {
    super.didMoveToWindow()
    //windowに貼り付けたあとに制約をつける
    self.centerInSuperview()
  }
  required init?(coder aDecoder: NSCoder) { fatalError("init(coder:) has not been implemented") }

  private func setup() {
    //自身のサイズ
    self.backgroundColor = .clear
    self.alpha = 0
    self.size(UIScreen.main.bounds.size)

    //背景をブラックアウトさせるview
    let backgroundView = UIView()
    self.addSubview(backgroundView)
    self.backgroundView = backgroundView
    backgroundView.edgesToSuperview()
    backgroundView.backgroundColor = UIColor.black.withAlphaComponent(0.8)

    //スライドさせるview
    let slideView = UIView()
    self.addSubview(slideView)
    self.slideView = slideView
    slideView.backgroundColor = .clear
    slideView.size(to: self)
    slideView.centerXToSuperview()
    //表示の制約
    self.dismissConstraint = slideView.topToBottom(of: self)
    //非表示の制約
    self.showConstraint = slideView.topToSuperview(isActive: false)
    do{
      //セーフエリア内のview
      let safeAreaView = UIView()
      slideView.addSubview(safeAreaView)
      self.safeAreaView = safeAreaView
      safeAreaView.layer.masksToBounds = true
      if #available(iOS 11.0, *) {
        safeAreaView.layer.maskedCorners = [.layerMinXMinYCorner, .layerMaxXMinYCorner]
      } else {
        // Fallback on earlier versions
      }
      safeAreaView.layer.cornerRadius = 40.0
      safeAreaView.backgroundColor = .red
      safeAreaView.widthToSuperview(offset:-14)
      safeAreaView.centerXToSuperview()
      safeAreaView.bottomToSuperview(usingSafeArea:true)
      safeAreaView.topToSuperview(usingSafeArea:true)

      //セーフエリア内にコンテンツを入れる
      self.setMainContents(mainView: safeAreaView)

      //セーフエリアの外のview
      let bottomAreaView = UIView()
      slideView.addSubview(bottomAreaView)
      bottomAreaView.backgroundColor = safeAreaView.backgroundColor
      bottomAreaView.width(to: safeAreaView)
      bottomAreaView.centerXToSuperview()
      bottomAreaView.topToBottom(of: safeAreaView)
      bottomAreaView.bottomToSuperview()
    }
  }

  func show(_ animated:Bool = true, complition:(()->())? = nil) {
    self.alpha = 1
    //表示と非表示の制約を入れ替える
    self.dismissConstraint?.isActive = false
    self.showConstraint?.isActive = true
    let duration = animated ? 0.4 : 0.0
    UIView.animate(withDuration: duration, animations: {
      self.backgroundView?.alpha = 1
      self.layoutIfNeeded()
    }) { (isComp) in
      self.isShowing = true
      complition?()
    }
  }

  func hide(_ animated:Bool=true, complition:(()->())? = nil) {
    //表示と非表示の制約を入れ替える
    self.showConstraint?.isActive = false
    self.dismissConstraint?.isActive = true
    let duration = animated ? 0.4 : 0.0
    UIView.animate(withDuration: duration, animations: {
      self.backgroundView?.alpha = 0
      self.layoutIfNeeded()
    }) { (isComp) in
      self.alpha = 0
      self.isShowing = false
      complition?()
    }
  }

  private func setMainContents(mainView:UIView?){
    guard let mainView = mainView else { return }

    let topLabel = UILabel()
    mainView.addSubview(topLabel)
    topLabel.backgroundColor = .white
    topLabel.text = "モーダルの一番上だよ"
    topLabel.sizeToFit()
    topLabel.centerXToSuperview()
    topLabel.topToSuperview()

    let bottomLabel = UILabel()
    mainView.addSubview(bottomLabel)
    bottomLabel.backgroundColor = .white
    bottomLabel.text = "モーダルの一番下だよ"
    bottomLabel.sizeToFit()
    bottomLabel.centerXToSuperview()
    bottomLabel.bottomToSuperview()
  }
}
import UIKit
import TinyConstraints

class ViewController:UIViewController{

  var modalView:ModalView?=nil

  override func viewDidLoad() {
    super.viewDidLoad()

    self.view.backgroundColor = .white

    //モーダルビューをセット
    let modalView = ModalView()
    self.view.addSubview(modalView)
    self.modalView = modalView
  }

  override func touchesBegan(_ touches: Set<UITouch>, with event: UIEvent?) {
    guard let modalView = self.modalView else { return }
    //非表示、非表示を切り替える
    if modalView.isShowing {
      modalView.dismiss()
    }
    else{
      modalView.show()
    }
  }
}
解説
これまでの組み合わせなので解説することもないのですが一応。。。
モーダル自体はセーフエリアの外まで伸びているため、セーフエリア内のsafeAreaViewとセーフエリア外のbottomAreaViewを用意してひとつのviewのように見せかけてます
実際にコンテンツを貼っていくのはsafeAreaView内だけにしておくとセーフエリアを気にすることなくどの端末でも同じ操作性を保てます
