はじめに
去年から量子コンピュータの勉強会に参加するようになったのですが、そこでとりあげられていた量子GANのお話が難しいながらもとても面白かったので、論文を読んでまとめることにしました。
また、量子GAN実装の方法も書いてあったので、MDR社のblueqatとpytorchでコードを書いてみることにしました。
論文のリンク↓↓
https://arxiv.org/pdf/1807.01235.pdf
論文の要旨
GANはDiscriminatorとGeneratorを交互に競合させながら学習を進めることで、本物に近いデータの生成を可能にするネットワークです。本論文ではDiscriminatorはそのままにして、Generatorを量子ゲートでおきかえています。これにより既存のGANや、量子機械学習と比べていくつかの点で有用だそうです。
- 古典的なGANでは勾配消失問題により、離散的な値を生成するのが苦手だったが、量子ゲートのおかげで原理的に可能になる。
- 量子機械学習では入力が普通の数値、出力が量子状態となる。古典的なインプットデータを量子状態に圧縮することや、解に対応する量子状態を出力して計算速度の向上につなげることがボトルネックだったがそれを回避する。
- 数値で与えられた確率分布が量子状態に落とし込めるので、色々なアプリケーションに有用かもしれない。
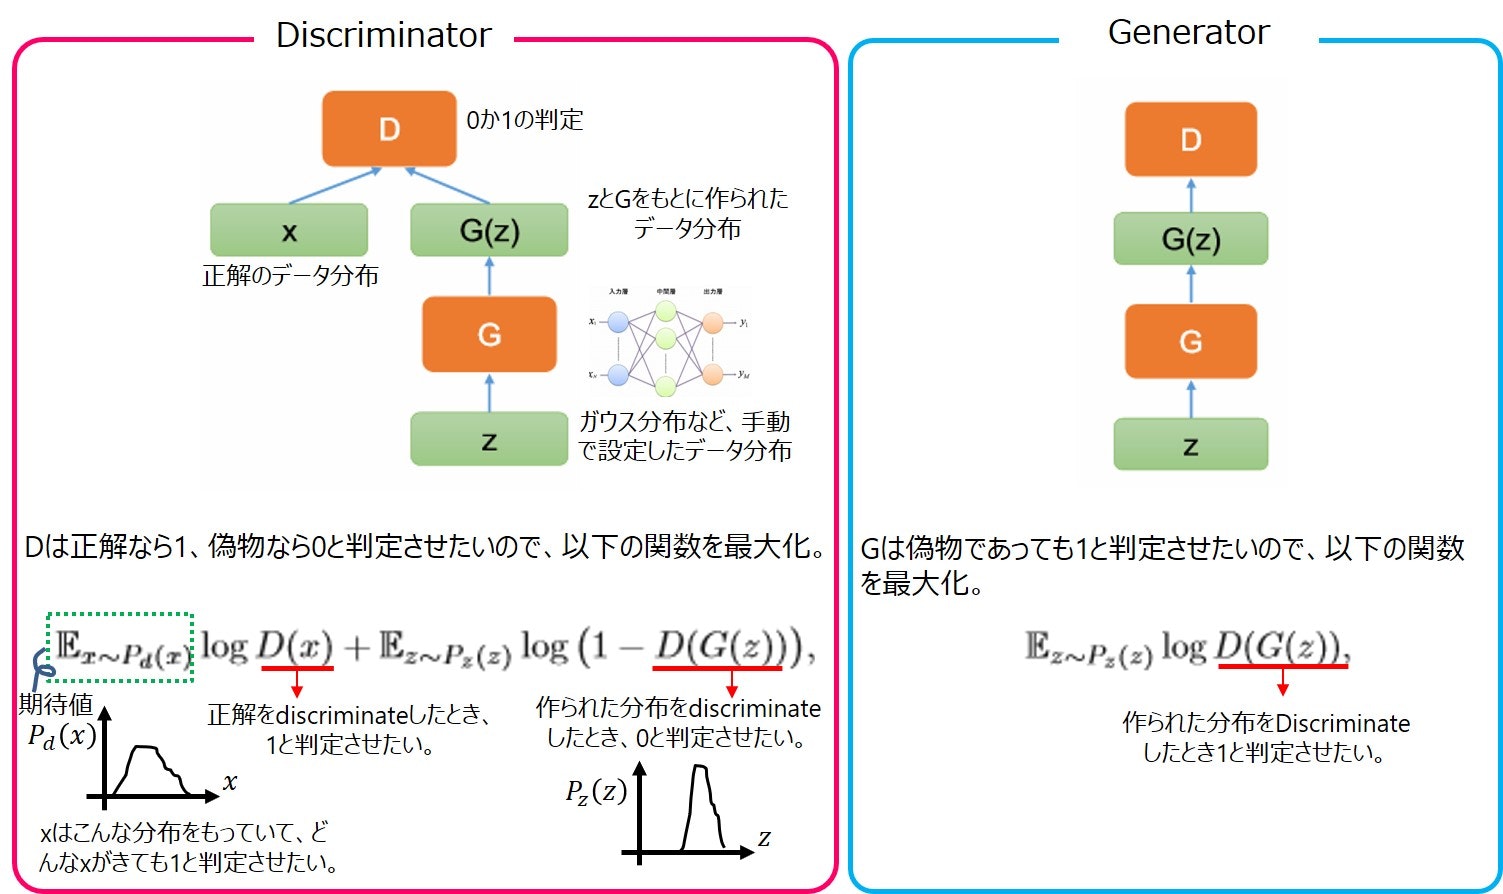
BASパターン
[引用]https://www.nature.com/articles/s41534-019-0157-8
Generator
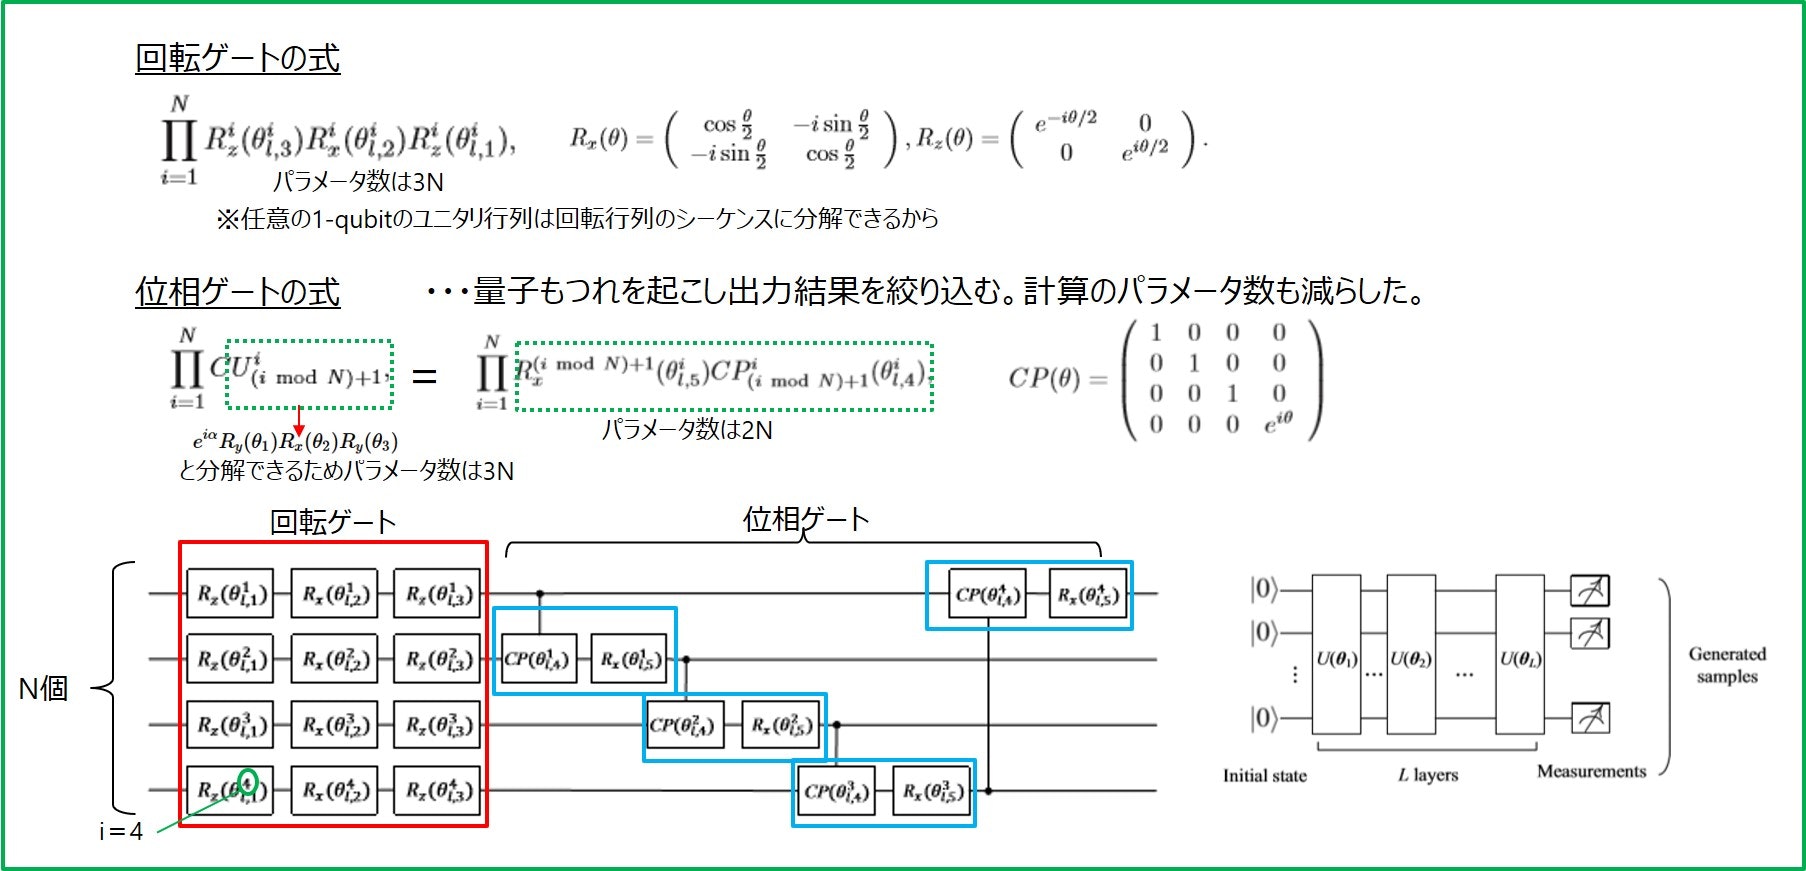
Generatorは回転ゲートと位相ゲートの組をL層つなげたものからなります。まとめると以下のような感じです。量子GANでは、5NL個のパラメータθを最適化していくことになります。
Discriminator
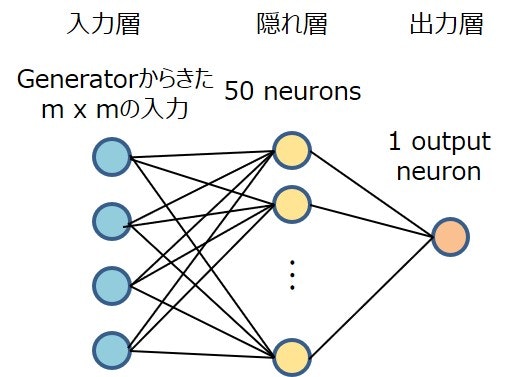
Generatorから来た4つの入力を、50個のニューロンからなる隠れ層に通して、出力する形としています。隠れ層、出力層の活性化関数はそれぞれrelu, sigmoid関数です。
学習の仕方
最初はgeneratorがBASパターン以外も生成するため誤差が大きいですが、①~⑩を繰り返すと正解のBASパターンの分布(等確率で分布)に近づいてくれるようになっているみたいです。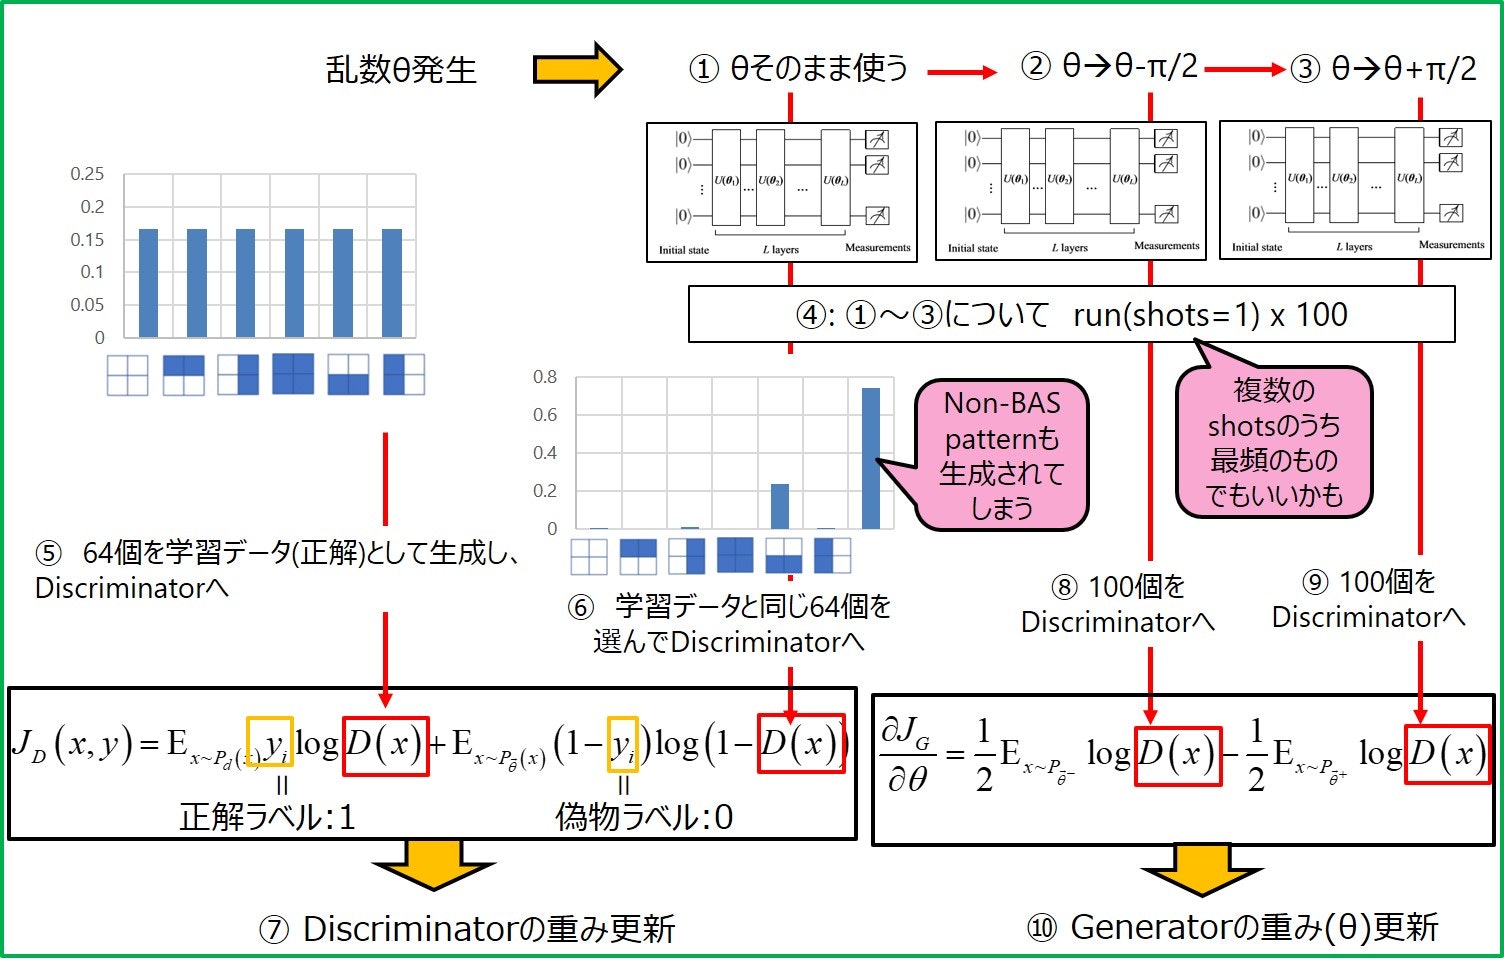
optimizerは、generatorがSGD(lr=2e-2)、discriminatorがAdam(lr=1e-3)です。
pytorchとblueqatを用いた量子GANの実装
実装方針として、古典GANを書いてから、本論文で提案された量子GANに書き換えることにしました。参考にさせていただいたサイトは以下になります。
・古典GAN: https://github.com/wiseodd/generative-models/tree/master/GAN/vanilla_gan/gan_pytorch.py
・ BASパターンの生成: https://github.com/patricieni/RBM-Tensorflow/blob/master/rbm/examples/bas_data.py
まずは古典GANからいきます。
python==3.6.6
numpy==1.16.0
pytorch==1.1.0
blueqat==0.3.13
blueqatは下記からインストールしました。チュートリアルがとてもわかりやすいです。
[インストール先] https://github.com/Blueqat/Blueqat
[日本語チュートリアル] https://github.com/Blueqat/Blueqat-tutorials/tree/master/tutorial-ja
import sys
import io
import math
import torch
import torch.nn.functional as nn
from torch.utils.data import TensorDataset, DataLoader
import numpy.random as rng
import bas_data as bas
import torch.autograd as autograd
import torch.optim as optim
import numpy as np
import matplotlib.pyplot as plt
import matplotlib.gridspec as gridspec
import os
import bas_data as bas
import blueqat as blueqat
from torch.autograd import Variable
from tensorflow.examples.tutorials.mnist import input_data
from blueqat import Circuit

mb_size = 200
Z_dim = 20
X_dim = 4
y_dim = 6
h_dim = 20
dis_h_dim = 50
c = 0
lr = 1e-3
print("X_dim=",X_dim)

def xavier_init(size):
    in_dim = size[0]
    xavier_stddev = 1. / np.sqrt(in_dim / 2.)
    return Variable(torch.randn(*size) * xavier_stddev, requires_grad=True)


# Generator, Discriminatorのlossのプロット
def plot_loss (G_losses, D_losses, epoch):
    plt.figure(figsize=(10,5))
    plt.title("Generator and Discriminator Loss - EPOCH "+ str(epoch))
    plt.plot(G_losses,label="G")
    plt.plot(D_losses,label="D")
    plt.xlabel("iterations")
    plt.ylabel("Loss")
    plt.legend()
    #plt.show()
    if not os.path.exists('out/'):
        os.makedirs('out/')
    #plt.savefig('out/loss_{}.png'.format(str(c).zfill(3)), bbox_inches='tight')
    plt.savefig('out/loss.png', bbox_inches='tight')
    plt.close()
# ==================== GENERATOR ========================

Wzh = xavier_init(size=[Z_dim, h_dim])
bzh = Variable(torch.zeros(h_dim), requires_grad=True)

Whx = xavier_init(size=[h_dim, X_dim])
bhx = Variable(torch.zeros(X_dim), requires_grad=True)

##### あとで①で置き換える(開始)#####
def G(z):
    h = nn.relu(z @ Wzh + bzh.repeat(z.size(0), 1))   #@はtorch.matmul()と同じ z.size(0)=mb_size
    X = nn.sigmoid(h @ Whx + bhx.repeat(h.size(0), 1))
    return X
##### あとで①で置き換える(終了)#####

# ==================== DISCRIMINATOR ========================

Wxh = xavier_init(size=[X_dim, dis_h_dim])
bxh = Variable(torch.zeros(dis_h_dim), requires_grad=True)

Why = xavier_init(size=[dis_h_dim, 1])
bhy = Variable(torch.zeros(1), requires_grad=True)


def D(X):
    h = nn.leaky_relu(X @ Wxh + bxh.repeat(X.size(0), 1),0.02)
    y = nn.sigmoid(h @ Why + bhy.repeat(h.size(0), 1))
    return y

G_params = [Wzh, bzh, Whx, bhx]
D_params = [Wxh, bxh, Why, bhy]
params = G_params + D_params

# ===================== TRAINING ========================
def reset_grad():
    for p in params:
        if p.grad is not None:
            data = p.grad.data
            p.grad = Variable(data.new().resize_as_(data).zero_())

G_solver = optim.SGD(G_params, lr=2e-2)
D_solver = optim.Adam(D_params, lr=1e-3)

ones_label = Variable(torch.ones(mb_size, 1))
zeros_label = Variable(torch.zeros(mb_size, 1))
ones_label_d = Variable(torch.ones(64, 1))
zeros_label_d = Variable(torch.zeros(64, 1))

# BAS pattern生成(batch_size個)
X=bas.get_data(rng).astype(np.float32)
X=np.tile(X,(20,1))
X = Variable(torch.from_numpy(X))


G_losses = []
D_losses = []

for it in range(5002):
    # Sample data
    z = Variable(torch.randn(mb_size, Z_dim))


    # Dicriminator forward-loss-backward-update
    #####あとで②で置き換える(開始)#####
    G_sample = G(z)
    #####あとで②で置き換える(終了)#####

    temp_g=DataLoader(G_sample,batch_size=64, shuffle=False)
    temp_x= DataLoader(X, batch_size=64, shuffle=False)
    G_sample=next(iter(temp_g))
    X = next(iter(temp_x))

    D_real = D(X)
    D_fake = D(G_sample)

    D_loss_real = nn.binary_cross_entropy(D_real, ones_label_d)
    D_loss_fake = nn.binary_cross_entropy(D_fake, zeros_label_d)
    D_loss = (D_loss_real + D_loss_fake)/2.

    D_loss.backward()
    D_solver.step()

    # Housekeeping - reset gradient
    reset_grad()

    # Generator forward-loss-backward-update
    z = Variable(torch.randn(mb_size, Z_dim))

    #####あとで③で置き換える(開始)#####
    G_sample = G(z)
    D_fake = D(G_sample)

    G_loss = nn.binary_cross_entropy(D_fake, ones_label)
    #####あとで③で置き換える(終了)#####

    G_loss.backward()
    G_solver.step()

    # Housekeeping - reset gradient
    reset_grad()

    # Print and plot every now and then
    kldfloat=[]
    if it % 50==0:
        D_losses.append(D_loss.data.numpy())
        G_losses.append(G_loss.data.numpy())
    if it % 1000 == 0:
        plot_loss(G_losses, D_losses, it)
        print('Iter-{}; D_loss: {}; G_loss: {}'.format(it, D_loss.data.numpy(), G_loss.data.numpy()))

        #####あとで④で置き換える(開始)#####
        samples = G(z).data.numpy()[:200]
        #####あとで④で置き換える(終了)#####

        fig = plt.figure(figsize=(16, 16))
        gs = gridspec.GridSpec(16, 16)
        gs.update(wspace=0.05, hspace=0.05)

        for i, sample in enumerate(samples):
            ax = plt.subplot(gs[i])
            plt.axis('on')
            ax.set_xticklabels([])
            ax.set_yticklabels([])
            ax.set_aspect('equal')
            plt.imshow(sample.reshape(2, 2), cmap='Greys_r')

        if not os.path.exists('out/'):
            os.makedirs('out/')

        plt.savefig('out/{}.png'.format(str(c).zfill(3)), bbox_inches='tight')
        c += 1
        plt.close(fig)
※Discriminatorの1層目のreluをleaky_relu(lr=0.02)にした以外、ほとんど論文で報告されたパラメータや誤差関数とそろえたつもりです。
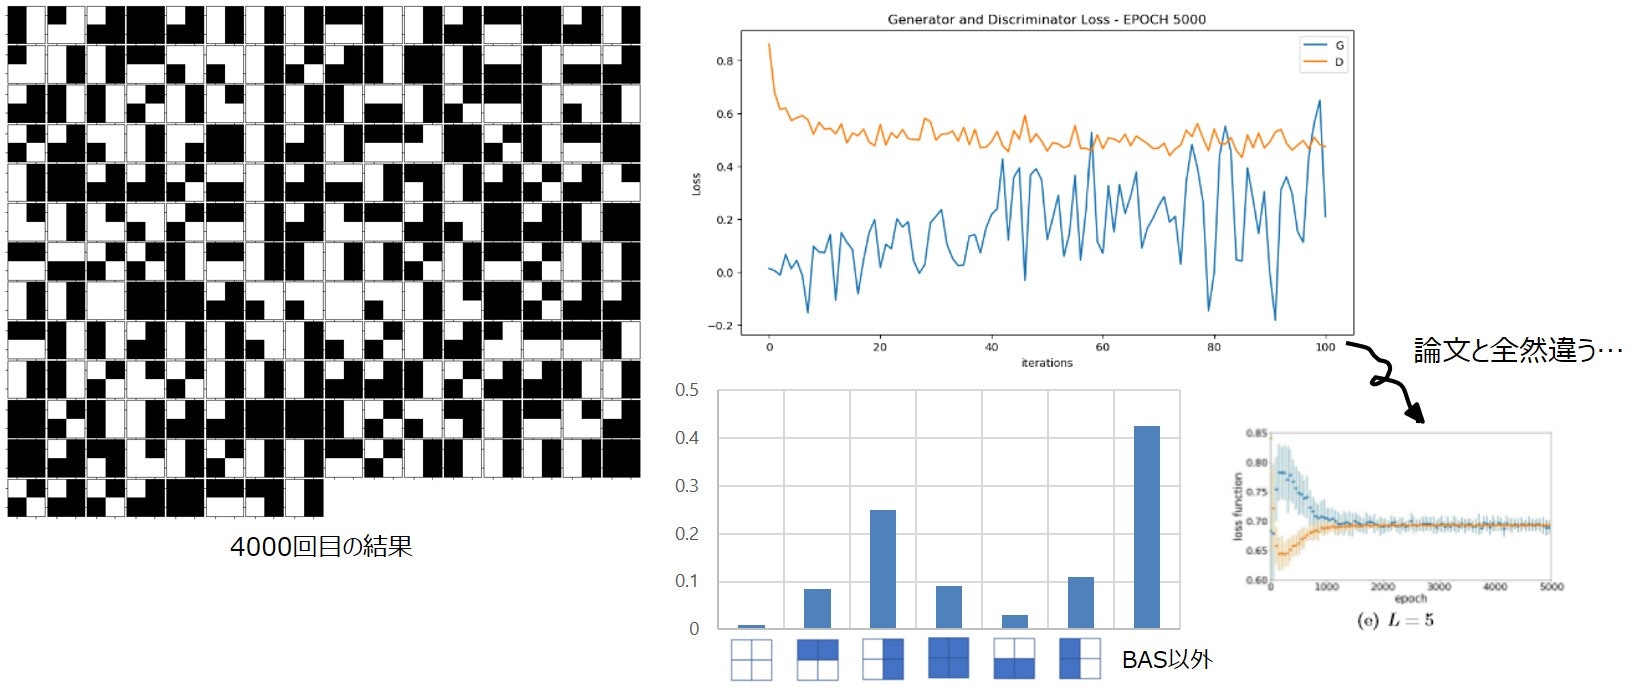
生成されたBASパターンとそれぞれの生成割合は以下のようになりました。generatorのlossがかなり大きかったです。BASパターン以外のものはほとんど生成されませんでしたが、2つのBASパターンが全く生成されませんでした。
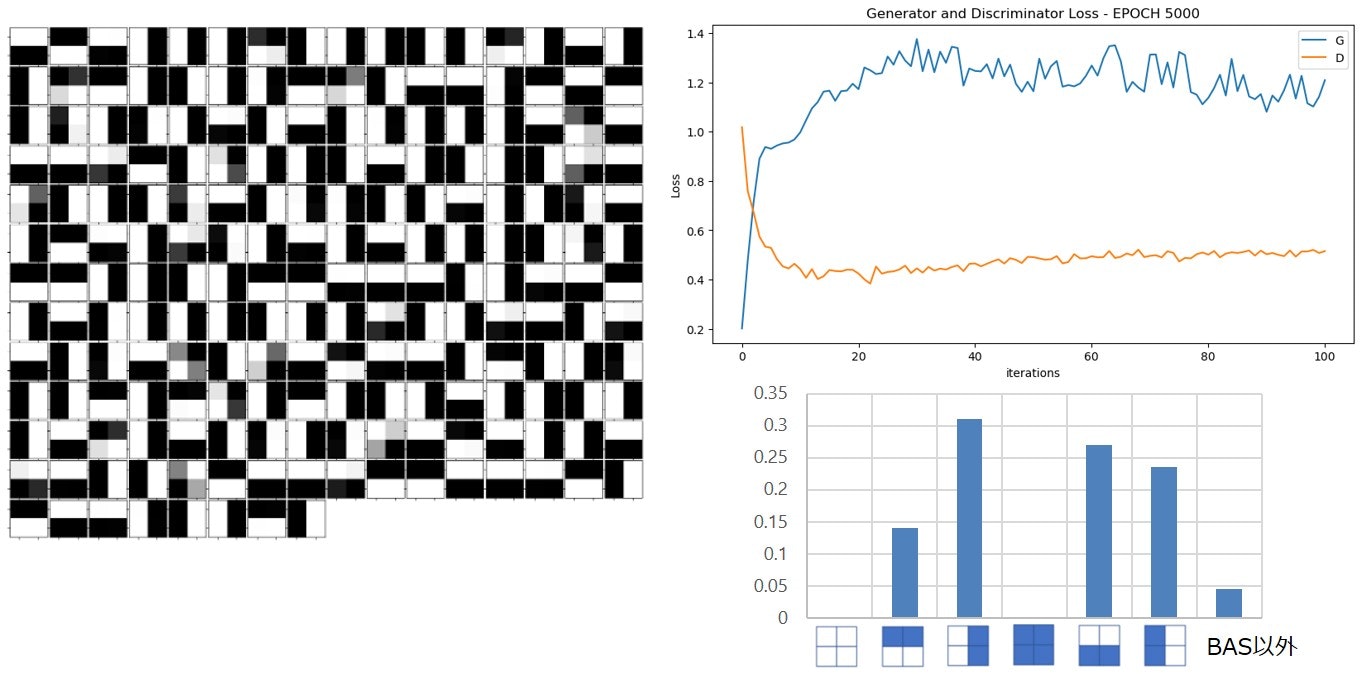
つづいて量子GANです。
①θそのまま、θ±pi/2の3つの回路を作成して測定を行い、generatorのアウトプットとしてreturnします。
def G(num):
    #θをそのまま使う
    Wzh_np = Wzh.to('cpu').detach().numpy()
    """ L=1 """
    r = Circuit().rz(Wzh_np[0,0] * math.pi)[0].rx(Wzh_np[0,1]* math.pi)[0].rz(Wzh_np[0,2] * math.pi)[0]
    r.rz(Wzh_np[0,3] * math.pi)[1].rx(Wzh_np[0,4] * math.pi)[1].rz(Wzh_np[0,5] * math.pi)[1]
    r.rz(Wzh_np[0,6] * math.pi)[2].rx(Wzh_np[0,7] * math.pi)[2].rz(Wzh_np[0,8] * math.pi)[2]
    r.rz(Wzh_np[0,9] * math.pi)[3].rx(Wzh_np[0,10] * math.pi)[3].rz(Wzh_np[0,11] * math.pi)[3]
    r.cr(Wzh_np[0,12] * math.pi)[0, 1].rx(Wzh_np[0,13] * math.pi)[1]
    r.cr(Wzh_np[0,14] * math.pi)[1, 2].rx(Wzh_np[0,15] * math.pi)[2]
    r.cr(Wzh_np[0,16] * math.pi)[2, 3].rx(Wzh_np[0,17] * math.pi)[3]
    r.cr(Wzh_np[0,18] * math.pi)[3, 0].rx(Wzh_np[0,19] * math.pi)[0]

     ~~~L=2~4は略。L=1の回路をコピーしてWzh_np[]の番号を変えればOK~~~

    """ L=5 """
    r.rz(Wzh_np[4, 0] * math.pi)[0].rx(Wzh_np[4, 1] * math.pi)[0].rz(Wzh_np[4, 2] * math.pi)[0]
    r.rz(Wzh_np[4,3] * math.pi)[1].rx(Wzh_np[4,4] * math.pi)[1].rz(Wzh_np[4,5] * math.pi)[1]
    r.rz(Wzh_np[4,6] * math.pi)[2].rx(Wzh_np[4,7] * math.pi)[2].rz(Wzh_np[4,8] * math.pi)[2]
    r.rz(Wzh_np[4,9] * math.pi)[3].rx(Wzh_np[4,10] * math.pi)[3].rz(Wzh_np[4,11] * math.pi)[3]
    r.cr(Wzh_np[4,12] * math.pi)[0, 1].rx(Wzh_np[4,13] * math.pi)[1]
    r.cr(Wzh_np[4,14] * math.pi)[1, 2].rx(Wzh_np[4,15] * math.pi)[2]
    r.cr(Wzh_np[4,16] * math.pi)[2, 3].rx(Wzh_np[4,17] * math.pi)[3]
    r.cr(Wzh_np[4,18] * math.pi)[3, 0].rx(Wzh_np[4,19] * math.pi)[0]
    r.m[:]

   #θ+pi/2の回路
   Wzh_npp=Wzh_np + 0.5  #この直後に上記のL1~L5をコピペして、Wzh_npをWzh_nppに書き換える。

   #θ+pi/2の回路
   Wzh_npm = Wzh_np - 0.5 #この直後に上記のL1~L5をコピペして、Wzh_nppをWzh_npmに書き換える。

# num個分順番に観測値を格納したい
    result=[]
    result_plus=[]
    result_minus=[]
    for j in range(num):
        #θをそのまま使った回路で観測
        output = r.run(shots=10) #観測するときのshot数。10shotsのうち最頻をとる。
        with io.StringIO() as f:
            sys.stdout = f
            print(output)
            text = f.getvalue()
            sys.stdout = sys.__stdout__
            #観測値はCounter({‘0010’: 1})のように出力されるので
            #11-14番目の文字列をfloatに変換する
            a=[float(text[10]), float(text[11]), float(text[12]),float(text[13])]
            result.append(a)

       #θ+pi/2の回路で観測
        output = rplus.run(shots=1)
        with io.StringIO() as f:
            sys.stdout = f
            print(output)
            text = f.getvalue()
            sys.stdout = sys.__stdout__
            a=[float(text[10]), float(text[11]), float(text[12]),float(text[13])]
            result_plus.append(a)

        #θ-pi/2の回路で観測
        output = rminus.run(shots=1)
        with io.StringIO() as f:
            sys.stdout = f
            print(output)
            text = f.getvalue()
            sys.stdout = sys.__stdout__
            a=[float(text[10]), float(text[11]), float(text[12]),float(text[13])]
            result_minus.append(a)

    X=torch.tensor(result)
    X_plus = torch.tensor(result_plus)
    X_minus = torch.tensor(result_minus)

    return X,X_plus,X_minus
②returnされたものを3つの変数に格納し、discriminatorの誤差を計算します。
G_sample,G_plus, G_minus = G(mb_size)
③generatorの誤差を計算します。
    # Generator forward-loss-backward-update
    G_sample,G_plus, G_minus = G(mb_size)

    D_fake = D(G_sample)
    D_fake_plus = D(G_plus)
    D_fake_minus = D(G_minus)

    G_loss = -(nn.binary_cross_entropy(D_fake_minus, ones_label)-nn.binary_cross_entropy(D_fake_plus, ones_label))/2.
④generatorで200個パターンを生成します。
samples = G(200)[0].data.numpy()[:200]
結果です。
generatorのlossの値が低すぎな上(負の時もあった)、振動が激しかったです。
ほぼすべてのBASパターンが発生しましたが、生成されなかったBASパターンの割合が多かったです。
結果は載せていませんが、Iteration0のとき発生させたパターンの分布に結果が左右される傾向にありました。
まとめ
とりあえず量子GANを実装することができました。
最初generatorのθそのままの回路でshots=1としたとき、結果が全然だめでしたが、shots=10(とか7)にすると、多少よくなりました。shot数が最適化の鍵を握っているかもしれません。

